
Safety Warning
DIY auto repair can cause serious injury, fire, or vehicle damage. These guides are for informational purposes only. Always follow OEM torque specs, wear PPE, and consult a certified mechanic if you are unsure. You are solely responsible for your safety.
2000 Mercury Sable V6-3.0L DOHC VIN SFACTORY OEM SERVICE PROCEDURE
Cylinder Head Assembly
ENGINE GENERAL SPECIFICATIONS
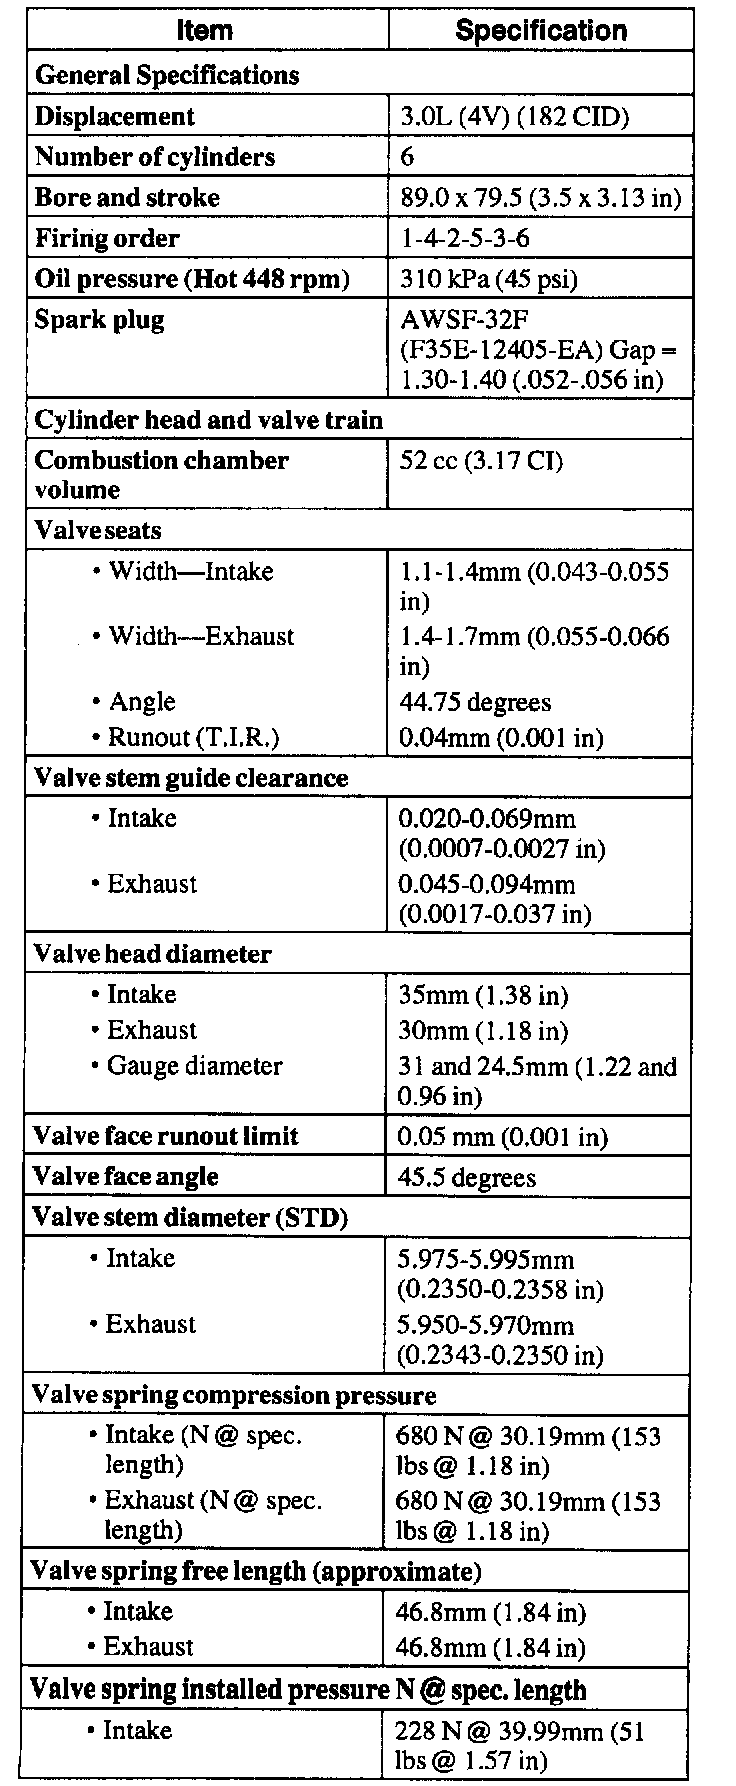


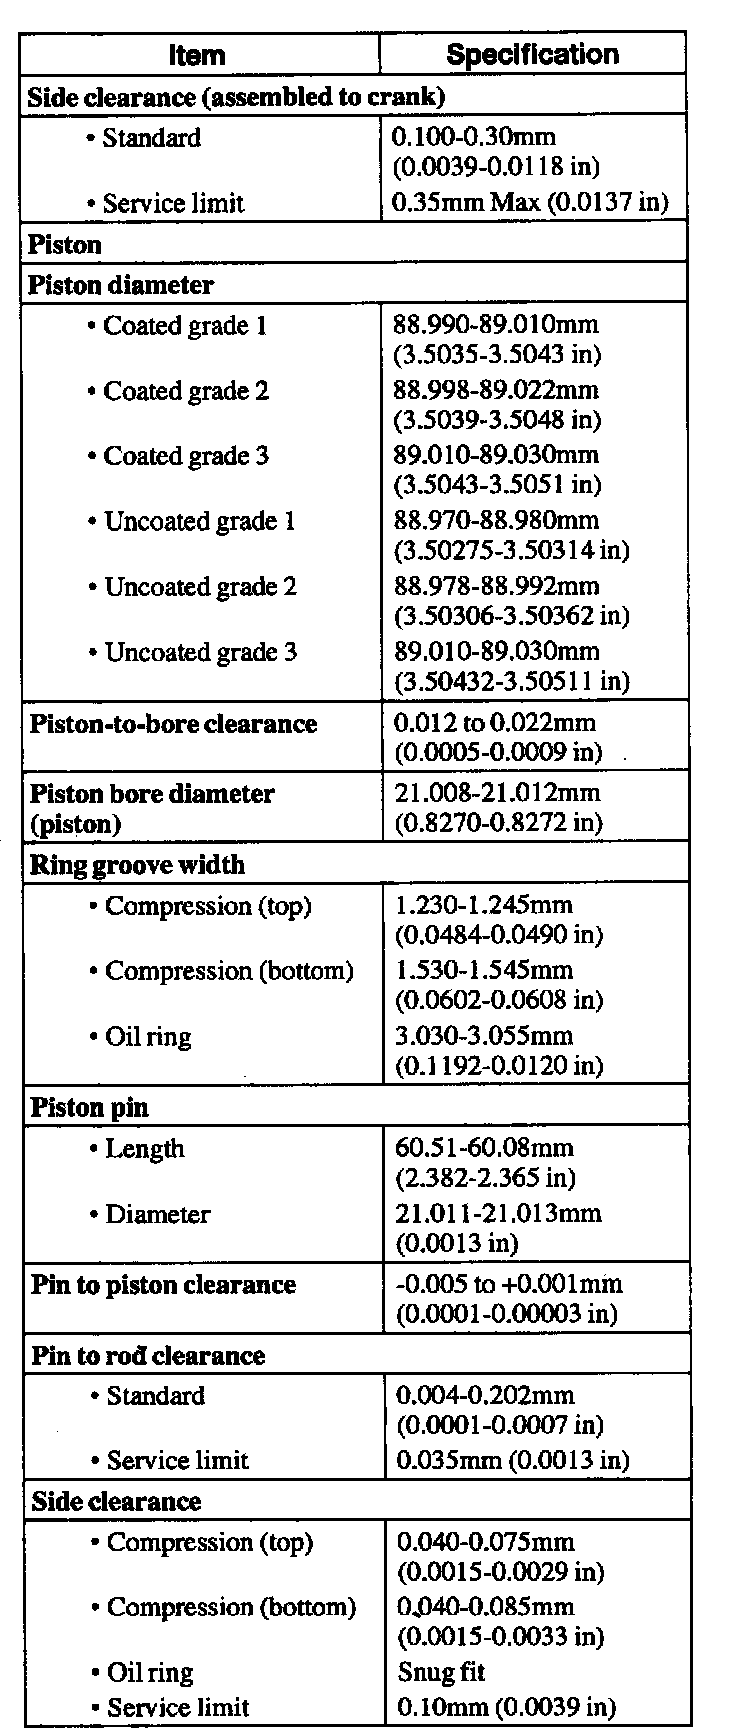

Footnotes:
a Cylinder Bore Diameter
Grade 1: 89.000-89.010 mm (3.50393-3.504323 inch)
Grade 2: 89.010-89.020 mm (3.504323-3.504717 inch)
Grade 3: 89.020-82.030 mm (3.504717-3.50511 inch)
b 0.250 mm Undersize-add 0.125 mm to standard or grade 2 thickness.
d Measured at 50 mm (1.9685 inch) from outer perimeter top of piston to the pin axis.
c Pin bore and crank bearing bore must be parallel and in same vertical plane within the specified total difference when measured at the ends of a 203 mm bar, 101.5 mm on each side of rod centerline.
e Specification 82.4 mm (3.2441 inch) diameter gauge.
f With filter change.
g Newly installed refers to the condition of the "new" drive belt before the engine has made no more than one rotation and before the drive belt has had a change to stretch or seat into the pulley grooves.
TIGHTENING SPECIFICATIONS
LH Cylinder Head

Note: The cylinder head bolts must be replaced with new bolts. They are torque-to-yield designed and cannot be reused.
Position the LH cylinder head, gasket and install the bolts in the sequence shown in six stages.
- Tighten the bolts in six stages.
- Stage 1: Tighten to 40 Nm (30 ft. lbs.).
- Stage 2: Tighten bolts 90 degrees.
- Stage 3: Loosen one full turn.
- Stage 4: Tighten to 40 Nm (30 ft. lbs.).
- Stage 5: Tighten 90 degrees.
- Stage 6: Tighten 90 degrees.
RH Cylinder Head
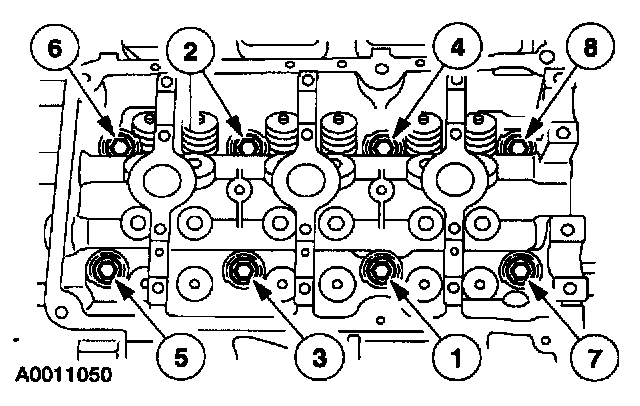
Note: The cylinder head bolts must be replaced with new bolts. They are torque-to-yield designed and cannot be reused.
Position the RH cylinder head, gasket and install the bolts in the sequence shown in six stages.
- Tighten the bolts in six stages.
- Stage 1: Tighten to 40 Nm (30 ft. lbs.).
- Stage 2: Tighten bolts 90 degrees.
- Stage 3: Loosen one full turn.
- Stage 4: Tighten to 40 Nm (30 ft. lbs.).
- Stage 5: Tighten 90 degrees.
- Stage 6: Tighten 90 degrees.
Footnotes:
a Cylinder Bore Diameter
Grade 1: 89.000-89.010 mm (3.50393-3.504323 inch)
Grade 2: 89.010-89.020 mm (3.504323-3.504717 inch)
Grade 3: 89.020-82.030 mm (3.504717-3.50511 inch)
b 0.250 mm Undersize-add 0.125 mm to standard or grade 2 thickness.
d Measured at 50 mm (1.9685 inch) from outer perimeter top of piston to the pin axis.
c Pin bore and crank bearing bore must be parallel and in same vertical plane within the specified total difference when measured at the ends of a 203 mm bar, 101.5 mm on each side of rod centerline.
e Specification 82.4 mm (3.2441 inch) diameter gauge.
f With filter change.
g Newly installed refers to the condition of the "new" drive belt before the engine has made no more than one rotation and before the drive belt has had a change to stretch or seat into the pulley grooves.
TIGHTENING SPECIFICATIONS
LH Cylinder Head
Note: The cylinder head bolts must be replaced with new bolts. They are torque-to-yield designed and cannot be reused.
Position the LH cylinder head, gasket and install the bolts in the sequence shown in six stages.
- Tighten the bolts in six stages.
- Stage 1: Tighten to 40 Nm (30 ft. lbs.).
- Stage 2: Tighten bolts 90 degrees.
- Stage 3: Loosen one full turn.
- Stage 4: Tighten to 40 Nm (30 ft. lbs.).
- Stage 5: Tighten 90 degrees.
- Stage 6: Tighten 90 degrees.
RH Cylinder Head
Note: The cylinder head bolts must be replaced with new bolts. They are torque-to-yield designed and cannot be reused.
Position the RH cylinder head, gasket and install the bolts in the sequence shown in six stages.
- Tighten the bolts in six stages.
- Stage 1: Tighten to 40 Nm (30 ft. lbs.).
- Stage 2: Tighten bolts 90 degrees.
- Stage 3: Loosen one full turn.
- Stage 4: Tighten to 40 Nm (30 ft. lbs.).
- Stage 5: Tighten 90 degrees.
- Stage 6: Tighten 90 degrees.
Factory Service Tools
Use the Manual With the Right Hardware
Pair factory procedures with proven DIY tools so the instructions are easier to execute.
Disclosure: Verified tool recommendations may earn an affiliate commission at no cost to you.
When to See a Mechanic
Stop DIY work and contact a certified mechanic immediately if any of the following apply:
- • You smell fuel, burning insulation, or see smoke.
- • Brakes feel soft, pull hard to one side, or make grinding noises.
- • The engine overheats, stalls repeatedly, or misfires under load.
- • You are missing required tools, torque specs, or safe lifting equipment.
- • You are not confident in the next step or safety outcome.
Rather have a pro handle this?
A certified mobile mechanic comes to your home or office. They bring the tools, you stay comfortable. No tow truck, no waiting room, no surprises.
Comes to youSame-day available12-month warranty
Get a Free QuoteNo obligation. See pricing before you book.