
Safety Warning
DIY auto repair can cause serious injury, fire, or vehicle damage. These guides are for informational purposes only. Always follow OEM torque specs, wear PPE, and consult a certified mechanic if you are unsure. You are solely responsible for your safety.
2008 Chrysler Sebring Convertible V6-2.7LFACTORY OEM SERVICE PROCEDURE
Sentry Key Remote Entry Module - Removal
REMOVAL
SEBRING
1. Disconnect and isolate the battery negative cable.
WARNING: Wait two minutes for the airbag system reserve capacitor to discharge before beginning any airbag system or component service. Failure to do so may result in accidental airbag deployment, personal injury or death.
2. Remove upper center instrument panel trim bezelInstrument Panel Center Bezel - Removal.
3. Remove the radio Removal.
4. Remove the steering column opening cover Steering Column Opening Cover - Removal.
5. Remove the lower instrument panel knee blocker Removal.
6. Remove the three screws from the lower steering column shroud and remove the lower shroud.
7. Remove the instrument cluster trim bezel Instrument Panel Cluster Bezel - Removal.
8. Remove the instrument cluster Instrument Cluster - Removal.
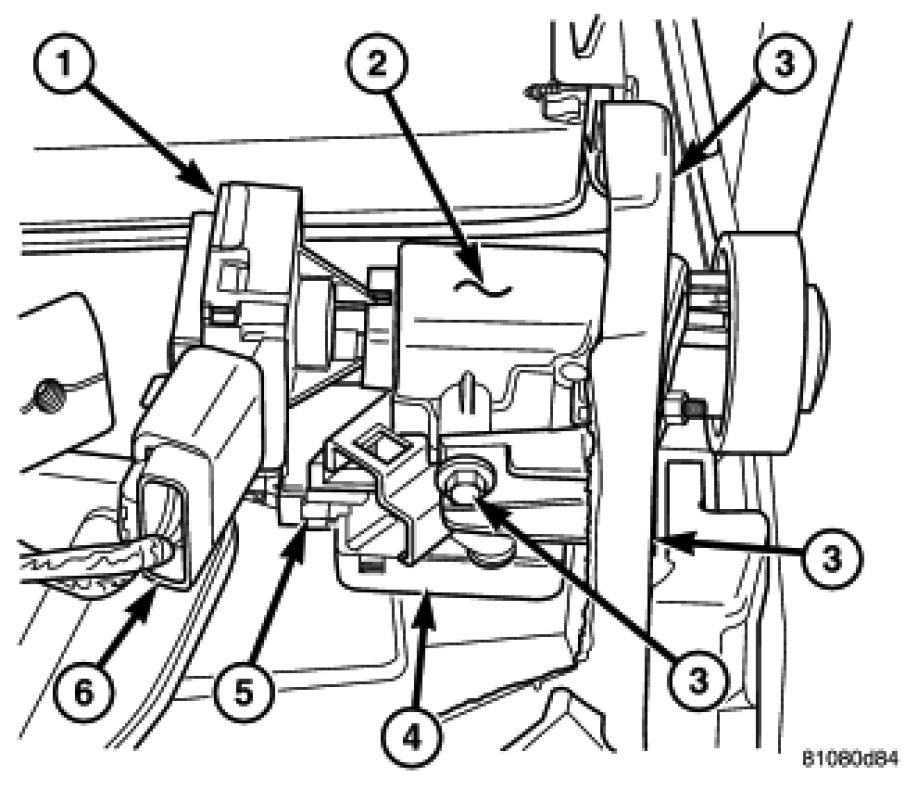
9. Reach up behind the left side of the center stack and disconnect the ignition switch electrical connector (6) and the WCM electrical connector (5).
10. Insert the ignition key into the ignition cylinder. Push the shift interlock cable locking tab inward and rotate the ignition key to the on position. This will release the cable from the ignition switch. Remove the shift interlock cable from the ignition cylinder.

11. Remove the ignition switch support bracket screw (1).

12. Remove the two ignition switch mounting screws (1) and remove one upper screw from the ignition cylinder support bracket.
13. Disconnect the WCM antenna from the WCM receiver.
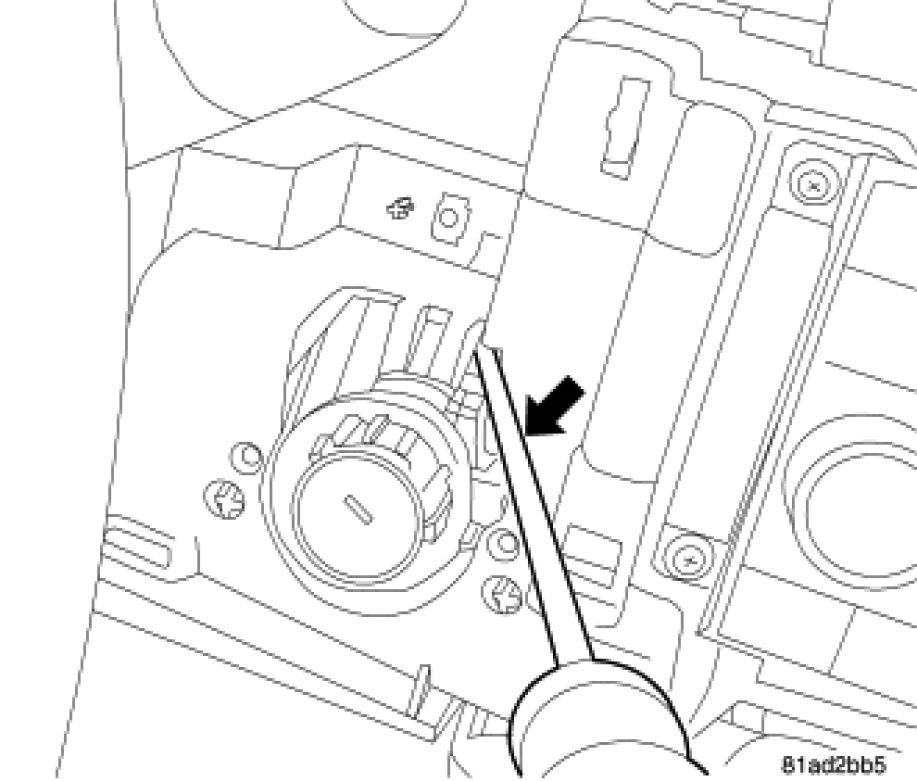
14. Use a thin screw driver and unclip ignition switch from mounting position. Push switch back to remove.
15. Remove the ignition switch/cylinder assembly through the lower steering column opening.

16. Remove WCM retaining screw (1) and flex the retaining tab to release the WCM from the ignition switch.
NOTE: After a SKREEM/WCM is replaced, the ignition/transponder keys need to be programmed to the new SKREEM/WCM. Follow the directions on the diagnostic scan tool. The transponder key for the SKREES/SKIM and the RKE will both be programmed during this operation. There is no need to program the fob of the key for RKE functionality once the transponder key is programmed to the new SKREEM/WCM.
NOTE: When a PCM and the SKREEM/WCM are replaced at the same time, perform the following steps in order:
- Program the new PCM.
- Program the new SKREEM/WCM.
- Program all ignition/transponder keys to the new SKREEM/WCM.
Programming the Sentry Key Remote Entry Module (SKREEM).
AVENGER
1. Disconnect battery negative cable.
2. Remove upper center instrument panel trim bezel.Instrument Panel Center Bezel - Removal.
3. Remove the radio Removal.
4. Remove center console trim bezel Center Console Bezel - Removal
5. Remove the three screws from the lower steering column shroud and remove the upper and lower shroud.
6. Remove the instrument cluster trim bezel Instrument Panel Cluster Bezel - Removal.

NOTE: Before the drivers surround bezel can be removed, it must be cut at two points (1) to allow removal without removing the steering wheel, air bag and multi function switches.

7. Cut the trim piece at points (1) as shown and remove.
8. Remove the drivers surround bezel Removal
9. Remove the instrument cluster Instrument Cluster - Removal.
10. Reach up behind the left side of the center stack and disconnect the ignition switch electrical connector (6) and the WCM electrical connector (5).
11. Insert the ignition key into the ignition cylinder. Push the shift interlock cable locking tab inward and rotate the ignition key to the on position. This will release the cable from the ignition switch. Remove the shift interlock cable from the ignition cylinder.
12. Remove the ignition switch support bracket screw (1).
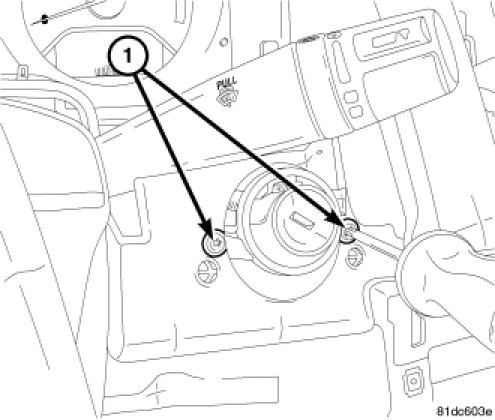
13. Remove the two ignition switch mounting screws (1) and remove one upper screw from the ignition cylinder support bracket. It will be necessary to detach the left side of the center instrument panel trim to gain access to one of the ignition switch mounting screws.
14. Disconnect the WCM antenna from the WCM receiver.
15. Use a thin screw driver and unclip ignition switch from mounting position. Push switch back to remove.
16. Remove the ignition switch/cylinder assembly through the lower steering column opening.
17. Remove WCM retaining screw (1) and flex the retaining tab to release the WCM from the ignition switch.
NOTE: After a SKREEM/WCM is replaced, the ignition/transponder keys need to be programmed to the new SKREEM/WCM. Follow the directions on the diagnostic scan tool. The transponder key for the SKREES/SKIM and the RKE will both be programmed during this operation. There is no need to program the fob of the key for RKE functionality once the transponder key is programmed to the new SKREEM/WCM.
NOTE: When a PCM and the SKREEM/WCM are replaced at the same time, perform the following steps in order:
- Program the new PCM.
- Program the new SKREEM/WCM.
- Program all ignition/transponder keys to the new SKREEM/WCM Programming the Sentry Key Remote Entry Module (SKREEM).
Factory Service Tools
Use the Manual With the Right Hardware
Pair factory procedures with proven DIY tools so the instructions are easier to execute.
Disclosure: Verified tool recommendations may earn an affiliate commission at no cost to you.
When to See a Mechanic
Stop DIY work and contact a certified mechanic immediately if any of the following apply:
- • You smell fuel, burning insulation, or see smoke.
- • Brakes feel soft, pull hard to one side, or make grinding noises.
- • The engine overheats, stalls repeatedly, or misfires under load.
- • You are missing required tools, torque specs, or safe lifting equipment.
- • You are not confident in the next step or safety outcome.
Rather have a pro handle this?
A certified mobile mechanic comes to your home or office. They bring the tools, you stay comfortable. No tow truck, no waiting room, no surprises.
Comes to youSame-day available12-month warranty
Get a Free QuoteNo obligation. See pricing before you book.