
Safety Warning
DIY auto repair can cause serious injury, fire, or vehicle damage. These guides are for informational purposes only. Always follow OEM torque specs, wear PPE, and consult a certified mechanic if you are unsure. You are solely responsible for your safety.
2003 Chevrolet Express 1/2 Ton Van V6-4.3L VIN XFACTORY OEM SERVICE PROCEDURE
Air Bag Control Module: Service and Repair
INFLATABLE RESTRAINT SENSING AND DIAGNOSTIC MODULE REPLACEMENT
REMOVAL PROCEDURE
1. Disable the SIR system. Refer to SIR Disabling and Enabling Zone 7 and SIR Disabling and Enabling Zone 3.
CAUTION:
- Do not strike or jolt the inflatable restraint sensing and diagnostic module (SDM). Before applying power to the SDM, make sure that it is securely fastened with the arrow facing toward the front of the vehicle. Failure to observe the correct installation procedure could cause SIR deployment, personal injury, or unnecessary SIR system repairs.
- If the vehicle interior is exposed to moisture and becomes soaked up to the level of the sensing and diagnostic module (SDM), the SDM and SDM harness connector must be replaced. The SDM could be activated when powered, which could cause airbag deployment and result in personal injury.
- Refer to SIR Inflator Module Handling and Storage Caution in Service Precautions.
2. Remove the driver seat.
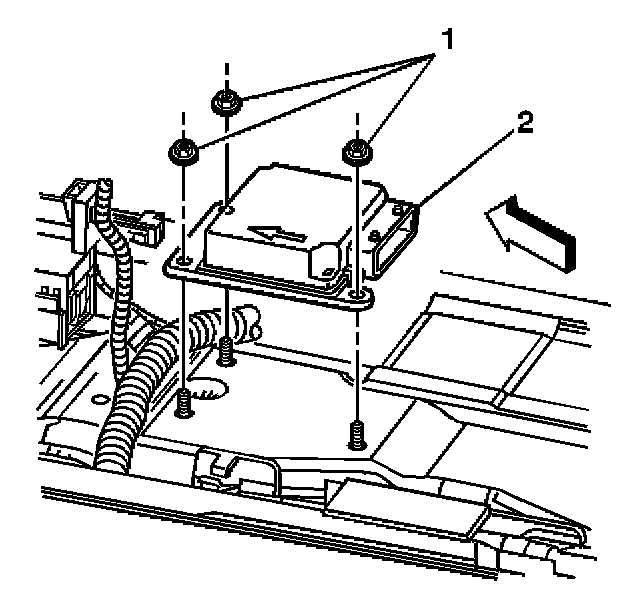
3. Fold back the carpet to access the inflatable restraint sensing and diagnostic module (SDM).
4. Remove the connector position assurance (CPA) from the SDM electrical connector.
5. Disconnect the SDM electrical connector.
6. Remove the SDM (2) mounting nuts (1).
7. Remove the SDM (2) from the vehicle.
8. Repair the studs using the following procedure:
IMPORTANT: The following repair procedures should only be used in the event that the inflatable restraint sensing and diagnostic module (SDM) mounting studs are damaged to the extent that the SDM may no longer be properly mounted.
8.1. Remove and discard the stripped nut.
8.2. Drill out the weld spots for the weld stud that has been damaged, remove and discard the damaged stud.
8.3. Condition the floor panel attaching surface where the new stud is to be installed.
8.4. Install new weld stud GM P/N 115115602 and clamp the weld stud into place.
8.5. Migweld the stud at the drilled holes.
8.6. Apply body sealer GM P/N 9984248 around any exposed openings.
8.7. Install a new nut (1) GM P/N 11515933.
INSTALLATION PROCEDURE
1. Remove any dirt, grease, or other impurities from the mounting surface.
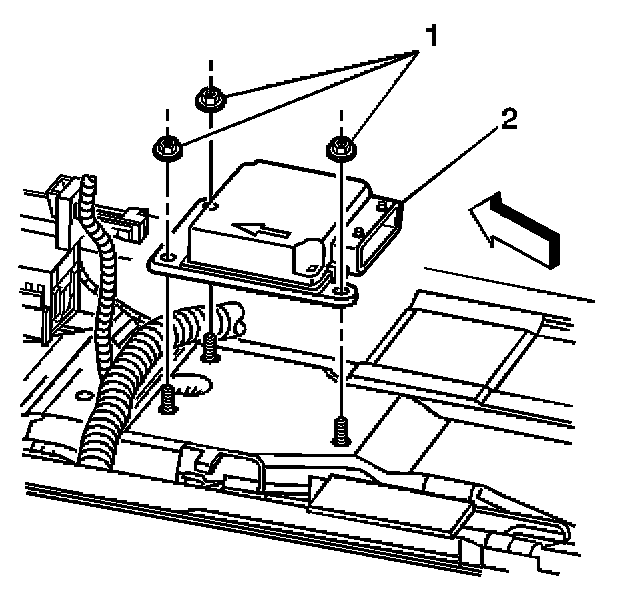
2. Install the SDM (2) horizontally to the studs.
3. Point the arrow on the SDM toward the front of the vehicle.
4. Install the SDM mounting nuts (1).
NOTE: Refer to Fastener Notice in Service Precautions.
Tighten
Tighten the nuts (1) to 10 N.m (89 lb in).
5. Install the SDM (2) electrical connector.
6. Install the CPA to the SDM electrical connector.
7. Install the carpet to cover SDM (2).
8. Install the driver seat.
9. Enable the SIR system. Refer to SIR Disabling and Enabling Zone 3 and to SIR Disabling and Enabling Zone 7.
REMOVAL PROCEDURE
1. Disable the SIR system. Refer to SIR Disabling and Enabling Zone 7 and SIR Disabling and Enabling Zone 3.
CAUTION:
- Do not strike or jolt the inflatable restraint sensing and diagnostic module (SDM). Before applying power to the SDM, make sure that it is securely fastened with the arrow facing toward the front of the vehicle. Failure to observe the correct installation procedure could cause SIR deployment, personal injury, or unnecessary SIR system repairs.
- If the vehicle interior is exposed to moisture and becomes soaked up to the level of the sensing and diagnostic module (SDM), the SDM and SDM harness connector must be replaced. The SDM could be activated when powered, which could cause airbag deployment and result in personal injury.
- Refer to SIR Inflator Module Handling and Storage Caution in Service Precautions.
2. Remove the driver seat.
3. Fold back the carpet to access the inflatable restraint sensing and diagnostic module (SDM).
4. Remove the connector position assurance (CPA) from the SDM electrical connector.
5. Disconnect the SDM electrical connector.
6. Remove the SDM (2) mounting nuts (1).
7. Remove the SDM (2) from the vehicle.
8. Repair the studs using the following procedure:
IMPORTANT: The following repair procedures should only be used in the event that the inflatable restraint sensing and diagnostic module (SDM) mounting studs are damaged to the extent that the SDM may no longer be properly mounted.
8.1. Remove and discard the stripped nut.
8.2. Drill out the weld spots for the weld stud that has been damaged, remove and discard the damaged stud.
8.3. Condition the floor panel attaching surface where the new stud is to be installed.
8.4. Install new weld stud GM P/N 115115602 and clamp the weld stud into place.
8.5. Migweld the stud at the drilled holes.
8.6. Apply body sealer GM P/N 9984248 around any exposed openings.
8.7. Install a new nut (1) GM P/N 11515933.
INSTALLATION PROCEDURE
1. Remove any dirt, grease, or other impurities from the mounting surface.
2. Install the SDM (2) horizontally to the studs.
3. Point the arrow on the SDM toward the front of the vehicle.
4. Install the SDM mounting nuts (1).
NOTE: Refer to Fastener Notice in Service Precautions.
Tighten
Tighten the nuts (1) to 10 N.m (89 lb in).
5. Install the SDM (2) electrical connector.
6. Install the CPA to the SDM electrical connector.
7. Install the carpet to cover SDM (2).
8. Install the driver seat.
9. Enable the SIR system. Refer to SIR Disabling and Enabling Zone 3 and to SIR Disabling and Enabling Zone 7.
Factory Service Tools
Use the Manual With the Right Hardware
Pair factory procedures with proven DIY tools so the instructions are easier to execute.
Disclosure: Verified tool recommendations may earn an affiliate commission at no cost to you.
When to See a Mechanic
Stop DIY work and contact a certified mechanic immediately if any of the following apply:
- • You smell fuel, burning insulation, or see smoke.
- • Brakes feel soft, pull hard to one side, or make grinding noises.
- • The engine overheats, stalls repeatedly, or misfires under load.
- • You are missing required tools, torque specs, or safe lifting equipment.
- • You are not confident in the next step or safety outcome.
Rather have a pro handle this?
A certified mobile mechanic comes to your home or office. They bring the tools, you stay comfortable. No tow truck, no waiting room, no surprises.
Comes to youSame-day available12-month warranty
Get a Free QuoteNo obligation. See pricing before you book.