
Safety Warning
DIY auto repair can cause serious injury, fire, or vehicle damage. These guides are for informational purposes only. Always follow OEM torque specs, wear PPE, and consult a certified mechanic if you are unsure. You are solely responsible for your safety.
2003 Chevrolet Express 1/2 Ton Van V6-4.3L VIN XFACTORY OEM SERVICE PROCEDURE
Idle Speed/Throttle Actuator - Electronic: Service and Repair
IDLE AIR CONTROL (IAC) VALVE REPLACEMENT
REMOVAL PROCEDURE
1. Turn OFF the ignition.
2. Remove the engine cover.
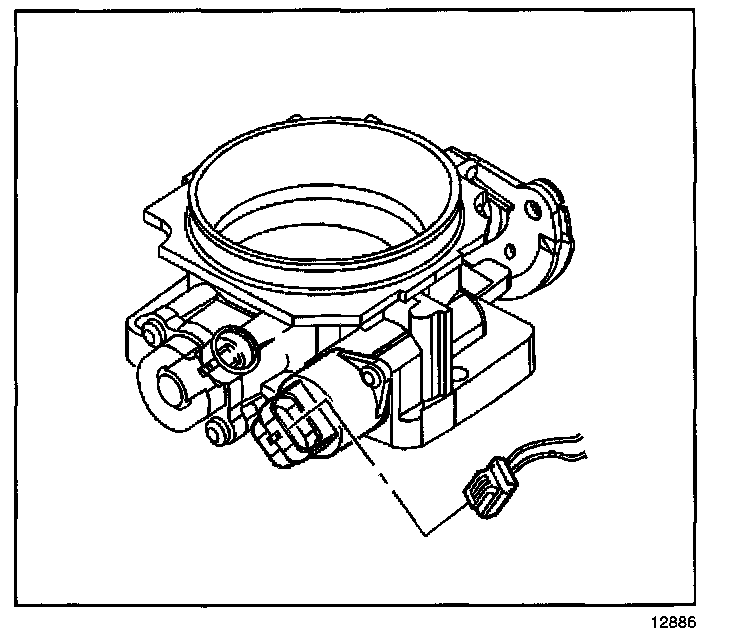
3. Disconnect the harness connector from the idle air control (IAC) valve.
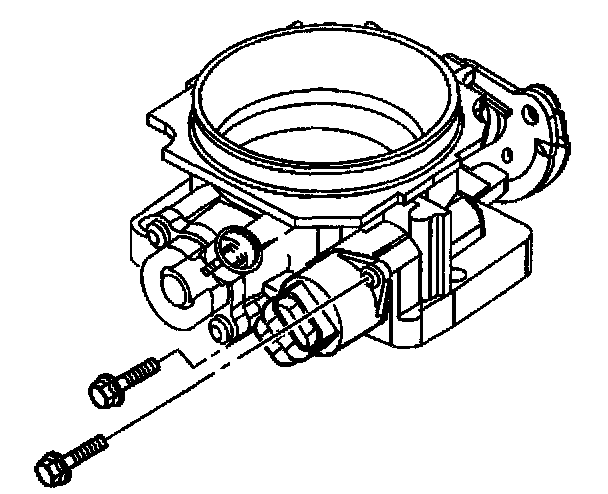
4. Remove the IAC valve attaching fasteners.
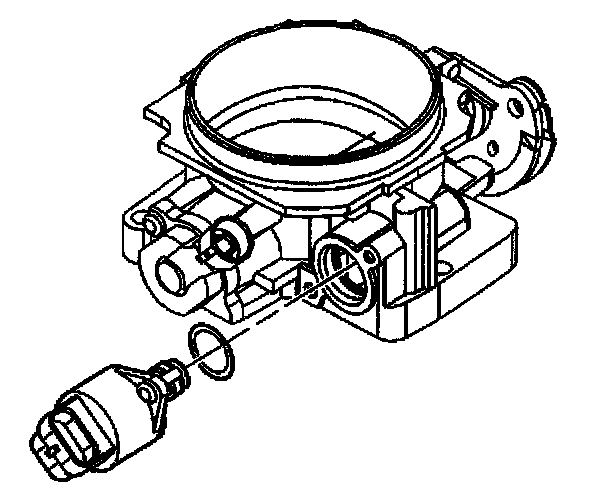
5. Remove the IAC valve assembly.
NOTE: If the IAC valve has been in service: DO NOT push or pull on the IAC valve pintle. The force required to move the pintle may damage the threads on the worm drive. Also, DO NOT soak the IAC valve in any liquid cleaner or solvent, as damage may result.
6. Remove the O-ring.
CLEANING AND INSPECTION PROCEDURE
1. Clean the IAC valve O-ring sealing surface, the pintle valve seat, and the air passage.
- Use a carburetor cleaner and a parts cleaning brush in order to remove any carbon deposits. Follow the instructions on the container.
- Do not use a cleaner that contains methyl ethyl ketone (MEK). MEK is an extremely strong solvent and not necessary for this type of deposit.
- Shiny spots on the pintle or seat are normal and do not indicate misalignment or a bent pintle shaft.
- If the air passage has heavy deposits, remove the throttle body for a complete cleaning.
2. Inspect the IAC valve O-ring for cuts, cracks, or distortion. Replace the O-ring if damaged.
INSTALLATION PROCEDURE
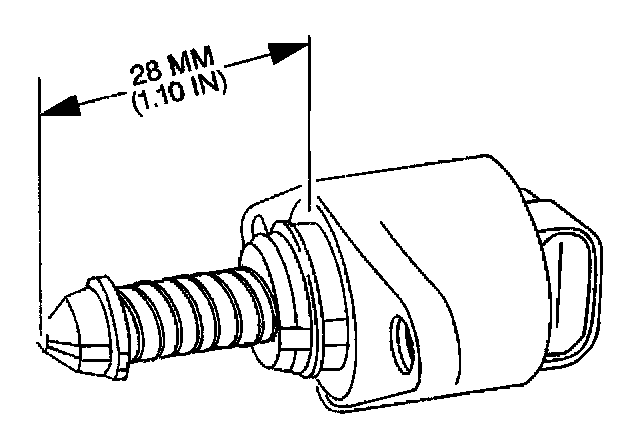
1. Measure the distance between tip of the IAC valve pintle and the mounting flange.
If the distance is more than 28 mm (1.10 in), use finger pressure in order to slowly retract the pintle. The force required to retract the pintle of a new valve will not cause damage to the valve.
IMPORTANT: If you are installing a new IAC valve, replace the valve with an identical part. The IAC valve pintle shape and diameter are designed for the specific application.
2. Lubricate the IAC valve O-ring with clean engine oil.
3. Install the IAC valve assembly.
4. Install the attaching fasteners.
NOTE: Refer to Fastener Notice in Service Precautions.
Tighten
Tighten the IAC valve fasteners to 3 N.m (27 lb in).
5. Connect the IAC harness connector.
6. Install the engine cover.
7. Reset the IAC valve pintle position.
IAC VALVE RESET PROCEDURE
1. Turn ON the ignition for 20 seconds.
2. Turn OFF the ignition for 10 seconds.
3. Start the engine.
4. Check for the proper idle speed.
REMOVAL PROCEDURE
1. Turn OFF the ignition.
2. Remove the engine cover.
3. Disconnect the harness connector from the idle air control (IAC) valve.
4. Remove the IAC valve attaching fasteners.
5. Remove the IAC valve assembly.
NOTE: If the IAC valve has been in service: DO NOT push or pull on the IAC valve pintle. The force required to move the pintle may damage the threads on the worm drive. Also, DO NOT soak the IAC valve in any liquid cleaner or solvent, as damage may result.
6. Remove the O-ring.
CLEANING AND INSPECTION PROCEDURE
1. Clean the IAC valve O-ring sealing surface, the pintle valve seat, and the air passage.
- Use a carburetor cleaner and a parts cleaning brush in order to remove any carbon deposits. Follow the instructions on the container.
- Do not use a cleaner that contains methyl ethyl ketone (MEK). MEK is an extremely strong solvent and not necessary for this type of deposit.
- Shiny spots on the pintle or seat are normal and do not indicate misalignment or a bent pintle shaft.
- If the air passage has heavy deposits, remove the throttle body for a complete cleaning.
2. Inspect the IAC valve O-ring for cuts, cracks, or distortion. Replace the O-ring if damaged.
INSTALLATION PROCEDURE
1. Measure the distance between tip of the IAC valve pintle and the mounting flange.
If the distance is more than 28 mm (1.10 in), use finger pressure in order to slowly retract the pintle. The force required to retract the pintle of a new valve will not cause damage to the valve.
IMPORTANT: If you are installing a new IAC valve, replace the valve with an identical part. The IAC valve pintle shape and diameter are designed for the specific application.
2. Lubricate the IAC valve O-ring with clean engine oil.
3. Install the IAC valve assembly.
4. Install the attaching fasteners.
NOTE: Refer to Fastener Notice in Service Precautions.
Tighten
Tighten the IAC valve fasteners to 3 N.m (27 lb in).
5. Connect the IAC harness connector.
6. Install the engine cover.
7. Reset the IAC valve pintle position.
IAC VALVE RESET PROCEDURE
1. Turn ON the ignition for 20 seconds.
2. Turn OFF the ignition for 10 seconds.
3. Start the engine.
4. Check for the proper idle speed.
Factory Service Tools
Use the Manual With the Right Hardware
Pair factory procedures with proven DIY tools so the instructions are easier to execute.
Disclosure: Verified tool recommendations may earn an affiliate commission at no cost to you.
When to See a Mechanic
Stop DIY work and contact a certified mechanic immediately if any of the following apply:
- • You smell fuel, burning insulation, or see smoke.
- • Brakes feel soft, pull hard to one side, or make grinding noises.
- • The engine overheats, stalls repeatedly, or misfires under load.
- • You are missing required tools, torque specs, or safe lifting equipment.
- • You are not confident in the next step or safety outcome.
Rather have a pro handle this?
A certified mobile mechanic comes to your home or office. They bring the tools, you stay comfortable. No tow truck, no waiting room, no surprises.
Comes to youSame-day available12-month warranty
Get a Free QuoteNo obligation. See pricing before you book.