B1134

Factory Manual References

Factory service manual diagnostic procedure for 2012 acura rl

A L L Diagnostic Trouble Codes ( DTC )

B1134


DTC Troubleshooting: B1134

DTC B1134:

Right Rear Power Window Motor A-Phase Pulse Signal Input Error

NOTE: If you are troubleshooting multiple DTCs, be sure to follow the instructions in B-CAN System Diagnosis Test Mode A Troubleshooting - B-CAN System Diagnosis Test Mode A.

1. Clear the DTCs with the HDS.

2. Turn the ignition switch to LOCK (0) and then back to ON (II).

3. Open and close the right rear power window by using the right rear power window switch manually.

4. Check for DTCs with the HDS.

Is DTC B1134 indicated?

YES -

Go to step 5.

NO -

Intermittent failure, the system is OK at this time. Check for loose or poor connections.

5. Open and close the right rear power window by using the power window master switch manually.

Does the window motor operate?

YES -

Go to step 6.

NO -

Test the right rear power window motor Power Window Motor Test. If the motor tests OK, go to step 6.

6. Select POWER WINDOWS from the BODY ELECTRICAL SYSTEM SELECT menu, and enter DATA LIST.

7. Check the DETECT/NONE information of the RIGHT REAR POWER WINDOW MOTOR PULSE A signal in the DATA LIST.

Does the information indicator display DETECT while the window is moving, and display NONE when the window is stopped?

YES -

Replace the right rear power window switch Passenger's Power Window Switch Test/Replacement.

NO -

Go to step 8.

8. Check for DTCs with the HDS.

Is DTC B1135 also indicated?

YES -

Go to step 15.

NO -

Go to step 9.

9. Turn the ignition switch to LOCK (0).

10. Disconnect the 14P connector from the right rear power window switch.

11. Disconnect the 6P connector from the right rear power window motor.

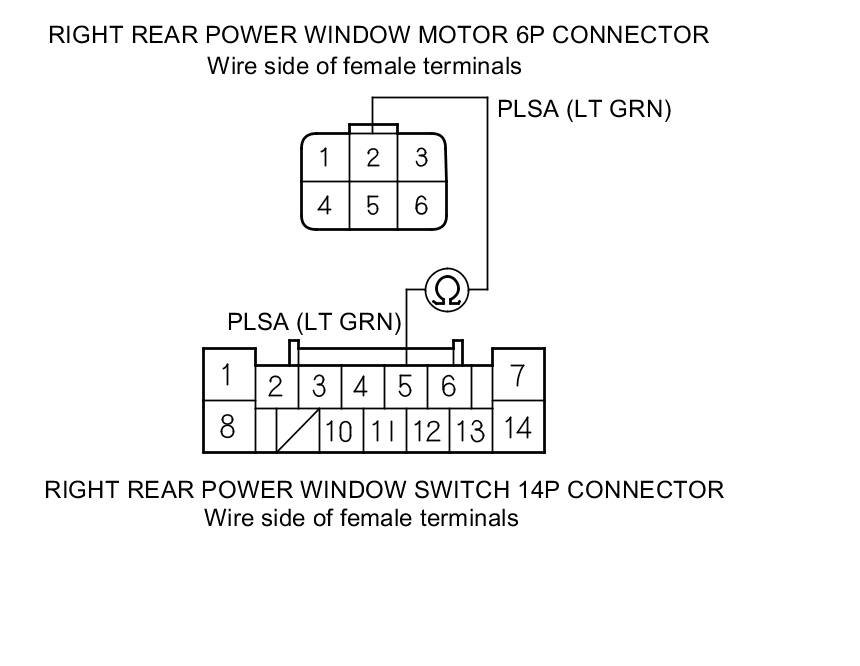
12. Check for continuity between right rear power window switch 14P connector terminal No. 5 and right rear power window motor 6P connector terminal No. 2.

Factory service manual diagram


Is there continuity?

YES -

Go to step 13.

NO -

Repair an open or high resistance in the wire.

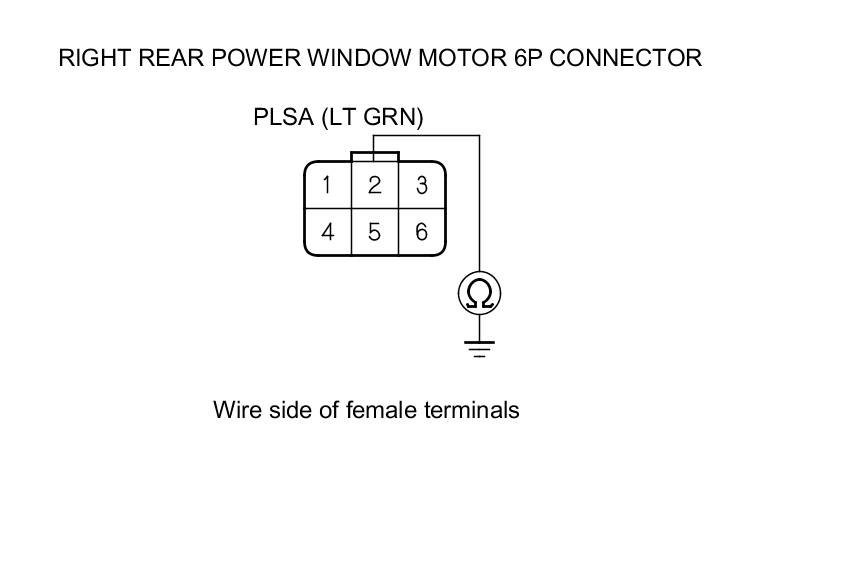
13. Check for continuity between right rear power window motor 6P connector terminal No. 2 and body ground.

Factory service manual diagram


Is there continuity?

YES -

Repair short to ground in the wire.

NO -

Go to step 14.

14. Test the right rear power window motor Power Window Motor Test.

Is the motor OK?

YES -

Replace the right rear power window switch Passenger's Power Window Switch Test/Replacement.

NO -

Faulty the right rear power window motor; replace right rear door regulator Service and Repair.

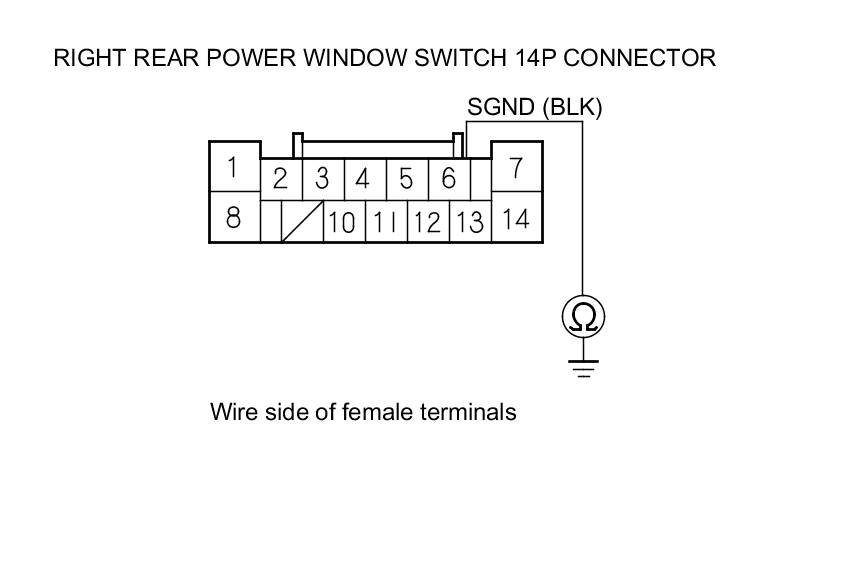
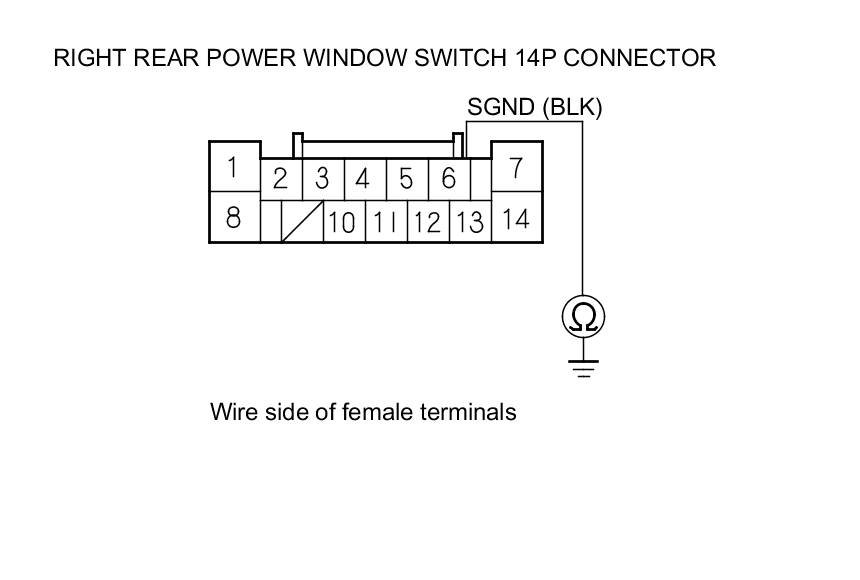
15. Check for continuity between right rear power window switch 14P connector terminal No. 6 and body ground.

Factory service manual diagram


Is there continuity?

YES -

Go to step 16.

NO -

Repair an open or high resistance in the wire or poor ground (G651).

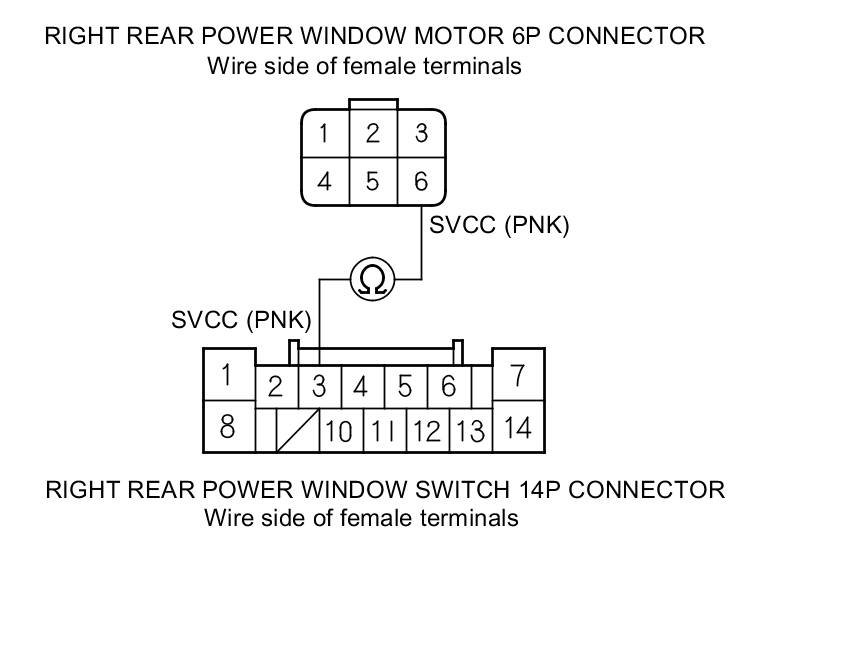
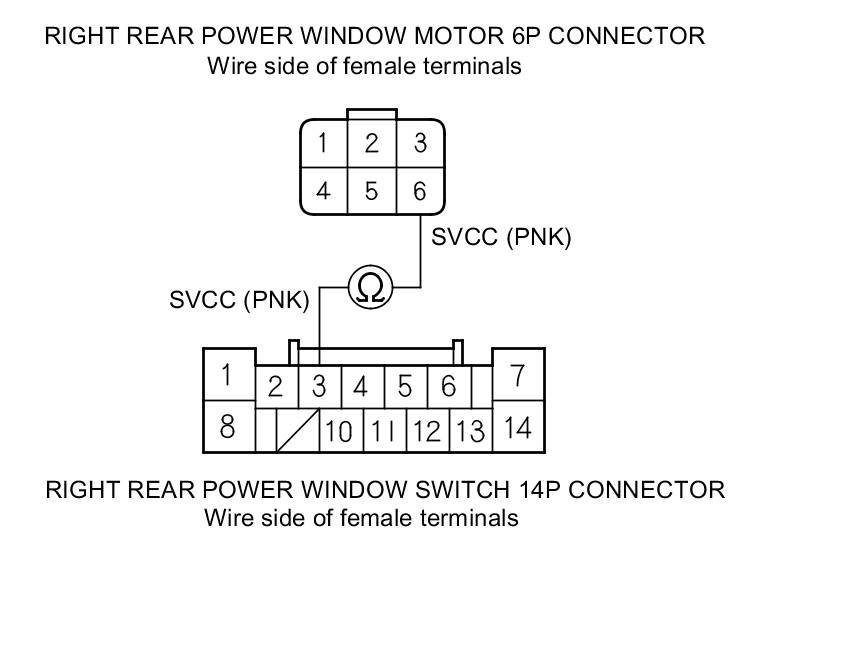
16. Check for continuity between right rear power window switch 14P connector terminal No. 3 and right rear power window motor 6P connector terminal No. 6 respectively.

Factory service manual diagram


Is there continuity?

YES -

Go to step 17.

NO -

Repair an open or high resistance in the wire.

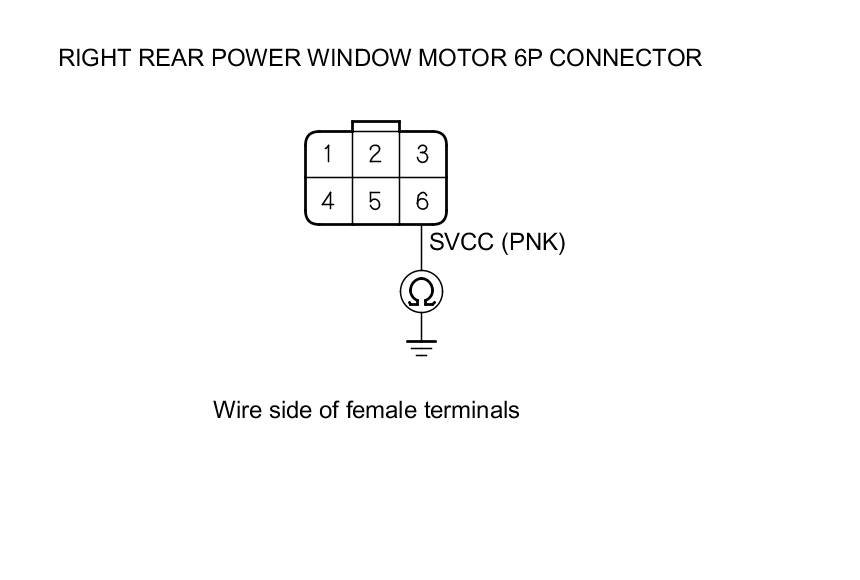
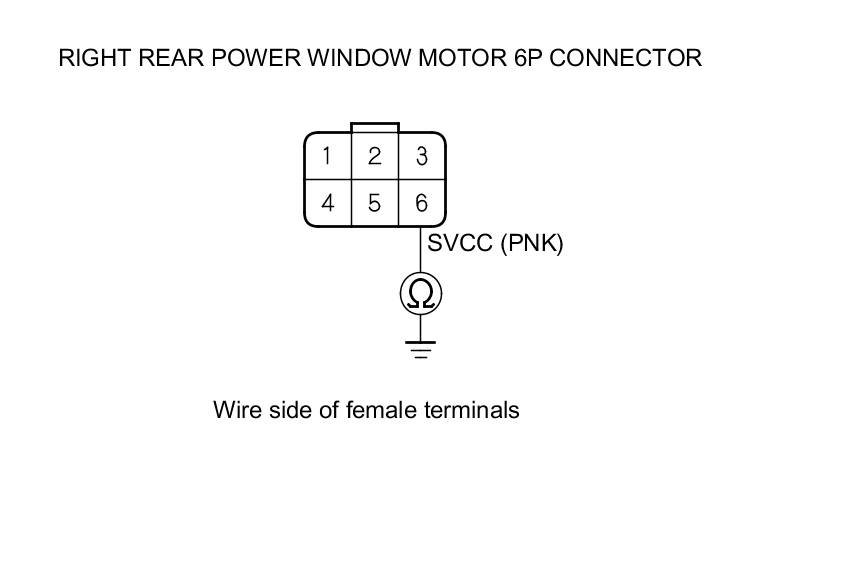
17. Check for continuity between right rear power window motor 6P connector terminal No. 6 and body ground.

Factory service manual diagram


Is there continuity?

YES -

Repair a short to ground in the wire.

NO -

Faulty the right rear power window motor; replace right rear door regulator Service and Repair.

B1135


DTC Troubleshooting: B1135

DTC B1135:

Right Rear Power Window Motor B-Phase Pulse Signal Input Error

NOTE: If you are troubleshooting multiple DTCs, be sure to follow the instructions in B-CAN System Diagnosis Test Mode A Troubleshooting - B-CAN System Diagnosis Test Mode A.

1. Clear the DTCs with the HDS.

2. Turn the ignition switch to LOCK (0) and then back to ON (II).

3. Open and close the right rear power window by using the right rear power window switch manually.

4. Check for DTCs with the HDS.

Is DTC B1135 indicated?

YES -

Go to step 5.

NO -

Intermittent failure, the system is OK at this time. Check for loose or poor connections.

5. Open and close the right rear power window by using the power window master switch manually.

Does the window motor operate?

YES -

Go to step 6.

NO -

Test the right rear power window motor Power Window Motor Test. If the motor tests OK, go to step 6.

6. Select POWER WINDOWS from the BODY ELECTRICAL SYSTEM SELECT menu, and enter DATA LIST.

7. Check the DETECT/NONE information of the RIGHT REAR POWER WINDOW MOTOR PULSE B signal in the DATA LIST.

Does the information indicator display DETECT while the window is moving, and display NONE when the window is stopped?

YES -

Replace the right rear power window switch Passenger's Power Window Switch Test/Replacement.

NO -

Go to step 8.

8. Check for DTCs with the HDS.

Is DTC B1134 also indicated?

YES -

Go to step 15.

NO -

Go to step 9.

9. Turn the ignition switch to LOCK (0).

10. Disconnect the 14P connector from the right rear power window switch.

11. Disconnect the 6P connector from the right rear power window motor.

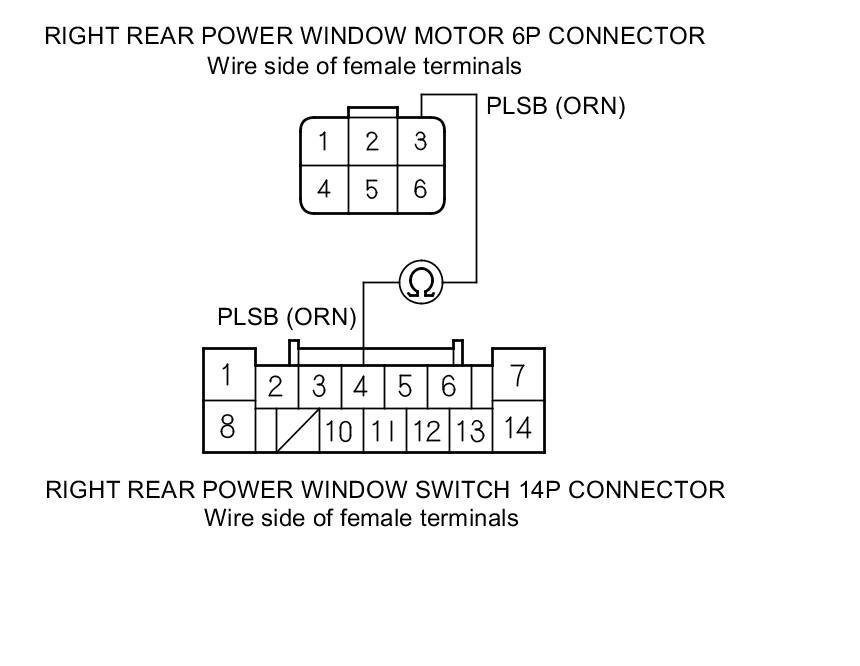
12. Check for continuity between right rear power window switch 14P connector terminal No. 4 and right rear power window motor 6P connector terminal No. 3.

Factory service manual diagram


Is there continuity?

YES -

Go to step 13.

NO -

Repair an open or high resistance in the wire.

13. Check for continuity between right rear power window motor 6P connector terminal No. 3 and body ground.

Factory service manual diagram


Is there continuity?

YES -

Repair a short to ground in the wire.

NO -

Go to step 14.

14. Test the right rear power window motor Power Window Motor Test.

Is the motor OK?

YES -

Replace the right rear power window switch Passenger's Power Window Switch Test/Replacement.

NO -

Faulty the right rear power window motor; replace right rear door regulator Service and Repair.
15. Check for continuity between right rear power window switch 14P connector terminal No. 6 and body ground.

Factory service manual diagram


Is there continuity?

YES -

Go to step 16.

NO -

Repair an open or high resistance in the wire or poor ground (G651).

16. Check for continuity between right rear power window switch 14P connector terminal No. 3 and right rear power window motor 6P connector terminal No. 6 respectively.

Factory service manual diagram


Is there continuity?

YES -

Go to step 17.

NO -

Repair an open or high resistance in the wire.

17. Check for continuity between the right rear power window motor 6P connector terminal No. 6 and body ground.

Factory service manual diagram


Is there continuity?

YES -

Repair a short to ground in the wire.

NO -

Faulty the right rear power window motor; replace right rear door regulator Service and Repair.
Supporting Diagrams & Locations

Reference material from the factory manual for this diagnostic procedure.

Diagram

A/C Leak Detection (B07-025)

Diagram

A/C Compressor Clutch Connector End View (View 21)

Diagram

A/C Compressor Connector End View (View 150)

Diagram

A/C Condenser Fan Motor Connector End View (View 22)

Diagram

A/C Pressure Sensor Connector End View (View 151)

Diagram

A/T Clutch Pressure Control Solenoid Valve A Connector End View (View 23)

Location

Accessory Power Sockets

Location

ACURALINK

Location

Adaptive Cruise Control (Acc)

Location

Audio System

Fuse/Relay

Dashboard

Fuse/Relay

Door

Fuse/Relay

B18-020: Warranty Extension: Customer Support Program For Driver's Airbag Inflator For 2013-14 ILX Hybrid And Other Listed Years And Models (Expires February 28, 2026) (B18-020)

Fuse/Relay

2012 RL: TQI Information (11-030)

Related Procedures

Procedure

A/C Refrigerant (Compressor) Oil Guide (BJA34004)

Procedure

A/C Refrigerant And Oil Type Guide (BJA1330)

Procedure

A/C Refrigerant Type Guide (BJA11220)

Procedure

A/C Refrigerant Types Guide (BJA09917 VERSION 2)

Procedure

Always Enter Campaign Number On Proof Of Correction Certificate (B13010B)

Procedure

ACURA Recommended Materials (B99-015)