
B1237

Factory Manual References

Factory service manual diagnostic procedure for 2010 acura tl

B1234


DTC Troubleshooting: B1234 (K and AUTO)

DTC B1234 or DTC indicator K and AUTO:

A Short in the Driver's Air Mix Control Motor Circuit

1. Clear the DTC with the HDS.

2. Turn the ignition switch to LOCK (0), and then back to ON (II), or press the engine start/stop button to select the OFF mode, and then the ON mode.

3. Do the Self-diagnostic Function with the HDS Initial Inspection and Diagnostic Overview or with the climate control unit Initial Inspection and Diagnostic Overview.

4. Check for DTCs.

Is DTC B1234 or K and AUTO indicated?

YES -

Go to step 5.

NO -

Intermittent failure. Check for loose or poor connection on the driver's air mix control motor circuit.�

5. Check for DTCs.

Are these DTCs also present; B1237 or N and AUTO, and/or B2968 or B and WINDSHIELD DEFROST, and/or B2980 or F and WINDSHIELD DEFROST?

YES -

Go to step 13.

NO -

Go to step 6.

6. Turn the ignition switch to LOCK (0), or press the engine start/stop button to select the OFF mode.

7. Test the driver's air mix control motor Driver's Air Mix Control Motor Test.

Is the driver's air mix control motor OK?

YES -

Go to step 8.

NO -

Replace the driver's air mix control motor Driver's Air Mix Control Motor Replacement.�

8. Disconnect the driver's air mix control motor 7P connector.

9. Disconnect climate control unit connectors A (32P) and C (20P).

10. Check for continuity between body ground and climate control unit connector A (32P) terminal No. 25.
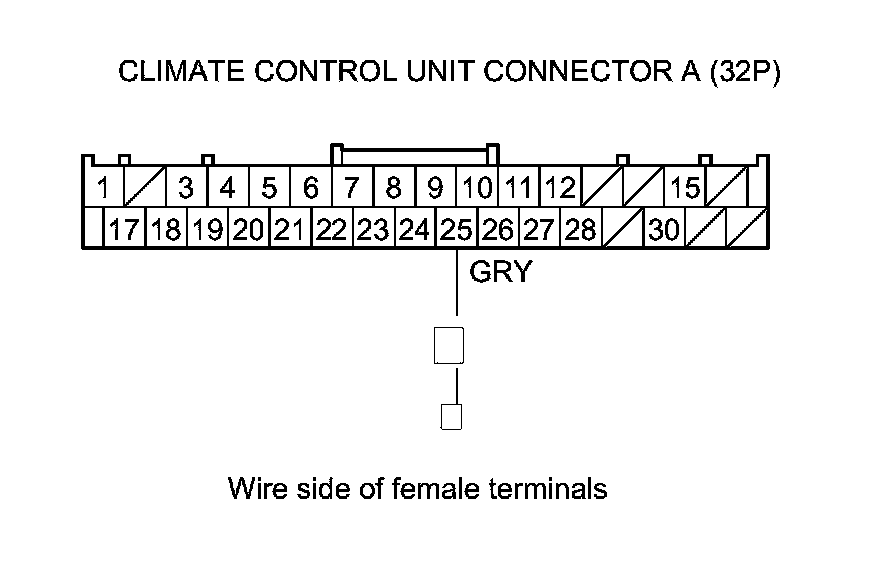
Factory service manual diagram


Is there continuity?

YES -

Repair a short to body ground in the wire between the climate control unit and the driver's air mix control motor.�

NO -

Go to step 11.

11. Check for continuity between climate control unit connector A (32P) terminal No. 25 and climate control unit connector C (20P) terminal No. 2.
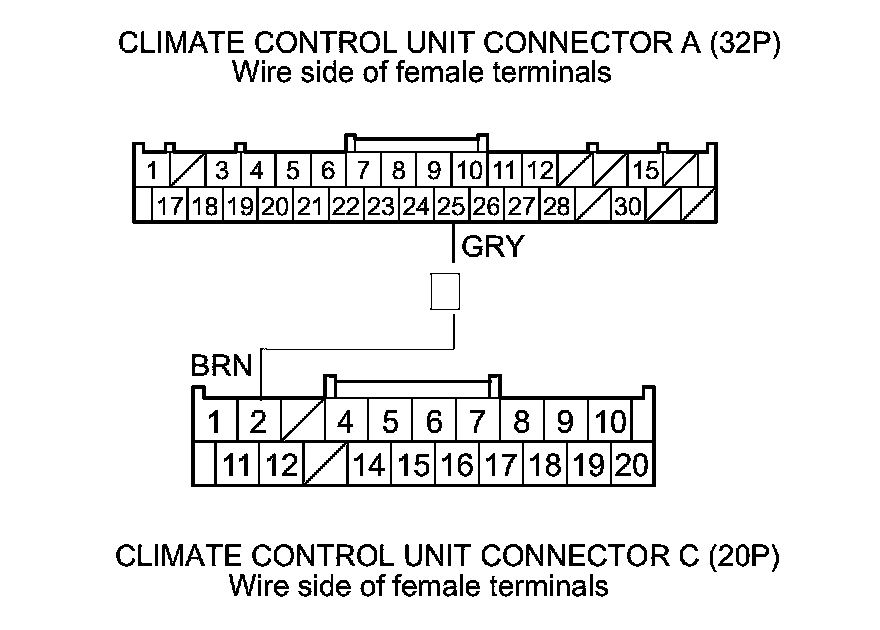
Factory service manual diagram


Is there continuity?

YES -

Repair a short in the wires.�

NO -

Go to step 12.

12. Turn the ignition switch to ON (II), or press the engine start/stop button to select the ON mode, and measure the voltage between climate control unit connector A (32P) terminal No. 25 and body ground.
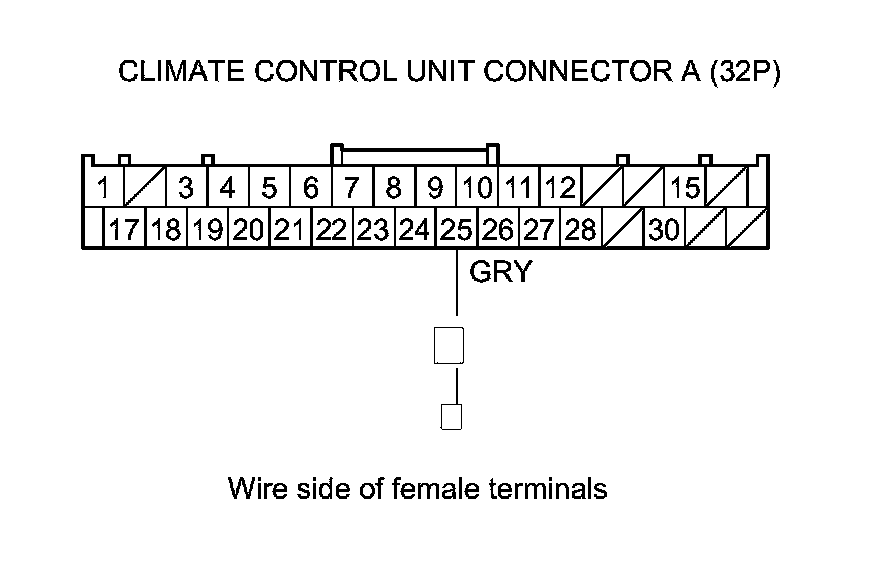
Factory service manual diagram


Is there any voltage?

YES -

Repair a short to power in the wire between the climate control unit and the driver's air mix control motor. This short may also damage the climate control unit. Repair a short to power before replacing the climate control unit.�

NO -

Substitute a known-good climate control unit, and recheck. If the symptom/indication goes away, replace the original climate control unit Climate Control Unit Removal/Installation.�

13. Turn the ignition switch to LOCK (0), or press the engine start/stop button to select the OFF mode, and disconnect the climate control unit connector C (20P).

14. Disconnect these items:

- Driver's air mix control motor
- Passenger's air mix control motor
- Humidity/in-car temperature sensor
- A/C pressure sensor

15. Check for continuity between climate control unit connector C (20P) terminal No. 2 and body ground.
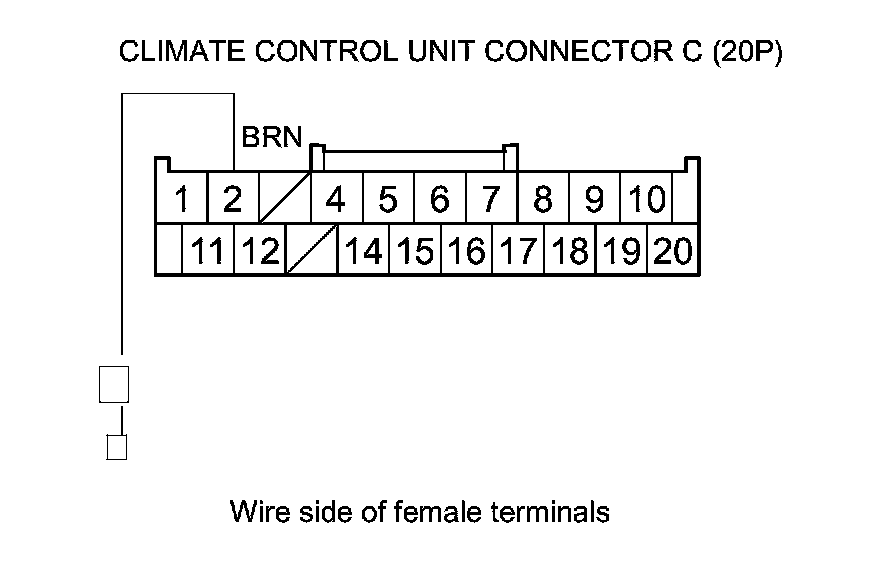
Factory service manual diagram


Is there continuity?

YES -

Repair a short to body ground in the wire.�

NO -

Go to step 16.

16. Turn the ignition switch to ON (II), or press the engine start/stop button to select the ON mode, and measure the voltage between the same terminal and body ground.
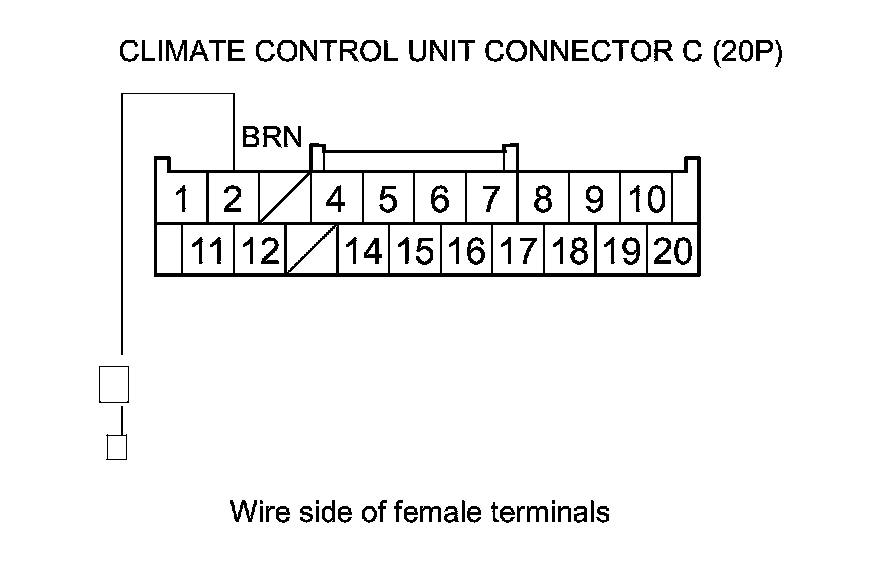
Factory service manual diagram


Is there any voltage?

YES -

Repair a short to power in the wire. This short may have also damaged the climate control unit. Repair a short to power before replacing the climate control unit.�

NO -

Go to step 17.

17. Turn the ignition switch to LOCK (0), or press the engine start/stop button to select the OFF mode.

18. Reconnect climate control unit connector C (20P).

19. Turn the ignition switch to ON (II), or press the engine start/stop button to select the ON mode, and measure the voltage between climate control unit connector C (20P) terminal No. 2 and body ground.
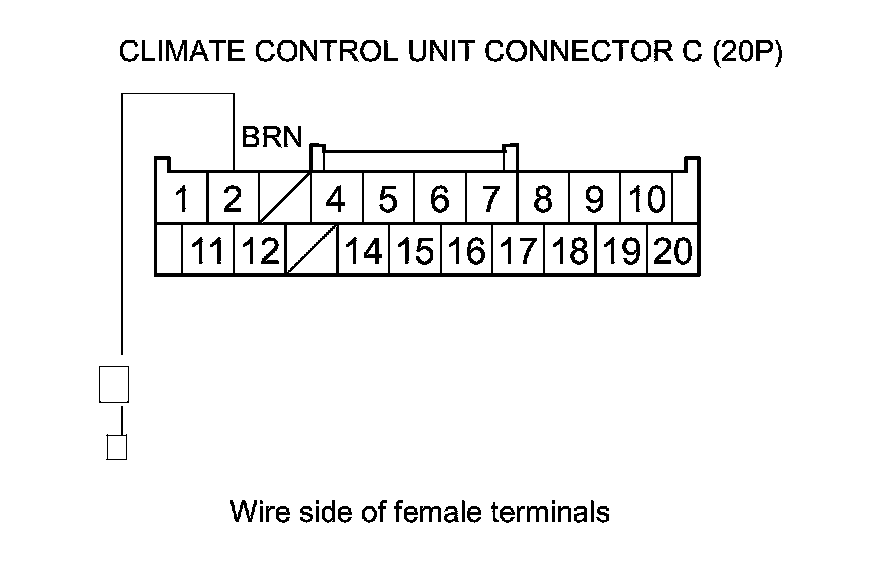
Factory service manual diagram


Is there about 5 V?

YES -

Go to step 20.

NO -

Check for a loose wire or poor connection at climate control unit connector C (20P). If the connection is good, substitute a known-good climate control unit, and recheck. If the symptom/indication goes away, replace the original climate control unit Climate Control Unit Removal/Installation.�

20. While measuring the voltage as described in step 19, reconnect these items individually and note the voltage reading each time:

- Driver's air mix control motor
- Passenger's air mix control motor
- Humidity/in-car temperature sensor
- A/C pressure sensor
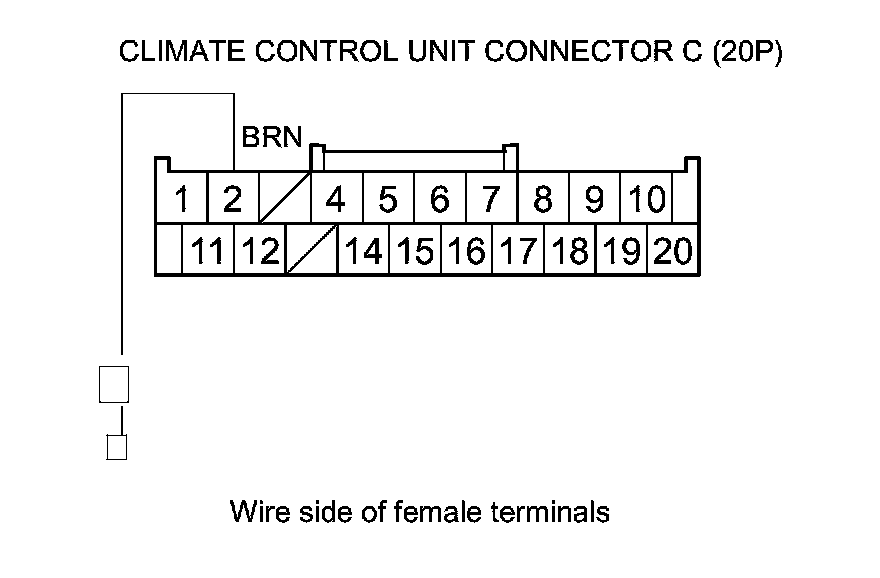
Factory service manual diagram


Does the voltage remain at about 5 V?

YES -

Substitute a known-good climate control unit, and recheck. If the symptom/indication goes away, replace the original climate control unit Climate Control Unit Removal/Installation.�

NO -

Replace the component that caused the voltage drop.�

B1234


DTC Troubleshooting: B1234 (K and AUTO)

DTC B1234 or DTC indicator K and AUTO:

A Short in the Driver's Air Mix Control Motor Circuit

1. Clear the DTC with the HDS.

2. Turn the ignition switch to LOCK (0), and then back to ON (II), or press the engine start/stop button to select the OFF mode, and then the ON mode.

3. Do the Self-diagnostic Function with the HDS Initial Inspection and Diagnostic Overview or with the climate control unit Initial Inspection and Diagnostic Overview.

4. Check for DTCs.

Is DTC B1234 or K and AUTO indicated?

YES -

Go to step 5.

NO -

Intermittent failure. Check for loose or poor connection on the driver's air mix control motor circuit.�

5. Check for DTCs.

Are these DTCs also present; B1237 or N and AUTO, and/or B2968 or B and WINDSHIELD DEFROST, and/or B2980 or F and WINDSHIELD DEFROST?

YES -

Go to step 13.

NO -

Go to step 6.

6. Turn the ignition switch to LOCK (0), or press the engine start/stop button to select the OFF mode.

7. Test the driver's air mix control motor Driver's Air Mix Control Motor Test.

Is the driver's air mix control motor OK?

YES -

Go to step 8.

NO -

Replace the driver's air mix control motor Driver's Air Mix Control Motor Replacement.�

8. Disconnect the driver's air mix control motor 7P connector.

9. Disconnect climate control unit connectors A (32P) and C (20P).

10. Check for continuity between body ground and climate control unit connector A (32P) terminal No. 25.

Factory service manual diagram


Is there continuity?

YES -

Repair a short to body ground in the wire between the climate control unit and the driver's air mix control motor.�

NO -

Go to step 11.

11. Check for continuity between climate control unit connector A (32P) terminal No. 25 and climate control unit connector C (20P) terminal No. 2.

Factory service manual diagram


Is there continuity?

YES -

Repair a short in the wires.�

NO -

Go to step 12.

12. Turn the ignition switch to ON (II), or press the engine start/stop button to select the ON mode, and measure the voltage between climate control unit connector A (32P) terminal No. 25 and body ground.

Factory service manual diagram


Is there any voltage?

YES -

Repair a short to power in the wire between the climate control unit and the driver's air mix control motor. This short may also damage the climate control unit. Repair a short to power before replacing the climate control unit.�

NO -

Substitute a known-good climate control unit, and recheck. If the symptom/indication goes away, replace the original climate control unit Climate Control Unit Removal/Installation.�

13. Turn the ignition switch to LOCK (0), or press the engine start/stop button to select the OFF mode, and disconnect the climate control unit connector C (20P).

14. Disconnect these items:

- Driver's air mix control motor
- Passenger's air mix control motor
- Humidity/in-car temperature sensor
- A/C pressure sensor

15. Check for continuity between climate control unit connector C (20P) terminal No. 2 and body ground.

Factory service manual diagram


Is there continuity?

YES -

Repair a short to body ground in the wire.�

NO -

Go to step 16.

16. Turn the ignition switch to ON (II), or press the engine start/stop button to select the ON mode, and measure the voltage between the same terminal and body ground.

Factory service manual diagram


Is there any voltage?

YES -

Repair a short to power in the wire. This short may have also damaged the climate control unit. Repair a short to power before replacing the climate control unit.�

NO -

Go to step 17.

17. Turn the ignition switch to LOCK (0), or press the engine start/stop button to select the OFF mode.

18. Reconnect climate control unit connector C (20P).

19. Turn the ignition switch to ON (II), or press the engine start/stop button to select the ON mode, and measure the voltage between climate control unit connector C (20P) terminal No. 2 and body ground.

Factory service manual diagram


Is there about 5 V?

YES -

Go to step 20.

NO -

Check for a loose wire or poor connection at climate control unit connector C (20P). If the connection is good, substitute a known-good climate control unit, and recheck. If the symptom/indication goes away, replace the original climate control unit Climate Control Unit Removal/Installation.�

20. While measuring the voltage as described in step 19, reconnect these items individually and note the voltage reading each time:

- Driver's air mix control motor
- Passenger's air mix control motor
- Humidity/in-car temperature sensor
- A/C pressure sensor

Factory service manual diagram


Does the voltage remain at about 5 V?

YES -

Substitute a known-good climate control unit, and recheck. If the symptom/indication goes away, replace the original climate control unit Climate Control Unit Removal/Installation.�

NO -

Replace the component that caused the voltage drop.�

Supporting Diagrams & Locations

Reference material from the factory manual for this diagnostic procedure.

Diagram

A/C Leak Detection (B07-025)

Diagram

A/C Leak Detection (B07-025)

Diagram

A/C Leak Detection (B07-025)

Location

ACURA

Location

AUDI

Location

ACURA Torque Converter Clutch Shudder Snap Shot Evaluation Job Aid (JA4659)

Location

Automatic Transmission In-Warranty Exchange Program (90-009)

Fuse/Relay

B1036

Fuse/Relay

B1077

Fuse/Relay

B10A2

Fuse/Relay

B10CF

Related Procedures

Procedure

A/C Refrigerant (Compressor) Oil Guide (BJA34004)

Procedure

A/C Refrigerant And Oil Type Guide (BJA1330)

Procedure

A/C Refrigerant Type Guide (BJA11220)

Procedure

A/C Refrigerant Types Guide (BJA09917 VERSION 2)

Procedure

Always Enter Campaign Number On Proof Of Correction Certificate (B13010B)

Procedure

ACURA Recommended Materials (B99-015)