DTC Troubleshooting: B1129DTC B1129: Driver's Door Lock Knob Switch Signal Error
NOTE: If you are troubleshooting multiple DTCs, be sure to follow the instructions in B-CAN System Diagnosis Test Mode A.
Troubleshooting - B-CAN System Diagnosis Test Mode A 1.
Clear the DTCs with the HDS.
2.
Turn the ignition switch to LOCK (0), and then back to ON (II).
3.
Operate the driver's door lock knob switch several times.
4.
Check for DTCs with the HDS.
Is DTC B1129 indicated?
YES - Go to step 5.
NO - Intermittent failure. The driver's door lock knob switch system is OK at this time.
5.
Select KEYLESS from the BODY ELECTRICAL menu, and enter DATA LIST.
6.
Check the ON/OFF information of the DRIVER'S DOOR LOCK KNOB SWITCH (LOCK) and the DRIVER'S DOOR LOCK KNOB SWITCH (UNLOCK).
Are the DRIVER'S DOOR LOCK KNOB SWITCH (LOCK) information indicator ON and DRIVER'S DOOR LOCK KNOB SWITCH (UNLOCK) information indicator OFF with the driver's door lock knob switch in LOCK position, and are the DRIVER'S DOOR LOCK KNOB SWITCH (LOCK) information indicator OFF and DRIVER'S DOOR LOCK KNOB SWITCH (UNLOCK) information indicator ON with the driver's door lock knob switch in UNLOCK position?
YES - Faulty MICU; replace the under-dash fuse/relay box.
NO - Go to step 7.
7.
Disconnect the driver's door lock actuator 10P connector.
8.
Check the ON/OFF information of the DRIVER'S DOOR LOCK KNOB SWITCH (LOCK) and DRIVER'S DOOR LOCK KNOB SWITCH (UNLOCK) in the DATA LIST.
Are both information indicators OFF?
YES - Check for an open in the driver's door lock knob switch terminal No. 6 wire or the driver's door lock knob switch terminal No. 7 wire between the MICU and the driver's door lock knob switch. If OK, replace the driver's door lock actuator.
NO - Go to step 9.
9.
Turn the ignition switch to LOCK (0).
10.
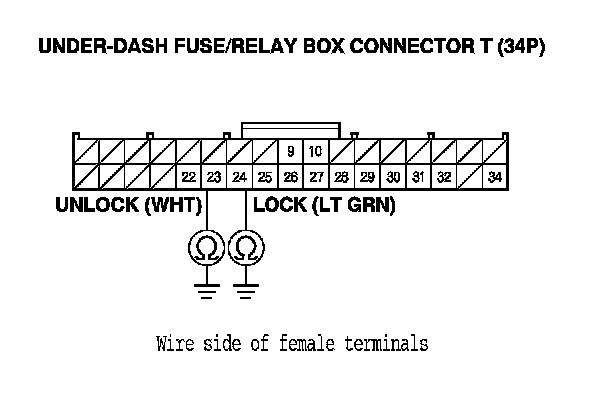
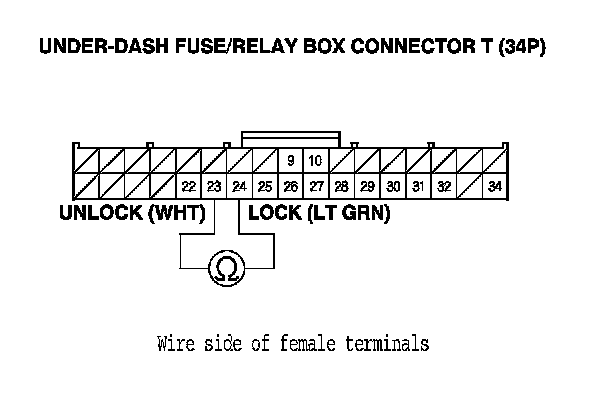
Disconnect under-dash fuse/relay box connector T (34P).
11.
Check for continuity between under-dash fuse/relay box connector T (34P) terminals No. 23 and No. 24 and body ground.
Is there continuity?
YES - Repair a short to ground in the wire.
NO - Go to step 12.
12.
Check for continuity between under-dash fuse/relay box connector T (34P) terminals No. 23 and No. 24.
Is there continuity?
YES - Repair a short to ground in the wire.
NO - Faulty MICU; replace the under-dash fuse/relay box.