B1078

Factory Manual References

Factory service manual diagnostic procedure for 2009 acura rdx

A L L Diagnostic Trouble Codes ( DTC )

B1078


DTC Troubleshooting: B1078, B1079

DTC B1078: Daytime Running Lights Signal Error (Canada)

DTC B1079: Daytime Running Lights Signal Error (USA)

NOTE: If you are troubleshooting multiple DTCs, be sure to follow the instructions in B-CAN System Diagnosis Test Mode A. Troubleshooting - B-CAN System Diagnosis Test Mode A

1. Turn the ignition switch to ON (II).

2. Pull the parking brake lever.

3. Clear the DTCs with the HDS.

4. Release the parking brake lever.

5. Turn the ignition switch to LOCK (0), and then back to ON (II).

6. Check for DTCs with the HDS.

Is DTC B1078 (Canada) or B1079 (USA) indicated?
YES - Go to step 7.

NO - Intermittent failure. The daytime running lights system is OK at this time. Check for loose or poor connections.


7. Turn the headlight switch to ON (high beam).

Do both headlights (high beam) come on?
YES - Go to step 8.

NO - Go to step 10.


8. Turn the ignition switch to LOCK (0).

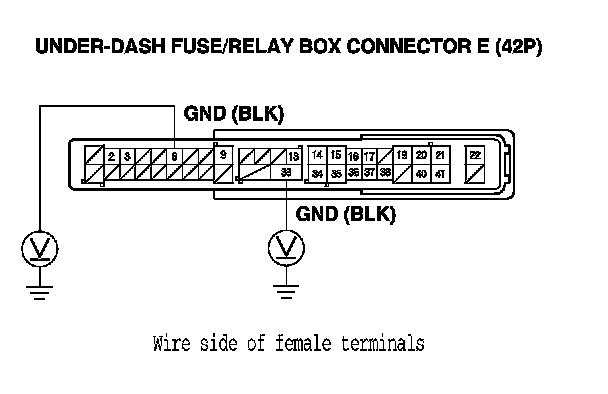
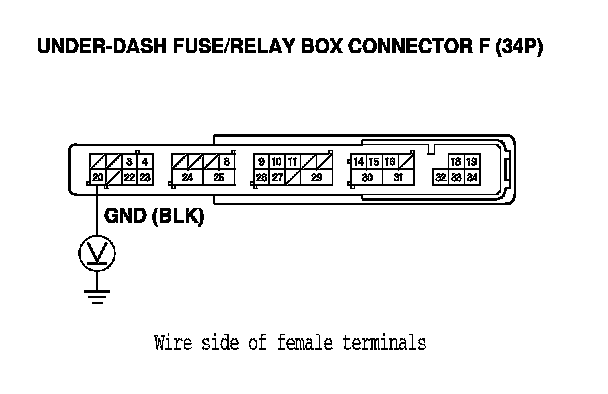
9. Measure the voltage between under-dash fuse/relay box connector E (42P) terminals No. 6 and No. 33 and body ground, and between under-dash fuse/relay box connector F (34P) terminal and body ground individually.

Is there less than 0.5 V?
YES - Faulty MICU; replace the under-dash fuse/relay box.

NO - Repair an open in the BLK wire or poor ground (G451, G601).


Factory service manual diagram


Factory service manual diagram


10. Turn the ignition switch to LOCK (0) and headlight switches OFF.

11. Check the No. 12, No. 13, and No. 18 fuses in the under-dash fuse/relay box.

Are all fuses OK?
YES - Go to step 12.

NO - Replace the blown fuse and recheck. If the No. 18 (20 A) fuse is blown again, replace the under-dash fuse/relay box. If the No. 12 (10 A) or No. 13 (10 A) fuse is blown again, repair a short in the wire between the under-dash fuse/relay box and the appropriate headlight (high beam).


12. Check the headlight (high beam) bulbs.

Are the headlight (high beam) bulbs OK?
YES - Go to step 13.

NO - Replace the faulty bulb.


13. Disconnect under-dash fuse/relay box connectors F (34P) and G (21P).

14. Disconnect both of the headlight (high beam) 2P connectors.

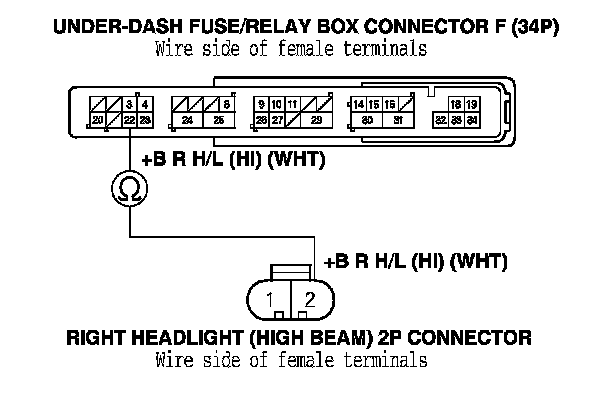
15. Check for continuity between right headlight (high beam) 2P connector terminal No. 2 and under-dash fuse/relay box connector F (34P) terminal No. 22.

Is there continuity?
YES - Go to step 16.

NO - Repair an open in the wire between the right headlight (high beam) and the under-dash fuse/relay box.


Factory service manual diagram


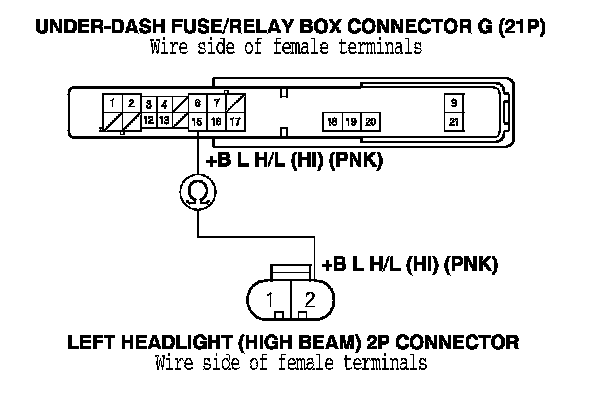
16. Check for continuity between left headlight (high beam) 2P connector terminal No. 2 and under-dash fuse/relay box connector G (21P) terminal No. 15.

Is there continuity?
YES - Go to step 17.

NO - Repair an open in the wire between the left headlight (high beam) and the under-dash fuse/relay box.


Factory service manual diagram


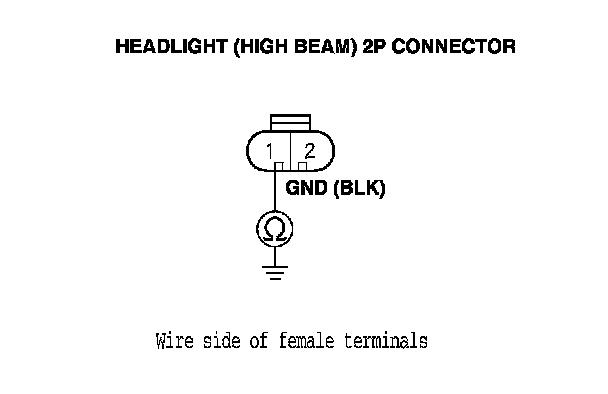
17. Check for continuity between each headlight (high beam) 2P connector terminal No. 1 and body ground.

Is there continuity?
YES - Faulty MICU; replace the under-dash fuse/relay box.

NO - Repair an open in the BLK wire or poor ground (G201-left side, G301-right side).


Factory service manual diagram


B1079


DTC Troubleshooting: B1078, B1079

DTC B1078: Daytime Running Lights Signal Error (Canada)

DTC B1079: Daytime Running Lights Signal Error (USA)

NOTE: If you are troubleshooting multiple DTCs, be sure to follow the instructions in B-CAN System Diagnosis Test Mode A. Troubleshooting - B-CAN System Diagnosis Test Mode A

1. Turn the ignition switch to ON (II).

2. Pull the parking brake lever.

3. Clear the DTCs with the HDS.

4. Release the parking brake lever.

5. Turn the ignition switch to LOCK (0), and then back to ON (II).

6. Check for DTCs with the HDS.

Is DTC B1078 (Canada) or B1079 (USA) indicated?
YES - Go to step 7.

NO - Intermittent failure. The daytime running lights system is OK at this time. Check for loose or poor connections.


7. Turn the headlight switch to ON (high beam).

Do both headlights (high beam) come on?
YES - Go to step 8.

NO - Go to step 10.


8. Turn the ignition switch to LOCK (0).

9. Measure the voltage between under-dash fuse/relay box connector E (42P) terminals No. 6 and No. 33 and body ground, and between under-dash fuse/relay box connector F (34P) terminal and body ground individually.

Is there less than 0.5 V?
YES - Faulty MICU; replace the under-dash fuse/relay box.

NO - Repair an open in the BLK wire or poor ground (G451, G601).


Factory service manual diagram


Factory service manual diagram


10. Turn the ignition switch to LOCK (0) and headlight switches OFF.

11. Check the No. 12, No. 13, and No. 18 fuses in the under-dash fuse/relay box.

Are all fuses OK?
YES - Go to step 12.

NO - Replace the blown fuse and recheck. If the No. 18 (20 A) fuse is blown again, replace the under-dash fuse/relay box. If the No. 12 (10 A) or No. 13 (10 A) fuse is blown again, repair a short in the wire between the under-dash fuse/relay box and the appropriate headlight (high beam).


12. Check the headlight (high beam) bulbs.

Are the headlight (high beam) bulbs OK?
YES - Go to step 13.

NO - Replace the faulty bulb.


13. Disconnect under-dash fuse/relay box connectors F (34P) and G (21P).

14. Disconnect both of the headlight (high beam) 2P connectors.

15. Check for continuity between right headlight (high beam) 2P connector terminal No. 2 and under-dash fuse/relay box connector F (34P) terminal No. 22.

Is there continuity?
YES - Go to step 16.

NO - Repair an open in the wire between the right headlight (high beam) and the under-dash fuse/relay box.


Factory service manual diagram


16. Check for continuity between left headlight (high beam) 2P connector terminal No. 2 and under-dash fuse/relay box connector G (21P) terminal No. 15.

Is there continuity?
YES - Go to step 17.

NO - Repair an open in the wire between the left headlight (high beam) and the under-dash fuse/relay box.


Factory service manual diagram


17. Check for continuity between each headlight (high beam) 2P connector terminal No. 1 and body ground.

Is there continuity?
YES - Faulty MICU; replace the under-dash fuse/relay box.

NO - Repair an open in the BLK wire or poor ground (G201-left side, G301-right side).


Factory service manual diagram


Supporting Diagrams & Locations

Reference material from the factory manual for this diagnostic procedure.

Diagram

A/C Leak Detection (B07-025)

Diagram

Connector End Views

Diagram

Air Conditioning

Diagram

Anti-Lock Brakes

Diagram

Anti-Theft

Diagram

Body Control Modules

Location

CHRYSLER Group LLC

Location

CHRYSLER Group LLC

Location

ACURA

Location

AUDI

Fuse/Relay

CHRYSLER Group LLC

Fuse/Relay

AUDI

Fuse/Relay

BMW

Fuse/Relay

CHRYSLER Group LLC

Related Procedures

Procedure

A/C Refrigerant (Compressor) Oil Guide (BJA34004)

Procedure

A/C Refrigerant And Oil Type Guide (BJA1330)

Procedure

A/C Refrigerant Type Guide (BJA11220)

Procedure

A/C Refrigerant Types Guide (BJA09917 VERSION 2)

Procedure

Always Enter Campaign Number On Proof Of Correction Certificate (B13010B)

Procedure

Be Careful Not To Damage That Inner Door Handle Cable End (B10020C)