DTC Troubleshooting: B1028DTC B1028: Rear Window Wiper Motor (Park) Signal Error
NOTE: If you are troubleshooting multiple DTCs, be sure to follow the instructions in B-CAN System Diagnosis Test Mode A.
Troubleshooting - B-CAN System Diagnosis Test Mode A 1.
Clear the DTCs with the HDS.
2.
Turn the ignition switch to LOCK (0), and then back to ON (II).
3.
Turn the rear wiper switch to ON for 15 seconds or more, then turn the switch OFF.
Does the rear window wiper motor run?
YES - Go to step 4.
NO - Go to step 11.
4.
Check for DTCs with the HDS.
Is DTC B1028 indicated?
YES - Go to step 5.
NO - Intermittent failure. The rear window wiper (Park) signal is OK at this time. Check for loose or poor connections.
5.
Do the rear wiper motor test.
Wiper Motor Test Does the rear wiper motor run and does it pulse normally?
YES - Go to step 6.
NO - Replace the rear wiper motor and recheck.
6.
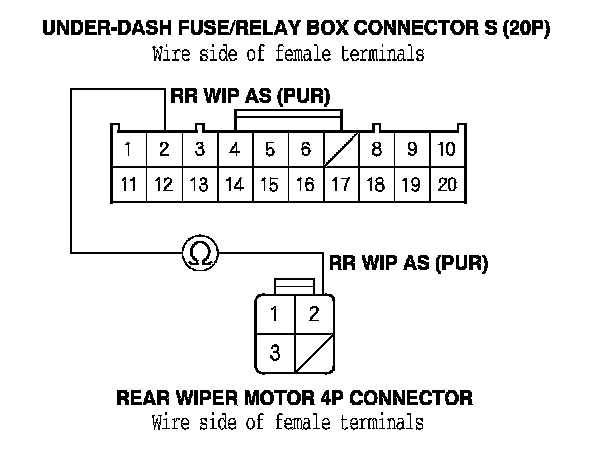
Disconnect under-dash fuse/relay box connector S (20P) and the rear wiper motor 4P connector.
7.
Check for continuity between rear wiper motor 4P connector terminal No. 2 and under-dash fuse/relay box connector S (20P) terminal No. 2.
Is there continuity?
YES - Go to step 8.
NO - Repair an open in the PUR wire.
8.
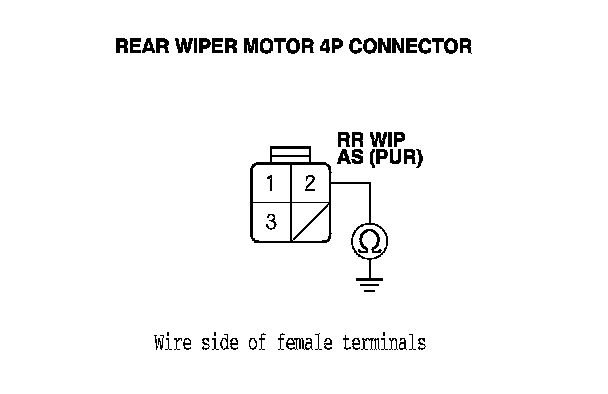
Check for continuity between the rear window wiper motor 4P connector terminal No. 2 and body ground.
Is there continuity?
YES - Repair a short to ground in the PUR wire.
NO - Go to step 9.
9.
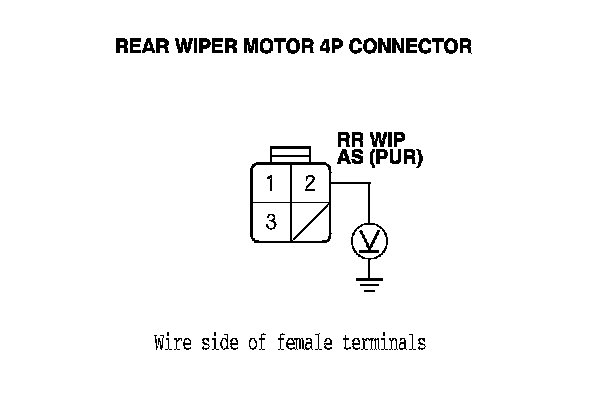
Turn the ignition switch to ON (II).
10.
Measure the voltage between the rear window wiper motor 4P connector terminal No. 2 and body ground.
Is there voltage?
YES - Repair a short to power in the PUR wire.
NO - Faulty MICU; replace the under-dash fuse/relay box.
11.
Turn the ignition switch to LOCK (0).
12.
Check the No. 8 (10 A) fuse in the under-dash fuse/relay box.
Is the fuse OK?
YES - Go to step 13.
NO - Replace the fuse and recheck the system.
13.
Do the wiper motor test.
Wiper Motor Test Does the wiper motor run normally?
YES - Go to step 14.
NO - Replace the windshield wiper motor and recheck.
14.
Do the rear window wiper relay test.
Testing and Inspection Is the relay OK?
YES - Go to step 15.
NO - Replace the rear window wiper relay and recheck.
15.
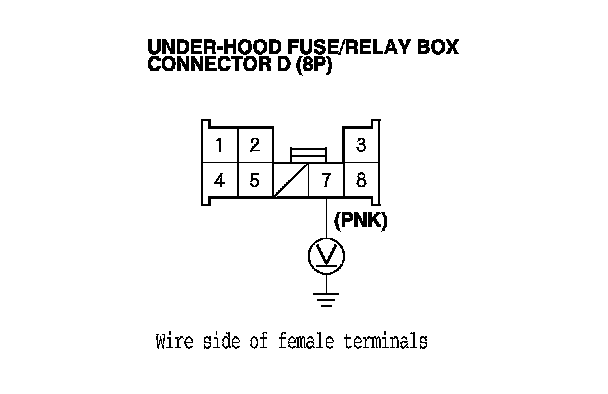
Turn the ignition switch to ON (II).
16.
Measure the voltage between under-hood fuse/relay box connector D (8P) terminal No. 7 and body ground.
Is there voltage?
YES - Go to step 17.
NO - Repair an open in the PNK wire or blown No. 8 fuse in the under-dash fuse/relay box.
17.
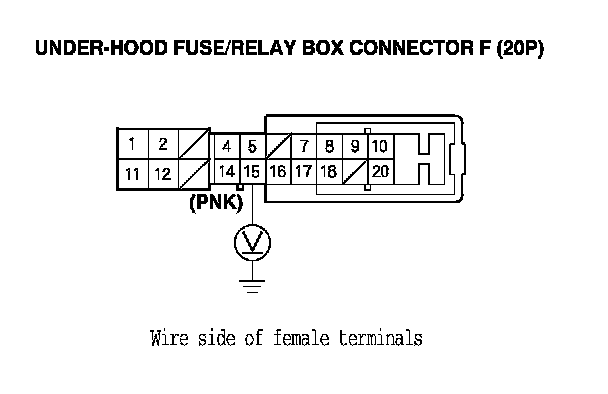
Measure the voltage between under-hood fuse/relay box connector F (20P) terminal No. 15 and body ground.
Is there voltage?
YES - Go to step 18.
NO - Repair an open in the PNK wire.
18.
Turn the ignition switch to LOCK (0).
19.
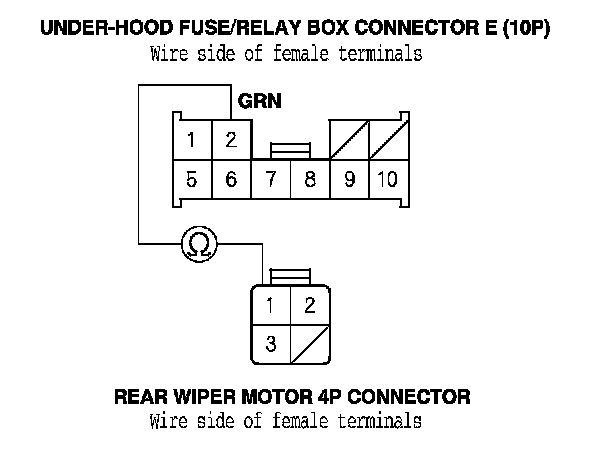
Disconnect under-hood fuse/relay box connector E (10P) and the rear wiper motor 4P connector.
20.
Check for continuity between rear window wiper motor 4P connector terminal No. 1 and under-hood fuse/relay box connector E (10P) terminal No. 2.
Is there continuity?
YES - Go to step 21.
NO - Repair an open in the GRN wire.
21.
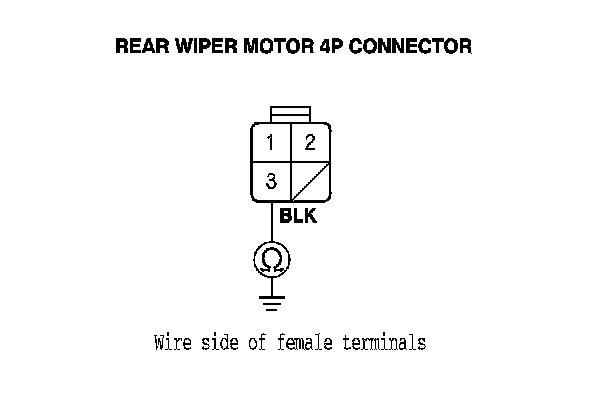
Check for continuity between the rear window wiper motor 4P connector terminal No. 3 and body ground.
Is there continuity?
YES - Go to step 22.
NO - Repair an open in the BLK wire or poor ground (G602).
22.
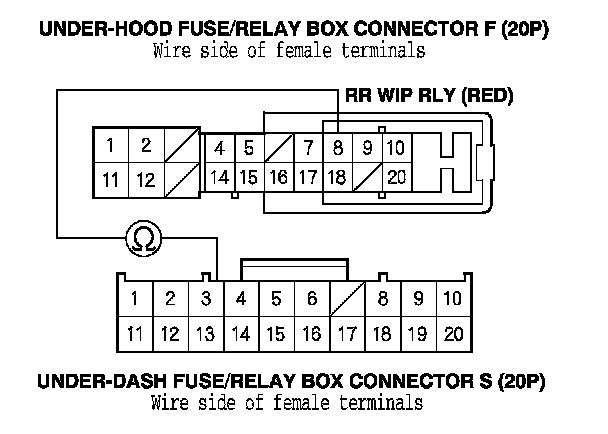
Disconnect under-hood fuse/relay box connector F (20P) and under-hood fuse/relay box connector S (20P).
23.
Check for continuity between under-hood fuse/relay box connector F (20P) terminal No. 8 and under-dash fuse/relay box connector S (20P) terminal No. 3.
Is there continuity?
YES - Faulty MICU; replace the under-dash fuse/relay box.
NO - Repair an open in the RED wire.