DTC B1079: Daytime Running Lights Malfunction (USA) 1.
Clear the DTCs with the HDS.
2.
Turn the ignition switch OFF.
3.
Make sure the brake pedal position switch is OFF.
4.
Make sure the headlight switch is OFF.
5.
Turn the ignition switch ON (II).
6.
Check for DTCs with the HDS.
Is DTC B1079 indicated?
YES - Go to step 7.
NO - Intermittent failure. The daytime running light system is OK at this time. Check for loose or poor connections.
7.
Turn the headlight high beams ON.
Do both headlights come on?
YES - Go to step 8.
NO - If one of the headlights doesn't come on, check the fuse and bulb, and for a poor ground (G201, G301) or an open in the wire. If both headlights don't come on, go to step 11.
8.
Turn the headlight switch OFF.
9.
Select LIGHTING SYSTEM from the HDS, and enter the DATA LIST.
10.
Check the ON/OFF information of the DRL Command in the DATA LIST.
Is the information indicator ON?
YES - Go to relay control module input test.
Relay Control Module Input Test NO - Substitute a known-good daytime running light control unit and recheck the system.
11.
Check the No. 3 (
10 A) and No. 5 (
10 A) fuses in the under-hood fuse/relay box.
Are both fuses OK?
YES - Go to step 12.
NO - Replace the blown fuse, and recheck the system.
12.
Check the headlight bulbs.
Are both bulbs OK?
YES - Go to step 13.
NO - Replace the blown bulb, and recheck the system.
13.
Disconnect the 2P connector from each headlight high beam.
14.
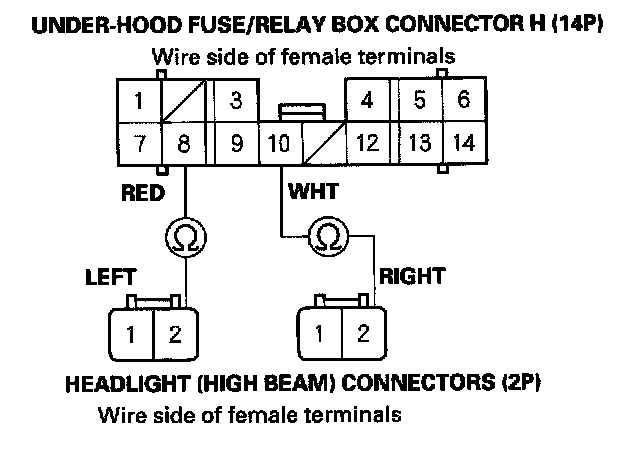
Disconnect under-hood fuse/relay box connector H (14P).
15.
Check for continuity between left headlight high beam 2P connector terminal No. 2 and under-hood fuse/relay box connector H (14P) terminal No. 8, and between right headlight high beam 2P connector terminal No. 2 and under-hood fuse/relay box connector H (14P) terminal No. 10.
Is there continuity?
YES - Go to step 16.
NO - Repair an open in the wire.
16.
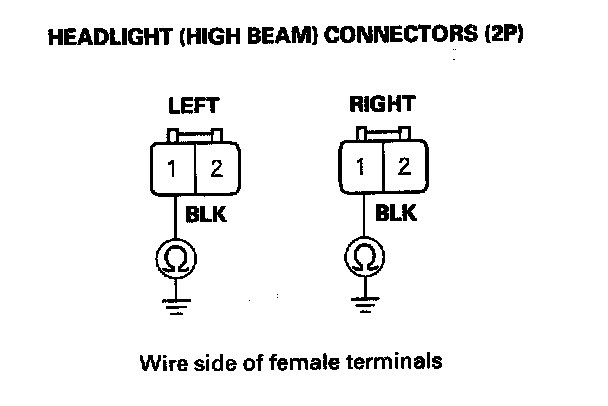
Check for continuity between each headlight high beam 2P connector terminal No. 1 and body ground.
Is there continuity?
YES - Faulty relay control module; replace the under-hood fuse/relay box.
NO - Repair an open in the wire or a poor ground (G201, G301).