
Factory manual example
Hummer H3 Serpentine Belt: 2006 3.5L Diagrams and Steps
This page shows the 2006 Hummer H3 L5 3.5L drive-belt procedures from its service manual. The manual has separate routing diagrams and steps for vehicles with A/C and without A/C. Confirm your model year, engine, and A/C equipment before using either selection.
This source does not verify belt part number or length, and this 2006 example is not confirmed for other H3 years or engines. Use the manual for your exact vehicle before ordering or starting work.
Exact vehicle section
2006 Hummer H3 L5 3.5L
The manual separates the belt procedure by A/C equipment. The two sections below keep each diagram beside its matching removal and installation procedure.
2006 Hummer H3 L5 3.5L manual
Drive belt replacement - Without A/C
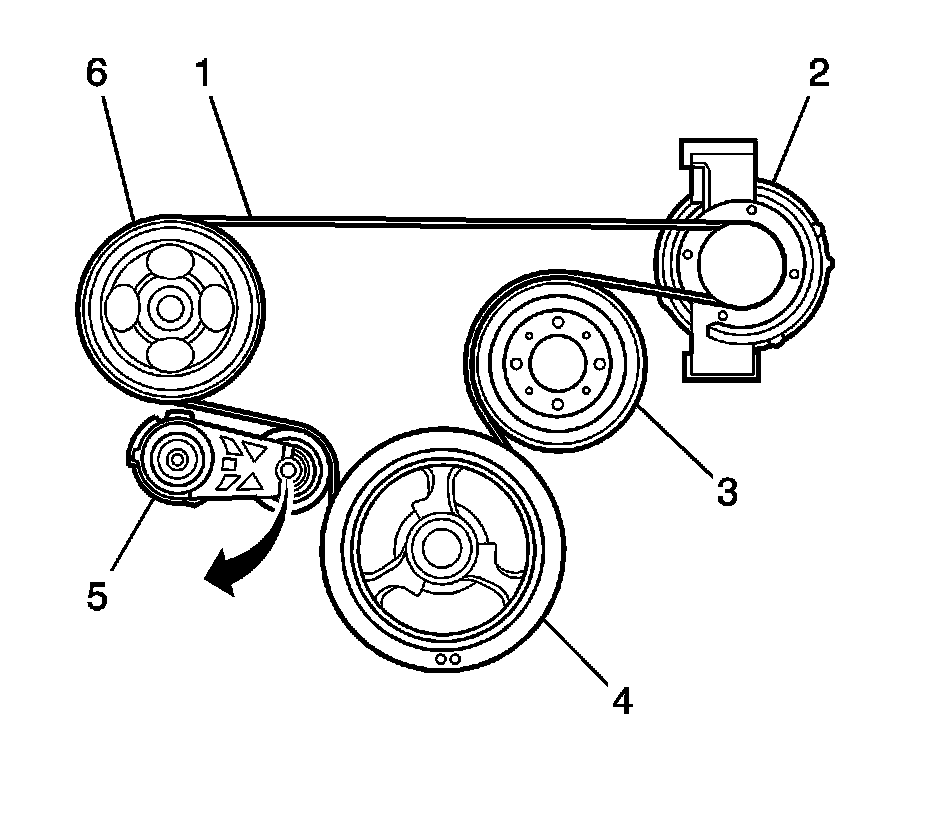
Removal - manual procedure summary
- Fit a 3/8-inch breaker bar into the automatic belt tensioner.
- Rotate the tensioner clockwise to release belt tension.
- Slide the belt off the water-pump pulley (pulley 3 in the source illustration), then let the tensioner return slowly.
- Remove the belt from the remaining pulleys.
Installation - manual procedure summary
- Route the belt over every pulley except the water-pump pulley.
- Use the breaker bar to rotate the tensioner clockwise and fit the belt over the water-pump pulley.
- Release the tensioner slowly. Confirm the belt is aligned and seated in each pulley groove.
2006 Hummer H3 L5 3.5L manual
Drive belt replacement - With A/C
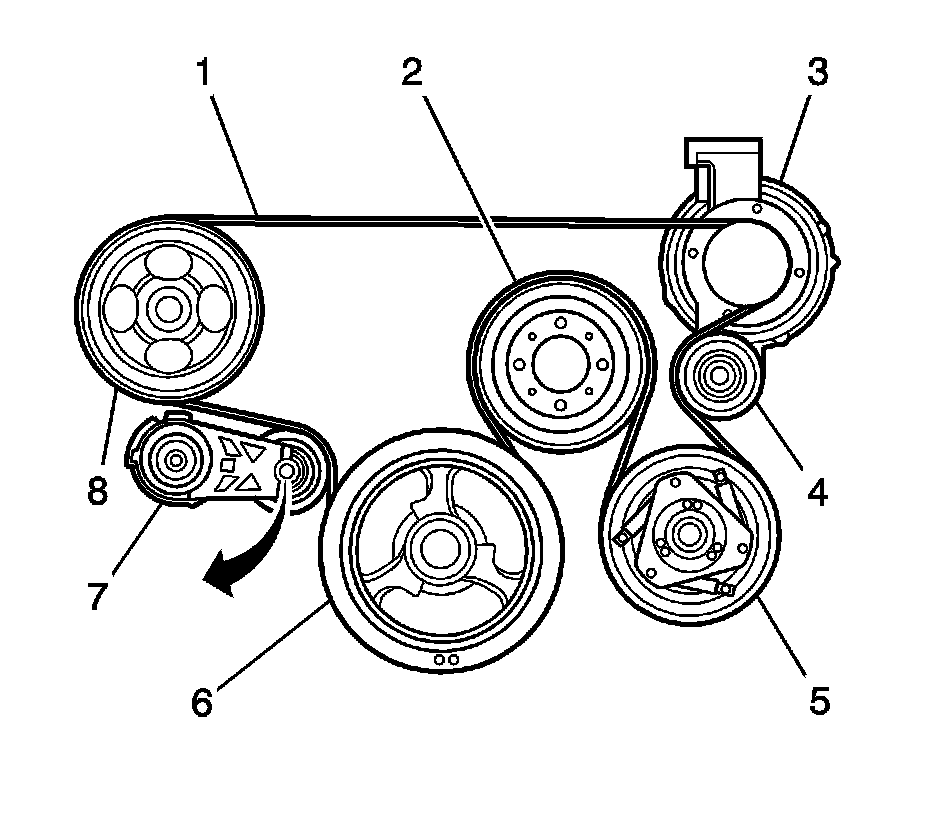
Removal - manual procedure summary
- Fit a 3/8-inch breaker bar into the automatic belt tensioner.
- Rotate the tensioner clockwise to release belt tension.
- Slide the belt off the water-pump pulley (pulley 2 in the source illustration), then let the tensioner return slowly.
- Remove the belt from the remaining pulleys.
Installation - manual procedure summary
- Route the belt over every pulley except the water-pump pulley.
- Use the breaker bar to rotate the tensioner clockwise and fit the belt over the water-pump pulley.
- Release the tensioner slowly. Confirm the belt is aligned and seated in each pulley groove.
Common questions
- Which Hummer H3 belt procedure should I use?
- The linked manual example is specifically for the 2006 H3 L5 3.5L. It has distinct procedures for A/C and without A/C. Confirm both the year and equipment on your vehicle.
- What tool does the manual call for at the tensioner?
- Both 2006 L5 3.5L procedures specify a 3/8-inch breaker bar. Verify the tool access and procedure in the exact manual section before beginning.
- Does this page give a belt size or fit every H3?
- No. The inspected manual leaves show routing and replacement steps, not a belt part number or length. This example does not establish fitment for other years or engines.
After confirming your configuration
Search for the belt and the specified tool
These are general searches, not verified part matches. Check the seller's year, engine, and A/C fitment data before purchase.
As an Amazon Associate, AllOEMManuals earns from qualifying purchases.
Need a different H3 year or configuration? Choose the matching service manual.