
Safety Warning
DIY auto repair can cause serious injury, fire, or vehicle damage. These guides are for informational purposes only. Always follow OEM torque specs, wear PPE, and consult a certified mechanic if you are unsure. You are solely responsible for your safety.
2005 Subaru Outback F6-3.0LFACTORY OEM SERVICE PROCEDURE
Windshield: Service and Repair
Windshield Glass
REMOVAL
1. USING WINDSHIELD GLASS KNIFE
1. Remove the cowl panel.
2. Remove the molding.
3. Tape the body side of the circumference of windshield glass for protection.
4. Apply sufficient amount of soapy water to the adhesive part.
5. Insert the windshield glass knife into adhesive part.
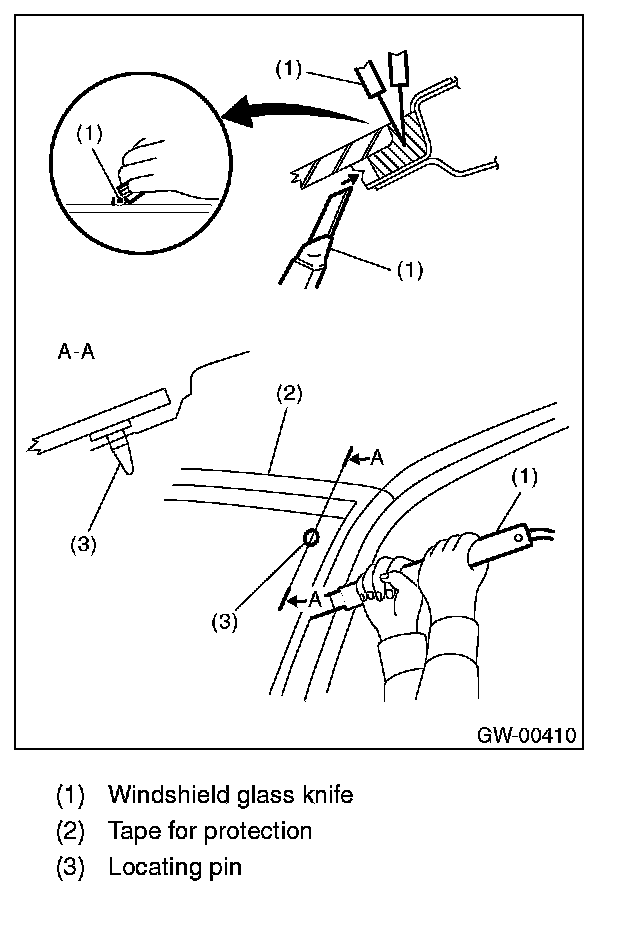

6. While holding the knife edge and windshield glass edge at a right angle, move the windshield glass knife in parallel to the windshield glass edge along face and edge of windshield glass to cut the adhesive part.
NOTE:
- Do not twist windshield glass knife.
- Cutting of adhesive part shall be started with wider gap between windshield glass and body.
- Because the locating pins are bonded to the corners of glass, use piano wire to cut the pin.
2. USING PIANO WIRE
1. Remove the cowl panel.
2. Remove the molding.
3. Tape the body side of the circumference of windshield glass for protection.
4. Make a hole in the adhesive part using drill or knife.

5. Pass the piano wire through the hole, and attach securely both the wire ends to pieces of wood.
6. Pull the wire ends alternately to cut off the adhesive part.
CAUTION:
- Do not tightly pull the piano wire against the windshield glass edge.
- Be careful not to damage interior and exterior parts.
- When removal is made with area close to instrument panel, place a protection plate over it. Pay particular attention to the removal.
- Do not cross piano wires. Otherwise they may be cut.
INSTALLATION
1. Clean the external circumference of windshield glass with alcohol or white gasoline.

2. Remove the adhesive layer on the body using cutter knife to obtain smooth face of 2 mm (0.08 in) thick.
CAUTION: Be careful not to damage the body and paint surface.
3. Clean the body with alcohol or white gasoline to eliminate cutting power, dust and dirt completely from body.
4. Install the dam rubber.

5. Fit molding mark (B) to notch (A) of glass side and install the molding to entire perimeter of glass.
6. Apply two types of primers to the adhesive layer of glass using sponge.
Glass primer:
Dow Automotive
ESSEX U-401, U-402

7. Apply primer to the adhesive layer of body.
Painted surface primer:
Dow Automotive
ESSEX U-413
NOTE:
- Primer once attached to the painted surface of the body and internal trim is hard to wipe off. Mask the circumference of such area.
- Let primer dry for about ten minutes before installing the glass.
- Do not touch the surface coated with primer.

8. Cut off the cartridge nozzle tip as shown and set it in sealant gun.

9. Apply adhesive to the glass end surface as shown.

10. Fit the locating pins, and install windshield glass using suction rubber cup.
11. Lightly press the windshield glass for tight fit.
12. Make flush the adhesive surface jutted out using spatula.
13. After completion of all work, allow the vehicle to stand for about 24 hours.
NOTE:
- When door is opened/closed after glass is bonded, always lower the door glass and then open/close it carefully.
- Move the vehicle slowly.
- For minimum drying time and vehicle standing time before driving after bonding, follow instructions or instruction manual from the adhesive manufacturer.
14. After curing of adhesive, pour the water on external surface of vehicle to check that there are no water leaks.
NOTE: When a vehicle is returned to the user, tell him or her that the vehicle should not be subjected to heavy impact for at least three days.
15. Install the cowl panel.
REMOVAL
1. USING WINDSHIELD GLASS KNIFE
1. Remove the cowl panel.
2. Remove the molding.
3. Tape the body side of the circumference of windshield glass for protection.
4. Apply sufficient amount of soapy water to the adhesive part.
5. Insert the windshield glass knife into adhesive part.
6. While holding the knife edge and windshield glass edge at a right angle, move the windshield glass knife in parallel to the windshield glass edge along face and edge of windshield glass to cut the adhesive part.
NOTE:
- Do not twist windshield glass knife.
- Cutting of adhesive part shall be started with wider gap between windshield glass and body.
- Because the locating pins are bonded to the corners of glass, use piano wire to cut the pin.
2. USING PIANO WIRE
1. Remove the cowl panel.
2. Remove the molding.
3. Tape the body side of the circumference of windshield glass for protection.
4. Make a hole in the adhesive part using drill or knife.
5. Pass the piano wire through the hole, and attach securely both the wire ends to pieces of wood.
6. Pull the wire ends alternately to cut off the adhesive part.
CAUTION:
- Do not tightly pull the piano wire against the windshield glass edge.
- Be careful not to damage interior and exterior parts.
- When removal is made with area close to instrument panel, place a protection plate over it. Pay particular attention to the removal.
- Do not cross piano wires. Otherwise they may be cut.
INSTALLATION
1. Clean the external circumference of windshield glass with alcohol or white gasoline.
2. Remove the adhesive layer on the body using cutter knife to obtain smooth face of 2 mm (0.08 in) thick.
CAUTION: Be careful not to damage the body and paint surface.
3. Clean the body with alcohol or white gasoline to eliminate cutting power, dust and dirt completely from body.
4. Install the dam rubber.
5. Fit molding mark (B) to notch (A) of glass side and install the molding to entire perimeter of glass.
6. Apply two types of primers to the adhesive layer of glass using sponge.
Glass primer:
Dow Automotive
ESSEX U-401, U-402
7. Apply primer to the adhesive layer of body.
Painted surface primer:
Dow Automotive
ESSEX U-413
NOTE:
- Primer once attached to the painted surface of the body and internal trim is hard to wipe off. Mask the circumference of such area.
- Let primer dry for about ten minutes before installing the glass.
- Do not touch the surface coated with primer.
8. Cut off the cartridge nozzle tip as shown and set it in sealant gun.
9. Apply adhesive to the glass end surface as shown.
10. Fit the locating pins, and install windshield glass using suction rubber cup.
11. Lightly press the windshield glass for tight fit.
12. Make flush the adhesive surface jutted out using spatula.
13. After completion of all work, allow the vehicle to stand for about 24 hours.
NOTE:
- When door is opened/closed after glass is bonded, always lower the door glass and then open/close it carefully.
- Move the vehicle slowly.
- For minimum drying time and vehicle standing time before driving after bonding, follow instructions or instruction manual from the adhesive manufacturer.
14. After curing of adhesive, pour the water on external surface of vehicle to check that there are no water leaks.
NOTE: When a vehicle is returned to the user, tell him or her that the vehicle should not be subjected to heavy impact for at least three days.
15. Install the cowl panel.
Factory Service Tools
Use the Manual With the Right Hardware
Pair factory procedures with proven DIY tools so the instructions are easier to execute.
Disclosure: Verified tool recommendations may earn an affiliate commission at no cost to you.
When to See a Mechanic
Stop DIY work and contact a certified mechanic immediately if any of the following apply:
- • You smell fuel, burning insulation, or see smoke.
- • Brakes feel soft, pull hard to one side, or make grinding noises.
- • The engine overheats, stalls repeatedly, or misfires under load.
- • You are missing required tools, torque specs, or safe lifting equipment.
- • You are not confident in the next step or safety outcome.