
Safety Warning
DIY auto repair can cause serious injury, fire, or vehicle damage. These guides are for informational purposes only. Always follow OEM torque specs, wear PPE, and consult a certified mechanic if you are unsure. You are solely responsible for your safety.
2004 Subaru Outback F6-3.0LFACTORY OEM SERVICE PROCEDURE
Power Steering Fluid: Service and Repair
INSTALLATION
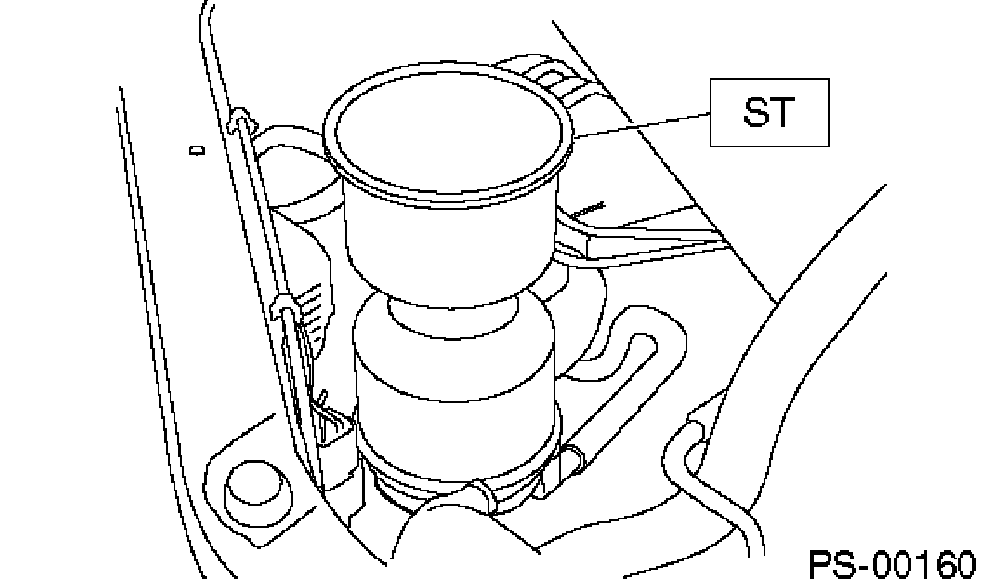
1. Set ST on top of reservoir tank and fill it about halfway with the specified fluid.
ST 34199AE040 OIL CHARGE GUIDE
2. Jack-up vehicle and support it with safety stands, then turn steering wheel with engine stopped.
3. Continue to turn steering wheel slowly from lock to lock until bubbles stop appearing in the tank while keeping the fluid at that level.
4. In case air is absorbed to deliver bubbles into piping because the fluid level is lower, leave it about half an hour and then do the step 2) all over again.
5. Start and idle the engine.
6. Continue to turn steering wheel slowly from lock to lock again until bubbles stop appearing in the tank while keeping the fluid at that level.
It is normal that bubbles stop appearing after three times turning of steering wheel.
7. In case bubbles do not stop appearing in the tank, leave it about half an hour and then do the step 5) all over again.
8. Stop the engine, and take out safety stands after jacking up vehicle again.
Then lower the vehicle, and idle the engine.
9. Continue to turn steering wheel from lock to lock until bubbles stop appearing and change of the fluid level is within 3 mm (0.12 inch).
10. In case the following happens, leave it about half an hour and then do step 8) again.
1. The fluid level changes over 3 mm (0.12 inch).
2. Bubbles remain on the upper surface of the fluid.
3. Grinding noise is generated from oil pump.
11. Check the fluid leakage at flare nuts after turning steering wheel from lock to lock with engine running.
CAUTION: Before checking, wipe off any fluid on flare nuts and piping.
In case the fluid leaks from flare nut, it is caused by dust (or the like) and/or damage between flare and tapered seat in piping.
Remove the flare nut and tighten again it to the specified torque after cleaning flare and tapered seat. If flare or tapered seat is damaged, replace with a new one.
1. Set ST on top of reservoir tank and fill it about halfway with the specified fluid.
ST 34199AE040 OIL CHARGE GUIDE
2. Jack-up vehicle and support it with safety stands, then turn steering wheel with engine stopped.
3. Continue to turn steering wheel slowly from lock to lock until bubbles stop appearing in the tank while keeping the fluid at that level.
4. In case air is absorbed to deliver bubbles into piping because the fluid level is lower, leave it about half an hour and then do the step 2) all over again.
5. Start and idle the engine.
6. Continue to turn steering wheel slowly from lock to lock again until bubbles stop appearing in the tank while keeping the fluid at that level.
It is normal that bubbles stop appearing after three times turning of steering wheel.
7. In case bubbles do not stop appearing in the tank, leave it about half an hour and then do the step 5) all over again.
8. Stop the engine, and take out safety stands after jacking up vehicle again.
Then lower the vehicle, and idle the engine.
9. Continue to turn steering wheel from lock to lock until bubbles stop appearing and change of the fluid level is within 3 mm (0.12 inch).
10. In case the following happens, leave it about half an hour and then do step 8) again.
1. The fluid level changes over 3 mm (0.12 inch).
2. Bubbles remain on the upper surface of the fluid.
3. Grinding noise is generated from oil pump.
11. Check the fluid leakage at flare nuts after turning steering wheel from lock to lock with engine running.
CAUTION: Before checking, wipe off any fluid on flare nuts and piping.
In case the fluid leaks from flare nut, it is caused by dust (or the like) and/or damage between flare and tapered seat in piping.
Remove the flare nut and tighten again it to the specified torque after cleaning flare and tapered seat. If flare or tapered seat is damaged, replace with a new one.
Factory Service Tools
Use the Manual With the Right Hardware
Pair factory procedures with proven DIY tools so the instructions are easier to execute.
Disclosure: Verified tool recommendations may earn an affiliate commission at no cost to you.
When to See a Mechanic
Stop DIY work and contact a certified mechanic immediately if any of the following apply:
- • You smell fuel, burning insulation, or see smoke.
- • Brakes feel soft, pull hard to one side, or make grinding noises.
- • The engine overheats, stalls repeatedly, or misfires under load.
- • You are missing required tools, torque specs, or safe lifting equipment.
- • You are not confident in the next step or safety outcome.