
Safety Warning
DIY auto repair can cause serious injury, fire, or vehicle damage. These guides are for informational purposes only. Always follow OEM torque specs, wear PPE, and consult a certified mechanic if you are unsure. You are solely responsible for your safety.
2003 Subaru Outback F6-3.0LFACTORY OEM SERVICE PROCEDURE
Alignment: Service and Repair
Wheel Alignment
INSPECTION
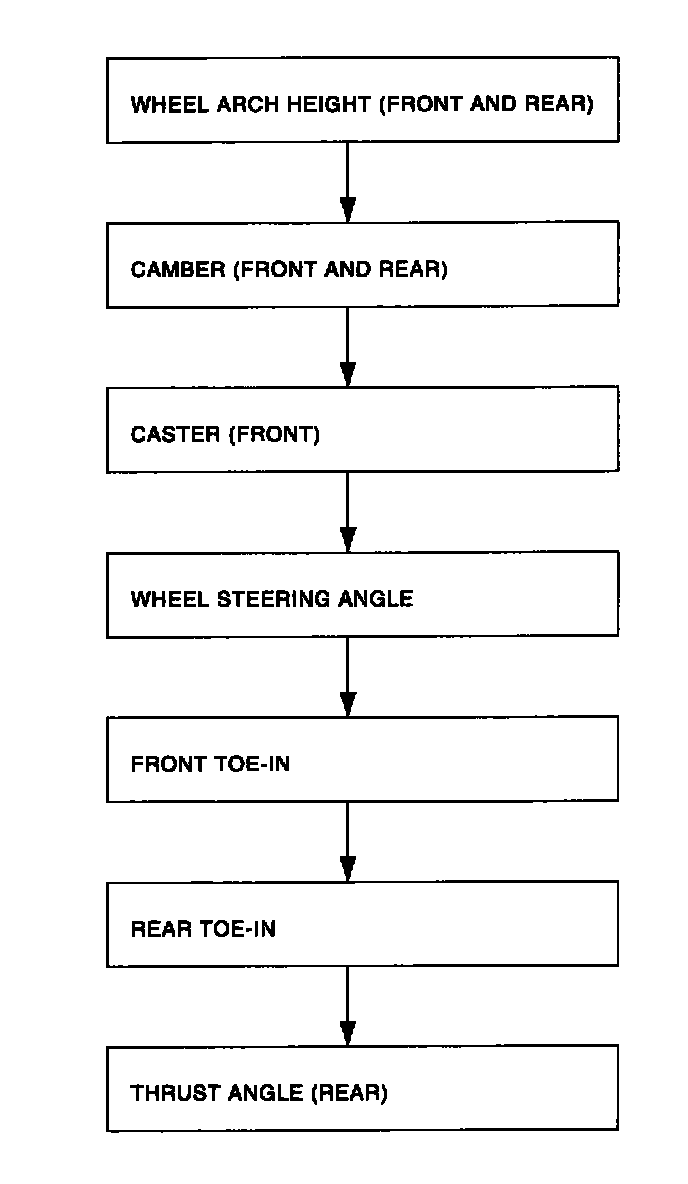
Check the following items before taking wheel alignment measurement.
Check items before taking wheel alignment measurement:
- tire air pressure
- unbalanced right and left tire wear, size difference
- tire run-out
- ball joint excessive play, wear
- tie rod end excessive play, wear
- wheel bearing excessive play
- right and left wheel base imbalance
- steering link part deformed, excessive play
- suspension part deformed, excessive play
Check, adjust and/or measure wheel alignment in accordance with procedures indicated in figure
WHEEL ARCH HEIGHT


1. Set vehicle on a level surface.
2. Set vehicle to "curb weight" conditions. (Empty luggage compartment, install spare tire, jack, service tools, and top up fuel tank.)
3. Set steering wheel in a straight line, then move the vehicle straight ahead more than 5 m (16 ft) to settle the suspension.
4. Suspend thread from wheel arch (point "A" in figure below) to determine a point directly above center of wheel.
5. Measure distance between measuring point "A" and center of wheel.
CAMBER
Inspection
1. Place front wheel on turning radius gauge. Make sure ground contacting surfaces of front and rear wheels are set at the same height.

2. Set ST into the center of the wheel, and then install the wheel alignment gauge.
ST 927380002 ADAPTER
3. Follow the wheel alignment gauge operation manual to measure the camber angle.
NOTE: Refer to the "SPECIFICATIONS" for the camber values.
Front Camber Adjustment
1. Loosen two self-locking nuts located at lower front portion of strut.
CAUTION: When adjusting bolt needs to be loosened or tightened, hold its head with a wrench and turn self-locking nut.
Discard loosened self-locking nut and replace with a new one.
2. Turn camber adjusting bolt so that camber is set at the specification.
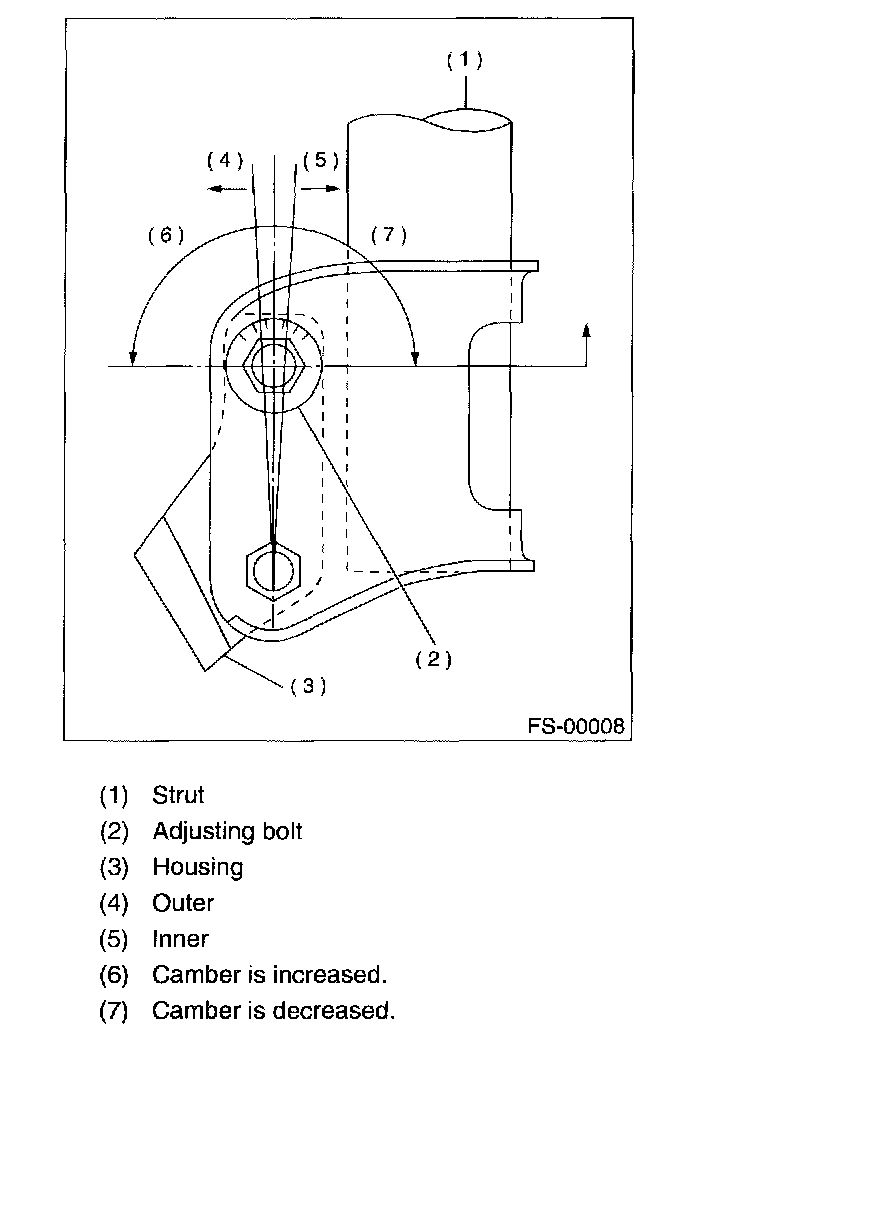
NOTE: Moving the adjusting bolt by one scale graduation changes camber by approximately 0° 10'.

3. Tighten the two self-locking nuts.
Tightening torque:
152 Nm (16 kgf-m, 116 ft. lbs.)
CASTER
Inspection
1. Place front wheel on turning radius gauge. Make sure ground contacting surfaces of front and rear wheels are set at the same height.
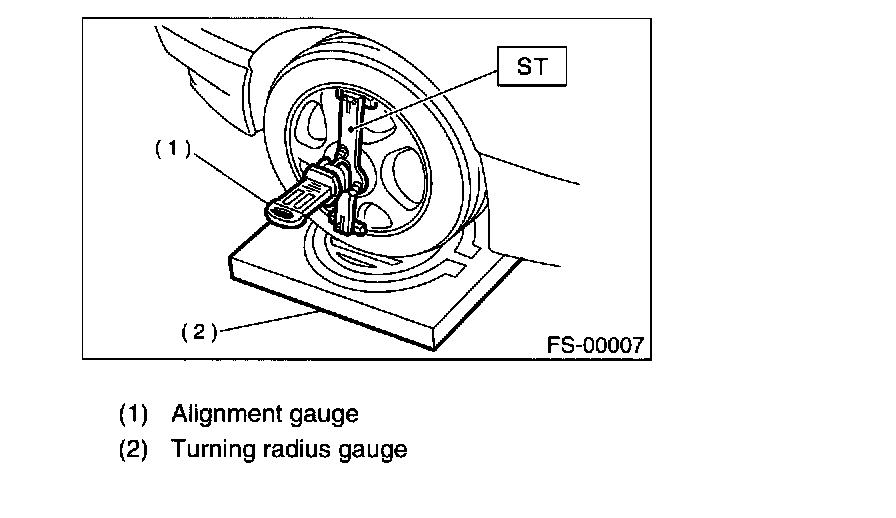
2. Set ST into the center of the wheel, and then install the wheel alignment gauge.
ST 927380002 ADAPTER
3. Follow the wheel alignment gauge operation manual to measure the caster angle.
NOTE: Refer to the "SPECIFICATIONS" for the caster values.

STEERING ANGLE
Inspection
1. Place vehicle on a turning radius gauge.
2. While depressing brake pedal, turn steering wheel fully to the left and right. With steering wheel held at each fully turned position, measure both the inner and outer wheel steering angle.
Adjustment
Turn tie-rod to adjust steering angle of both inner and outer wheels.

CAUTION: Check toe-in.
Correct boot if it is twisted.
FRONT WHEEL TOE-IN
Inspection
1. Using a toe gauge, measure front wheel toe-in.
Toe-in:
0±3 mm (0±0.12 inch)
2. Mark rear sides of left and right tires at height corresponding to center of spindles and measure distance"A" between marks.
3. Move vehicle forward so that marks line up with front sides at height corresponding to center of spindles.
4. Measure distance "B" between left and right marks. Toe-in can then be obtained by the following equation:

Adjustment
1. Loosen the left and right side steering tie-rods lock nuts.

2. Turn the left and right tie rods equal amounts until the toe-in is at the specification. Both the left and right tie-rods are right-hand threaded. To increase toe-in, turn both tie-rods clockwise equal amounts (as viewed from the inside of the vehicle).
3. Tighten tie-rod lock nut.
Tightening torque:
83 Nm (8.5 kgf-m, 61.5 ft. lbs.)
CAUTION: Correct tie-rod boot, if it is twisted.
NOTE: Check the left and right wheel steering angle is within specifications.
REAR WHEEL TOE-IN

Inspection
1. Using a toe-in gauge, measure rear wheel toe in.
Toe-in:
0±3 mm (0±0.12 inch)
2. Mark rear sides of left and right tires at height corresponding to center of spindles and measure distance "A" between marks.
3. Move vehicle forward so that marks line up with front sides at height corresponding to center of spindles.
4. Measure distance "B" between left and right marks. Toe-in can then be obtained by the following equation:
Adjustment
1. Loosen self-locking nut on inner side of link rear.

CAUTION: When loosening or tightening adjusting bolt, hold bolt head and turn self-locking nut.
Discard loosened self-locking nut and replace with a new one.
2. Turn adjusting bolt head until toe-in is at the specification.

NOTE: When left and right wheels are adjusted for toe-in at the same time, the movement of one scale graduation changes toe-in by approximately 3 mm (0.12 inch).
3. Tighten self-locking nut.
Tightening torque: 120 Nm (12.2 kgf-m, 88 ft. lbs.)
THRUST ANGLE
Inspection
1. Position vehicle on a level surface.
2. Move vehicle 3 to 4 meters directly forward.
3. Determine locus of both front and rear axles.
4. Measure distance "L" between center line of location of the axles.

Thrust angle:
Less than 30' when "L" is equal to or less than 23 mm (0.91 inch).
Adjustment
1. Make thrust angle adjustments by turning toe-in adjusting bolts of rear suspension equally in the same direction.
2. When one rear wheel is adjusted in a toe-in direction, adjust the other rear wheel equally in toe-out direction, in order to make thrust angle adjustment.
3. When left and right adjusting bolts are turned incrementally by one graduation in the same direction, the thrust angle will change approximately 10' ["L" is almost equal to 7.5 mm (0.295 inch)].

Thrust angle:
0° ± 30'

NOTE: Thrust angle refers to a mean value of left and right rear wheel toe angles in relation to vehicle body center line. Vehicle is driven straight in the thrust angle direction while swinging in the oblique direction depending on the degree of the mean thrust angle.
Thrust angle: r = (a - B)/2 or: Right rear wheel toe-in angle if: Left rear wheel toe-in angle
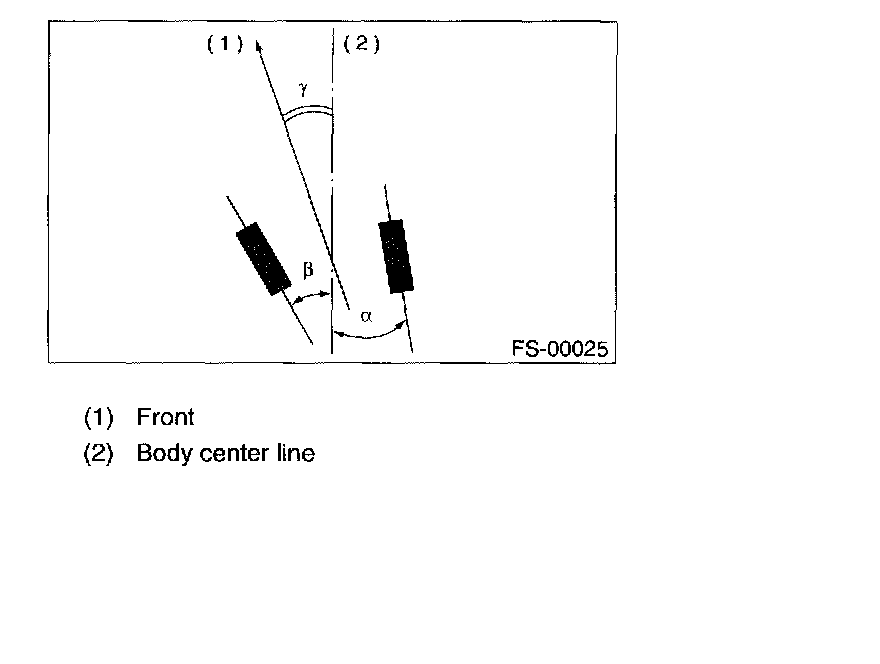
NOTE: Here, use only positive toe-in values from each wheel to substitute for a and B in the equation.
INSPECTION
Check the following items before taking wheel alignment measurement.
Check items before taking wheel alignment measurement:
- tire air pressure
- unbalanced right and left tire wear, size difference
- tire run-out
- ball joint excessive play, wear
- tie rod end excessive play, wear
- wheel bearing excessive play
- right and left wheel base imbalance
- steering link part deformed, excessive play
- suspension part deformed, excessive play
Check, adjust and/or measure wheel alignment in accordance with procedures indicated in figure
WHEEL ARCH HEIGHT
1. Set vehicle on a level surface.
2. Set vehicle to "curb weight" conditions. (Empty luggage compartment, install spare tire, jack, service tools, and top up fuel tank.)
3. Set steering wheel in a straight line, then move the vehicle straight ahead more than 5 m (16 ft) to settle the suspension.
4. Suspend thread from wheel arch (point "A" in figure below) to determine a point directly above center of wheel.
5. Measure distance between measuring point "A" and center of wheel.
CAMBER
Inspection
1. Place front wheel on turning radius gauge. Make sure ground contacting surfaces of front and rear wheels are set at the same height.
2. Set ST into the center of the wheel, and then install the wheel alignment gauge.
ST 927380002 ADAPTER
3. Follow the wheel alignment gauge operation manual to measure the camber angle.
NOTE: Refer to the "SPECIFICATIONS" for the camber values.
Front Camber Adjustment
1. Loosen two self-locking nuts located at lower front portion of strut.
CAUTION: When adjusting bolt needs to be loosened or tightened, hold its head with a wrench and turn self-locking nut.
Discard loosened self-locking nut and replace with a new one.
2. Turn camber adjusting bolt so that camber is set at the specification.
NOTE: Moving the adjusting bolt by one scale graduation changes camber by approximately 0° 10'.
3. Tighten the two self-locking nuts.
Tightening torque:
152 Nm (16 kgf-m, 116 ft. lbs.)
CASTER
Inspection
1. Place front wheel on turning radius gauge. Make sure ground contacting surfaces of front and rear wheels are set at the same height.
2. Set ST into the center of the wheel, and then install the wheel alignment gauge.
ST 927380002 ADAPTER
3. Follow the wheel alignment gauge operation manual to measure the caster angle.
NOTE: Refer to the "SPECIFICATIONS" for the caster values.
Steering Angle:
STEERING ANGLE
Inspection
1. Place vehicle on a turning radius gauge.
2. While depressing brake pedal, turn steering wheel fully to the left and right. With steering wheel held at each fully turned position, measure both the inner and outer wheel steering angle.
Adjustment
Turn tie-rod to adjust steering angle of both inner and outer wheels.
CAUTION: Check toe-in.
Correct boot if it is twisted.
FRONT WHEEL TOE-IN
Inspection
1. Using a toe gauge, measure front wheel toe-in.
Toe-in:
0±3 mm (0±0.12 inch)
2. Mark rear sides of left and right tires at height corresponding to center of spindles and measure distance"A" between marks.
3. Move vehicle forward so that marks line up with front sides at height corresponding to center of spindles.
4. Measure distance "B" between left and right marks. Toe-in can then be obtained by the following equation:
A - B = Toe-in:
Adjustment
1. Loosen the left and right side steering tie-rods lock nuts.
2. Turn the left and right tie rods equal amounts until the toe-in is at the specification. Both the left and right tie-rods are right-hand threaded. To increase toe-in, turn both tie-rods clockwise equal amounts (as viewed from the inside of the vehicle).
3. Tighten tie-rod lock nut.
Tightening torque:
83 Nm (8.5 kgf-m, 61.5 ft. lbs.)
CAUTION: Correct tie-rod boot, if it is twisted.
NOTE: Check the left and right wheel steering angle is within specifications.
REAR WHEEL TOE-IN
A-B=Toe-In:
Inspection
1. Using a toe-in gauge, measure rear wheel toe in.
Toe-in:
0±3 mm (0±0.12 inch)
2. Mark rear sides of left and right tires at height corresponding to center of spindles and measure distance "A" between marks.
3. Move vehicle forward so that marks line up with front sides at height corresponding to center of spindles.
4. Measure distance "B" between left and right marks. Toe-in can then be obtained by the following equation:
Adjustment
1. Loosen self-locking nut on inner side of link rear.
CAUTION: When loosening or tightening adjusting bolt, hold bolt head and turn self-locking nut.
Discard loosened self-locking nut and replace with a new one.
2. Turn adjusting bolt head until toe-in is at the specification.
NOTE: When left and right wheels are adjusted for toe-in at the same time, the movement of one scale graduation changes toe-in by approximately 3 mm (0.12 inch).
3. Tighten self-locking nut.
Tightening torque: 120 Nm (12.2 kgf-m, 88 ft. lbs.)
THRUST ANGLE
Inspection
1. Position vehicle on a level surface.
2. Move vehicle 3 to 4 meters directly forward.
3. Determine locus of both front and rear axles.
4. Measure distance "L" between center line of location of the axles.
Thrust angle:
Less than 30' when "L" is equal to or less than 23 mm (0.91 inch).
Adjustment
1. Make thrust angle adjustments by turning toe-in adjusting bolts of rear suspension equally in the same direction.
2. When one rear wheel is adjusted in a toe-in direction, adjust the other rear wheel equally in toe-out direction, in order to make thrust angle adjustment.
3. When left and right adjusting bolts are turned incrementally by one graduation in the same direction, the thrust angle will change approximately 10' ["L" is almost equal to 7.5 mm (0.295 inch)].
Thrust angle:
0° ± 30'
NOTE: Thrust angle refers to a mean value of left and right rear wheel toe angles in relation to vehicle body center line. Vehicle is driven straight in the thrust angle direction while swinging in the oblique direction depending on the degree of the mean thrust angle.
Thrust angle: r = (a - B)/2 or: Right rear wheel toe-in angle if: Left rear wheel toe-in angle
NOTE: Here, use only positive toe-in values from each wheel to substitute for a and B in the equation.
Factory Service Tools
Use the Manual With the Right Hardware
Pair factory procedures with proven DIY tools so the instructions are easier to execute.
Disclosure: Verified tool recommendations may earn an affiliate commission at no cost to you.
When to See a Mechanic
Stop DIY work and contact a certified mechanic immediately if any of the following apply:
- • You smell fuel, burning insulation, or see smoke.
- • Brakes feel soft, pull hard to one side, or make grinding noises.
- • The engine overheats, stalls repeatedly, or misfires under load.
- • You are missing required tools, torque specs, or safe lifting equipment.
- • You are not confident in the next step or safety outcome.