
Safety Warning
DIY auto repair can cause serious injury, fire, or vehicle damage. These guides are for informational purposes only. Always follow OEM torque specs, wear PPE, and consult a certified mechanic if you are unsure. You are solely responsible for your safety.
2001 Saturn SC1 L4-1.9L SOHC VIN 8FACTORY OEM SERVICE PROCEDURE
3 - Fuel Flow/Pressure Tests
TOOLS REQUIRED
^ SA9127E-7 Fuel Flow/Pressure Test Adapter
CAUTION: DO NOT ALLOW SMOKING OR THE USE OF OPEN FLAMES IN THE AREA WHERE WORK ON THE FUEL SYSTEM IS TAKING PLACE. ANYTIME WORK IS BEING DONE ON THE FUEL SYSTEM, DISCONNECT THE NEGATIVE BATTERY CABLE, EXCEPT FOR THOSE TESTS WHERE BATTERY VOLTAGE IS REQUIRED.
IMPORTANT: Battery must be at a minimum of 12 volts when performing any fuel system test. Charge battery before proceeding if below 12 volts.
1. Remove air induction tube.
2. Relieve fuel system pressure (refer to "Relieving Fuel Pressure").
3. Remove fuel feed line retainer clip attachment screw (10 mm hex).
CAUTION: WHENEVER FUEL LINE FITTINGS ARE LOOSENED OR REMOVED, WRAP A SHOP CLOTH AROUND THE FITTING AND HAVE AN APPROVED CONTAINER AVAILABLE TO COLLECT ANY FUEL.
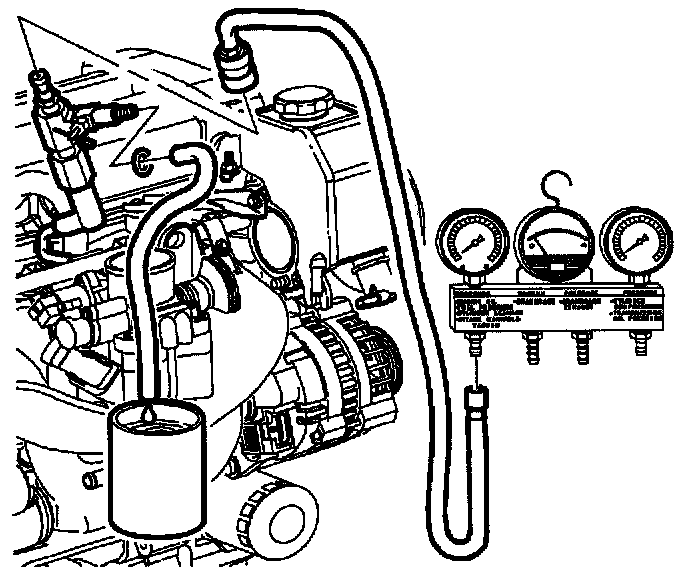
4. Disconnect fuel feed line at fuel rail.
NOTE: To properly utilize the fuel flow/pressure test adapter it must always be connected with the fuel feed line on the "INLET" side of the adapter and the fuel return or drain line connected to the side with the flow control (ON/OFF) valve. If not connected properly, a "zero" pressure reading will always be read. Use the appropriately sized connector fittings to hookup the adapter to the feed and return lines.
5. Connect INLET side of Fuel Flow/Pressure Test Adapter SA9127E-7 into fuel feed line 90° quick connect and make sure fitting is firmly latched.
6. Connect fuel pressure gauge to test adapter.
7. Connect a fuel return hose to quick connect on test adapter and place other end of line into approved container or run return hose back to fuel filler pipe.
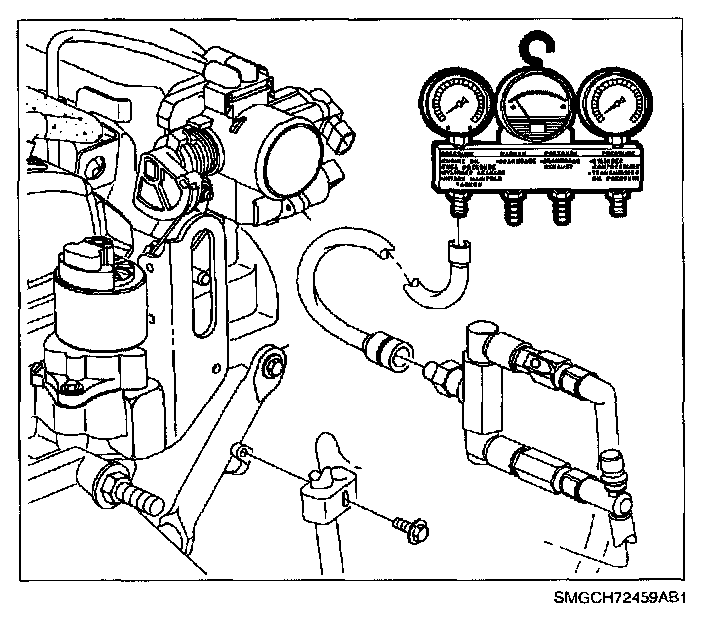
8. Turn ON/OFF valve on test adapter to On.
IMPORTANT: Battery must be at a minimum of 12 volts when performing any fuel system tests.
9. Energize fuel pump (refer to Energizing the Fuel Pump".) for a minimum of 10 seconds.
9.1 Record fuel pressure while fuel pump is energized.
9.2 Repeat this procedure a mini mum of two times.
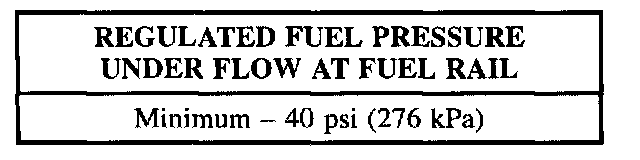
10. Compare pressure recorded to published specification
11. Refer to "Fuel System Diagnosis Fuel Supply Chart" and use test result to make appropriate decision
^ SA9127E-7 Fuel Flow/Pressure Test Adapter
CAUTION: DO NOT ALLOW SMOKING OR THE USE OF OPEN FLAMES IN THE AREA WHERE WORK ON THE FUEL SYSTEM IS TAKING PLACE. ANYTIME WORK IS BEING DONE ON THE FUEL SYSTEM, DISCONNECT THE NEGATIVE BATTERY CABLE, EXCEPT FOR THOSE TESTS WHERE BATTERY VOLTAGE IS REQUIRED.
IMPORTANT: Battery must be at a minimum of 12 volts when performing any fuel system test. Charge battery before proceeding if below 12 volts.
1. Remove air induction tube.
2. Relieve fuel system pressure (refer to "Relieving Fuel Pressure").
3. Remove fuel feed line retainer clip attachment screw (10 mm hex).
CAUTION: WHENEVER FUEL LINE FITTINGS ARE LOOSENED OR REMOVED, WRAP A SHOP CLOTH AROUND THE FITTING AND HAVE AN APPROVED CONTAINER AVAILABLE TO COLLECT ANY FUEL.
4. Disconnect fuel feed line at fuel rail.
NOTE: To properly utilize the fuel flow/pressure test adapter it must always be connected with the fuel feed line on the "INLET" side of the adapter and the fuel return or drain line connected to the side with the flow control (ON/OFF) valve. If not connected properly, a "zero" pressure reading will always be read. Use the appropriately sized connector fittings to hookup the adapter to the feed and return lines.
5. Connect INLET side of Fuel Flow/Pressure Test Adapter SA9127E-7 into fuel feed line 90° quick connect and make sure fitting is firmly latched.
6. Connect fuel pressure gauge to test adapter.
7. Connect a fuel return hose to quick connect on test adapter and place other end of line into approved container or run return hose back to fuel filler pipe.
8. Turn ON/OFF valve on test adapter to On.
IMPORTANT: Battery must be at a minimum of 12 volts when performing any fuel system tests.
9. Energize fuel pump (refer to Energizing the Fuel Pump".) for a minimum of 10 seconds.
9.1 Record fuel pressure while fuel pump is energized.
9.2 Repeat this procedure a mini mum of two times.
10. Compare pressure recorded to published specification
11. Refer to "Fuel System Diagnosis Fuel Supply Chart" and use test result to make appropriate decision
Factory Service Tools
Use the Manual With the Right Hardware
Pair factory procedures with proven DIY tools so the instructions are easier to execute.
Disclosure: Verified tool recommendations may earn an affiliate commission at no cost to you.
When to See a Mechanic
Stop DIY work and contact a certified mechanic immediately if any of the following apply:
- • You smell fuel, burning insulation, or see smoke.
- • Brakes feel soft, pull hard to one side, or make grinding noises.
- • The engine overheats, stalls repeatedly, or misfires under load.
- • You are missing required tools, torque specs, or safe lifting equipment.
- • You are not confident in the next step or safety outcome.
Rather have a pro handle this?
A certified mobile mechanic comes to your home or office. They bring the tools, you stay comfortable. No tow truck, no waiting room, no surprises.
Comes to youSame-day available12-month warranty
Get a Free QuoteNo obligation. See pricing before you book.