
Safety Warning
DIY auto repair can cause serious injury, fire, or vehicle damage. These guides are for informational purposes only. Always follow OEM torque specs, wear PPE, and consult a certified mechanic if you are unsure. You are solely responsible for your safety.
1999 Saturn SC2 L4-1.9L DOHC VIN 7FACTORY OEM SERVICE PROCEDURE
Left Hand Drive
NOTE: Record preset radio stations and clock time. Disconnect negative battery cable.
REMOVAL
1. Remove I/P upper trim panel outer cover fillers by carefully lifting up at clip locations, starting at the rear above end cap.
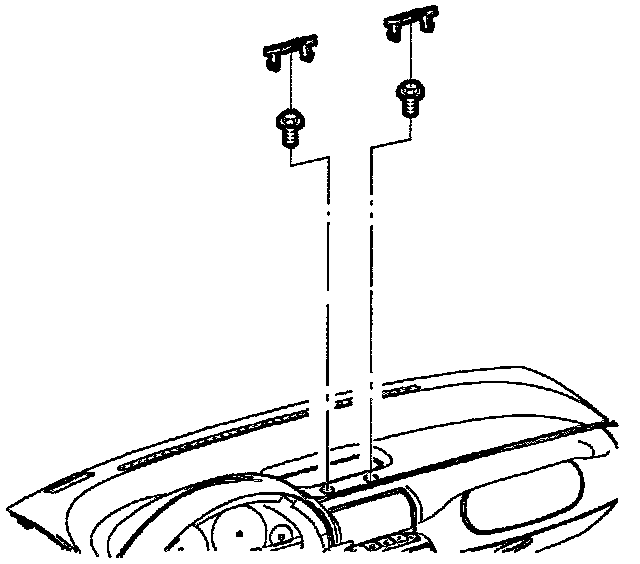
2. Remove I/P bolt caps by carefully prying with a small flat head screwdriver.
3. Remove I/P upper trim panel screws.
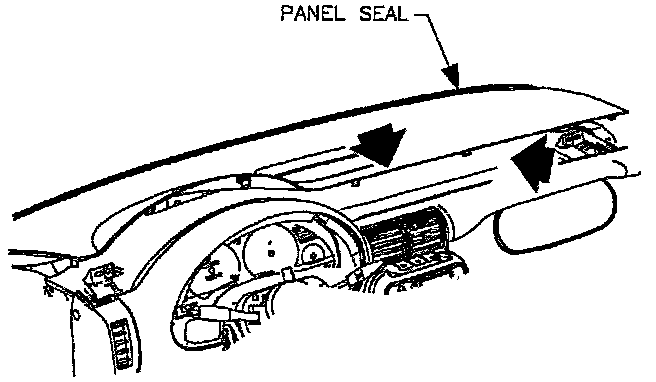
4. Lift I/P upper trim panel at clip locations on rear edge to disengage clips.
5. Pull I/P upper trim panel rearward out of clips at bottom of windshield.
NOTE:
^ Be careful, when removing or replacing I/P upper trim panel, not to damage VIN plate.
^ Be careful, when removing upper trim panel, not to damage the upper trim panel seal (SL/SW only).
6. Remove I/P upper trim panel.
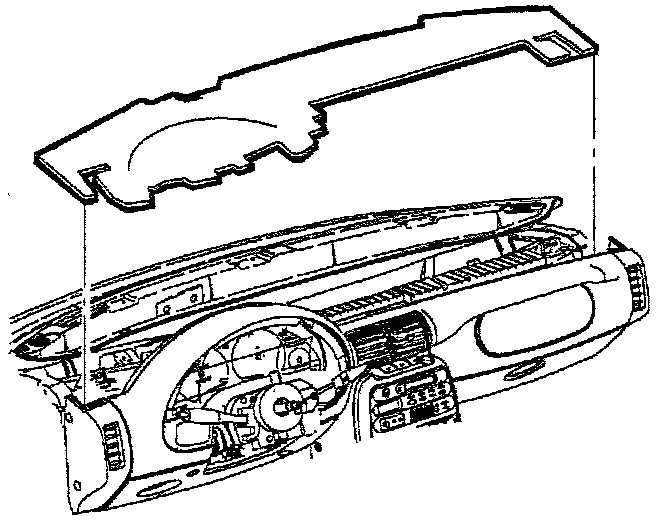
7. Remove I/P upper trim pad sound insulator.
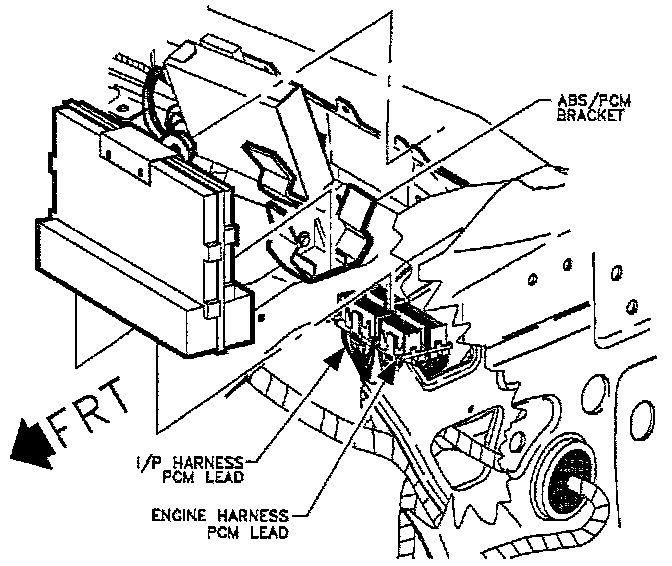
8. Disconnect PCM electrical connector from under instrument panel.
NOTE: Do not pull on the connectors or wires to remove the PCM. This could back out a terminal and cause an intermittent connection.
9. Loosen PCM attachment out at cross car beam and lift PCM upward (towards windshield) to disengage PCM from ABS/PCM bracket.
INSTALLATION
1. Lower PCM into ABS/PCM bracket while guiding attachment stud into slot in cross car beam.
NOTE: Torque is critical to preserve the integrity of the plastic insulator on the PCM case. Damage to the PCM can result from over torque of the nut.
2. Install and torque nut.
Torque: 10 NM (89 in.lbs.)
3. Install PCM connectors.
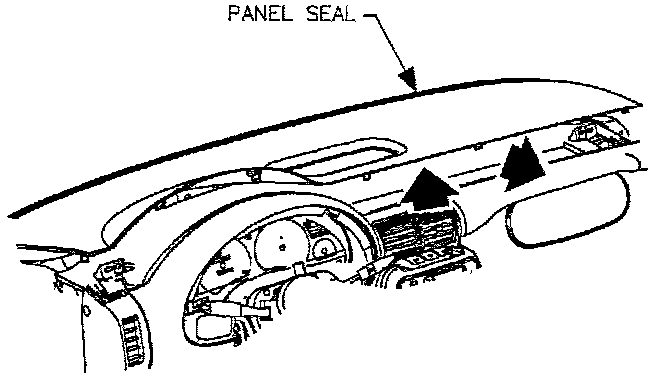
4. Install I/P upper trim pad sound insulator.
NOTE:
^ Make sure to tuck in all flaps.
^ Be sure I/P upper trim panel seal is correctly seated on forward edge before installing upper trim panel.
^ Be careful when removing or replacing upper trim panel, not to damage VIN plate.
5. Install I/P upper trim panel into clips at base of windshield.
6. Lower I/P upper trim panel, making sure I/P upper trim panel alignment tabs interlock with windshield garnish slots.
7. Push down at clip locations to secure.
8. Install I/P upper trim panel screws.
9. Install I/P bolt cap.
WARNING: The PCM may be damaged if the reprogramming process is interrupted during download procedures. Verify the PDT (Scan Tool) cable connections are secure and power to the PCM is not interupted. Make sure the vehicle battery has sufficient charge and the original PCM in the vehicle has the correct VIN and options prior to reprogramming the replacement PCM. Make sure both the PDT and service stall system are of equal levels of software prior to reprogramming. Refer to equipment operation manual.
10. Reprogram PCM.
11. Verify operation. If diagnostic trouble codes (DTCs) are present, refer to the specific code chart.
IMPORTANT: Following PCM replacement, the SERVICE telltale will flash. This is a normal function of the PCM. When a service replacement PCM is installed and properly programmed, the PCM will learn the crankshaft notches for misfire diagnosis. This procedure flashes the SERVICE telltale. (Refer to "CKP Variation Learn Procedure".)
Testing and Inspection
REMOVAL
1. Remove I/P upper trim panel outer cover fillers by carefully lifting up at clip locations, starting at the rear above end cap.
I/P Retaining Bolt Caps:
2. Remove I/P bolt caps by carefully prying with a small flat head screwdriver.
3. Remove I/P upper trim panel screws.
Upper Trim Panel Removal:
4. Lift I/P upper trim panel at clip locations on rear edge to disengage clips.
5. Pull I/P upper trim panel rearward out of clips at bottom of windshield.
NOTE:
^ Be careful, when removing or replacing I/P upper trim panel, not to damage VIN plate.
^ Be careful, when removing upper trim panel, not to damage the upper trim panel seal (SL/SW only).
6. Remove I/P upper trim panel.
I/P Upper Trim Panel:
7. Remove I/P upper trim pad sound insulator.
PCM Mounting:
8. Disconnect PCM electrical connector from under instrument panel.
NOTE: Do not pull on the connectors or wires to remove the PCM. This could back out a terminal and cause an intermittent connection.
9. Loosen PCM attachment out at cross car beam and lift PCM upward (towards windshield) to disengage PCM from ABS/PCM bracket.
INSTALLATION
1. Lower PCM into ABS/PCM bracket while guiding attachment stud into slot in cross car beam.
NOTE: Torque is critical to preserve the integrity of the plastic insulator on the PCM case. Damage to the PCM can result from over torque of the nut.
2. Install and torque nut.
Torque: 10 NM (89 in.lbs.)
3. Install PCM connectors.
I/P Upper Trim Panel Installation:
4. Install I/P upper trim pad sound insulator.
NOTE:
^ Make sure to tuck in all flaps.
^ Be sure I/P upper trim panel seal is correctly seated on forward edge before installing upper trim panel.
^ Be careful when removing or replacing upper trim panel, not to damage VIN plate.
5. Install I/P upper trim panel into clips at base of windshield.
6. Lower I/P upper trim panel, making sure I/P upper trim panel alignment tabs interlock with windshield garnish slots.
7. Push down at clip locations to secure.
8. Install I/P upper trim panel screws.
9. Install I/P bolt cap.
WARNING: The PCM may be damaged if the reprogramming process is interrupted during download procedures. Verify the PDT (Scan Tool) cable connections are secure and power to the PCM is not interupted. Make sure the vehicle battery has sufficient charge and the original PCM in the vehicle has the correct VIN and options prior to reprogramming the replacement PCM. Make sure both the PDT and service stall system are of equal levels of software prior to reprogramming. Refer to equipment operation manual.
I/P Retaining Bolt Caps:
10. Reprogram PCM.
11. Verify operation. If diagnostic trouble codes (DTCs) are present, refer to the specific code chart.
IMPORTANT: Following PCM replacement, the SERVICE telltale will flash. This is a normal function of the PCM. When a service replacement PCM is installed and properly programmed, the PCM will learn the crankshaft notches for misfire diagnosis. This procedure flashes the SERVICE telltale. (Refer to "CKP Variation Learn Procedure".)
Testing and Inspection
Factory Service Tools
Use the Manual With the Right Hardware
Pair factory procedures with proven DIY tools so the instructions are easier to execute.
Disclosure: Verified tool recommendations may earn an affiliate commission at no cost to you.
When to See a Mechanic
Stop DIY work and contact a certified mechanic immediately if any of the following apply:
- • You smell fuel, burning insulation, or see smoke.
- • Brakes feel soft, pull hard to one side, or make grinding noises.
- • The engine overheats, stalls repeatedly, or misfires under load.
- • You are missing required tools, torque specs, or safe lifting equipment.
- • You are not confident in the next step or safety outcome.
Rather have a pro handle this?
A certified mobile mechanic comes to your home or office. They bring the tools, you stay comfortable. No tow truck, no waiting room, no surprises.
Comes to youSame-day available12-month warranty
Get a Free QuoteNo obligation. See pricing before you book.