
Safety Warning
DIY auto repair can cause serious injury, fire, or vehicle damage. These guides are for informational purposes only. Always follow OEM torque specs, wear PPE, and consult a certified mechanic if you are unsure. You are solely responsible for your safety.
2000 Pontiac Sunfire L4-2.2L VIN 4FACTORY OEM SERVICE PROCEDURE
Powertrain Control Module (PCM) Replacement
NOTE: In order to prevent internal damage to the PCM, the ignition must be OFF when disconnecting or reconnecting the PCM connector.
Service of the PCM should normally consist of either replacement of the PCM or EEPROM re-programming.
If the diagnostic procedures call for the PCM to be replaced, the PCM should be checked first to see if it is the correct part. DTC P0601 indicates the EEPROM programming has malfunctioned. When DTC P0601 is obtained, re-program the EEPROM.
NOTE: In order to prevent internal damage to the PCM, the ignition must be OFF when disconnecting or reconnecting the PCM connector. The ignition should be OFF for at least 10 seconds before disconnecting power to the PCM so the IAC valve has time to move to the engine OFF position.
REMOVAL PROCEDURE
IMPORTANT: Turn the ignition switch OFF to prevent internal PCM damage when disconnecting or reconnecting power to the PCM (for example, battery cable, PCM pigtail, PCM fuse, jumper cables, etc.). The ignition switch should be OFF for at least 10 seconds before disconnecting the power to the PCM so the IAC valve has time to move to the engine OFF position.
CAUTION: Refer to Battery Disconnect Caution in Service Precautions.
1. Disconnect the negative battery cable.
CAUTION: Refer to Vehicle Lifting Caution in Service Precautions.
2. Lift the vehicle Refer to Lifting and Jacking the Vehicle in General Information.
3. Remove the RH engine splash shield.
4. Disconnect the horn electrical connector.
5. Remove the horn attaching bolt and the horn.
NOTE: Do not touch the PCM connector pins or soldered components on the circuit board in order to prevent possible Electrostatic Discharge (ESD) damage. Do not remove the integrated circuit boards from the carrier.
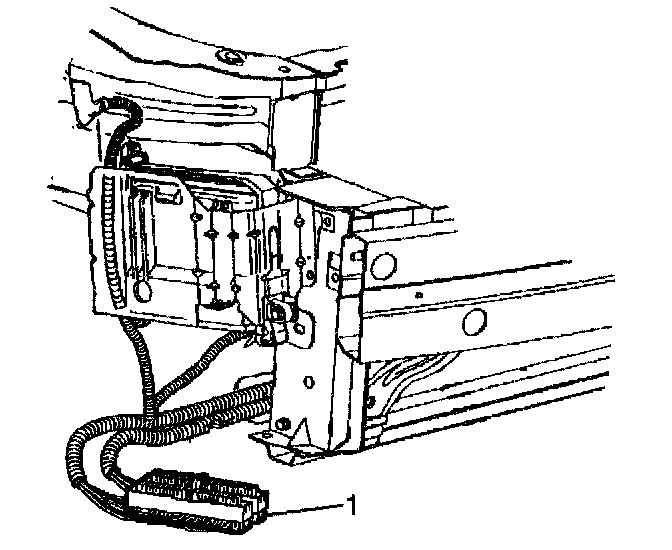
6. Disconnect the PCM electrical connectors (1).
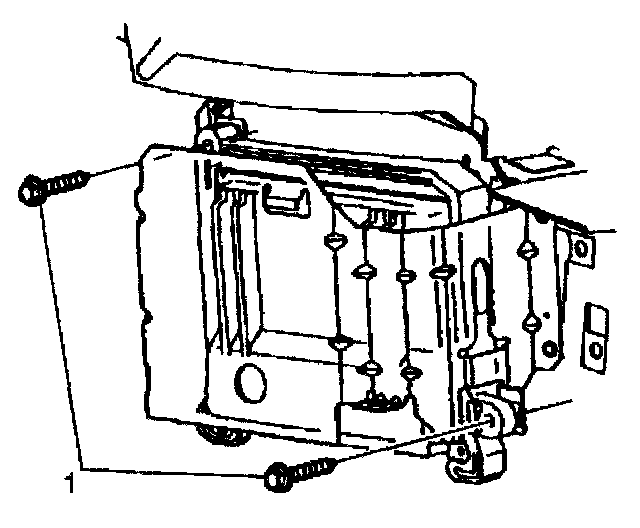
7. Remove the PCM retainer attaching bolts (1).
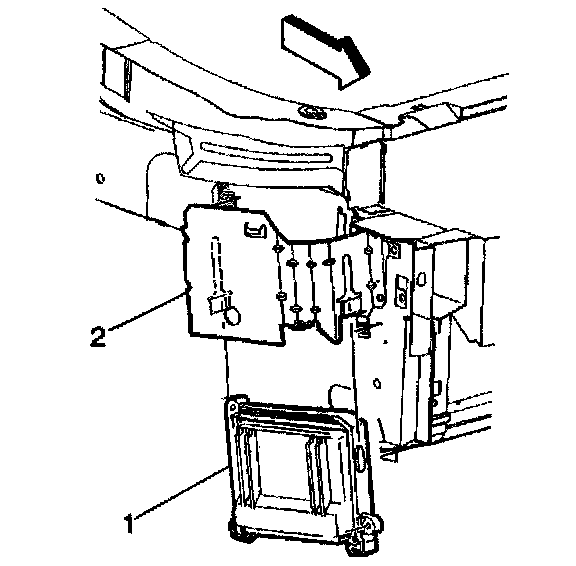
8. Slide the PCM and the retainer (1) from the PCM bracket (2).
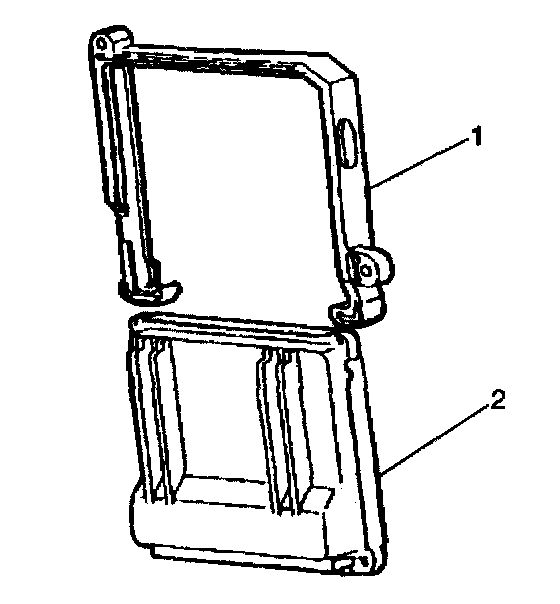
9. Remove the retainer (1) from the PCM (2).
INSTALLATION PROCEDURE
Remove the replacement PCM from its packaging and check the service number to make sure it is the same number or updated number as the malfunctioning PCM.
1. Slide the PCM (2) into the PCM retainer (1).
2. Slide the PCM and the retainer (1) into the PCM bracket (2) slots.
NOTE: Refer to Fastener Notice in Service Precautions.
3. Install the PCM retainer attaching bolts (1).
Tighten
Tighten the PCM retainer attaching bolts to 8-12 N.m (6-9 lb ft).
NOTE: Do not touch the PCM connector pins or soldered components on the circuit board in order to prevent possible Electrostatic Discharge (ESD) Damage. Do not remove the integrated circuit boards from the carrier.
4. Connect the PCM electrical connectors (1).
5. Install the horn and the horn attaching bolt.
6. Connect the horn electrical connector.
7. Install the RH engine splash shield.
CAUTION: Refer to Vehicle Lifting Caution in Service Precautions.
8. Lower the vehicle.
9. Connect the negative battery cable.
10. Reprogram the PCM and perform the Crankshaft Position System Variation Learning Procedure. Programming and Relearning
Service of the PCM should normally consist of either replacement of the PCM or EEPROM re-programming.
If the diagnostic procedures call for the PCM to be replaced, the PCM should be checked first to see if it is the correct part. DTC P0601 indicates the EEPROM programming has malfunctioned. When DTC P0601 is obtained, re-program the EEPROM.
NOTE: In order to prevent internal damage to the PCM, the ignition must be OFF when disconnecting or reconnecting the PCM connector. The ignition should be OFF for at least 10 seconds before disconnecting power to the PCM so the IAC valve has time to move to the engine OFF position.
REMOVAL PROCEDURE
IMPORTANT: Turn the ignition switch OFF to prevent internal PCM damage when disconnecting or reconnecting power to the PCM (for example, battery cable, PCM pigtail, PCM fuse, jumper cables, etc.). The ignition switch should be OFF for at least 10 seconds before disconnecting the power to the PCM so the IAC valve has time to move to the engine OFF position.
CAUTION: Refer to Battery Disconnect Caution in Service Precautions.
1. Disconnect the negative battery cable.
CAUTION: Refer to Vehicle Lifting Caution in Service Precautions.
2. Lift the vehicle Refer to Lifting and Jacking the Vehicle in General Information.
3. Remove the RH engine splash shield.
4. Disconnect the horn electrical connector.
5. Remove the horn attaching bolt and the horn.
NOTE: Do not touch the PCM connector pins or soldered components on the circuit board in order to prevent possible Electrostatic Discharge (ESD) damage. Do not remove the integrated circuit boards from the carrier.
6. Disconnect the PCM electrical connectors (1).
7. Remove the PCM retainer attaching bolts (1).
8. Slide the PCM and the retainer (1) from the PCM bracket (2).
9. Remove the retainer (1) from the PCM (2).
INSTALLATION PROCEDURE
Remove the replacement PCM from its packaging and check the service number to make sure it is the same number or updated number as the malfunctioning PCM.
1. Slide the PCM (2) into the PCM retainer (1).
2. Slide the PCM and the retainer (1) into the PCM bracket (2) slots.
NOTE: Refer to Fastener Notice in Service Precautions.
3. Install the PCM retainer attaching bolts (1).
Tighten
Tighten the PCM retainer attaching bolts to 8-12 N.m (6-9 lb ft).
NOTE: Do not touch the PCM connector pins or soldered components on the circuit board in order to prevent possible Electrostatic Discharge (ESD) Damage. Do not remove the integrated circuit boards from the carrier.
4. Connect the PCM electrical connectors (1).
5. Install the horn and the horn attaching bolt.
6. Connect the horn electrical connector.
7. Install the RH engine splash shield.
CAUTION: Refer to Vehicle Lifting Caution in Service Precautions.
8. Lower the vehicle.
9. Connect the negative battery cable.
10. Reprogram the PCM and perform the Crankshaft Position System Variation Learning Procedure. Programming and Relearning
Factory Service Tools
Use the Manual With the Right Hardware
Pair factory procedures with proven DIY tools so the instructions are easier to execute.
Disclosure: Verified tool recommendations may earn an affiliate commission at no cost to you.
When to See a Mechanic
Stop DIY work and contact a certified mechanic immediately if any of the following apply:
- • You smell fuel, burning insulation, or see smoke.
- • Brakes feel soft, pull hard to one side, or make grinding noises.
- • The engine overheats, stalls repeatedly, or misfires under load.
- • You are missing required tools, torque specs, or safe lifting equipment.
- • You are not confident in the next step or safety outcome.