
Safety Warning
DIY auto repair can cause serious injury, fire, or vehicle damage. These guides are for informational purposes only. Always follow OEM torque specs, wear PPE, and consult a certified mechanic if you are unsure. You are solely responsible for your safety.
2002 Nissan-Datsun Sentra SE-R L4-2.5L (QR25DE)FACTORY OEM SERVICE PROCEDURE
Front
FRONT WHEEL ALIGNMENT
Before checking front wheel alignment, be sure to make a preliminary inspection (unladen*).
*: Fuel, radiator coolant and engine oil full. Spare tire, jack, hand tools and mats in designated positions.
Preliminary Inspection
1. Check tires for wear and improper inflation.
2. Check wheels for deformation, cracks and other damage. If deformed, remove wheel and check wheel runout.
a. Remove tire from wheel and mount wheel on a tire balance machine.

b. Set dial indicator as shown in the illustration.
Wheel runout (Dial indicator value):
Refer to Specifications.
3. Check front wheel bearings for looseness.
4. Check front suspension for looseness.
5. Check steering linkage for looseness.
6. Check that front shock absorbers work properly.
7. Check vehicle wheelarch height (unladen*).
*: Fuel, radiator coolant and engine oil full. Spare tire, jack, hand tools and mats in designated positions.
Camber, Caster and Kingpin Inclination
Camber, caster and kingpin inclination are preset at factory and cannot be adjusted.

1. Measure camber, caster and kingpin inclination of both right and left wheels with a suitable alignment gauge.
Camber, caster and kingpin inclination:
Refer to Specifications.
2. If camber, caster or kingpin inclination is not within specification, inspect front suspension parts. Replace damaged or worn out parts.
Toe-in
Measure toe-in using the following procedure.

WARNINGS
- Always perform the following procedure on a flat surface.
- Make sure that no person is in front of the vehicle before pushing it.
1. Bounce front of vehicle up and down to stabilize the posture.
2. Push the vehicle straight ahead about 5 m (16 ft.).
3. Put a mark on base line of tread (rear side of both tires at the same height as hub center. These are measuring points.

4. Measure distance "A" (rear side).
5. Push the vehicle slowly ahead to rotate the wheels 180 degrees (1/2 turn).
If the wheels have rotated more than 180 degrees (1/2 turn), try the above procedure again from the beginning. Never push vehicle backward.
6. Measure distance "B" (front side).
Total toe-in:
Refer to Tie Rod; Specifications.
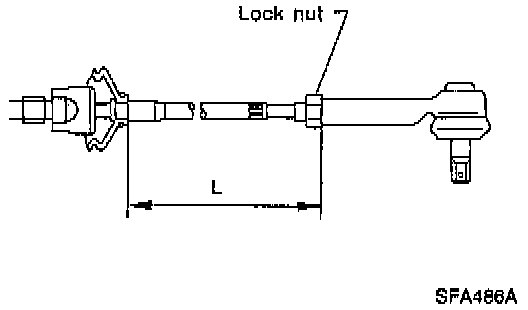
7. Adjust toe-in by varying the length of steering tie-rods.
a. Loosen lock nuts.
b. Adjust toe-in by screwing tie-rods in and out.
Standard length "L".
Refer to Tie Rod; Specifications.
c. Tighten lock nuts to specified torque.
Lock nut tightening torque:
Refer to Tie Rod; Specifications.
Front Wheel Turning Angle
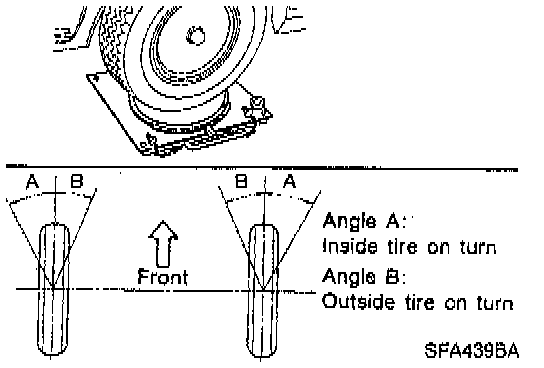
1. Set wheels in straight-ahead position. Then move vehicle forward until front wheels rest on turning radius gauge properly.
2. Rotate steering wheel all the way right and left; measure turning angle.
Do not hold the steering wheel on full lock for more than 15 seconds.
Wheel turning angle (Full turn):
Refer to Specifications.
Before checking front wheel alignment, be sure to make a preliminary inspection (unladen*).
*: Fuel, radiator coolant and engine oil full. Spare tire, jack, hand tools and mats in designated positions.
Preliminary Inspection
1. Check tires for wear and improper inflation.
2. Check wheels for deformation, cracks and other damage. If deformed, remove wheel and check wheel runout.
a. Remove tire from wheel and mount wheel on a tire balance machine.
b. Set dial indicator as shown in the illustration.
Wheel runout (Dial indicator value):
Refer to Specifications.
3. Check front wheel bearings for looseness.
4. Check front suspension for looseness.
5. Check steering linkage for looseness.
6. Check that front shock absorbers work properly.
7. Check vehicle wheelarch height (unladen*).
*: Fuel, radiator coolant and engine oil full. Spare tire, jack, hand tools and mats in designated positions.
Camber, Caster and Kingpin Inclination
Camber, caster and kingpin inclination are preset at factory and cannot be adjusted.
1. Measure camber, caster and kingpin inclination of both right and left wheels with a suitable alignment gauge.
Camber, caster and kingpin inclination:
Refer to Specifications.
2. If camber, caster or kingpin inclination is not within specification, inspect front suspension parts. Replace damaged or worn out parts.
Toe-in
Measure toe-in using the following procedure.
WARNINGS
- Always perform the following procedure on a flat surface.
- Make sure that no person is in front of the vehicle before pushing it.
1. Bounce front of vehicle up and down to stabilize the posture.
2. Push the vehicle straight ahead about 5 m (16 ft.).
3. Put a mark on base line of tread (rear side of both tires at the same height as hub center. These are measuring points.
4. Measure distance "A" (rear side).
5. Push the vehicle slowly ahead to rotate the wheels 180 degrees (1/2 turn).
If the wheels have rotated more than 180 degrees (1/2 turn), try the above procedure again from the beginning. Never push vehicle backward.
6. Measure distance "B" (front side).
Total toe-in:
Refer to Tie Rod; Specifications.
7. Adjust toe-in by varying the length of steering tie-rods.
a. Loosen lock nuts.
b. Adjust toe-in by screwing tie-rods in and out.
Standard length "L".
Refer to Tie Rod; Specifications.
c. Tighten lock nuts to specified torque.
Lock nut tightening torque:
Refer to Tie Rod; Specifications.
Front Wheel Turning Angle
1. Set wheels in straight-ahead position. Then move vehicle forward until front wheels rest on turning radius gauge properly.
2. Rotate steering wheel all the way right and left; measure turning angle.
Do not hold the steering wheel on full lock for more than 15 seconds.
Wheel turning angle (Full turn):
Refer to Specifications.
Factory Service Tools
Use the Manual With the Right Hardware
Pair factory procedures with proven DIY tools so the instructions are easier to execute.
Disclosure: Verified tool recommendations may earn an affiliate commission at no cost to you.
When to See a Mechanic
Stop DIY work and contact a certified mechanic immediately if any of the following apply:
- • You smell fuel, burning insulation, or see smoke.
- • Brakes feel soft, pull hard to one side, or make grinding noises.
- • The engine overheats, stalls repeatedly, or misfires under load.
- • You are missing required tools, torque specs, or safe lifting equipment.
- • You are not confident in the next step or safety outcome.