
Safety Warning
DIY auto repair can cause serious injury, fire, or vehicle damage. These guides are for informational purposes only. Always follow OEM torque specs, wear PPE, and consult a certified mechanic if you are unsure. You are solely responsible for your safety.
2012 Mazda 5 L4-2.5LFACTORY OEM SERVICE PROCEDURE
Clutch Fluid: Service and Repair
CLUTCH FLUID REPLACEMENT/AIR BLEEDING [G66M-R]
CAUTION:
- Do not allow clutch fluid get on a painted surface. Clutch fluid contains properties which can dissolve the paint. If clutch fluid gets on a painted surface, wash it off with water immediately and wipe the area off completely.
- Do not mix different types of clutch fluid, otherwise the clutch may not operate normally.
- Do not reuse old clutch fluid, otherwise the clutch may not operate normally.
NOTE:
- A common reserve tank is used for the clutch system and brake system.
1. Remove the aerodynamic under cover. Service and Repair
2. Drain the clutch fluid from bleeder plug.
3. Add new clutch fluid to the MAX mark of the reserve tank.
Clutch fluid
- SAE J1703 or FMVSS116 DOT-3
4. Bleed the air from the clutch system.
CAUTION:
- Keep the clutch fluid level in the reserve tank at 3/4 full or more during air bleeding.
a. Connect a vinyl tube to the bleeder plug.
b. Place the other end of the vinyl tube in a clear container, and fill clutch fluid in the container during air bleeding.
c. Working with two people, one should depress the clutch pedal a few times and then depress and hold the pedal down. If the clutch pedal does not return to its original position, pull the clutch pedal outward.
d. While the clutch pedal is being held down, the other person should loosen the bleeder screw using the commercially available flare nut wrench, and bleed any clutch fluid containing air bubbles. Once completed, tighten the bleeder screw.
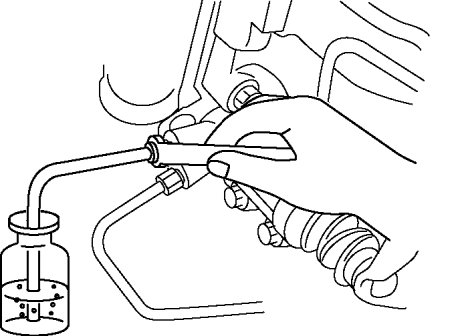
e. Continue to perform air bleeding (Steps (3) - (4)) until no air comes from the vinyl tube.
f. Tighten the bleeder screw using the commercially available flare nut wrench.
Tightening torque
- 5.9-8.8 Nm {61-89 kgf-cm, 53-77 in-lbf}
g. Fill the reserve tank to MAX mark with the clutch fluid.
Clutch fluid
- SAE J1703 or FMVSS116 DOT-3
5. Install the aerodynamic under cover. Service and Repair
Factory Service Tools
Use the Manual With the Right Hardware
Pair factory procedures with proven DIY tools so the instructions are easier to execute.
Disclosure: Verified tool recommendations may earn an affiliate commission at no cost to you.
When to See a Mechanic
Stop DIY work and contact a certified mechanic immediately if any of the following apply:
- • You smell fuel, burning insulation, or see smoke.
- • Brakes feel soft, pull hard to one side, or make grinding noises.
- • The engine overheats, stalls repeatedly, or misfires under load.
- • You are missing required tools, torque specs, or safe lifting equipment.
- • You are not confident in the next step or safety outcome.