
Safety Warning
DIY auto repair can cause serious injury, fire, or vehicle damage. These guides are for informational purposes only. Always follow OEM torque specs, wear PPE, and consult a certified mechanic if you are unsure. You are solely responsible for your safety.
2010 Mazda 6 L4-2.5LFACTORY OEM SERVICE PROCEDURE
Body Control Module: Application and ID
Distinguishing between Type A and B in Wiring Diagram
Verify the BCM part number (first 4 digits), and distinguish between Type A and B.
- Type A : GS3L or GS3M
- Type B : GEA1 or GEA2
Procedure for verifying BCM part number using M-MDS
1. Connect the M-MDS to the DLC 2.

2. After the vehicle is identified, select the following items from the initialization screen of the M-MDS.
- When using the IDS (laptop PC)
1. Select "DataLogger".
2. Select "Modules".
3. Select "BCM/GEM".
- When using the PDS (Pocket PC)
1. Select "Module Tests".
2. Select "BCM/GEM".
3. Select "DataLogger".
3. Select the PART#_PFX
4. Verify the PID data according to the directions on the screen.
Procedure for verifying BCM part number without using M-MDS
1. Remove the front scuff plate (driver-side).
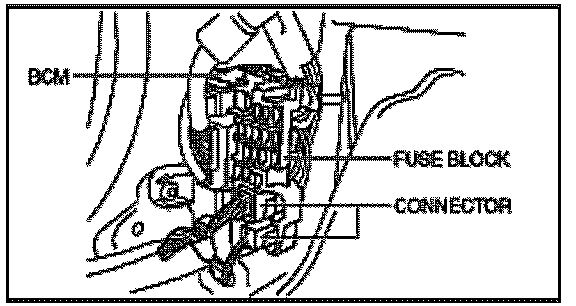
2. Remove the front side trim (driver-side).
3. Disconnect the connector at the position shown in the figure.
4. Remove tab A as shown in the figure,pull the fuse block in the direction of the arrow (1), and remove tab B.

5. Remove the fuse block.
6. Verify the part number indicated on the label on the BCM.

Verify the BCM part number (first 4 digits), and distinguish between Type A and B.
- Type A : GS3L or GS3M
- Type B : GEA1 or GEA2
Procedure for verifying BCM part number using M-MDS
1. Connect the M-MDS to the DLC 2.
2. After the vehicle is identified, select the following items from the initialization screen of the M-MDS.
- When using the IDS (laptop PC)
1. Select "DataLogger".
2. Select "Modules".
3. Select "BCM/GEM".
- When using the PDS (Pocket PC)
1. Select "Module Tests".
2. Select "BCM/GEM".
3. Select "DataLogger".
3. Select the PART#_PFX
4. Verify the PID data according to the directions on the screen.
Procedure for verifying BCM part number without using M-MDS
1. Remove the front scuff plate (driver-side).
2. Remove the front side trim (driver-side).
3. Disconnect the connector at the position shown in the figure.
4. Remove tab A as shown in the figure,pull the fuse block in the direction of the arrow (1), and remove tab B.
5. Remove the fuse block.
6. Verify the part number indicated on the label on the BCM.
Factory Service Tools
Use the Manual With the Right Hardware
Pair factory procedures with proven DIY tools so the instructions are easier to execute.
Disclosure: Verified tool recommendations may earn an affiliate commission at no cost to you.
When to See a Mechanic
Stop DIY work and contact a certified mechanic immediately if any of the following apply:
- • You smell fuel, burning insulation, or see smoke.
- • Brakes feel soft, pull hard to one side, or make grinding noises.
- • The engine overheats, stalls repeatedly, or misfires under load.
- • You are missing required tools, torque specs, or safe lifting equipment.
- • You are not confident in the next step or safety outcome.