
Safety Warning
DIY auto repair can cause serious injury, fire, or vehicle damage. These guides are for informational purposes only. Always follow OEM torque specs, wear PPE, and consult a certified mechanic if you are unsure. You are solely responsible for your safety.
2009 Mazda RX8 2RTR-1.3LFACTORY OEM SERVICE PROCEDURE
PCM Inspection
PCM INSPECTION [13B-MSP]
Without Using the SST
CAUTION:
- The PCM terminal voltages vary with change in measuring conditions and vehicle conditions. Always carry out a total inspection of the input systems, output systems, and PCM to determine the cause of trouble. Otherwise, a wrong diagnosis will be made.
1. Measure the voltage at each terminal.
- If any incorrect voltage is detected, inspect the related system(s), wiring harnesses and connector(s) referring to the Action column in the terminal voltage table.
Terminal voltage table (Reference)
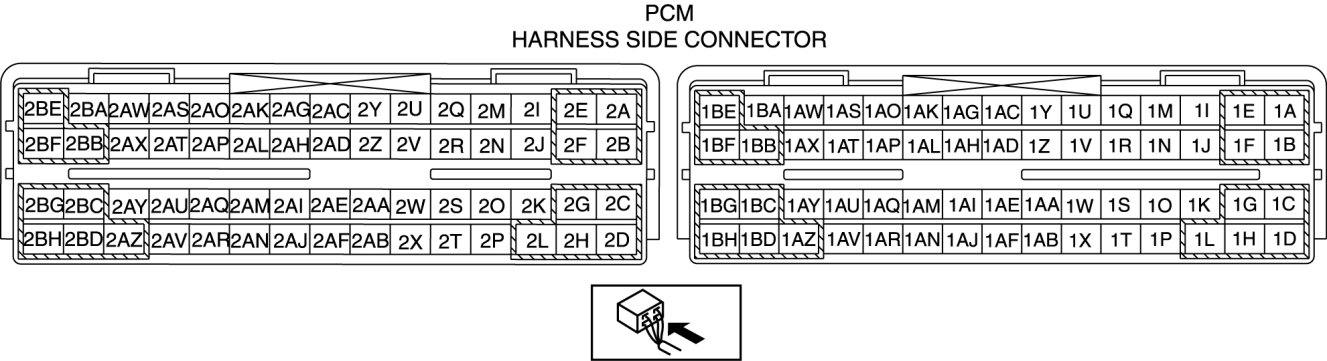
Terminal Voltage Table (Reference) (Part 1):

Terminal Voltage Table (Reference) (Part 2):

Terminal Voltage Table (Reference) (Part 3):

Terminal Voltage Table (Reference) (Part 4):

Terminal Voltage Table (Reference) (Part 5):

Terminal Voltage Table (Reference) (Part 6):

Terminal Voltage Table (Reference) (Part 7):

Terminal Voltage Table (Reference) (Part 8):

*1
MT
*2
13B-MSP(high power)
Inspection Using An Oscilloscope (Reference)
NOTE:
- The duty ratio for the wave pattern can vary with the control conditions. Therefore determine comprehensively where the malfunction occurs among the input systems, output systems, and the PCM.
Throttle control (+)

- Terminal connected: 2A (+)-Negative battery terminal
- Oscilloscope setting: 5 V/DIV (Y): 0.4 ms/DIV (X), DC range
- Measurement condition: IG SW ON
Throttle control (-)

- Terminal connected: 2B (+)-Negative battery terminal
- Oscilloscope setting: 5 V/DIV (Y): 1 ms/DIV (X), DC range
- Measurement condition: As soon as the accelerator pedal is fully released from the fully depressed position while the ignition switch is at ON (engine off).
Purge control

- Terminal connected: 2C (+)-Negative battery terminal
- Oscilloscope setting: 5 V/DIV (Y): 20 ms/DIV (X), DC range
- Measurement condition: Idling after warm-up (no load)
NOTE:
- Purge control might not be activated depending on the engine conditions.
APV motor control (+)
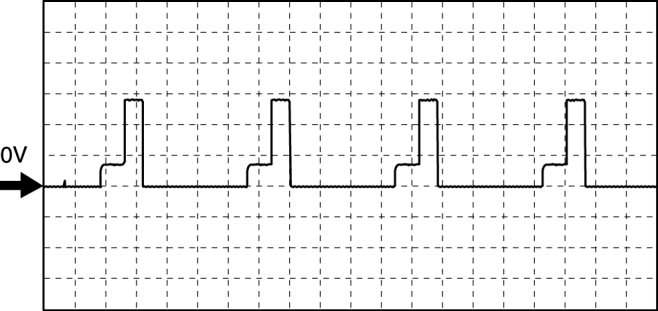
- Terminal connected: 2D (+)-Negative battery terminal
- Oscilloscope setting: 5 V/DIV (Y): 20 ms/DIV (X), DC range
- Measurement condition: High engine speed after warm-up
OCV control

- Terminal connected: 2E (+)-Negative battery terminal
- Oscilloscope setting: 5 V/DIV (Y): 2 ms/DIV (X), DC range
- Measurement condition: Idling after warm-up (no load)
APV motor control (-)
- Terminal connected: 2F (+)-Negative battery terminal
- Oscilloscope setting: 5 V/DIV (Y): 20 ms/DIV (X), DC range
- Measurement condition: High engine speed after warm-up
Eccentric shaft position sensor

- Terminal connected: 2AG (+)-Negative battery terminal
- Oscilloscope setting: 2 V/DIV (Y): 5 ms/DIV (X), DC range
- Measurement condition: Idling after warm-up (no load)
Field coil control (Generator)
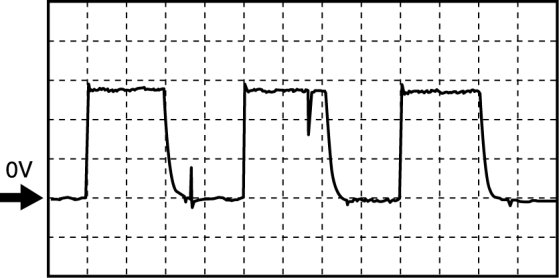
- Terminal connected: 2AI (+)-Negative battery terminal
- Oscilloscope setting: 0.5 V/DIV (Y): 1 ms/DIV (X), DC range
- Measurement condition: Idling after warm-up (no load)
Generator output voltage

- Terminal connected: 2AJ (+)-Negative battery terminal
- Oscilloscope setting: 2 V/DIV (Y): 2 ms/DIV (X), DC range
- Measurement condition: Idling after warm-up (no load)
Ignition coil (L/F, L/R, T/F, T/R)

- Terminal connected:
L/F: 2AX (+)-Negative battery terminal
L/R: 2AT (+)-Negative battery terminal
T/F: 2BA (+)-Negative battery terminal
T/R: 2AW (+)-Negative battery terminal
- Oscilloscope setting: 2 V/DIV (Y): 10 ms/DIV (X), DC range
- Measurement condition: Idling after warm-up (no load)
Fuel injector (FS, RS) control

- Terminal connected:
FS: 2BC (+)-Negative battery terminal
RS: 2AZ (+)-Negative battery terminal
- Oscilloscope setting: 5 V/DIV (Y): 5 ms/DIV (X), DC range
- Measurement condition: Racing after warm-up (no load)
Fuel injector (FP, RP) control

- Terminal connected:
FP: 2BB (+)-Negative battery terminal
RP: 2BD (+)-Negative battery terminal
- Oscilloscope setting: 5 V/DIV (Y): 10 ms/DIV (X), DC range
- Measurement condition: Idling after warm-up (no load)

- Terminal connected:
FP: 2BB (+)-Negative battery terminal
RP: 2BD (+)-Negative battery terminal
- Oscilloscope setting: 5 V/DIV (Y): 10 ms/DIV (X), DC range
- Measurement condition: Cranking while the engine is cold. (ECT: Approx. 20 °C {68 °F})
HO2S heater control

- Terminal connected: 2BE (+)-Negative battery terminal
- Oscilloscope setting: 5 V/DIV (Y): 100 ms/DIV (X), DC range
- Measurement condition: Idling after warm-up (no load)
A/F sensor heater control

- Terminal connected: 2BG (+)-Negative battery terminal
- Oscilloscope setting: 5 V/DIV (Y): 50 ms/DIV (X), DC range
- Measurement condition: Idling after warm-up (no load)
Using the M-MDS
NOTE:
- PIDs for the following parts are not available on this model. Go to the appropriate part inspection page.
- Main relay Testing and Inspection
1. Connect the M-MDS to the DLC-2.

2. Turn the ignition switch to ON position.
3. Measure the PID value.
- If PID value is not within the specification, follow the instructions in Action column.
NOTE:
- The PID/DATA MONITOR function monitors the calculated value of the input/output signals in the PCM. Therefore, an output device malfunction is not directly indicated as a malfunction of the monitored value for the output device. If a monitored value of an output device is out of specification, inspect the monitored value of the input device related to the output control.
- For input/output signals except those of the monitoring items, use a voltmeter to measure the PCM terminal voltage.
- The simulation items that are used in the ENGINE CONTROL SYSTEM OPERATION INSPECTION are as follows.
CAUTION:
- To prevent engine damage, use MOP_FL_C and MOP_FL_S only during idling (after engine warm-up) up to 30 s.
- ACCS, AIP RLY, ALTF, APV, ARPMDES, DEI, ETC_DSD, EVAPCP, FAN1, FAN2, FAN3, FP, FPRR, FUELPW1, GENVDSD, HTR12, IASV, MOP_FL_C, MOP_FL_S, OCV_CLOSE, PACNTV, SSV, test
PID/DATA monitor table (reference)
PID/Data Monitor Table (Reference) (Part 1):

PID/Data Monitor Table (Reference) (Part 2):

PID/Data Monitor Table (Reference) (Part 3):

PID/Data Monitor Table (Reference) (Part 4):

PID/Data Monitor Table (Reference) (Part 5):

PID/Data Monitor Table (Reference) (Part 6):

PID/Data Monitor Table (Reference) (Part 7):

PID/Data Monitor Table (Reference) (Part 8):

PID/Data Monitor Table (Reference) (Part 9):

*1
Calculated value; differs from terminal voltage
*2
Refrigerant pressure switch (middle) turns off when the refrigerant pressure is 1.11 MPa {11.3 kgf/cm2, 161 psi} or less
*3
Refrigerant pressure switch (middle) turns on when the refrigerant pressure is 1.60 MPa {16.3 kgf/cm2, 232 psi} or more
*4
MT
*5
California emission regulation applicable model
*6
13B-MSP(high power)
*7
With VFAD
Factory Service Tools
Use the Manual With the Right Hardware
Pair factory procedures with proven DIY tools so the instructions are easier to execute.
Disclosure: Verified tool recommendations may earn an affiliate commission at no cost to you.
When to See a Mechanic
Stop DIY work and contact a certified mechanic immediately if any of the following apply:
- • You smell fuel, burning insulation, or see smoke.
- • Brakes feel soft, pull hard to one side, or make grinding noises.
- • The engine overheats, stalls repeatedly, or misfires under load.
- • You are missing required tools, torque specs, or safe lifting equipment.
- • You are not confident in the next step or safety outcome.