
Safety Warning
DIY auto repair can cause serious injury, fire, or vehicle damage. These guides are for informational purposes only. Always follow OEM torque specs, wear PPE, and consult a certified mechanic if you are unsure. You are solely responsible for your safety.
2004 Mazda RX8 2RTR-1.3LFACTORY OEM SERVICE PROCEDURE
Compression Check: Testing and Inspection
COMPRESSION INSPECTION
Warning:
^ Hot engines can cause severe burns. Be careful not to burn yourself during removal/installation of each component.
^ Fuel vapor is hazardous. It can very easily ignite, causing serious injury and damage. Always keep sparks and flames away from fuel.
1. Remove the engine cover.
2. Verify that the battery is fully charged.
3. Warm up the engine.
4. To decrease the exhaust system temperature, stop the engine and leave it as it is for approximately 10 min.
5. Remove the trailing or leading side spark plug of the front and rear rotors.
6. Disconnect the eccentric shaft position sensor connector.
Caution:
^ To cut the fuel injection and ignition, make sure the eccentric shaft position sensor connector is disconnected.
7. Measure the compression pressure using one of the following procedures:

1. Install the SST (49 F018 901) to the trailing or leading side plug hole of the rotor housing.
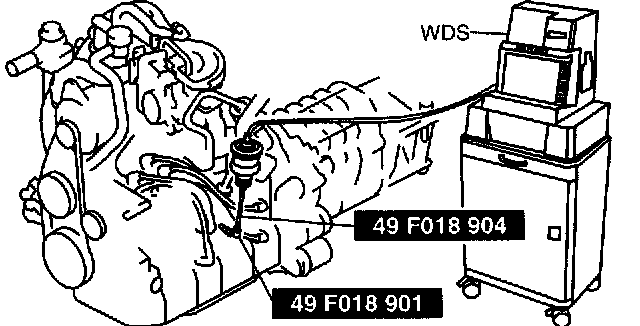
2. Set the SST (49 F018 9A0B) as shown in the figure.
^ When using the WDS or equivalent, set the WDS or equivalent to the SST (49 F018 901, 49 F018 904) as shown in the figure.
3. Depress the accelerator pedal fully and crank for 5 - 10 s.
4. Read the compression and engine speed.
Compression pressure
^ Standard: 830 kPa (8.5 kgf/cm2, 120 psi) [250 rpm]
^ Minimum: 680 kPa (6.9 kgf/cm2, 98.6 psi) [250 rpm]
^ Standard difference in chambers:
Within 150 kPa (1.5 kgf/cm2, 21.8 psi)
^ Standard difference in rotors: Within 100 kPa (1.0 kgf/cm2, 14.5 psi)
5. Perform the same procedure for the other rotor housing.
6. If the compression is at the minimum or less, or the difference in the chambers and difference in the rotors exceed the specifications, replace or overhaul.
Caution:
^ If the engine speed when measuring compression differs from the standard, adjust according to the Graph.

8. Install the spark plugs.
9. Connect the eccentric shaft position sensor connector.
10. Install the engine cover.
Warning:
^ Hot engines can cause severe burns. Be careful not to burn yourself during removal/installation of each component.
^ Fuel vapor is hazardous. It can very easily ignite, causing serious injury and damage. Always keep sparks and flames away from fuel.
1. Remove the engine cover.
2. Verify that the battery is fully charged.
3. Warm up the engine.
4. To decrease the exhaust system temperature, stop the engine and leave it as it is for approximately 10 min.
5. Remove the trailing or leading side spark plug of the front and rear rotors.
6. Disconnect the eccentric shaft position sensor connector.
Caution:
^ To cut the fuel injection and ignition, make sure the eccentric shaft position sensor connector is disconnected.
7. Measure the compression pressure using one of the following procedures:
1. Install the SST (49 F018 901) to the trailing or leading side plug hole of the rotor housing.
2. Set the SST (49 F018 9A0B) as shown in the figure.
^ When using the WDS or equivalent, set the WDS or equivalent to the SST (49 F018 901, 49 F018 904) as shown in the figure.
3. Depress the accelerator pedal fully and crank for 5 - 10 s.
4. Read the compression and engine speed.
Compression pressure
^ Standard: 830 kPa (8.5 kgf/cm2, 120 psi) [250 rpm]
^ Minimum: 680 kPa (6.9 kgf/cm2, 98.6 psi) [250 rpm]
^ Standard difference in chambers:
Within 150 kPa (1.5 kgf/cm2, 21.8 psi)
^ Standard difference in rotors: Within 100 kPa (1.0 kgf/cm2, 14.5 psi)
5. Perform the same procedure for the other rotor housing.
6. If the compression is at the minimum or less, or the difference in the chambers and difference in the rotors exceed the specifications, replace or overhaul.
Caution:
^ If the engine speed when measuring compression differs from the standard, adjust according to the Graph.
8. Install the spark plugs.
9. Connect the eccentric shaft position sensor connector.
10. Install the engine cover.
Factory Service Tools
Use the Manual With the Right Hardware
Pair factory procedures with proven DIY tools so the instructions are easier to execute.
Disclosure: Verified tool recommendations may earn an affiliate commission at no cost to you.
When to See a Mechanic
Stop DIY work and contact a certified mechanic immediately if any of the following apply:
- • You smell fuel, burning insulation, or see smoke.
- • Brakes feel soft, pull hard to one side, or make grinding noises.
- • The engine overheats, stalls repeatedly, or misfires under load.
- • You are missing required tools, torque specs, or safe lifting equipment.
- • You are not confident in the next step or safety outcome.