
Safety Warning
DIY auto repair can cause serious injury, fire, or vehicle damage. These guides are for informational purposes only. Always follow OEM torque specs, wear PPE, and consult a certified mechanic if you are unsure. You are solely responsible for your safety.
2008 Kia Optima V6-2.7LFACTORY OEM SERVICE PROCEDURE
Engine Controls - MIL ON/DTC's P0110/P0111/P0116/P161B
GROUP: ENGINE
NUMBER: 061 [REV 1]
MODEL:
SEDONA (VQ)
AMANTI (GH)
OPTIMA (MG)
RONDO (UN) w/ 2.7
DATE: JULY 2010
SUBJECT:
PCM UPGRADE P0110, P0111, P0116 AND P161B
This bulletin provides information related to the ECM software upgrade of some 2006~2010MY Sedona (VQ) vehicles with 3.8L engines, 2007~2009MY Amanti (GH) vehicles with 3.8L engine, 2006~2010MY Optima (MG) vehicles with 2.7L engines, and 2007~2010MY Rondo (UN) vehicles with 2.7L engines which may experience a malfunction indicator lamp illuminated with the PCM (Powertrain Control Module) system-related DTC(s), P0110, P0111, P0116 and P161B.
^ P0110: Intake Air Temperature sensor 1 Circuit
^ P0111: Intake Air Temperature sensor 1 Circuit Range / Performance
^ P0116: Engine Coolant Temperature Circuit Range / Performance
^ P161B: ECM Torque Calculation Performance
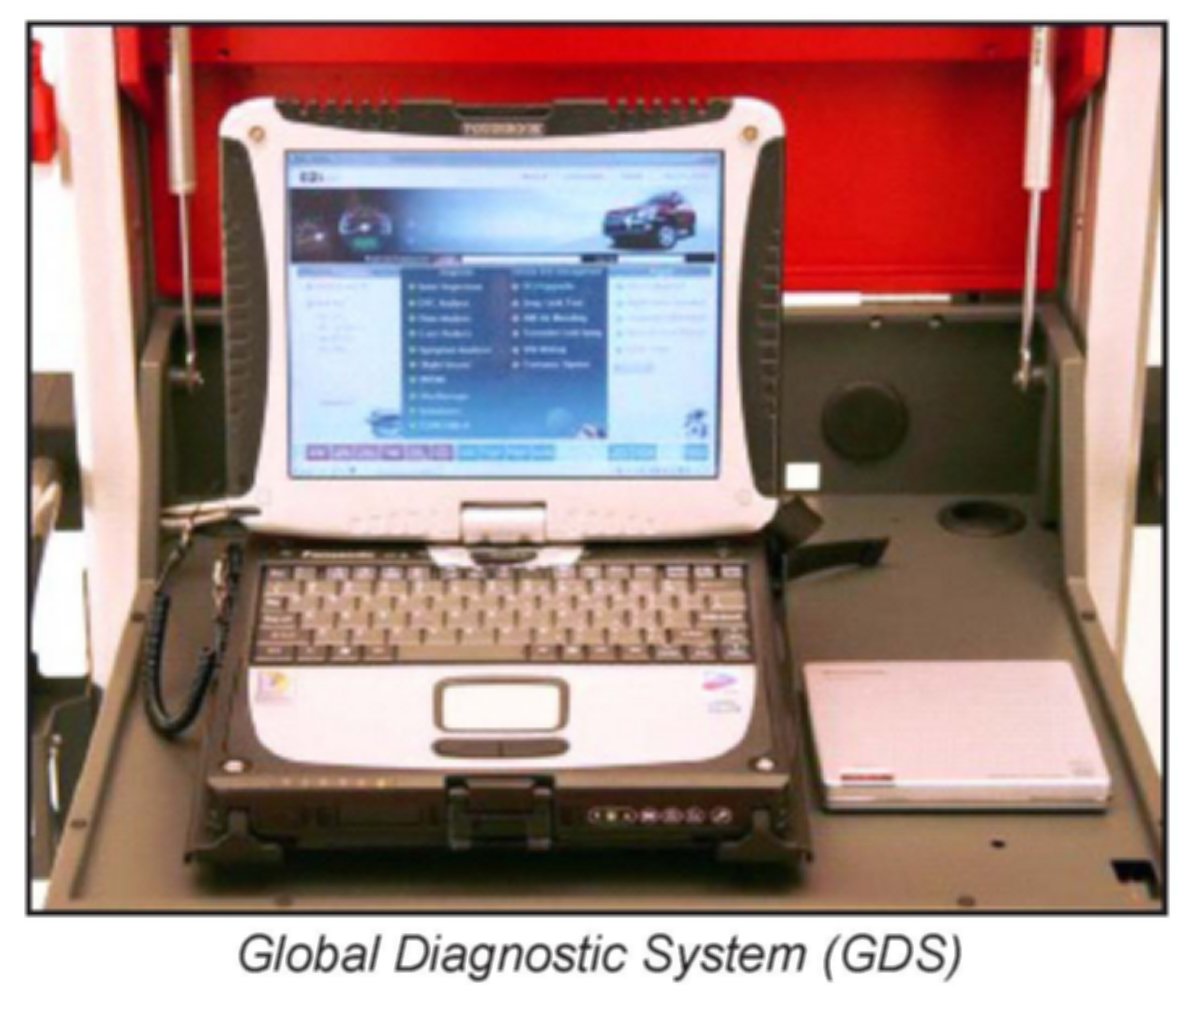
To correct this condition, the PCM should be reprogrammed using the GDS download as described in this bulletin.

UPGRADE EVENT NAME
NOTICE
^ A fully charged battery is necessary before ECU upgrade can take place. DO NOT connect a battery charger to the vehicle during ECU upgrade. Make sure the blower motor is "OFF" during ECU upgrade.
^ All ECU upgrades must be done with the ignition key in the "ON" position.
^ Be careful not to disconnect any cables connected to the vehicle or GDS during the ECU upgrade procedure.
^ DO NOT start the engine during ECU upgrade.
^ DO NOT turn the ignition key "OFF" or interrupt the power supply during ECU upgrade.
^ When the ECU upgrade is completed, turn the ignition key "OFF" and wait 20 seconds before starting the engine.
^ ONLY use approved ECU upgrade software designated for the correct model, year and engine size. Failure to do so may create other driveability issues due to the use of the incorrect ECM/PCM calibration.
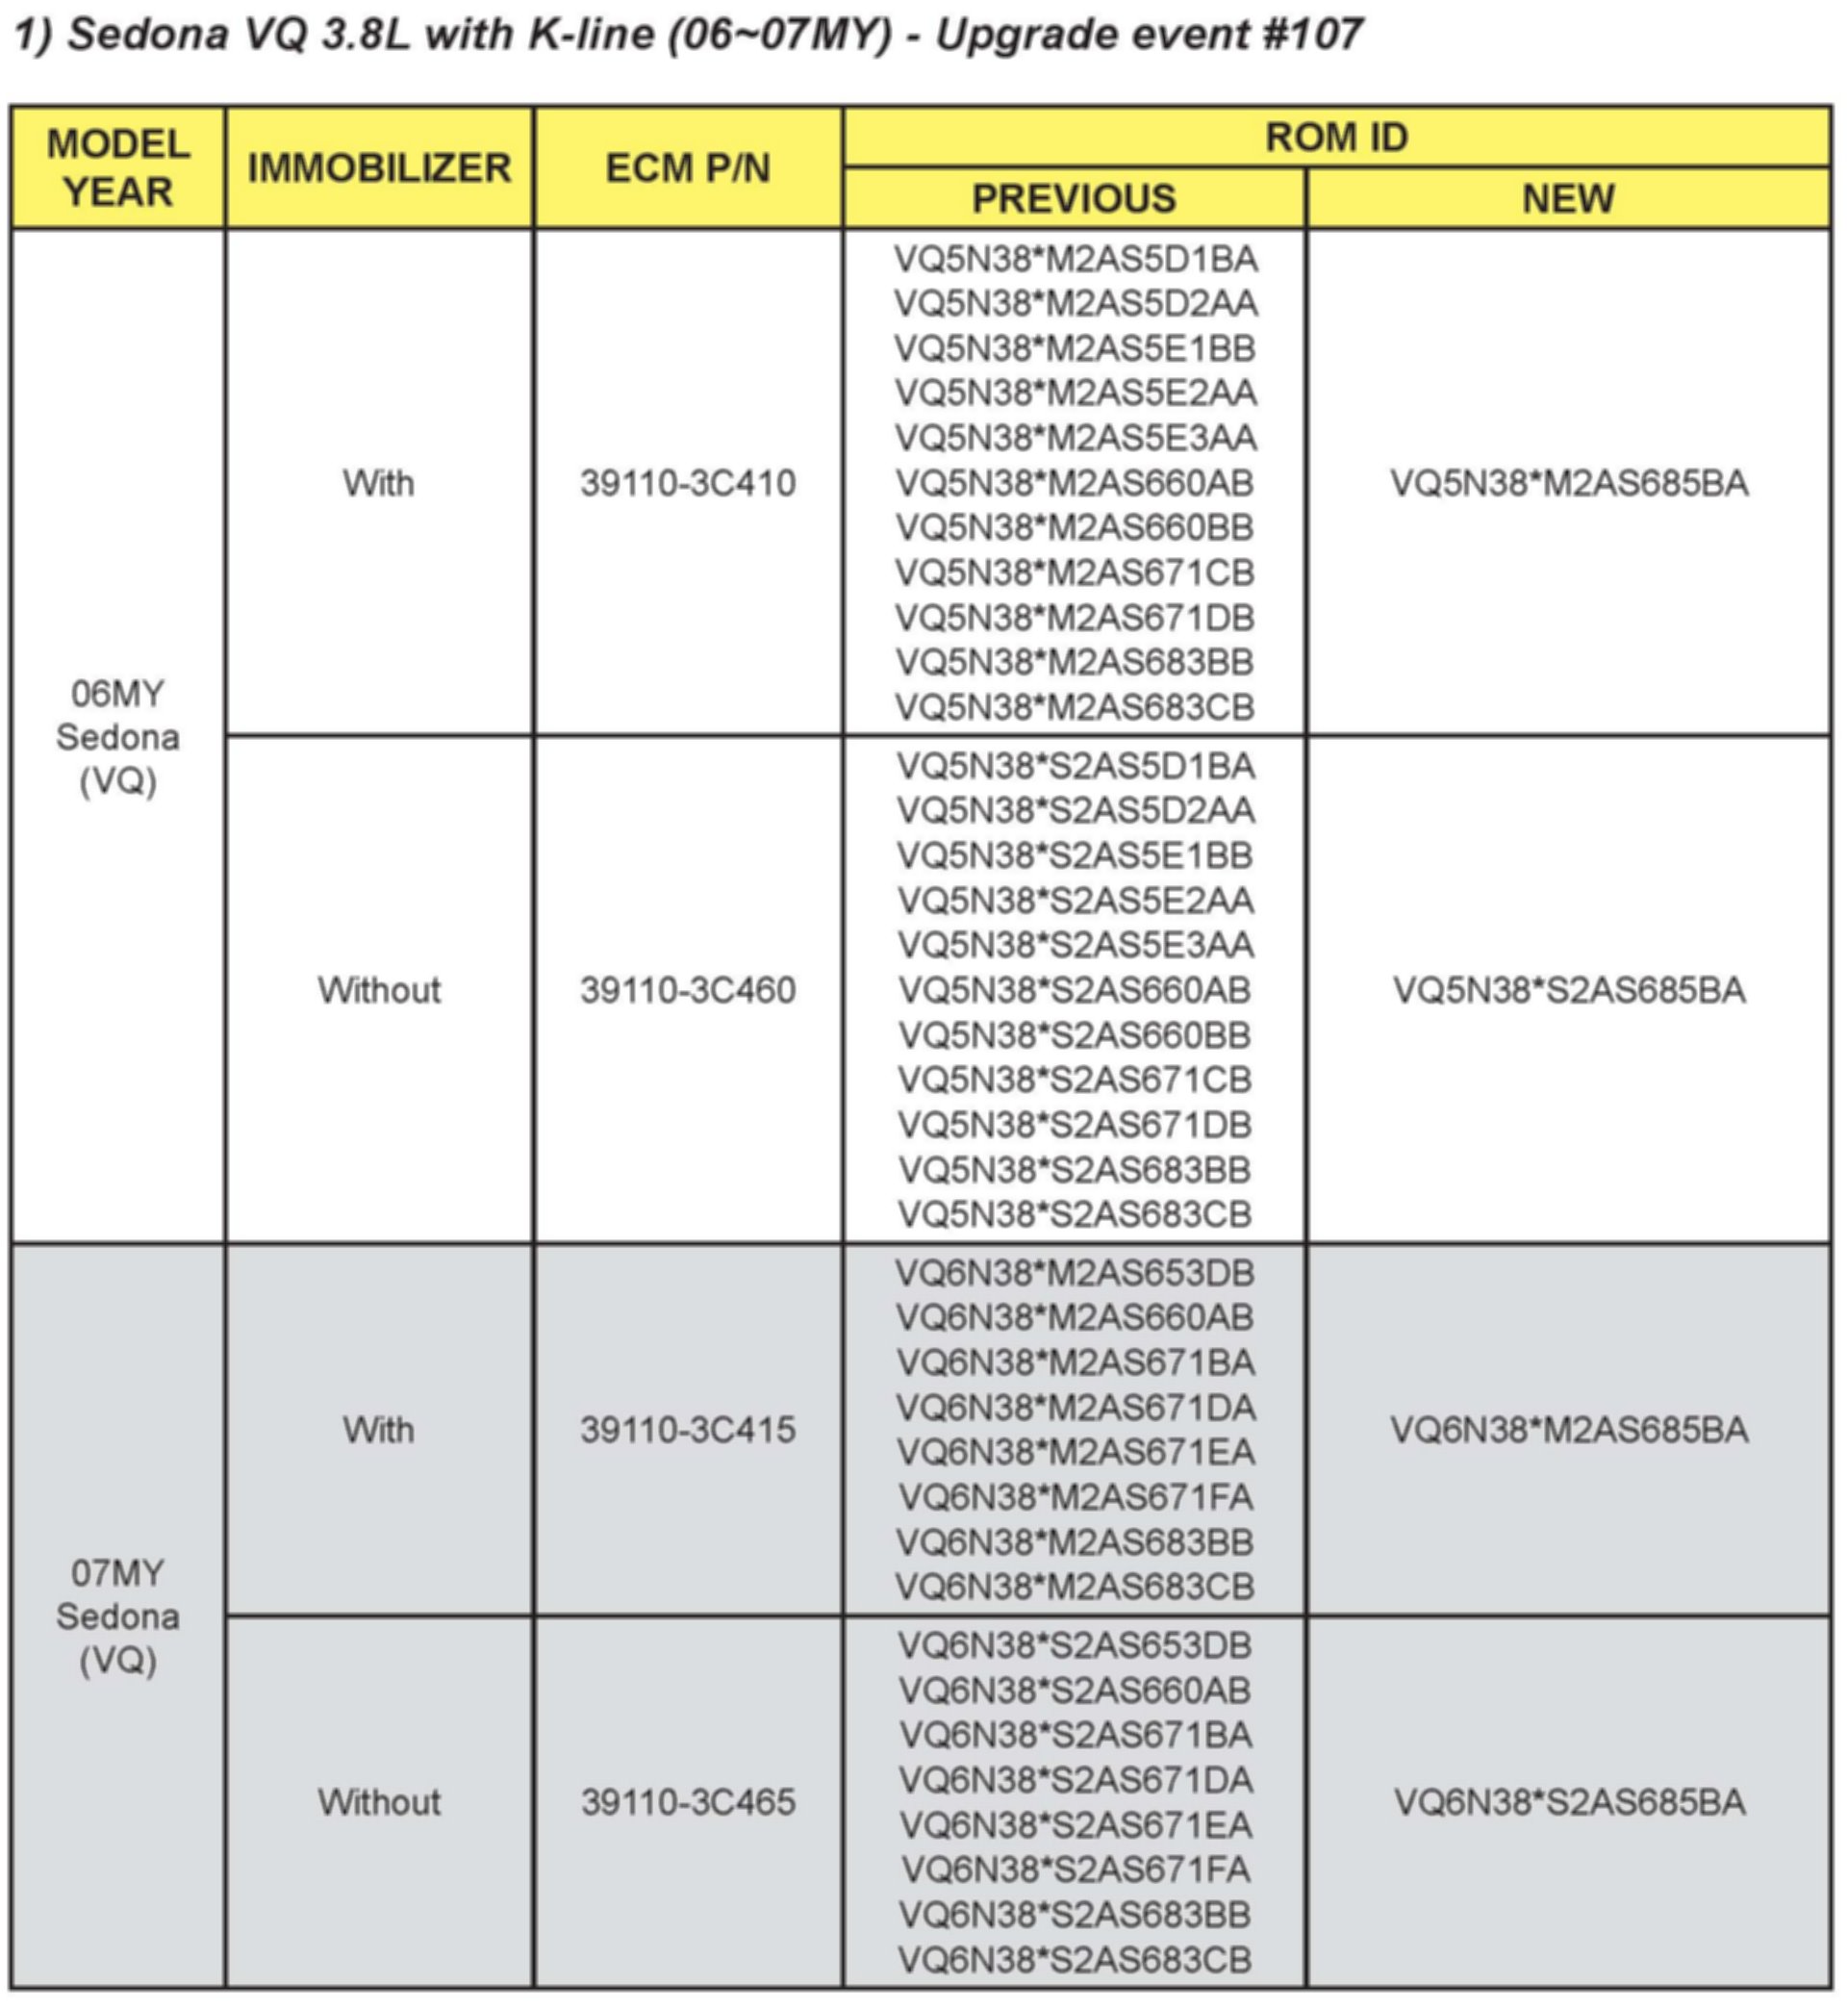
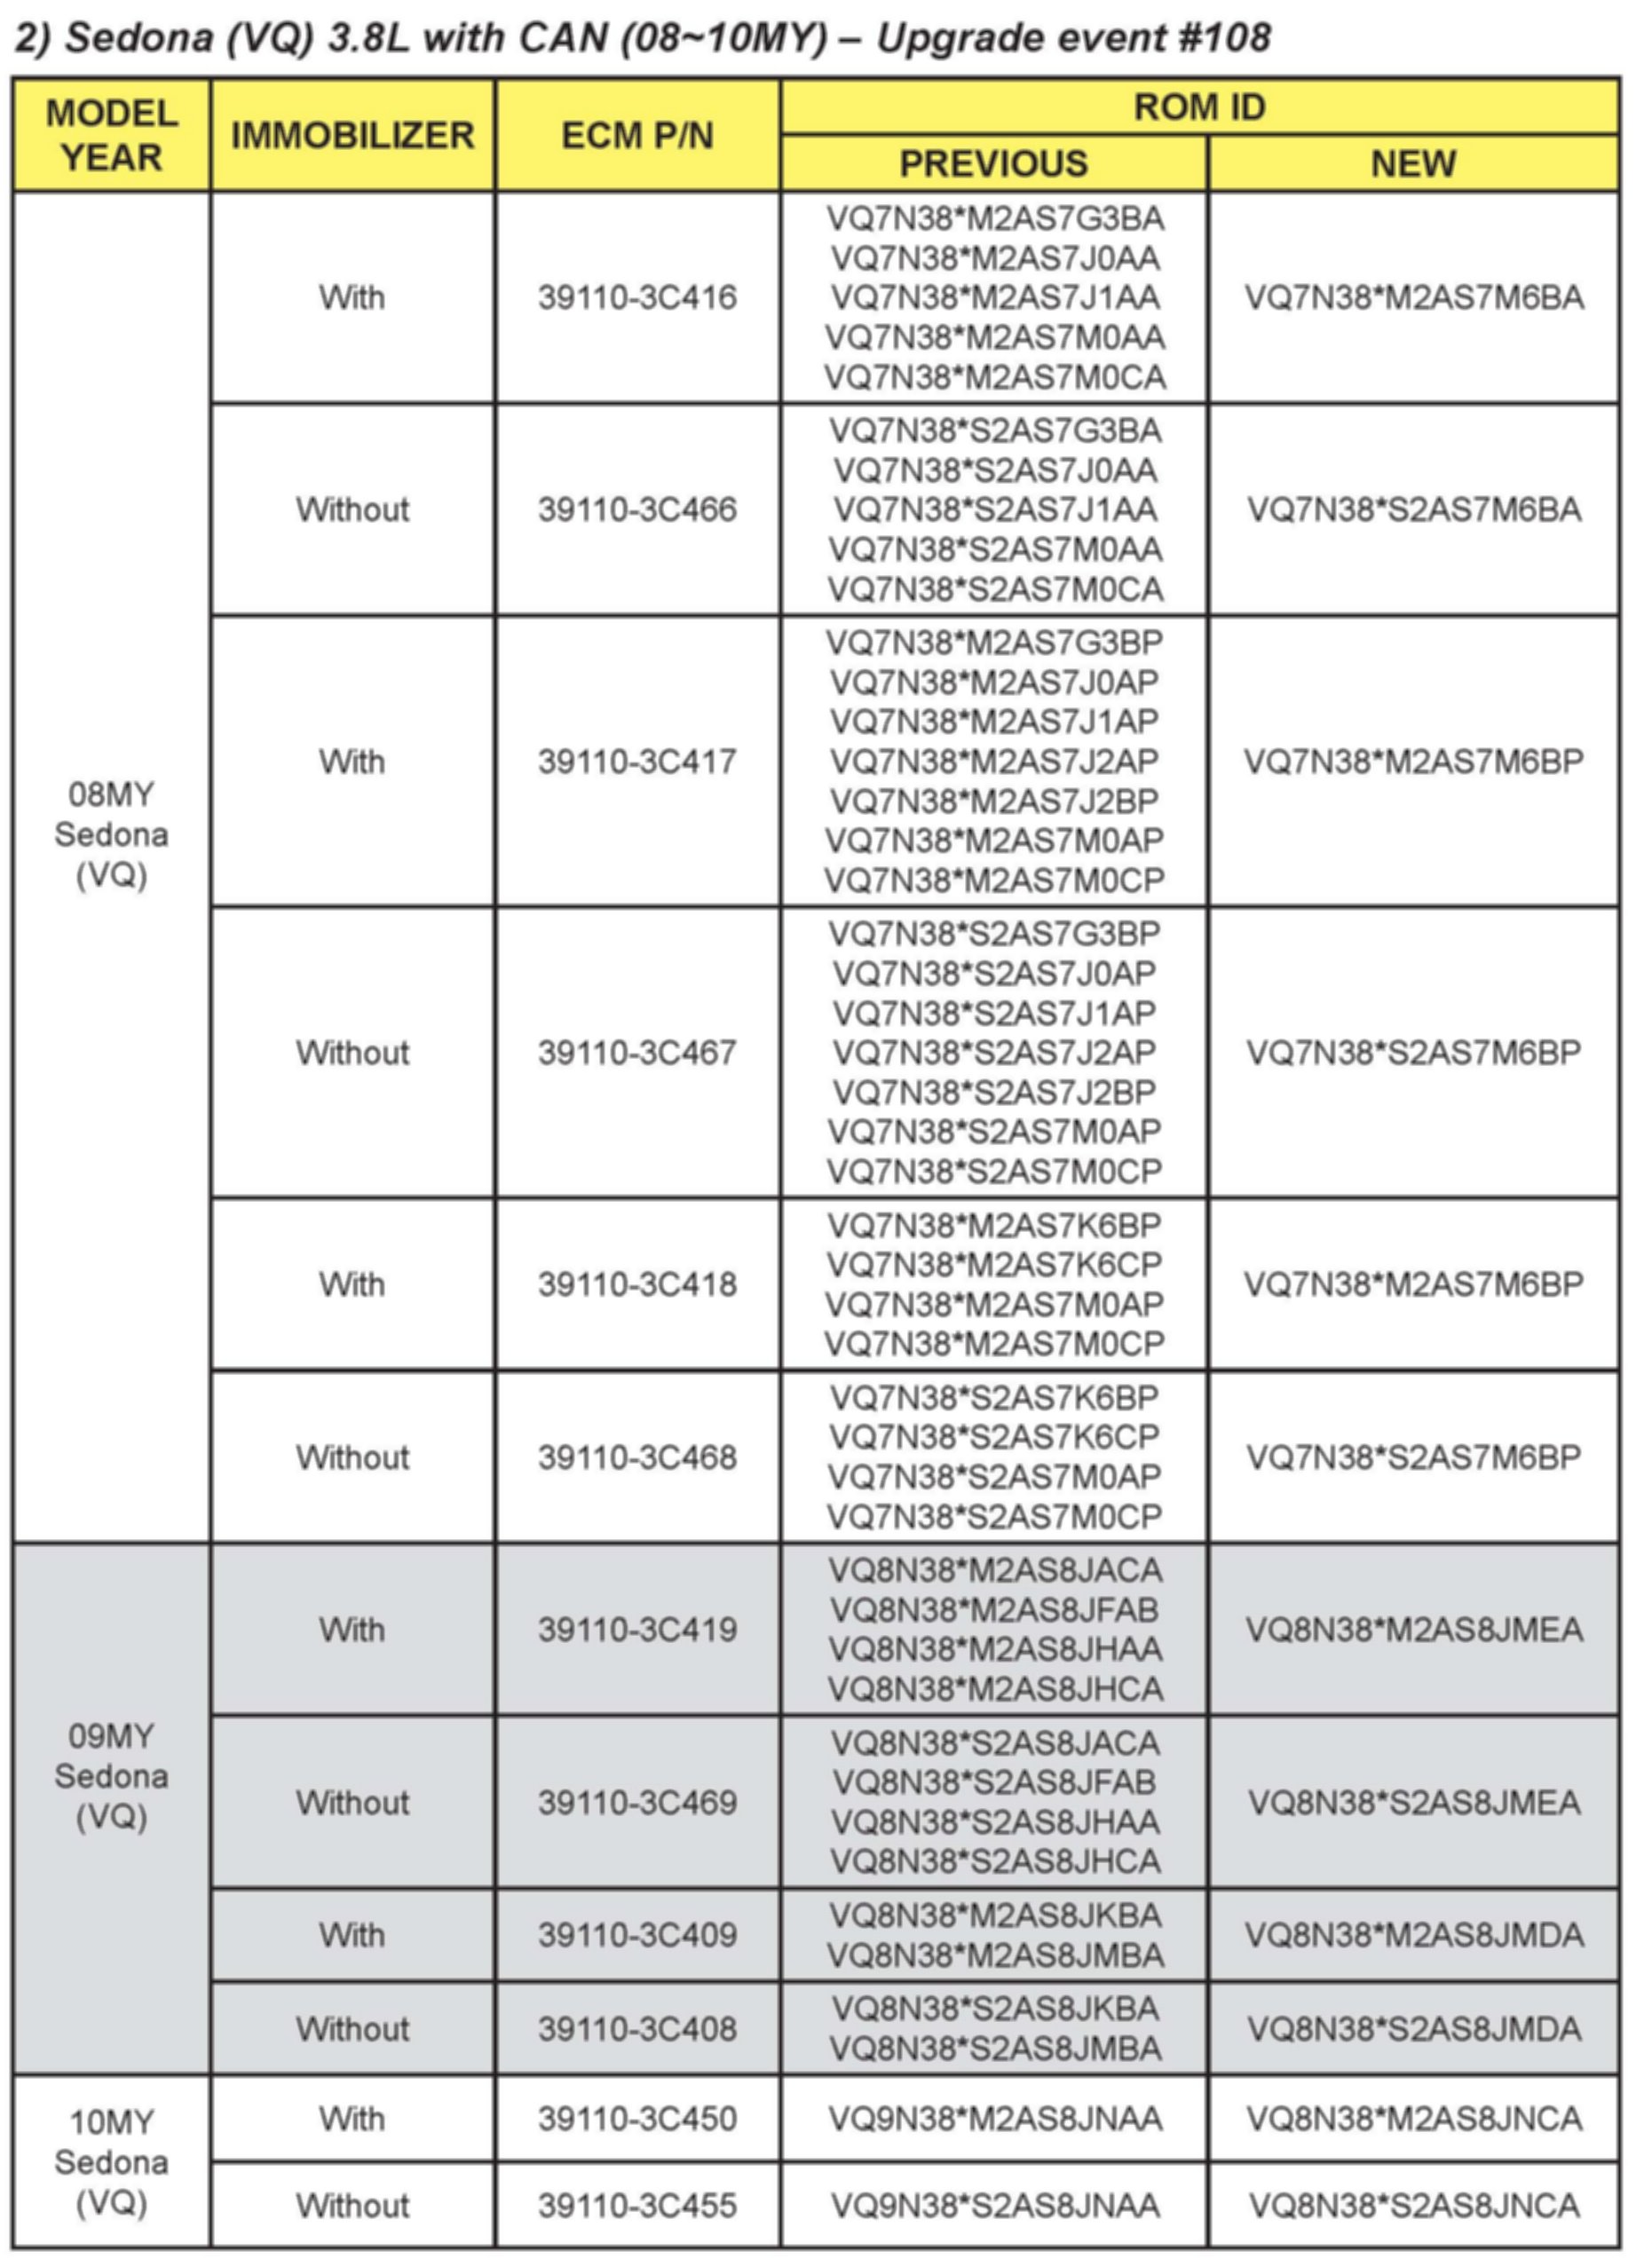
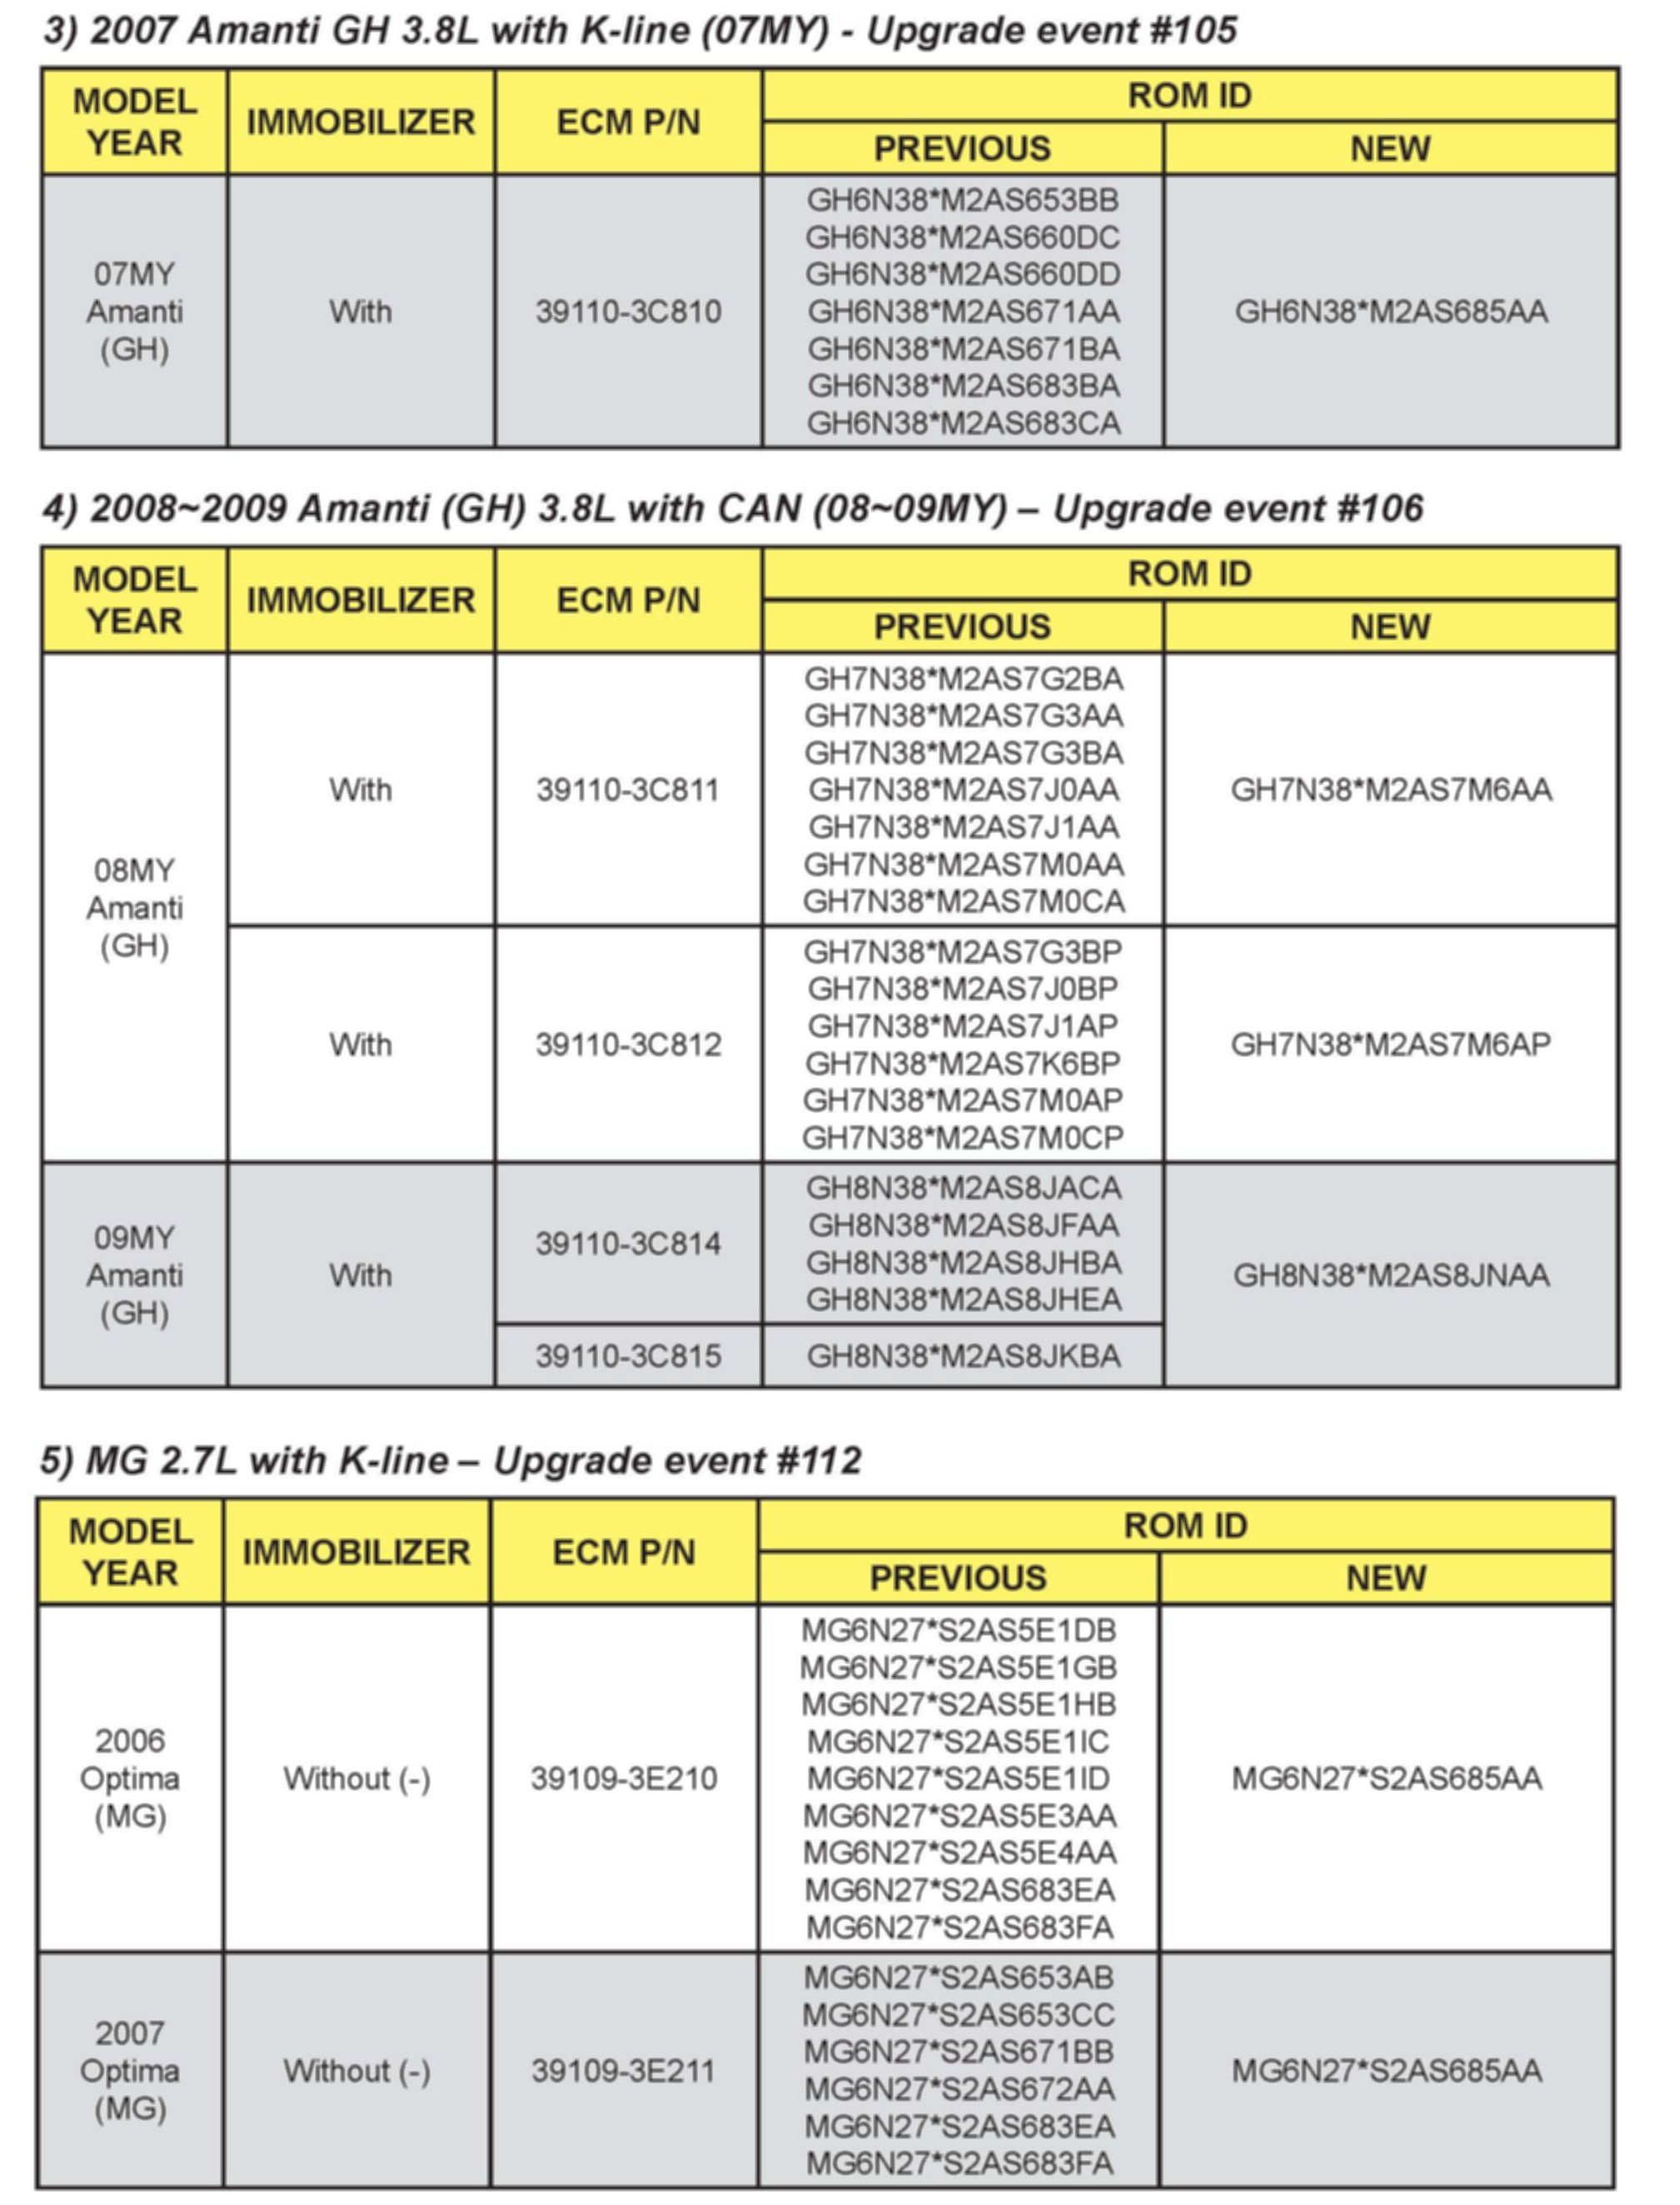

ROM ID INFORMATION TABLES
To verify the vehicle is affected, be sure to check the Calibration Identification of the vehicle's PCM's ROM ID and reference the Information Table as necessary.
1. Connect the power supply cable to the GDS tool.
NOTICE
If attempting to perform the ECU upgrade with the power supply cable disconnected from the GDS tool, be sure to check that the GDS tool is fully charged before ECU upgrade. If the GDS tool is not fully charged, failure to perform the ECU upgrade may occur. Therefore, it is strongly recommended that the power supply connector be connected to the GDS tool.
2. Connect the USB cable between the VCI and the GDS tool.
NOTICE
When performing the ECU upgrade using the GDS tool, wireless communication between the VCI and GDS tool is not available. Therefore, be sure to connect the USB cable between the VCI and the GDS tool.
3. Connect the Main 16-pin DLC cable (GHDM - 241000) to the VCI.
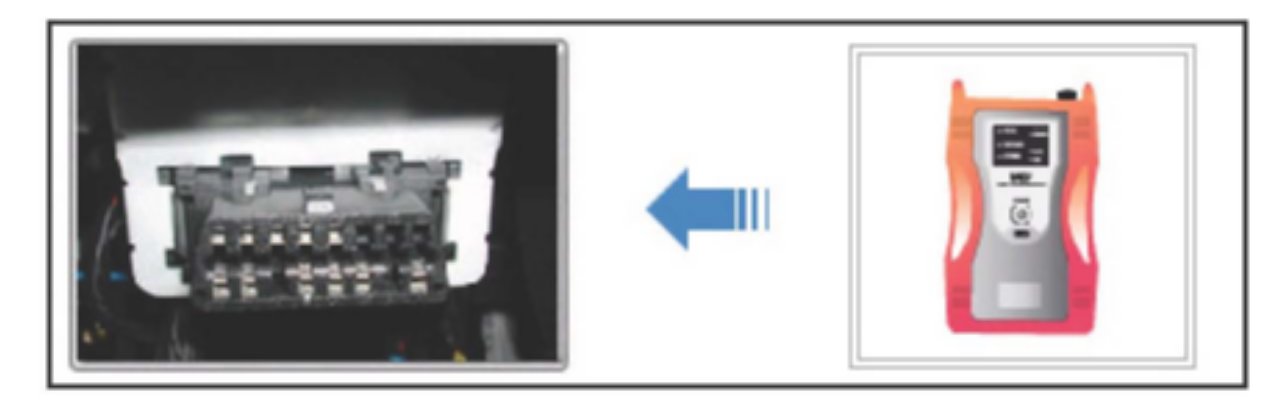
4. Connect the Main 16-pin DLC cable (GHDM - 241000) to the OBD-II connector, located under the driver's side of the instrument panel.
5. With the ignition key ON, turn ON the VCI and GDS tool. Access the GDS vehicle identification number (VIN) screen and configure the vehicle using the VIN AUTO DETECT Function.
6. Once back at the GDS Main Screen, select ECM upgrade from the bottom right-hand corner. Next select Auto Mode, Engine. Perform the ECM upgrade in accordance with normal GDS tool ECM upgrade procedures.

When performing the ECU upgrade using the GDS tool, wireless communication between the VCI and GDS tool is not available. Therefore, be sure to connect the USB cable between the VCI and the GDS tool.
NOTICE
DO NOT attempt to perform a Manual Mode ECM upgrade unless Auto Mode fails. Always follow the instructions given on the GDS tool in either Auto or Manual mode. See table for Manual Mode passwords. In addition, a ECM reset is required if Auto Mode fails; refer to the table below for procedure.
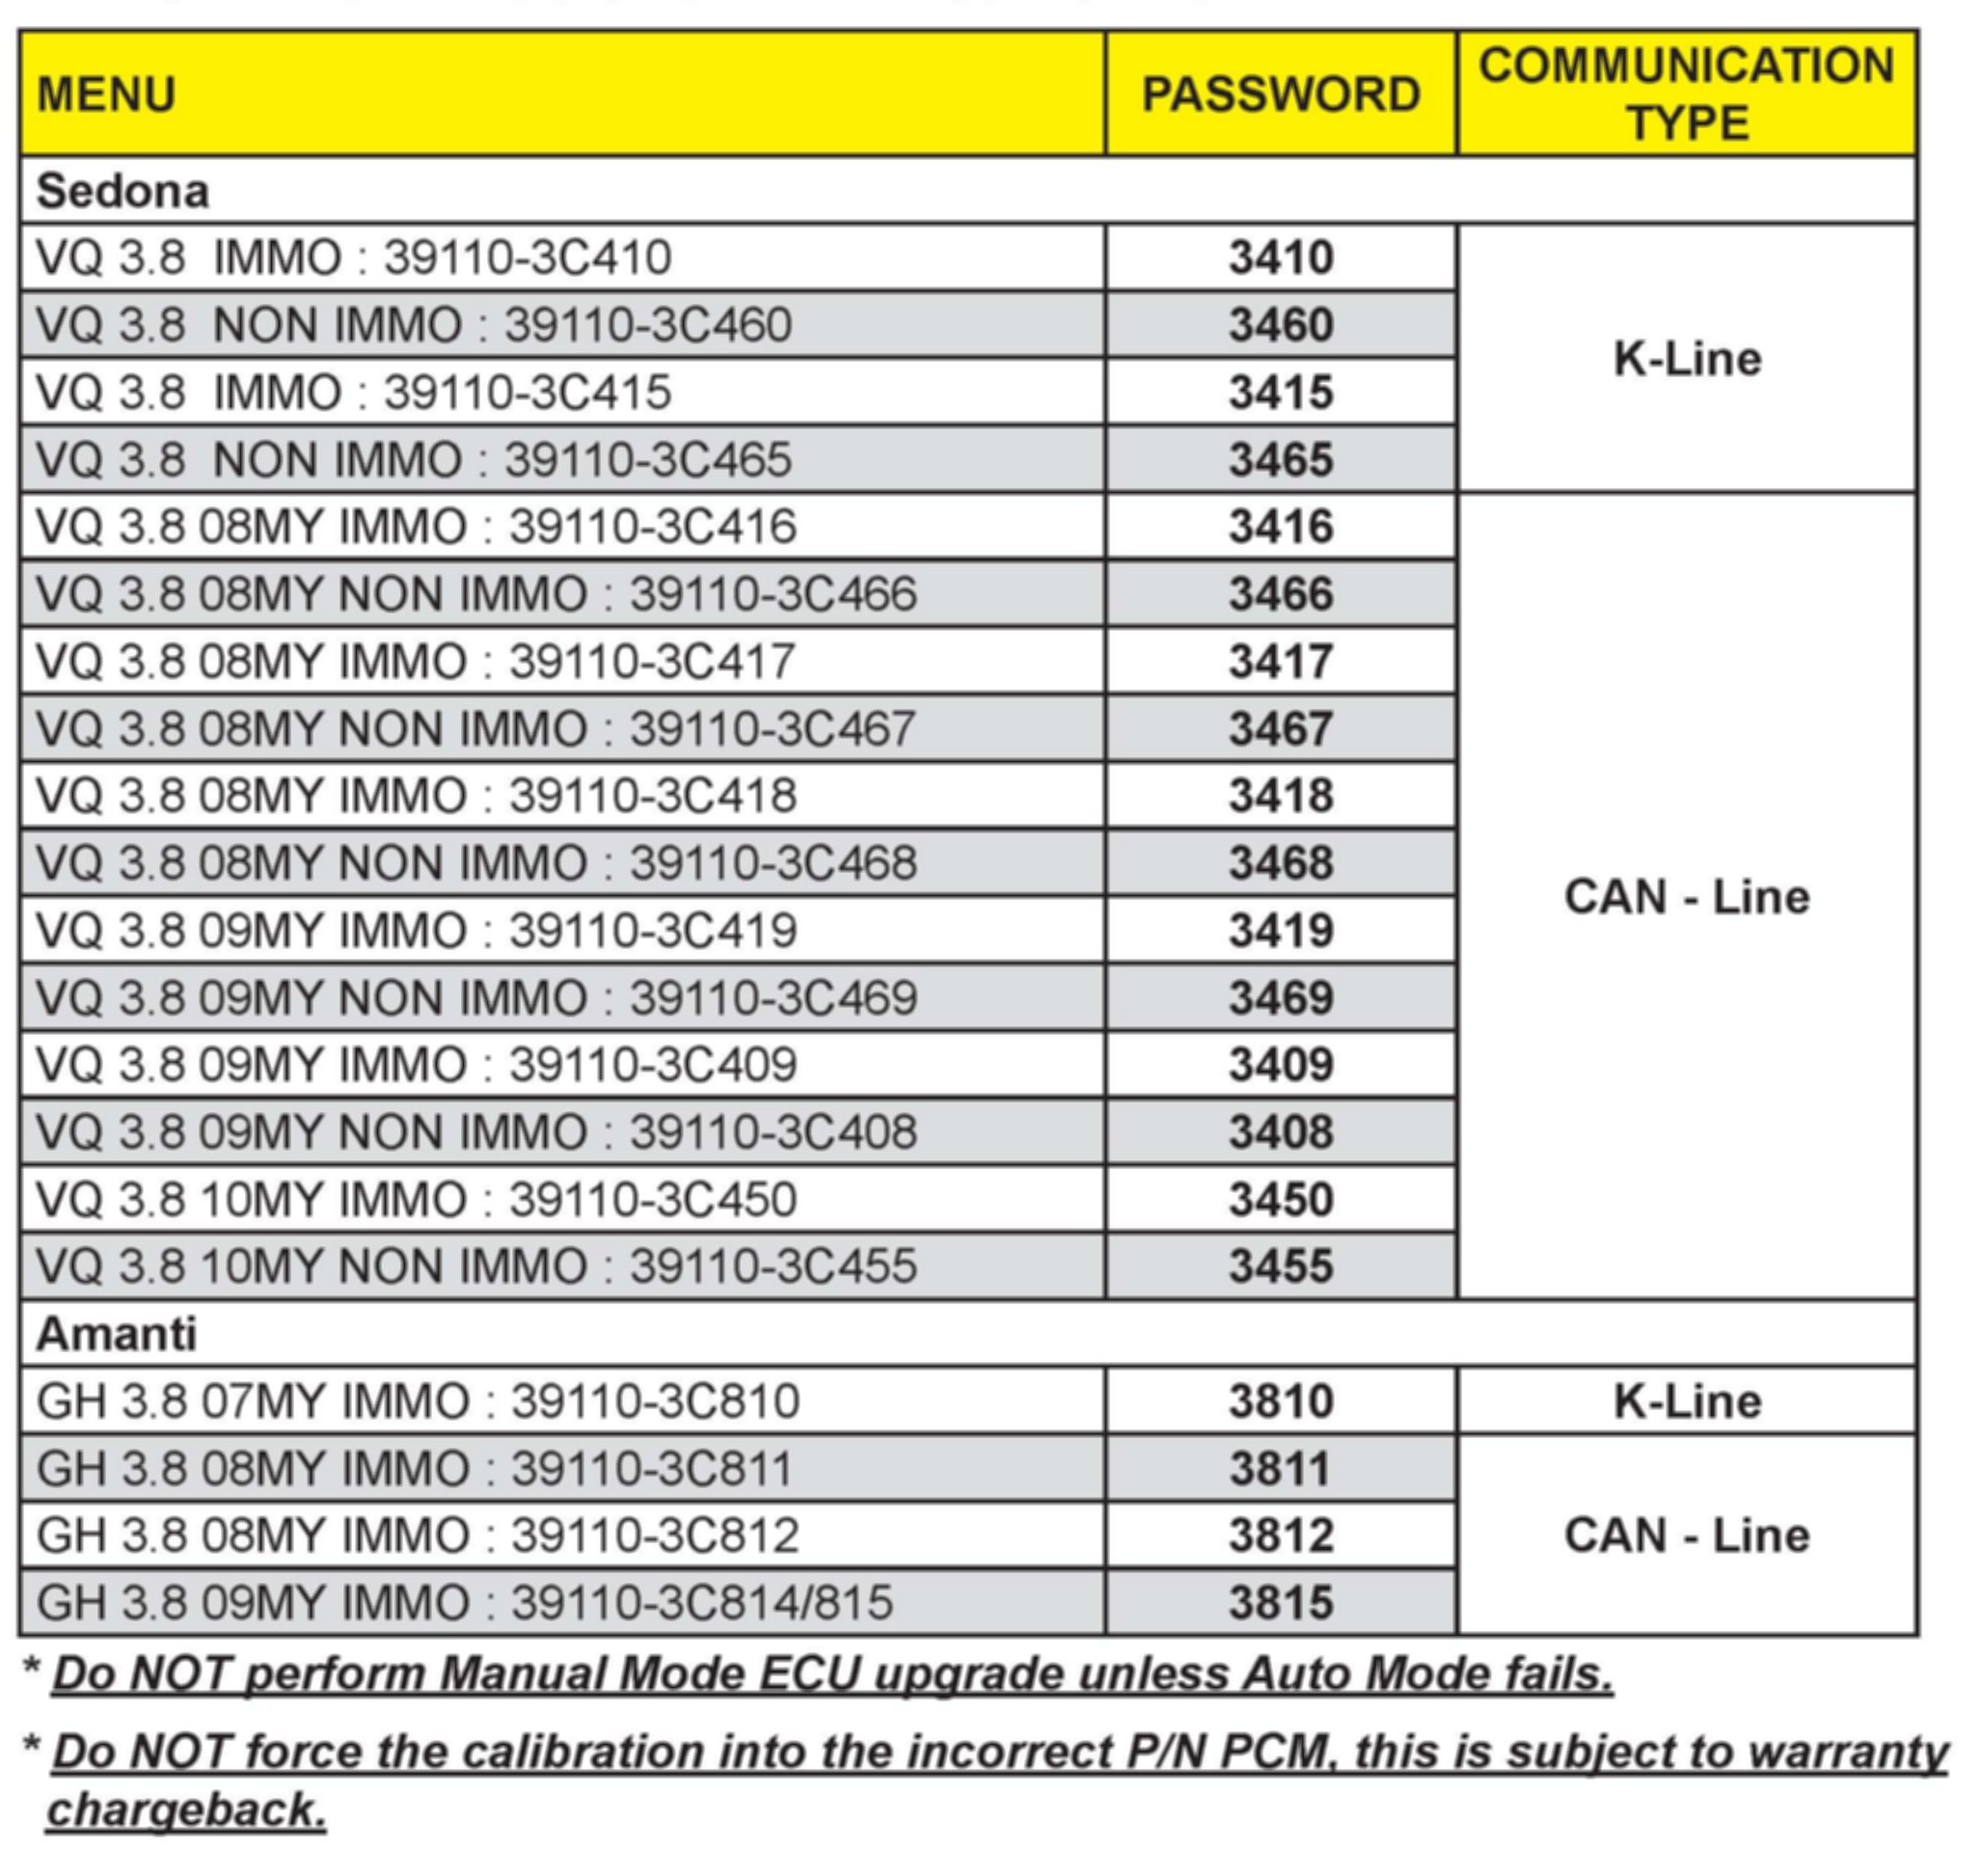

MANUAL MODE ECU UPGRADE PASSWORDS
7. When the GDS tool reports that the ECM upgrade has been successfully completed, click OK, turn OFF the ignition key, and wait at least 10 seconds before attempting to start the engine.
8. Check for Diagnostic Trouble Codes using the GDS and erase any DTCs stored due to CAN-Line communication during reprogramming.
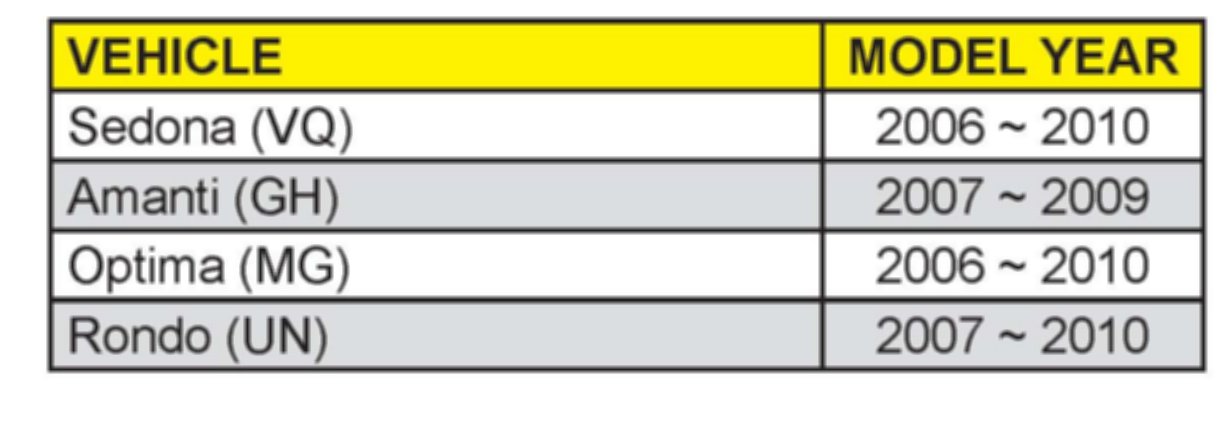
AFFECTED VEHICLES & PRODUCTION RANGE
NUMBER: 061 [REV 1]
MODEL:
SEDONA (VQ)
AMANTI (GH)
OPTIMA (MG)
RONDO (UN) w/ 2.7
DATE: JULY 2010
SUBJECT:
PCM UPGRADE P0110, P0111, P0116 AND P161B
This bulletin provides information related to the ECM software upgrade of some 2006~2010MY Sedona (VQ) vehicles with 3.8L engines, 2007~2009MY Amanti (GH) vehicles with 3.8L engine, 2006~2010MY Optima (MG) vehicles with 2.7L engines, and 2007~2010MY Rondo (UN) vehicles with 2.7L engines which may experience a malfunction indicator lamp illuminated with the PCM (Powertrain Control Module) system-related DTC(s), P0110, P0111, P0116 and P161B.
^ P0110: Intake Air Temperature sensor 1 Circuit
^ P0111: Intake Air Temperature sensor 1 Circuit Range / Performance
^ P0116: Engine Coolant Temperature Circuit Range / Performance
^ P161B: ECM Torque Calculation Performance
To correct this condition, the PCM should be reprogrammed using the GDS download as described in this bulletin.
UPGRADE EVENT NAME
NOTICE
^ A fully charged battery is necessary before ECU upgrade can take place. DO NOT connect a battery charger to the vehicle during ECU upgrade. Make sure the blower motor is "OFF" during ECU upgrade.
^ All ECU upgrades must be done with the ignition key in the "ON" position.
^ Be careful not to disconnect any cables connected to the vehicle or GDS during the ECU upgrade procedure.
^ DO NOT start the engine during ECU upgrade.
^ DO NOT turn the ignition key "OFF" or interrupt the power supply during ECU upgrade.
^ When the ECU upgrade is completed, turn the ignition key "OFF" and wait 20 seconds before starting the engine.
^ ONLY use approved ECU upgrade software designated for the correct model, year and engine size. Failure to do so may create other driveability issues due to the use of the incorrect ECM/PCM calibration.
ROM ID INFORMATION TABLES
To verify the vehicle is affected, be sure to check the Calibration Identification of the vehicle's PCM's ROM ID and reference the Information Table as necessary.
1. Connect the power supply cable to the GDS tool.
NOTICE
If attempting to perform the ECU upgrade with the power supply cable disconnected from the GDS tool, be sure to check that the GDS tool is fully charged before ECU upgrade. If the GDS tool is not fully charged, failure to perform the ECU upgrade may occur. Therefore, it is strongly recommended that the power supply connector be connected to the GDS tool.
2. Connect the USB cable between the VCI and the GDS tool.
NOTICE
When performing the ECU upgrade using the GDS tool, wireless communication between the VCI and GDS tool is not available. Therefore, be sure to connect the USB cable between the VCI and the GDS tool.
3. Connect the Main 16-pin DLC cable (GHDM - 241000) to the VCI.
4. Connect the Main 16-pin DLC cable (GHDM - 241000) to the OBD-II connector, located under the driver's side of the instrument panel.
5. With the ignition key ON, turn ON the VCI and GDS tool. Access the GDS vehicle identification number (VIN) screen and configure the vehicle using the VIN AUTO DETECT Function.
6. Once back at the GDS Main Screen, select ECM upgrade from the bottom right-hand corner. Next select Auto Mode, Engine. Perform the ECM upgrade in accordance with normal GDS tool ECM upgrade procedures.
When performing the ECU upgrade using the GDS tool, wireless communication between the VCI and GDS tool is not available. Therefore, be sure to connect the USB cable between the VCI and the GDS tool.
NOTICE
DO NOT attempt to perform a Manual Mode ECM upgrade unless Auto Mode fails. Always follow the instructions given on the GDS tool in either Auto or Manual mode. See table for Manual Mode passwords. In addition, a ECM reset is required if Auto Mode fails; refer to the table below for procedure.
MANUAL MODE ECU UPGRADE PASSWORDS
7. When the GDS tool reports that the ECM upgrade has been successfully completed, click OK, turn OFF the ignition key, and wait at least 10 seconds before attempting to start the engine.
8. Check for Diagnostic Trouble Codes using the GDS and erase any DTCs stored due to CAN-Line communication during reprogramming.
AFFECTED VEHICLES & PRODUCTION RANGE
Factory Service Tools
Use the Manual With the Right Hardware
Pair factory procedures with proven DIY tools so the instructions are easier to execute.
Disclosure: Verified tool recommendations may earn an affiliate commission at no cost to you.
When to See a Mechanic
Stop DIY work and contact a certified mechanic immediately if any of the following apply:
- • You smell fuel, burning insulation, or see smoke.
- • Brakes feel soft, pull hard to one side, or make grinding noises.
- • The engine overheats, stalls repeatedly, or misfires under load.
- • You are missing required tools, torque specs, or safe lifting equipment.
- • You are not confident in the next step or safety outcome.