
Safety Warning
DIY auto repair can cause serious injury, fire, or vehicle damage. These guides are for informational purposes only. Always follow OEM torque specs, wear PPE, and consult a certified mechanic if you are unsure. You are solely responsible for your safety.
2006 Kia Spectra5 L4-2.0LFACTORY OEM SERVICE PROCEDURE
Engine Oil: Service and Repair
OIL AND FILTER REPLACEMENT
CAUTION:
1) Prolonged and repeated contact with mineral oil will result in the removal of natural fats from the skin, leading to dryness, irritation and dermatitis. In addition, used engine oil contains potentially harmful contaminants which may cause skin cancer.
2) Exercise caution in order to minimize the length and frequency of contact of your skin to used oil. Wear protective clothing and gloves. Wash your skin thoroughly with soap and water, or use water-less hand cleaner, to remove any used engine oil. Do not use gasoline, thinners, or solvents.
3) In order to preserve the environment, used oil and used oil filter must be disposed of only at designated disposal sites.
1. Drain the engine oil.
1) Remove the oil filler cap.
2) Remove the oil drain plug, and drain the oil into a container.
2. Replace the oil filter.
1) Remove the oil filter.
2) Check and clean the oil filter installation surface.
3) Check the part number of the new oil filter is as same as old one.
4) Apply clean engine oil to the gasket of a new oil filter.
5) Lightly screw the oil filter into place, and tighten it until the gasket contacts the seat.
6) Tighten it an additional 3/4 turn.
3. Refill with engine oil.
1) Clean and install the oil drain plug with a new gasket.
Tightening torque: 39.2 - 44.1 Nm (4.0 - 4.5 kg-m, 28.9 - 32.5 ft. lbs.)
2) Fill with fresh engine oil.
Oil Capacity Total: 4.0 L (4.23 US qt, 3.52 Imp qt)
Oil pan: 3.7 L (3.91 US qt, 3.26 Imp qt)
Oil filter: 0.3 L (0.32 US qt, 0.26 Imp qt)
3) Install the oil filler cap.
4. Start engine and check for oil leaks.
5. Recheck the engine oil level.
INSPECTION
1. Check the engine oil quality.
Check for oil deterioration, entry of water, discoloring of thinning.
If the quality is visibly poor, replace the oil.
2. Check the engine oil level.
After warming up the engine for five minutes, stop the engine and check the oil lever. The level should be between the L and F marks on the dipstick.
If low, check for oil leakage and add oil up to the F mark on the dipstick.
NOTE: Do not fill with engine oil above the F mark.
SELECTION OF ENGINE OIL
Recommended ILSAC classification: GF1 OR ABOVE
Recommended API classification: SH OR ABOVE
Recommended SAE viscosity grades:
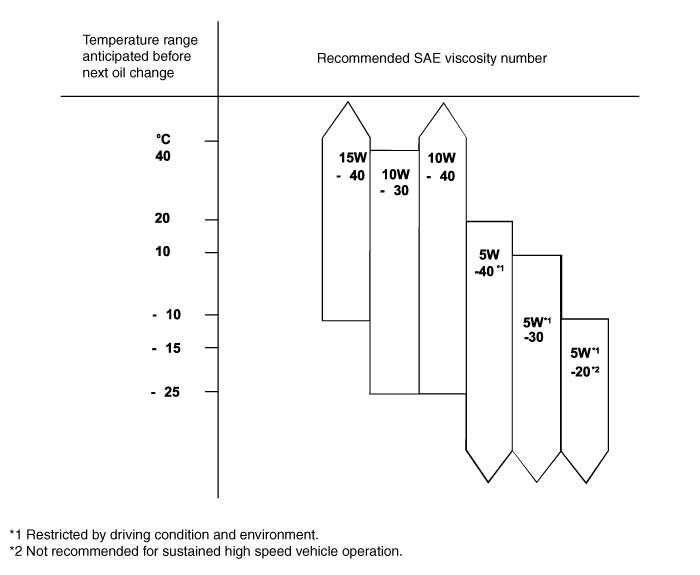
NOTE: For best performance and maximum protection of all types of operation, select only those lubricants which:
1) Satisfy the requirement of the API classification.
2) Have proper SAE grade number for expected ambient temperature range.
3) Lubricants that do not have both an SAE grade number and API service classification on the container should not be used.
CAUTION:
1) Prolonged and repeated contact with mineral oil will result in the removal of natural fats from the skin, leading to dryness, irritation and dermatitis. In addition, used engine oil contains potentially harmful contaminants which may cause skin cancer.
2) Exercise caution in order to minimize the length and frequency of contact of your skin to used oil. Wear protective clothing and gloves. Wash your skin thoroughly with soap and water, or use water-less hand cleaner, to remove any used engine oil. Do not use gasoline, thinners, or solvents.
3) In order to preserve the environment, used oil and used oil filter must be disposed of only at designated disposal sites.
1. Drain the engine oil.
1) Remove the oil filler cap.
2) Remove the oil drain plug, and drain the oil into a container.
2. Replace the oil filter.
1) Remove the oil filter.
2) Check and clean the oil filter installation surface.
3) Check the part number of the new oil filter is as same as old one.
4) Apply clean engine oil to the gasket of a new oil filter.
5) Lightly screw the oil filter into place, and tighten it until the gasket contacts the seat.
6) Tighten it an additional 3/4 turn.
3. Refill with engine oil.
1) Clean and install the oil drain plug with a new gasket.
Tightening torque: 39.2 - 44.1 Nm (4.0 - 4.5 kg-m, 28.9 - 32.5 ft. lbs.)
2) Fill with fresh engine oil.
Oil Capacity Total: 4.0 L (4.23 US qt, 3.52 Imp qt)
Oil pan: 3.7 L (3.91 US qt, 3.26 Imp qt)
Oil filter: 0.3 L (0.32 US qt, 0.26 Imp qt)
3) Install the oil filler cap.
4. Start engine and check for oil leaks.
5. Recheck the engine oil level.
INSPECTION
1. Check the engine oil quality.
Check for oil deterioration, entry of water, discoloring of thinning.
If the quality is visibly poor, replace the oil.
2. Check the engine oil level.
After warming up the engine for five minutes, stop the engine and check the oil lever. The level should be between the L and F marks on the dipstick.
If low, check for oil leakage and add oil up to the F mark on the dipstick.
NOTE: Do not fill with engine oil above the F mark.
SELECTION OF ENGINE OIL
Recommended ILSAC classification: GF1 OR ABOVE
Recommended API classification: SH OR ABOVE
Recommended SAE viscosity grades:
NOTE: For best performance and maximum protection of all types of operation, select only those lubricants which:
1) Satisfy the requirement of the API classification.
2) Have proper SAE grade number for expected ambient temperature range.
3) Lubricants that do not have both an SAE grade number and API service classification on the container should not be used.
Factory Service Tools
Use the Manual With the Right Hardware
Pair factory procedures with proven DIY tools so the instructions are easier to execute.
Disclosure: Verified tool recommendations may earn an affiliate commission at no cost to you.
When to See a Mechanic
Stop DIY work and contact a certified mechanic immediately if any of the following apply:
- • You smell fuel, burning insulation, or see smoke.
- • Brakes feel soft, pull hard to one side, or make grinding noises.
- • The engine overheats, stalls repeatedly, or misfires under load.
- • You are missing required tools, torque specs, or safe lifting equipment.
- • You are not confident in the next step or safety outcome.
Rather have a pro handle this?
A certified mobile mechanic comes to your home or office. They bring the tools, you stay comfortable. No tow truck, no waiting room, no surprises.
Comes to youSame-day available12-month warranty
Get a Free QuoteNo obligation. See pricing before you book.