
Safety Warning
DIY auto repair can cause serious injury, fire, or vehicle damage. These guides are for informational purposes only. Always follow OEM torque specs, wear PPE, and consult a certified mechanic if you are unsure. You are solely responsible for your safety.
2008 Jeep Wrangler 4WD V6-3.8LFACTORY OEM SERVICE PROCEDURE
Installation
INSTALLATION
WARNING: Allow the urethane at least 24 hours to cure before returning the vehicle to use.
CAUTION: Roll down the left and right front door glass and open the rear glass slider (if available) before installing windshield to avoid pressurizing the passenger compartment if a door is slammed before urethane is cured. Water leaks can result.
NOTE: The windshield fence should be cleaned of most of its old urethane bonding material. A small amount of old urethane, approximately 1-2 mm in height, should remain on the fence. Do not grind off or completely remove all old urethane from the fence, the paint finish and bonding strength will be adversely affected. Support spacers located on the cowl at the bottom of the windshield opening should be replaced with new parts. Replace any missing or damaged spacers around the perimeter of the windshield opening.
Windshield Preparation - Installing A Previously Installed Windshield
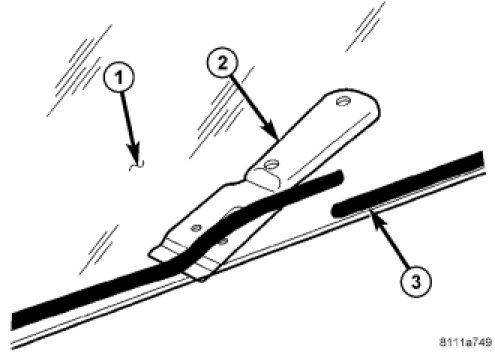
1. Before proceeding with the following repair procedure, review all warnings and cautions. Service Precautions
2. Level old bead of windshield adhesive (3) to a thickness of approximately 1 mm (0.04 in.) and remove loose adhesive.
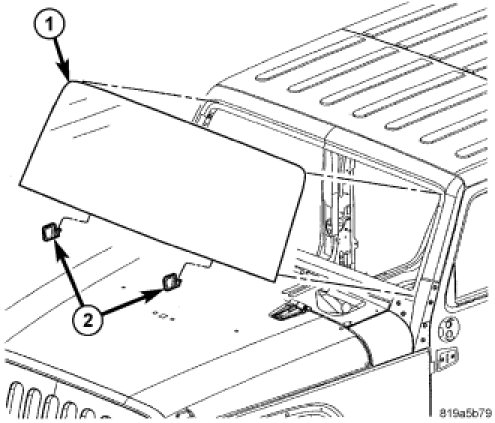
3. Apply four new spacers the top and sides of the glass.
4. Install the lower spacer assemblies (2) onto the glass.
5. Position windshield (1) in center of windshield opening and resting on the lower spacers (2).
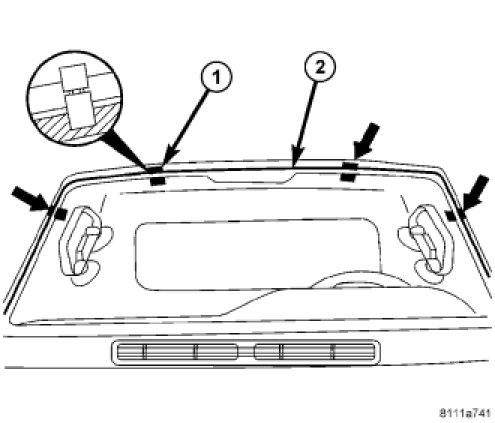
6. Apply adhesive tape (1) to the locations shown to aid with final installation.
7. Verify windshield gap is parallel to with windshield.
8. Cut tape with a sharp knife and remove windshield.
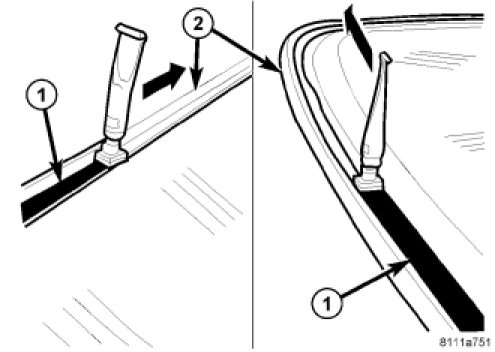
NOTE: Typical primer installation shown.
9. Clean and dry area of glass (2) to be re-glued with a suitable glass preparation solvent and rag.
10. Using a flash light, verify that glass primer is without damage.
11. Re-prime any damaged area. If old adhesive has been exposed for more than 12 hours, entire adhesive area needs to be re-primed.
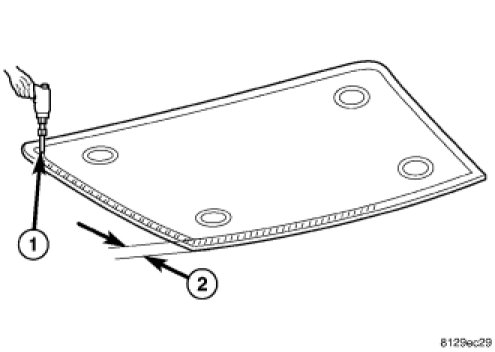
12. Apply primer (1) around the perimeter of the glass to a width of 18 mm (0.7 in.) (2) and 6 mm (0.25 in) from the edge.
13. Allow primer to air dry for at least 10 minutes.
14. Using a flash light, verify that glass primer is without damage.
Windshield Preparation - Installing A New Windshield
1. Apply four new spacers the top and sides of the glass.
2. Install the lower spacer assemblies (2) onto the glass.
3. Position windshield (2) in center of windshield opening and resting on the side and lower spacers (2).
4. Clean and check windshield for damage.
5. Position windshield in center of windshield opening.
6. Apply adhesive tape to the locations shown to aid with final installation.
7. Verify windshield gap is parallel to with windshield.
8. Cut tape with a sharp knife and remove windshield.
9. Clean and dry area of glass to be glued with a suitable glass preparation solvent and rag.
10. Apply primer to gluing surface at windshield seal.
11. Apply primer (1) around the perimeter of the glass to a width of 18 mm (0.7 in.) (2) and 6 mm (0.25 in) from the edge.
12. Allow primer to air dry for at least 10 minutes.
13. Using a flash light, verify that glass primer is without damage.
Windshield Opening Preparation
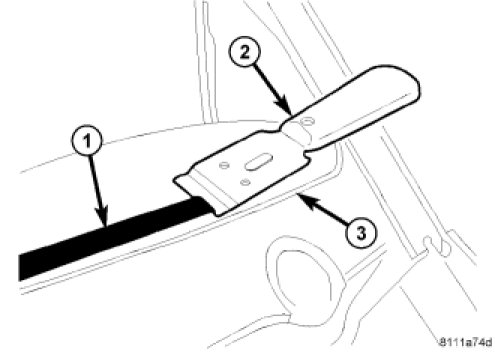
1. Clean and vacuum windshield opening.
2. Level old bead of windshield opening adhesive (1) to a thickness of approximately 1 mm (0.04 in.) and remove loose adhesive.
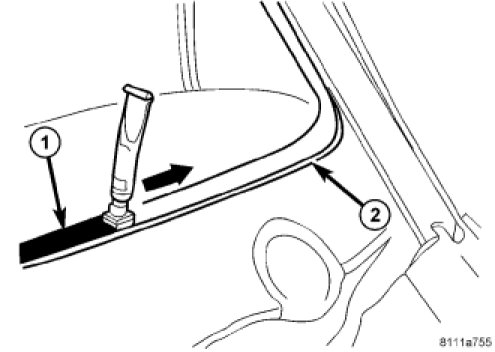
3. Clean and dry area of windshield opening to be re-glued with a suitable glass preparation solvent and rag.
4. Re-prime any damaged area. If old adhesive has been exposed for more than 12 hours, entire adhesive area needs to be re-primed.
5. Allow primer to air dry for at least 10 minutes.
Windshield Installation
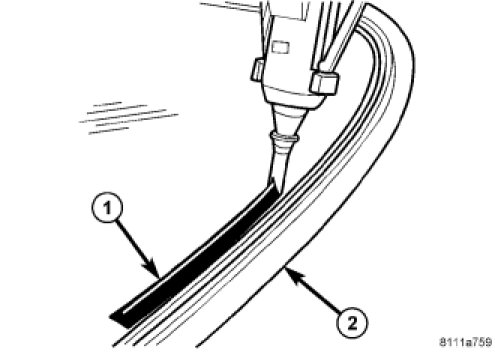
1. Apply bead of adhesive (1) with a triangular nozzle directly to the windshield seal starting at bottom in center of windshield.
CAUTION: Always apply bead of adhesive to the windshield. Always install the windshield within 5 minutes after applying adhesive.
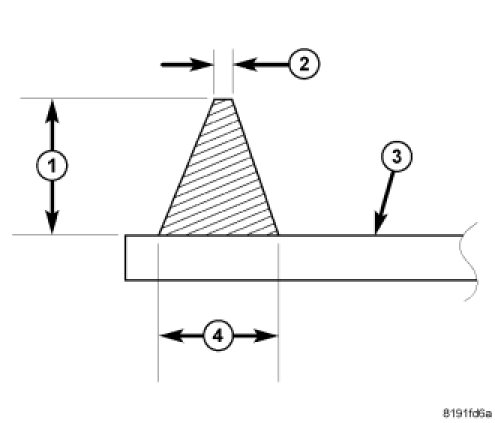
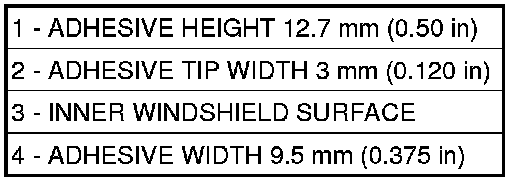
2. Bead dimensions should be approximately 9.5 mm wide (4) by 12.7 mm in height (1).
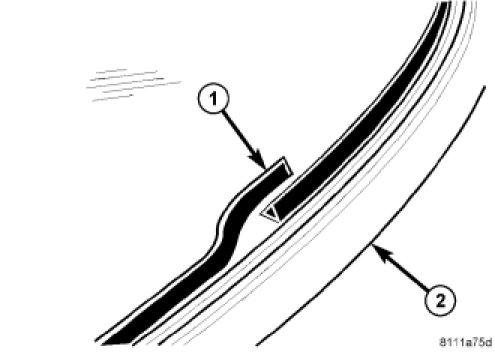
3. Allow end of adhesive bead to run out parallel to the start of the bead and smooth ends flush.
4. Lift windshield (1) into place in the center of the windshield opening and use the tape as a guide to aid installation of the windshield into the center of the cutout.
5. Carefully lay down windshield and press on.
CAUTION: It is no longer possible to move the windshield after installation. The windshield should never be pressed into place by more than one person, because the windshield can break if pressed simultaneously on both sides.
CAUTION: Roll down the left and right front door glass and open the rear glass slider (if available) before installing windshield to avoid pressurizing the passenger compartment if a door is slammed before urethane is cured. Water leaks can result.
6. Install rear view mirror Rear View Mirror - Installation.
Factory Service Tools
Use the Manual With the Right Hardware
Pair factory procedures with proven DIY tools so the instructions are easier to execute.
Disclosure: Verified tool recommendations may earn an affiliate commission at no cost to you.
When to See a Mechanic
Stop DIY work and contact a certified mechanic immediately if any of the following apply:
- • You smell fuel, burning insulation, or see smoke.
- • Brakes feel soft, pull hard to one side, or make grinding noises.
- • The engine overheats, stalls repeatedly, or misfires under load.
- • You are missing required tools, torque specs, or safe lifting equipment.
- • You are not confident in the next step or safety outcome.
Rather have a pro handle this?
A certified mobile mechanic comes to your home or office. They bring the tools, you stay comfortable. No tow truck, no waiting room, no surprises.
Comes to youSame-day available12-month warranty
Get a Free QuoteNo obligation. See pricing before you book.