
Safety Warning
DIY auto repair can cause serious injury, fire, or vehicle damage. These guides are for informational purposes only. Always follow OEM torque specs, wear PPE, and consult a certified mechanic if you are unsure. You are solely responsible for your safety.
2005 Jeep TJ (CANADA) L4-2.4LFACTORY OEM SERVICE PROCEDURE
Control Assembly: Testing and Inspection
VACUUM SYSTEM
Vacuum control is used to operate the mode doors in the HVAC housing. Testing of the heater-A/C mode control switch operation will determine if the vacuum and mechanical controls are functioning. However, it is possible that a vacuum control system that operates correctly at engine idle (high engine vacuum) may not function properly at high engine speeds or loads (low engine vacuum). This can be caused by leaks in the vacuum system, or a faulty vacuum check valve.
A vacuum system test will help to identify the source of poor vacuum system performance or vacuum system leaks. Before starting this test, stop the engine and make certain that the problem isn't a disconnected vacuum supply tube at the engine intake manifold vacuum tap or the vacuum reservoir.
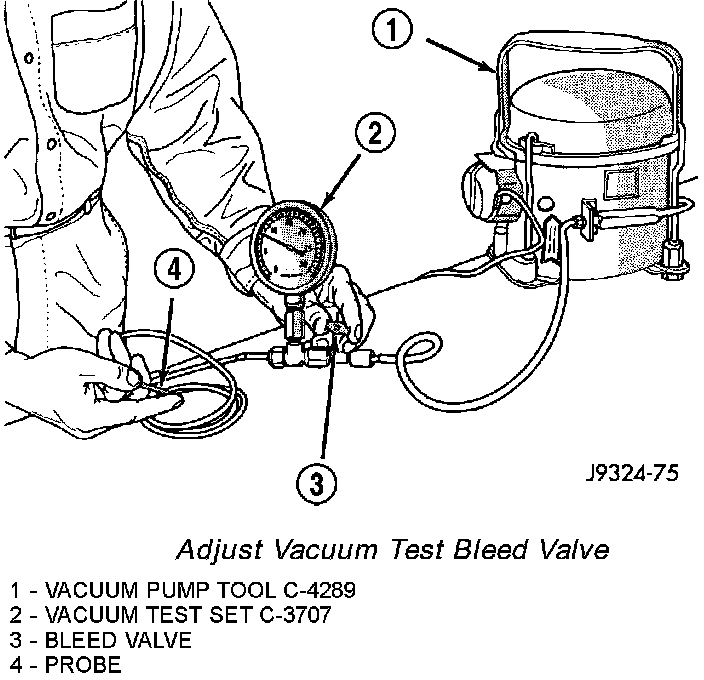
Use an adjustable vacuum test set (Special Tool C-3707-B) and a suitable vacuum pump to test the heater-A/C vacuum control system. With a finger placed over the end of the vacuum test hose probe , adjust the bleed valve on the test set gauge to obtain a vacuum of exactly 27 kPa (8 in. Hg.). Release and block the end of the probe several times to verify that the vacuum reading returns to the exact 27 kPa (8 in. Hg.) setting. Otherwise, a false reading will be obtained during testing.
VACUUM CHECK VALVE
1. Remove the vacuum check valve. The valve is located in the (black) vacuum supply tube at the intake manifold vacuum tap.
2. Connect the test set vacuum supply hose to the heater-A/C system (natural color) side of the valve. When connected to this side of the check valve, no vacuum should pass and the test set gauge should return to the 27 kPa (8 in. Hg.) setting. If OK, go to Step 3. If not OK, replace the faulty valve.
3. Connect the test set vacuum supply hose to the engine vacuum (black color) side of the valve. When connected to this side of the check valve, vacuum should flow through the valve without restriction. If not OK, replace the faulty valve.
HEATER-A/C CONTROLS
1. Connect the test set vacuum probe to the heater-A/C vacuum supply (black) tube in the engine compartment. Position the test set gauge so that it can be viewed from the passenger compartment.
2. Place the heater-A/C mode control switch knob in each mode position, one position at a time, and pause after each selection. The test set gauge should return to the 27 kPa (8 in. Hg.) setting shortly after each selection is made. If not OK, a component or vacuum line in the vacuum circuit of the selected mode has a leak. See the procedure in Locating Vacuum Leaks.
CAUTION: Do not use lubricant on the switch ports or in the holes in the plug, as lubricant will ruin the vacuum valve in the switch. A drop of clean water in the connector plug holes will help the connector slide onto the switch ports.
LOCATING VACUUM LEAKS
WARNING: ON VEHICLES EQUIPPED WITH AIR-BAGS, DISABLE THE AIRBAG SYSTEM BEFORE ATTEMPTING ANY STEERING WHEEL, STEERING COLUMN, OR INSTRUMENT PANEL COMPONENT DIAGNOSIS OR SERVICE. DISCONNECT AND ISOLATE THE BATTERY NEGATIVE (GROUND) CABLE, THEN WAIT TWO MINUTES FOR THE AIRBAG SYSTEM CAPACITOR TO DISCHARGE BEFORE PERFORMING FURTHER DIAGNOSIS OR SERVICE. THIS IS THE ONLY SURE WAY TO DISABLE THE AIRBAG SYSTEM. FAILURE TO TAKE THE PROPER PRECAUTIONS COULD RESULT IN ACCIDENTAL AIR-BAG DEPLOYMENT AND POSSIBLE PERSONAL INJURY.
1. Disconnect the vacuum harness connector at the back of the A/C-heater control.
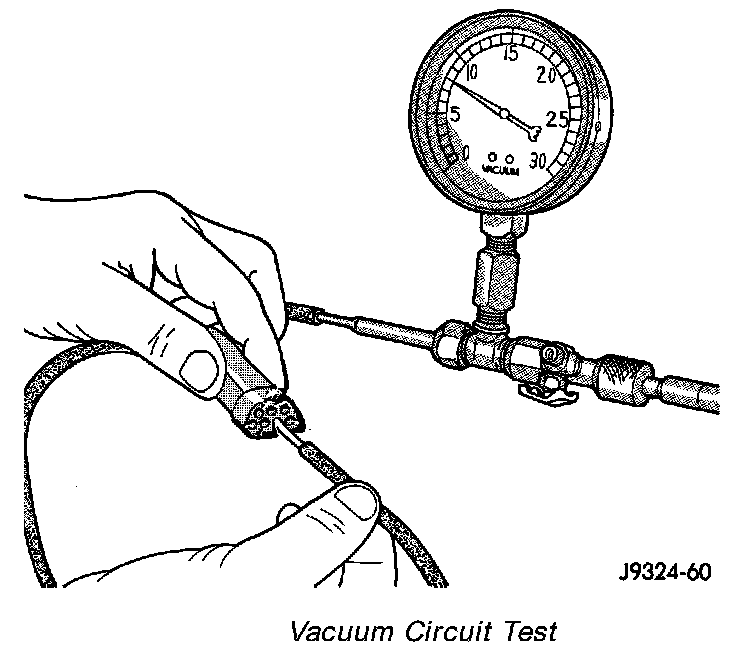
2. Connect the test set vacuum hose probe to each port in the vacuum harness connector, one port at a time, and pause after each connection . The test set gauge should return to the 27 kPa (8 in. Hg.) setting shortly after each connection is made. If OK, replace the faulty mode control switch. If not OK, go to Step 3.
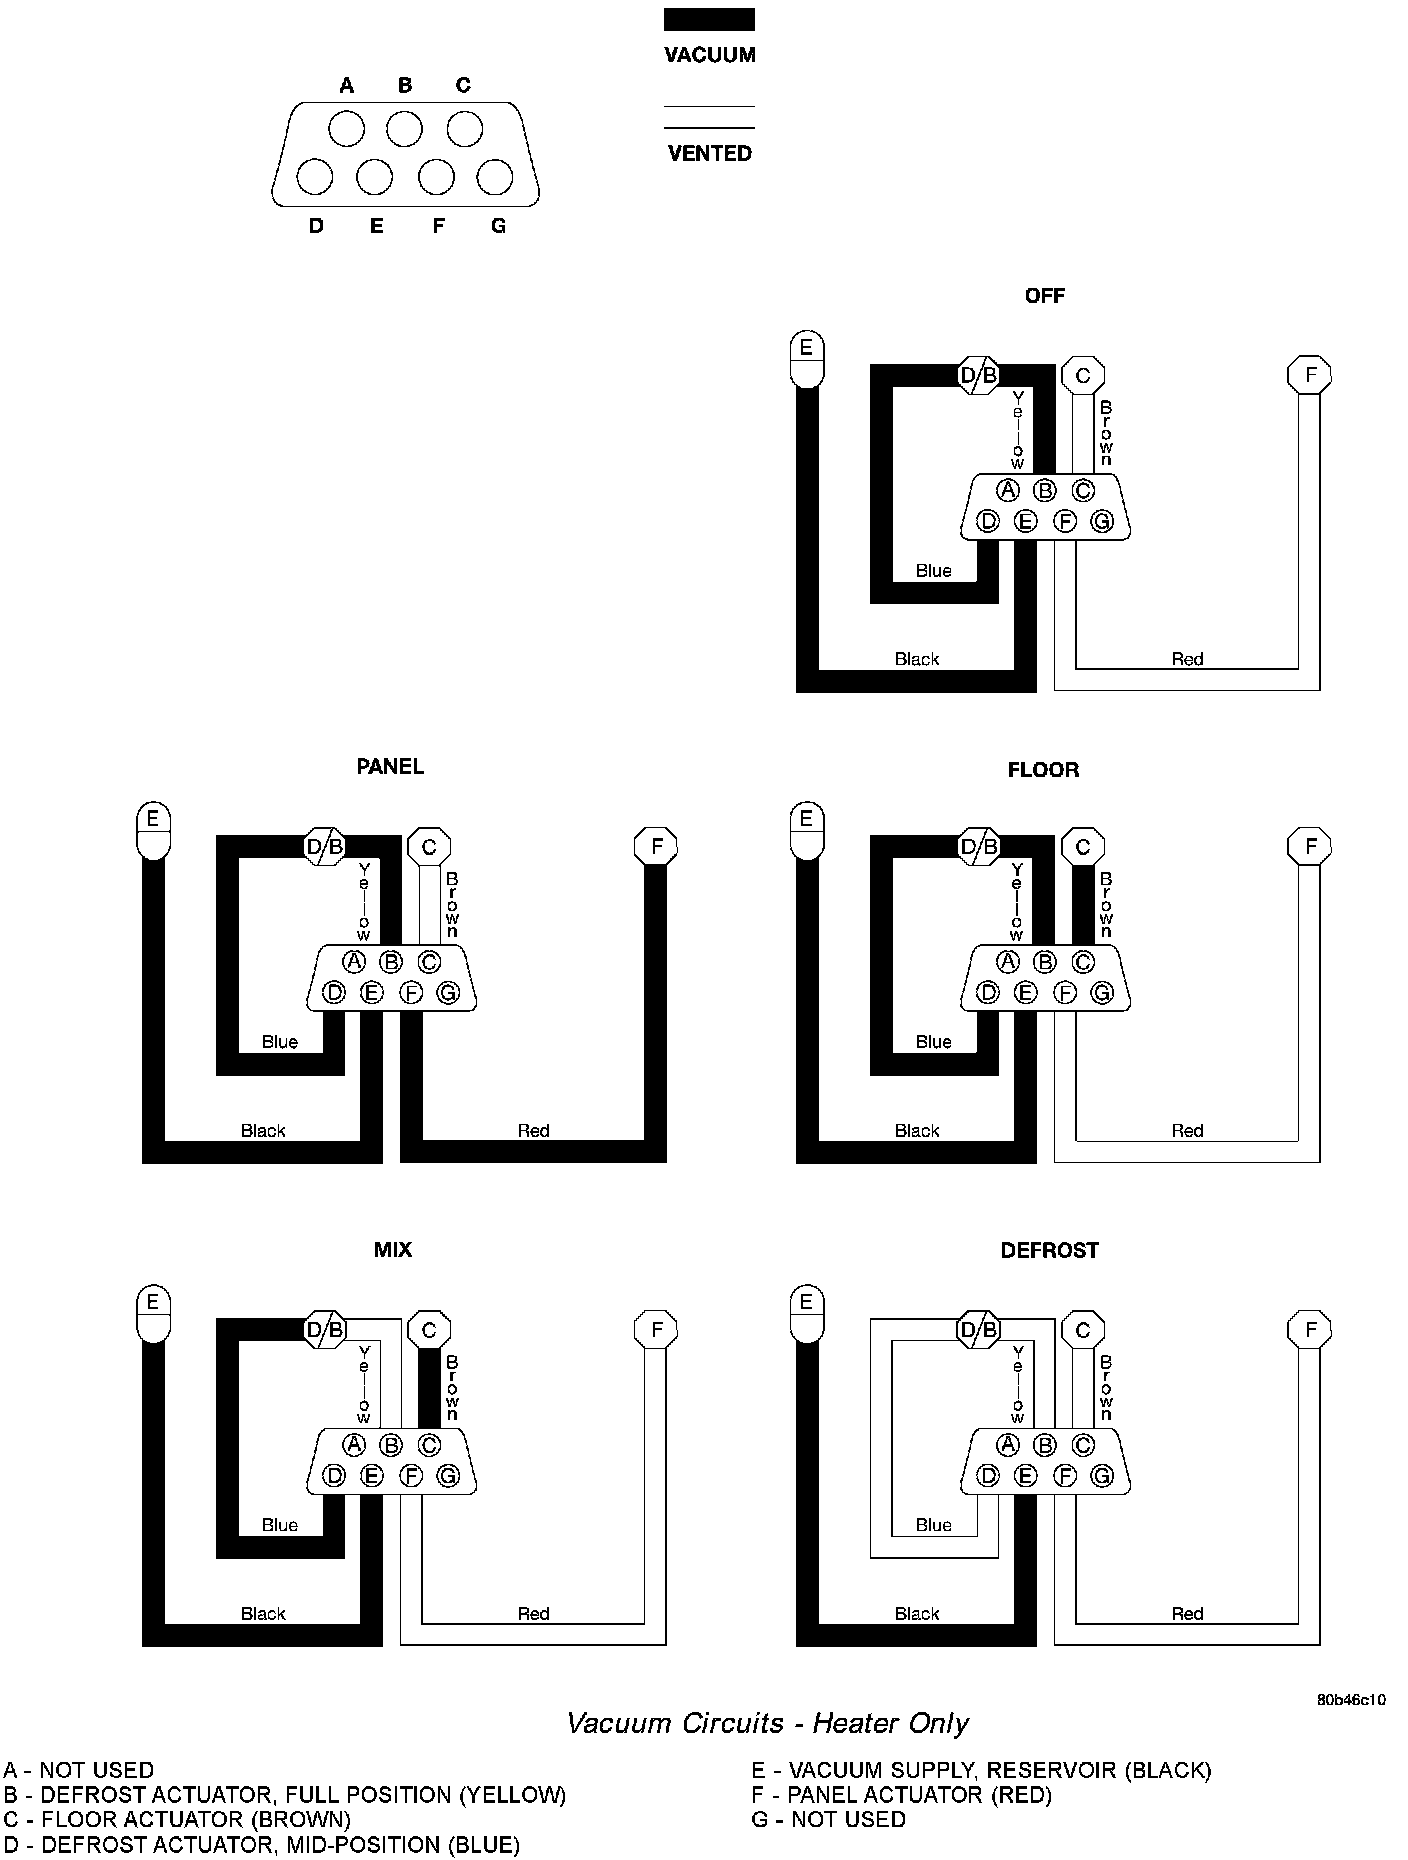
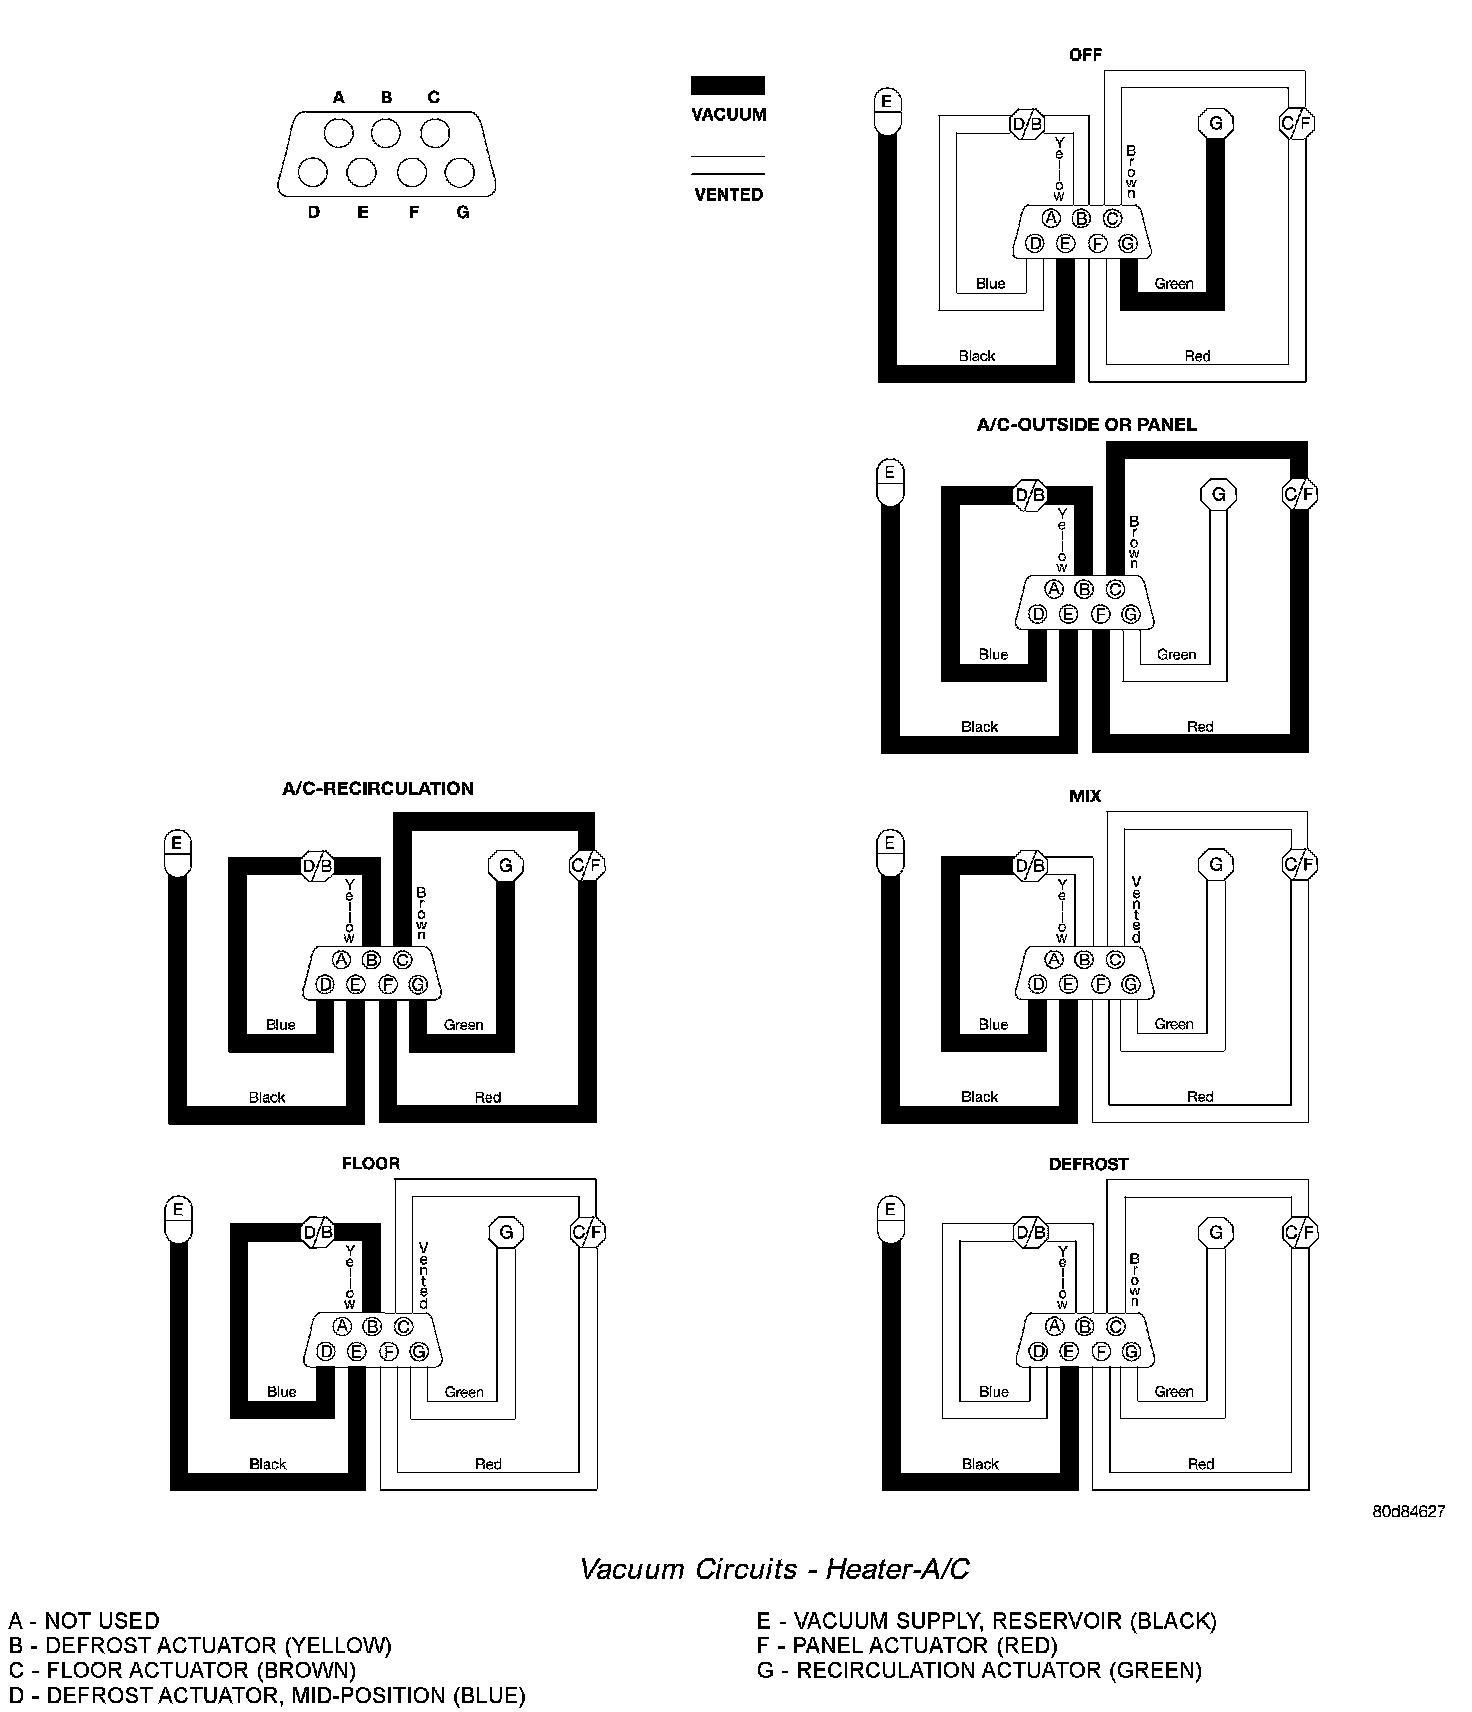
3. Determine the vacuum line color of the vacuum circuit that is leaking. To determine the vacuum line colors, refer to the Vacuum Circuit charts.
4. Disconnect and plug the vacuum line from the component (fitting, actuator, valve, switch, or reservoir) on the other end of the leaking circuit. Instrument panel disassembly or removal may be necessary to gain access to some components.
5. Connect the test set hose or probe to the open end of the leaking circuit. The test set gauge should return to the 27 kPa (8 in. Hg.) setting shortly after each connection is made. If OK, replace the faulty disconnected component. If not OK, go to Step 6.
6. To locate a leak in a vacuum line, leave one end of the line plugged and connect the test set hose or probe to the other end. Run your fingers slowly along the line while watching the test set gauge. The vacuum reading will fluctuate when your fingers contact the source of the leak. To repair the vacuum line, cut out the leaking section of the line. Then, insert the loose ends of the line into a suitable length of 3 mm (1/8 in.) inside diameter rubber hose.
Vacuum control is used to operate the mode doors in the HVAC housing. Testing of the heater-A/C mode control switch operation will determine if the vacuum and mechanical controls are functioning. However, it is possible that a vacuum control system that operates correctly at engine idle (high engine vacuum) may not function properly at high engine speeds or loads (low engine vacuum). This can be caused by leaks in the vacuum system, or a faulty vacuum check valve.
A vacuum system test will help to identify the source of poor vacuum system performance or vacuum system leaks. Before starting this test, stop the engine and make certain that the problem isn't a disconnected vacuum supply tube at the engine intake manifold vacuum tap or the vacuum reservoir.
Adjust Vacuum Test Bleed Valve:
Use an adjustable vacuum test set (Special Tool C-3707-B) and a suitable vacuum pump to test the heater-A/C vacuum control system. With a finger placed over the end of the vacuum test hose probe , adjust the bleed valve on the test set gauge to obtain a vacuum of exactly 27 kPa (8 in. Hg.). Release and block the end of the probe several times to verify that the vacuum reading returns to the exact 27 kPa (8 in. Hg.) setting. Otherwise, a false reading will be obtained during testing.
VACUUM CHECK VALVE
1. Remove the vacuum check valve. The valve is located in the (black) vacuum supply tube at the intake manifold vacuum tap.
2. Connect the test set vacuum supply hose to the heater-A/C system (natural color) side of the valve. When connected to this side of the check valve, no vacuum should pass and the test set gauge should return to the 27 kPa (8 in. Hg.) setting. If OK, go to Step 3. If not OK, replace the faulty valve.
3. Connect the test set vacuum supply hose to the engine vacuum (black color) side of the valve. When connected to this side of the check valve, vacuum should flow through the valve without restriction. If not OK, replace the faulty valve.
HEATER-A/C CONTROLS
1. Connect the test set vacuum probe to the heater-A/C vacuum supply (black) tube in the engine compartment. Position the test set gauge so that it can be viewed from the passenger compartment.
2. Place the heater-A/C mode control switch knob in each mode position, one position at a time, and pause after each selection. The test set gauge should return to the 27 kPa (8 in. Hg.) setting shortly after each selection is made. If not OK, a component or vacuum line in the vacuum circuit of the selected mode has a leak. See the procedure in Locating Vacuum Leaks.
CAUTION: Do not use lubricant on the switch ports or in the holes in the plug, as lubricant will ruin the vacuum valve in the switch. A drop of clean water in the connector plug holes will help the connector slide onto the switch ports.
LOCATING VACUUM LEAKS
WARNING: ON VEHICLES EQUIPPED WITH AIR-BAGS, DISABLE THE AIRBAG SYSTEM BEFORE ATTEMPTING ANY STEERING WHEEL, STEERING COLUMN, OR INSTRUMENT PANEL COMPONENT DIAGNOSIS OR SERVICE. DISCONNECT AND ISOLATE THE BATTERY NEGATIVE (GROUND) CABLE, THEN WAIT TWO MINUTES FOR THE AIRBAG SYSTEM CAPACITOR TO DISCHARGE BEFORE PERFORMING FURTHER DIAGNOSIS OR SERVICE. THIS IS THE ONLY SURE WAY TO DISABLE THE AIRBAG SYSTEM. FAILURE TO TAKE THE PROPER PRECAUTIONS COULD RESULT IN ACCIDENTAL AIR-BAG DEPLOYMENT AND POSSIBLE PERSONAL INJURY.
1. Disconnect the vacuum harness connector at the back of the A/C-heater control.
Vacuum Circuit Test:
2. Connect the test set vacuum hose probe to each port in the vacuum harness connector, one port at a time, and pause after each connection . The test set gauge should return to the 27 kPa (8 in. Hg.) setting shortly after each connection is made. If OK, replace the faulty mode control switch. If not OK, go to Step 3.
Vacuum Circuits - Heater Only:
Vacuum Circuits - Heater-A/C:
3. Determine the vacuum line color of the vacuum circuit that is leaking. To determine the vacuum line colors, refer to the Vacuum Circuit charts.
4. Disconnect and plug the vacuum line from the component (fitting, actuator, valve, switch, or reservoir) on the other end of the leaking circuit. Instrument panel disassembly or removal may be necessary to gain access to some components.
5. Connect the test set hose or probe to the open end of the leaking circuit. The test set gauge should return to the 27 kPa (8 in. Hg.) setting shortly after each connection is made. If OK, replace the faulty disconnected component. If not OK, go to Step 6.
6. To locate a leak in a vacuum line, leave one end of the line plugged and connect the test set hose or probe to the other end. Run your fingers slowly along the line while watching the test set gauge. The vacuum reading will fluctuate when your fingers contact the source of the leak. To repair the vacuum line, cut out the leaking section of the line. Then, insert the loose ends of the line into a suitable length of 3 mm (1/8 in.) inside diameter rubber hose.
Factory Service Tools
Use the Manual With the Right Hardware
Pair factory procedures with proven DIY tools so the instructions are easier to execute.
Disclosure: Verified tool recommendations may earn an affiliate commission at no cost to you.
When to See a Mechanic
Stop DIY work and contact a certified mechanic immediately if any of the following apply:
- • You smell fuel, burning insulation, or see smoke.
- • Brakes feel soft, pull hard to one side, or make grinding noises.
- • The engine overheats, stalls repeatedly, or misfires under load.
- • You are missing required tools, torque specs, or safe lifting equipment.
- • You are not confident in the next step or safety outcome.