
Safety Warning
DIY auto repair can cause serious injury, fire, or vehicle damage. These guides are for informational purposes only. Always follow OEM torque specs, wear PPE, and consult a certified mechanic if you are unsure. You are solely responsible for your safety.
2003 Isuzu Rodeo 2WD L4-2.2LFACTORY OEM SERVICE PROCEDURE
Windshield: Service and Repair
Windshield
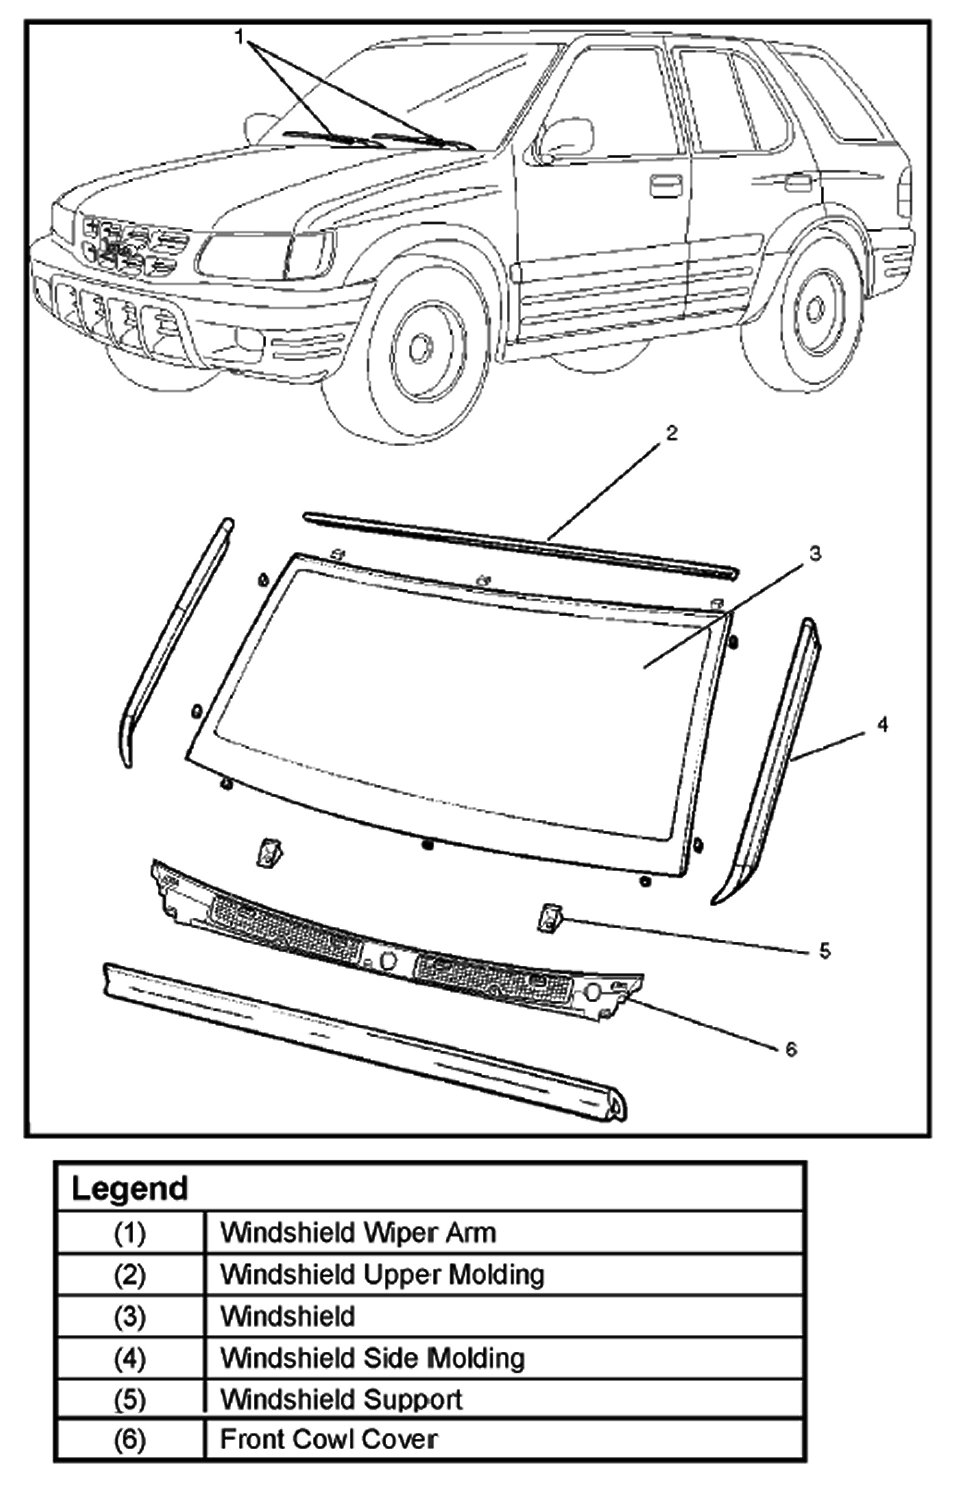
Removal
1. Disconnect the battery ground cable.
2. Remove the front pillar trim cover.
- Turn up the finisher and pry the trim cover clips free from the body panel.
3. Remove the sunvisors and sunvisor holders.
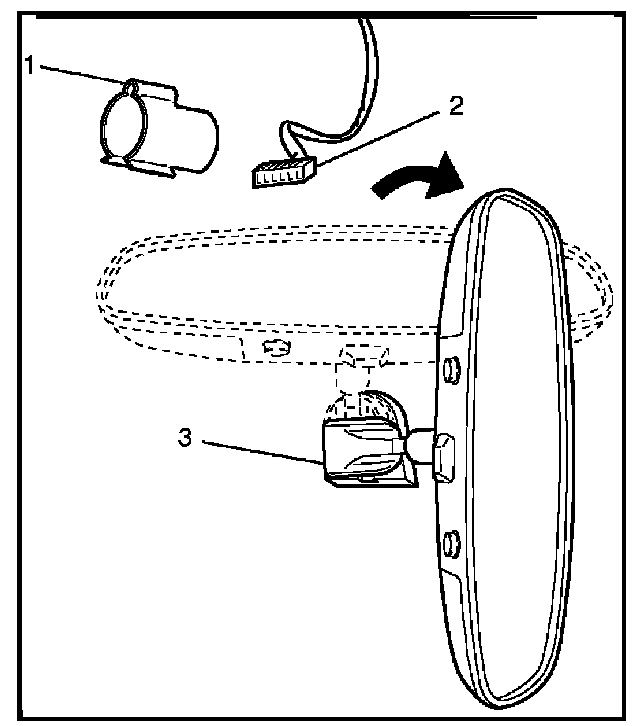
4. Remove the rear view mirror.
- Remove the clip (1) and disconnect the connector (2).
- Turn the channel mount (3) 90 degrees clockwise and pull down.
5. Remove the windshield wiper arm.
6. Remove the windshield side molding.
- Pull the molding out from drip rail.
7. Remove the front cowl cover.
8. Remove the windshield support.
9. Remove the upper moulding.
10. Remove the windshield.
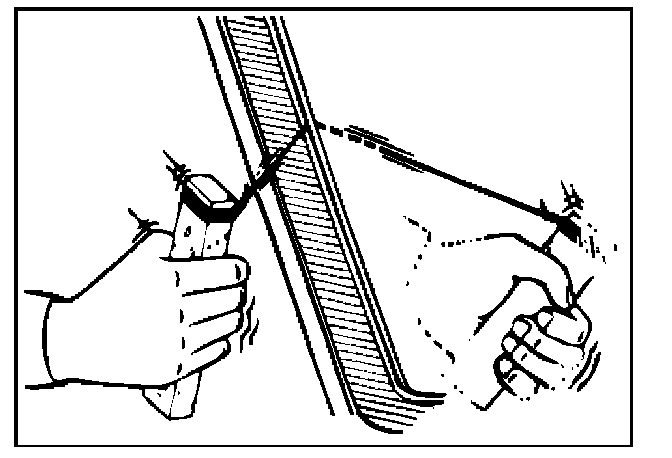
- Use a knife to cut through part of the adhesive caulking material.
- Secure one end of a piece of steel piano wire (0.02 inches in diameter) to a piece of wood that can serve as a handle.
- Use a pair of needle nose pliers to insert the other end of the piano wire through the adhesive caulking material at the edge of the windshield glass.
- Secure the other end of the piano wire to another piece of wood.
- With the aid of an assistant, carefully move the piano wire with a sawing motion to cut through the adhesive caulking material around the entire circumference of the windshield glass.
- Attach some cloth tape (1) on the body for protecting the painting surface.
- Clean the remaining adhesive caulking material from the area of the body which holds the windshield.
Installation
To install, follow the removal steps in the reverse order, noting the following points:
1. Clean the bonding surfaces of both the windshield and body panel with a soft rag and white gasoline.
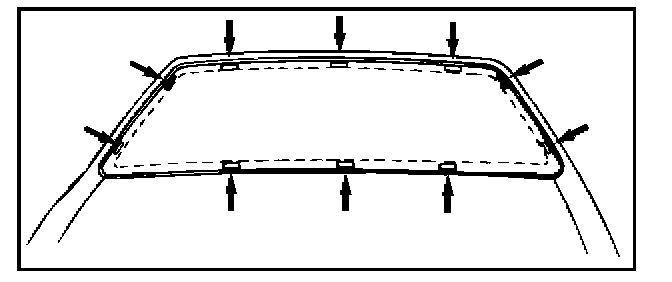
2. Install the spacer.
- Attach spacers in ten locations as shown in the figure.
- Always use new spacer.
3. Install the windshield upper molding.
- Peel off the tear-away paper from the windshield upper molding and start applying it with one end of the glass and cut away the surplus at the other end of the glass for length adjustment.
- Always use new upper molding.
4. Temporary install the windshield support.
5. Apply the primer to the windshield and body panel.
- Apply the primer (3) (Sun star #435-40 or equivalent) to the windshield side bonding surface as shown in the figure.
- Apply the primer (Sun star #435-95 or equivalent) to the body side bonding surface.
NOTE: Apply an adhesive 3 minutes or more but within 24 hours after the application of primer. If more than 24 hours have passed, reapply primer.
Primer should be handled as following:
1. Use the primer manufactured 3 months or less ago and having been kept in a refrigerator.
2. Wipe off primer-stains on positions other than requires application.
3. Stir the primer for a minute or more before use.

6. Apply the adhesive (1) to the windshield.
- After drying primer completely, apply a sealing adhesive (Sun star #555 or equivalent) along the edge of the glass so that the sealing adhesive has a 20 mm (0.79 in) junction at middle of the base of the glass.

NOTE: Apply an adhesive 3 minutes or more but within 24 hours after the application of primer. If more than 24 hours have passed, reapply primer.
Adhesive should be handled as follows:
1. Use the adhesive manufactured 3 months or less ago.
2. Wipe off adhesive-stains on positions other than requires application.
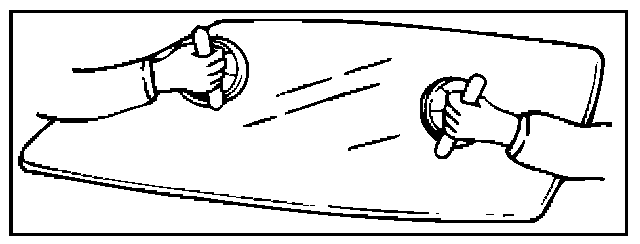
7. Install the windshield.
- Set the windshield with sealing adhesive applied to entire circumference in the body panel. Specifically, adjust the windshield support with the upper molding making contact with the body panel, press the glass and tighten the windshield support.
NOTE: Affix the glass within 5 minutes of application.
8. Install the front cowl cover.
9. Install side molding.
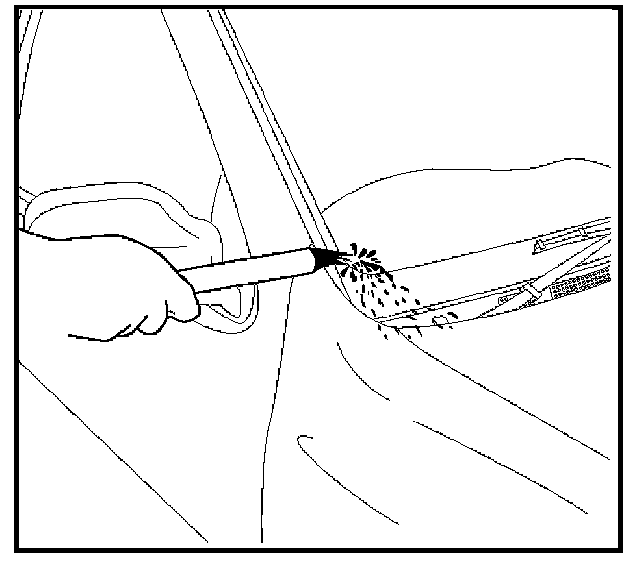
- Use alcohol wipe or equivalent cleaner with soft cloth to wipe away any excess adhesive.
- Cure the bonding at a temperature of 20�C -30�C (68�F -86�F) for 24 hours.
- Check the windshield for any signs of water leak.
10. Install windshield wiper arm.
Parts Location:
Removal
1. Disconnect the battery ground cable.
2. Remove the front pillar trim cover.
- Turn up the finisher and pry the trim cover clips free from the body panel.
3. Remove the sunvisors and sunvisor holders.
4. Remove the rear view mirror.
- Remove the clip (1) and disconnect the connector (2).
- Turn the channel mount (3) 90 degrees clockwise and pull down.
5. Remove the windshield wiper arm.
6. Remove the windshield side molding.
- Pull the molding out from drip rail.
7. Remove the front cowl cover.
8. Remove the windshield support.
9. Remove the upper moulding.
10. Remove the windshield.
- Use a knife to cut through part of the adhesive caulking material.
- Secure one end of a piece of steel piano wire (0.02 inches in diameter) to a piece of wood that can serve as a handle.
- Use a pair of needle nose pliers to insert the other end of the piano wire through the adhesive caulking material at the edge of the windshield glass.
- Secure the other end of the piano wire to another piece of wood.
- With the aid of an assistant, carefully move the piano wire with a sawing motion to cut through the adhesive caulking material around the entire circumference of the windshield glass.
- Attach some cloth tape (1) on the body for protecting the painting surface.
- Clean the remaining adhesive caulking material from the area of the body which holds the windshield.
Installation
To install, follow the removal steps in the reverse order, noting the following points:
1. Clean the bonding surfaces of both the windshield and body panel with a soft rag and white gasoline.
2. Install the spacer.
- Attach spacers in ten locations as shown in the figure.
- Always use new spacer.
3. Install the windshield upper molding.
- Peel off the tear-away paper from the windshield upper molding and start applying it with one end of the glass and cut away the surplus at the other end of the glass for length adjustment.
- Always use new upper molding.
4. Temporary install the windshield support.
5. Apply the primer to the windshield and body panel.
- Apply the primer (3) (Sun star #435-40 or equivalent) to the windshield side bonding surface as shown in the figure.
- Apply the primer (Sun star #435-95 or equivalent) to the body side bonding surface.
NOTE: Apply an adhesive 3 minutes or more but within 24 hours after the application of primer. If more than 24 hours have passed, reapply primer.
Primer should be handled as following:
1. Use the primer manufactured 3 months or less ago and having been kept in a refrigerator.
2. Wipe off primer-stains on positions other than requires application.
3. Stir the primer for a minute or more before use.
6. Apply the adhesive (1) to the windshield.
- After drying primer completely, apply a sealing adhesive (Sun star #555 or equivalent) along the edge of the glass so that the sealing adhesive has a 20 mm (0.79 in) junction at middle of the base of the glass.
NOTE: Apply an adhesive 3 minutes or more but within 24 hours after the application of primer. If more than 24 hours have passed, reapply primer.
Adhesive should be handled as follows:
1. Use the adhesive manufactured 3 months or less ago.
2. Wipe off adhesive-stains on positions other than requires application.
7. Install the windshield.
- Set the windshield with sealing adhesive applied to entire circumference in the body panel. Specifically, adjust the windshield support with the upper molding making contact with the body panel, press the glass and tighten the windshield support.
NOTE: Affix the glass within 5 minutes of application.
8. Install the front cowl cover.
9. Install side molding.
- Use alcohol wipe or equivalent cleaner with soft cloth to wipe away any excess adhesive.
- Cure the bonding at a temperature of 20�C -30�C (68�F -86�F) for 24 hours.
- Check the windshield for any signs of water leak.
10. Install windshield wiper arm.
Factory Service Tools
Use the Manual With the Right Hardware
Pair factory procedures with proven DIY tools so the instructions are easier to execute.
Disclosure: Verified tool recommendations may earn an affiliate commission at no cost to you.
When to See a Mechanic
Stop DIY work and contact a certified mechanic immediately if any of the following apply:
- • You smell fuel, burning insulation, or see smoke.
- • Brakes feel soft, pull hard to one side, or make grinding noises.
- • The engine overheats, stalls repeatedly, or misfires under load.
- • You are missing required tools, torque specs, or safe lifting equipment.
- • You are not confident in the next step or safety outcome.