
Safety Warning
DIY auto repair can cause serious injury, fire, or vehicle damage. These guides are for informational purposes only. Always follow OEM torque specs, wear PPE, and consult a certified mechanic if you are unsure. You are solely responsible for your safety.
2012 Hyundai Tucson AWD L4-2.4LFACTORY OEM SERVICE PROCEDURE
Repair Procedures
Removal
Smart Key Unit
1. Disconnect the negative (-) battery terminal.
2. Remove the glove box housing.
3. After disconnecting the smart key unit connector (A), loosen the smart key unit mounting bolts, and remove the smart key unit (B).

RF Receiver
1. Disconnect the negative (-) battery terminal.
2. Remove the glove box housing.
3. Remove the air vent housing in front of the assist seat.
4. After loosening the mounting nut (B), disconnect the connector (A) and remove the receiver (C).

Interior 1 Antenna
1. Disconnect the negative (-) battery terminal.
2. Remove the seat heater switch assembly.
3. After loosening the antenna nuts (2EA) and connector (B), remove the interior 1 antenna (A).

NOTE:
Release the connector lock (A) as indicated by the arrow, and then push-down the lock.
Make sure the connector is locked completely when installing.

Interior 2 Antenna
1. Disconnect the negative (-) battery terminal.
2. Remove the floor console rear panel (A) using the appropriate tool.

NOTE:
Take care not to damage and scratch the floor console rear panel and its related parts.
Take care not to damage the hook when removing the floor console rear panel.
3. After loosening the antenna nuts (2EA) and connector, remove the interior 2 antenna (A).

NOTE:
Release the connector lock (A) as indicated by the arrow, and then push-down the lock.
Make sure the connector is locked completely when installing.
Interior 3 Antenna
1. Disconnect the negative (-) battery terminal.
2. After loosening the mounting bolts, then remove the rear seat assembly.
3. After loosening the antenna nuts (2EA) and connector (A), remove the interior 3 antenna (B).

NOTE:
Release the connector lock (A) as indicated by the arrow, and then push-down the lock.
Make sure the connector is locked completely when installing.
Exterior Bumper Antenna
1. Disconnect the negative (-) battery terminal.
2. Lift the vehicle up using the lift.
3. Disconnect the antenna connector (A) on the center of rear bumper.

4. After loosening the nuts (2EA), remove the exterior bumper antenna (B).
Buzzer
1. Disconnect the negative (-) battery terminal.
2. Remove the front left fender.
3. Disconnect the connectors, then remove the buzzer (A).
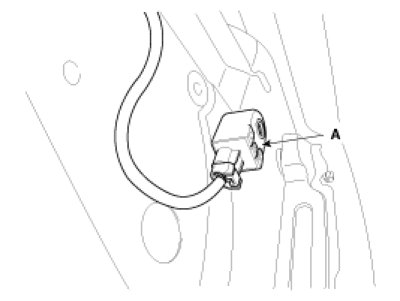
Door Outside Handle
1. Disconnect the negative (-) battery terminal.
2. Disconnect the connector after removing the door trim.
3. After loosening the mounting bolt, then remove the key holder (A).

4. Remove the outside handle (A) by sliding it rearward.

5. Disconnect the outside handle connector (B).

Tailgate Switch
1. Disconnect the negative (-) battery terminal.
2. Remove the tailgate trim.
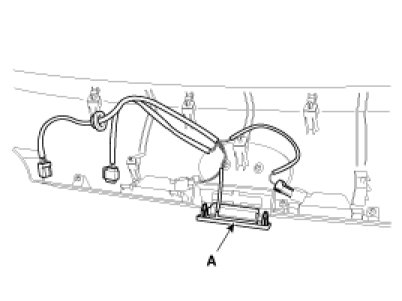
3. Disconnect the connector. After loosening the tailgate garnish mounting nuts (13EA), remove the tailgate garnish (A).

4. Remove the outside handle (A) after loosening the outside handle mounting screws.

5. Remove the other wiring connectors which connected with outside handle, then remove the tailgate switch assembly (A).
Inspection
Smart Key Unit
- Refer to BE group - inspection / self diagnosis with scan tool.
Smart Key Switch
- Refer to BE group - inspection / self diagnosis with scan tool.
Antenna
- Refer to BE group - inspection / self diagnosis with scan tool.
Tailgate Switch
1. Check for continuity between the tailgate latch terminals.

2. If continuity is not specified, inspect the switch

Installation
Smart Key Unit
1. Install the smart key unit.
2. Install the smart key unit mounting bolt and nut, and then connect the connector.
3. Install the glove box.
4. Install the negative (-) battery terminal and check the smart key system.
RF Receiver
1. Install the RF receiver.
2. Install the glove box housing and air vent housing.
3. Install the negative (-) battery terminal and check the smart key system.
Interior 1 Antenna
1. Install the interior 1 antenna.
2. Install the front seat heater switch assembly.
3. Install the negative (-) battery terminal and check the smart key system.
Interior 2 Antenna
1. Install the interior 2 antenna.
2. Install the floor console rear cover after connecting the connector.
3. Install the negative (-) battery terminal and check the smart key system.
Interior 3 Antenna
1. Install the interior 3 antenna.
2. Install the rear seat assembly.
3. Install the negative (-) battery terminal and check the smart key system.
Exterior Bumper Antenna
1. Install the exterior bumper antenna.
2. Install the negative (-) battery terminal and check the smart key system.
Buzzer
1. Install the buzzer.
2. Install the front left fender.
3. Install the negative (-) battery terminal and check the smart key system.
Door Outside Handle
1. Install the outside handle.
2. Install the door trim.
3. Install the negative (-) battery terminal and check the smart key system.
Tailgate Switch
1. Install the tailgate switch.
2. Install the tailgate garnish.
3. Install the tailgate trim.
4. Install the negative (-) battery terminal and check the smart key system.
Factory Service Tools
Use the Manual With the Right Hardware
Pair factory procedures with proven DIY tools so the instructions are easier to execute.
Disclosure: Verified tool recommendations may earn an affiliate commission at no cost to you.
When to See a Mechanic
Stop DIY work and contact a certified mechanic immediately if any of the following apply:
- • You smell fuel, burning insulation, or see smoke.
- • Brakes feel soft, pull hard to one side, or make grinding noises.
- • The engine overheats, stalls repeatedly, or misfires under load.
- • You are missing required tools, torque specs, or safe lifting equipment.
- • You are not confident in the next step or safety outcome.