
Safety Warning
DIY auto repair can cause serious injury, fire, or vehicle damage. These guides are for informational purposes only. Always follow OEM torque specs, wear PPE, and consult a certified mechanic if you are unsure. You are solely responsible for your safety.
2012 Hyundai Equus V8-5.0LFACTORY OEM SERVICE PROCEDURE
Cruise Control Module: Service and Repair
Removal
1. Remove the bumper.
2. Disconnect the smart cruise control unit connector (A).
3. Loosen the bolts and then remove the smart cruise control unit bracket (B).
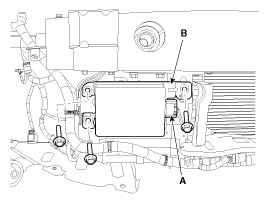
4. Loosen the nuts and then disassemble the smart cruise control unit (A) from the bracket (B).

Installation
1. Assemble the smart cruise control unit (A) to the bracket (B) correctly.
2. Install the smart cruise control unit bracket (B) on the vehicle.
3. Connect the smart cruise control connector (A) to the unit.
4. Align the smart cruise control sensor.
5. Install the bumper.
Smart Cruise Control(SCC) Sensor Alignment
The objective of the alignment is to ensure correct SCC performance. In order for the sensor to perform correctly, the sensor must be aligned correctly. The sensor alignment has major impact on road estimation, lane prediction, and target processing. When the sensor is misaligned, the performance of SCC cannot be guaranteed. Therefore, when the sensor is reinstalled or a new sensor is installed on a vehicle, the sensor shall be aligned by service personnel.
NOTE:
The sensor must be aligned when;
- The sensor is reinstalled after removing.
- A new sensor is installed on a vehicle.
- The sensor or nearby parts are impacted in a collision.
- The sensor can not recognize a vehicle ahead.
CAUTION:
Preparation for sensor alignment:
- Remove heavy objects, such as luggage in the trunk, from the vehicle.
- Adjust the tire pressure properly.
- Check wheel alignment.
- If possible, adjust the vehicle's height to the normal position.
Sensor Alignment Procedure (Parking Mode)
The SCC sensor can be aligned using a metal plate reflector.
The ignition switch should be ON for the alignment procedure.
1. Put the rear wheel of the vehicle on the dynamometer roll.

2. Rotate the rear wheel (approximately three revolutions) to make the rear axis be parallel to dynamometer axis. Make sure the steering wheel is straight ahead to align the front wheels to the vehicle motion vector.
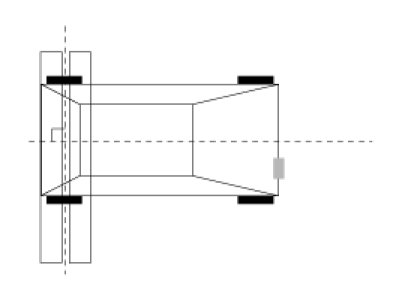
3. Put the metal plate reflector (09964-3N200) on the front of the sensor so the reflector is perpendicular to the vehicle motion vector.
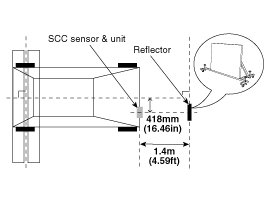
NOTE:
- The reflector should be perpendicular to the floor. Use the bubble level on the reflector.
- Make sure that there is no other material except the reflector in a space around the reflector.
- Between the vehicle and reflector
- Within 1.0m (3.28ft) from the back of the reflector
- Within 0.5m (1.64ft) from the left of right side of the reflector
- Within 1.0m (3.28ft) from the top of the reflector
4. Connect the GDS to the vehicle. Select the model and the system and click the "Vehicle S/W Management".
NOTE:
Erase the DTC code (C1620) before the sensor alignment procedure.
5. Select "Parking Mode" to start sensor alignment.

6. Check the alignment (0%) start on the GDS. The progress of the alignment is displayed on the GDS.
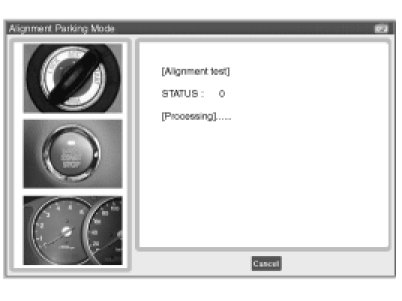
7. Make sure that the sensor alignment is completed (100%).

8. If the sensor alignment fails, delete the DTC code (C1620) and then repeat the above procedure.
Sensor Alignment Procedure (Driving Mode)
The SCC sensor can be aligned by driving the vehicle. The alignment is based on moving and stationary targets in front of the sensor.
1. Connect the GDS to the vehicle. Select the model and the system and click the "Vehicle S/W Management".
NOTE:
Erase the DTC code (C1620) before the sensor alignment procedure.
2. Select "Driving Mode" to start sensor alignment.
3. Drive the vehicle after checking the alignment (0%) start on the GDS. The progress of the alignment is displayed on the GDS.

NOTE:
The sensor alignment will last about 10 - 15 minutes. Depending on the traffic situation or road condition, the duration of the procedure can shorten or extend.
To complete the alignment in minimum time, if it is possible, drive the vehicle considering the driving/road conditions as follows.
- To shorten the duration of the alignment;
- Drive at more than 50km/h (31.1mph).
- Drive on a straight road without any curve and incline.
- Drive on a thick and wide asphalt road.
- Drive on a road with repetitive static targets.
- Drive behind a passenger car (not SUV, bus or truck) at a distance of about 30 - 90m (98.4 - 295.2ft).
- Drive on a dry and good road without rain and snow.
- The alignment process can be interrupted when the following condition exists;
- When the vehicle encounter curves with a radius smaller than 100m (328.0ft).
- When the vehicle accelerates/decelerates more than 2m/s2 (6.6ft/s2).
- When the vehicle speed is lower than 10km/h (6.2mph).
- When the vehicle is in a tunnel or under pass.
- When there are excessive steering wheel actions such as turning to the right or left and sudden lane change.
CAUTION:
Be careful when driving the vehicle for sensor alignment as follows;
- Observe a regulation speed on the road.
- Do not stick to the previous driving/road conditions excessively to shorten the duration of the alignment and drive the vehicle safely considering traffic situations.
- When driving the vehicle, do not operate the GDS and look at the GDS display for a long time. You can lose your steering control.
- Operate the GDS only when the vehicle stops.
4. Make sure that the sensor alignment is completed (100%).

5. If the sensor alignment fails, delete the DTC code (C1620) and then repeat the above procedure.
Factory Service Tools
Use the Manual With the Right Hardware
Pair factory procedures with proven DIY tools so the instructions are easier to execute.
Disclosure: Verified tool recommendations may earn an affiliate commission at no cost to you.
When to See a Mechanic
Stop DIY work and contact a certified mechanic immediately if any of the following apply:
- • You smell fuel, burning insulation, or see smoke.
- • Brakes feel soft, pull hard to one side, or make grinding noises.
- • The engine overheats, stalls repeatedly, or misfires under load.
- • You are missing required tools, torque specs, or safe lifting equipment.
- • You are not confident in the next step or safety outcome.
Rather have a pro handle this?
A certified mobile mechanic comes to your home or office. They bring the tools, you stay comfortable. No tow truck, no waiting room, no surprises.
Comes to youSame-day available12-month warranty
Get a Free QuoteNo obligation. See pricing before you book.