
Safety Warning
DIY auto repair can cause serious injury, fire, or vehicle damage. These guides are for informational purposes only. Always follow OEM torque specs, wear PPE, and consult a certified mechanic if you are unsure. You are solely responsible for your safety.
2008 Hummer H2 V8-6.2LFACTORY OEM SERVICE PROCEDURE
Instrument Panel/Center Console Component Views
Instrument Panel/Center Console Component Views
Instrument Panel and Console Overview
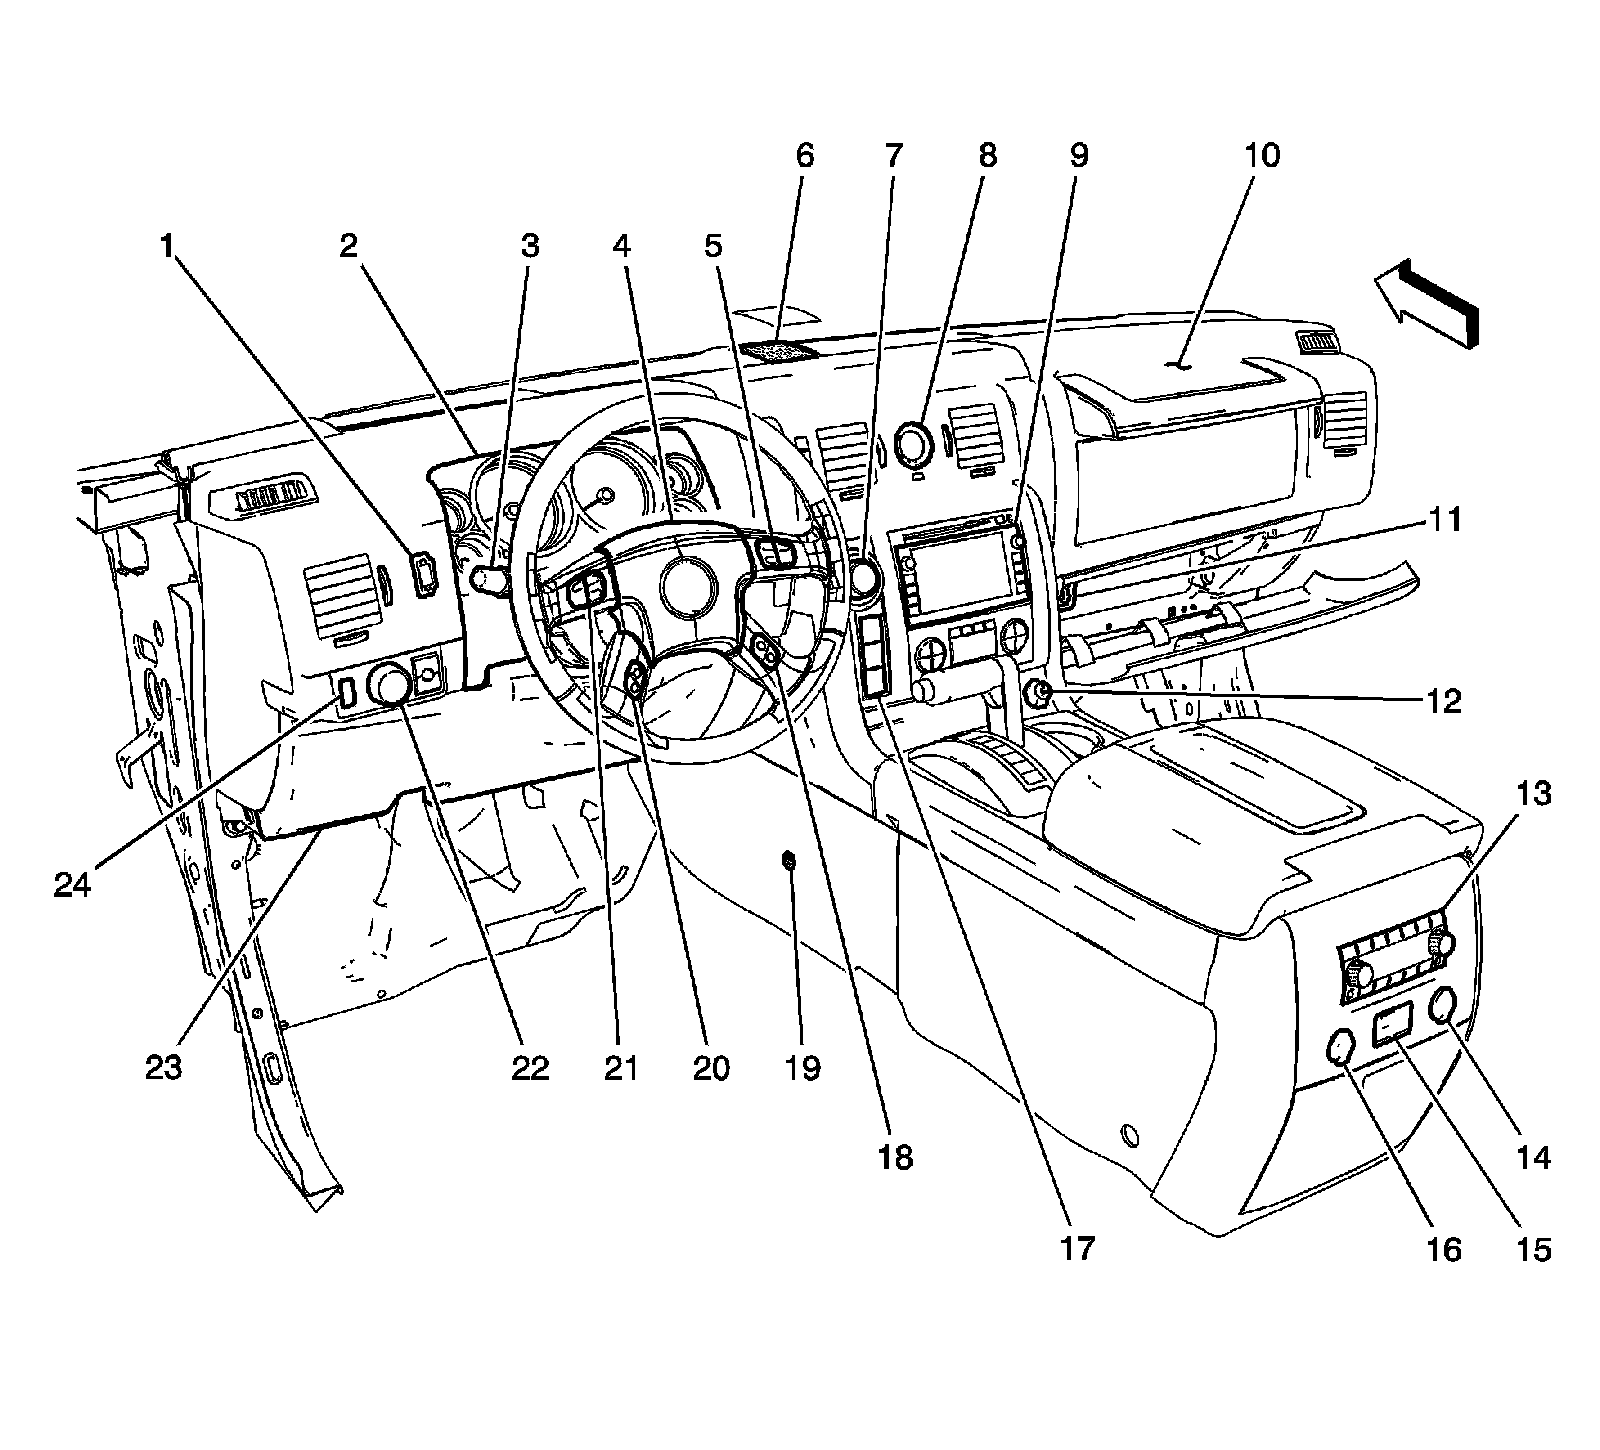
1 - Rear Wiper/Washer Switch (SUV) or Midgate Window Switch (SUT)
2 - Instrument Panel Cluster (IPC)
3 - Turn Signal/Multifunction Switch
4 - Inflatable Restraint Steering Wheel Module
5 - Steering Wheel Control Switch Assembly - Upper Right
6 - Ambient Light/Sunload Sensor Assembly
7 - Transfer Case Shift Control Switch
8 - Analog Clock
9 - Radio/Navigation Unit
10 - Inflatable Restraint I/P Module
11 - Inflatable Restraint I/P Module Disable Switch
12 - Cigar Lighter
13 - Rear Seat Audio (RSA) Controller
14 - Auxiliary Power Outlet - Console 1
15 - Audio/Video Adapter (U42)
16 - Auxiliary Power Outlet - Console 2
17 - Accessory Switch Assembly (Tow Haul/Traction Control/Ride Height )
18 - Steering Wheel Control Switch Assembly - Lower Right
19 - Noise Compensation Microphone
20 - Steering Wheel Control Switch Assembly - Lower Left
21 - Steering Wheel Control Switch Assembly - Upper Left
22 - Headlamp and Panel Dimmer Switch
23 - Data Link Connector (DLC)
24 - Universal Up/Down Switch
Lower Left of the I/P
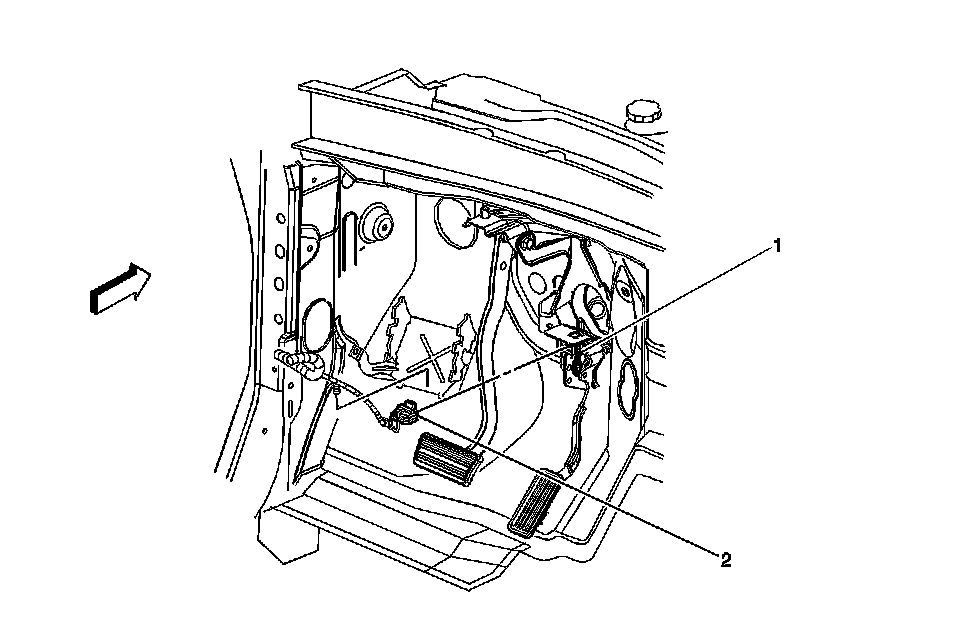
1 - APP Sensor
2 - APP Sensor Connector
Stop Lamp Switch
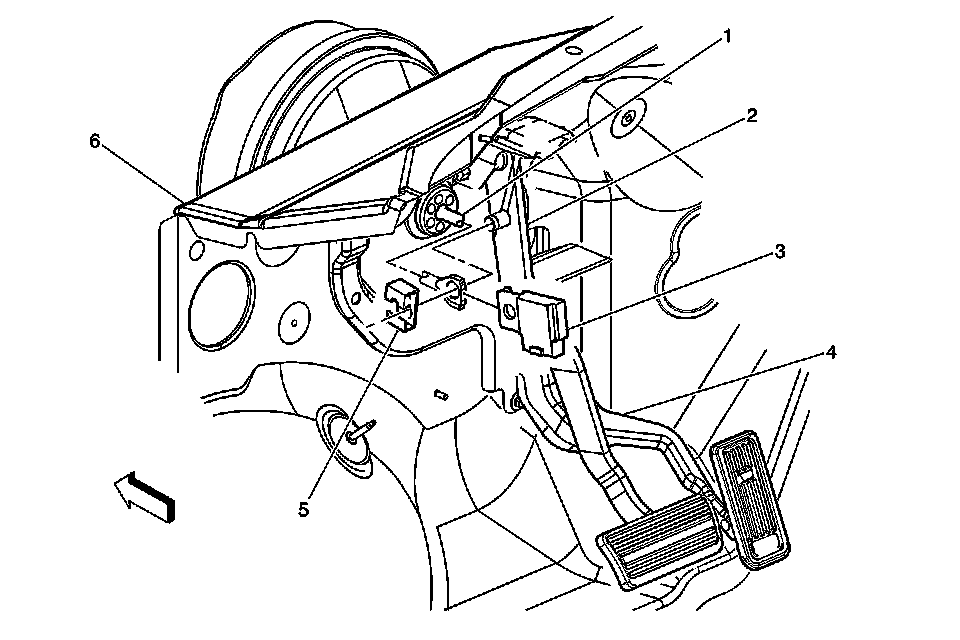
1 - Vacuum Booster
2 - Brake Pedal
3 - Stop Lamp Switch
4 - Accelerator Pedal
5 - Stop Lamp Switch Retainer
6 - Dash Panel
Instrument Panel Harness Components
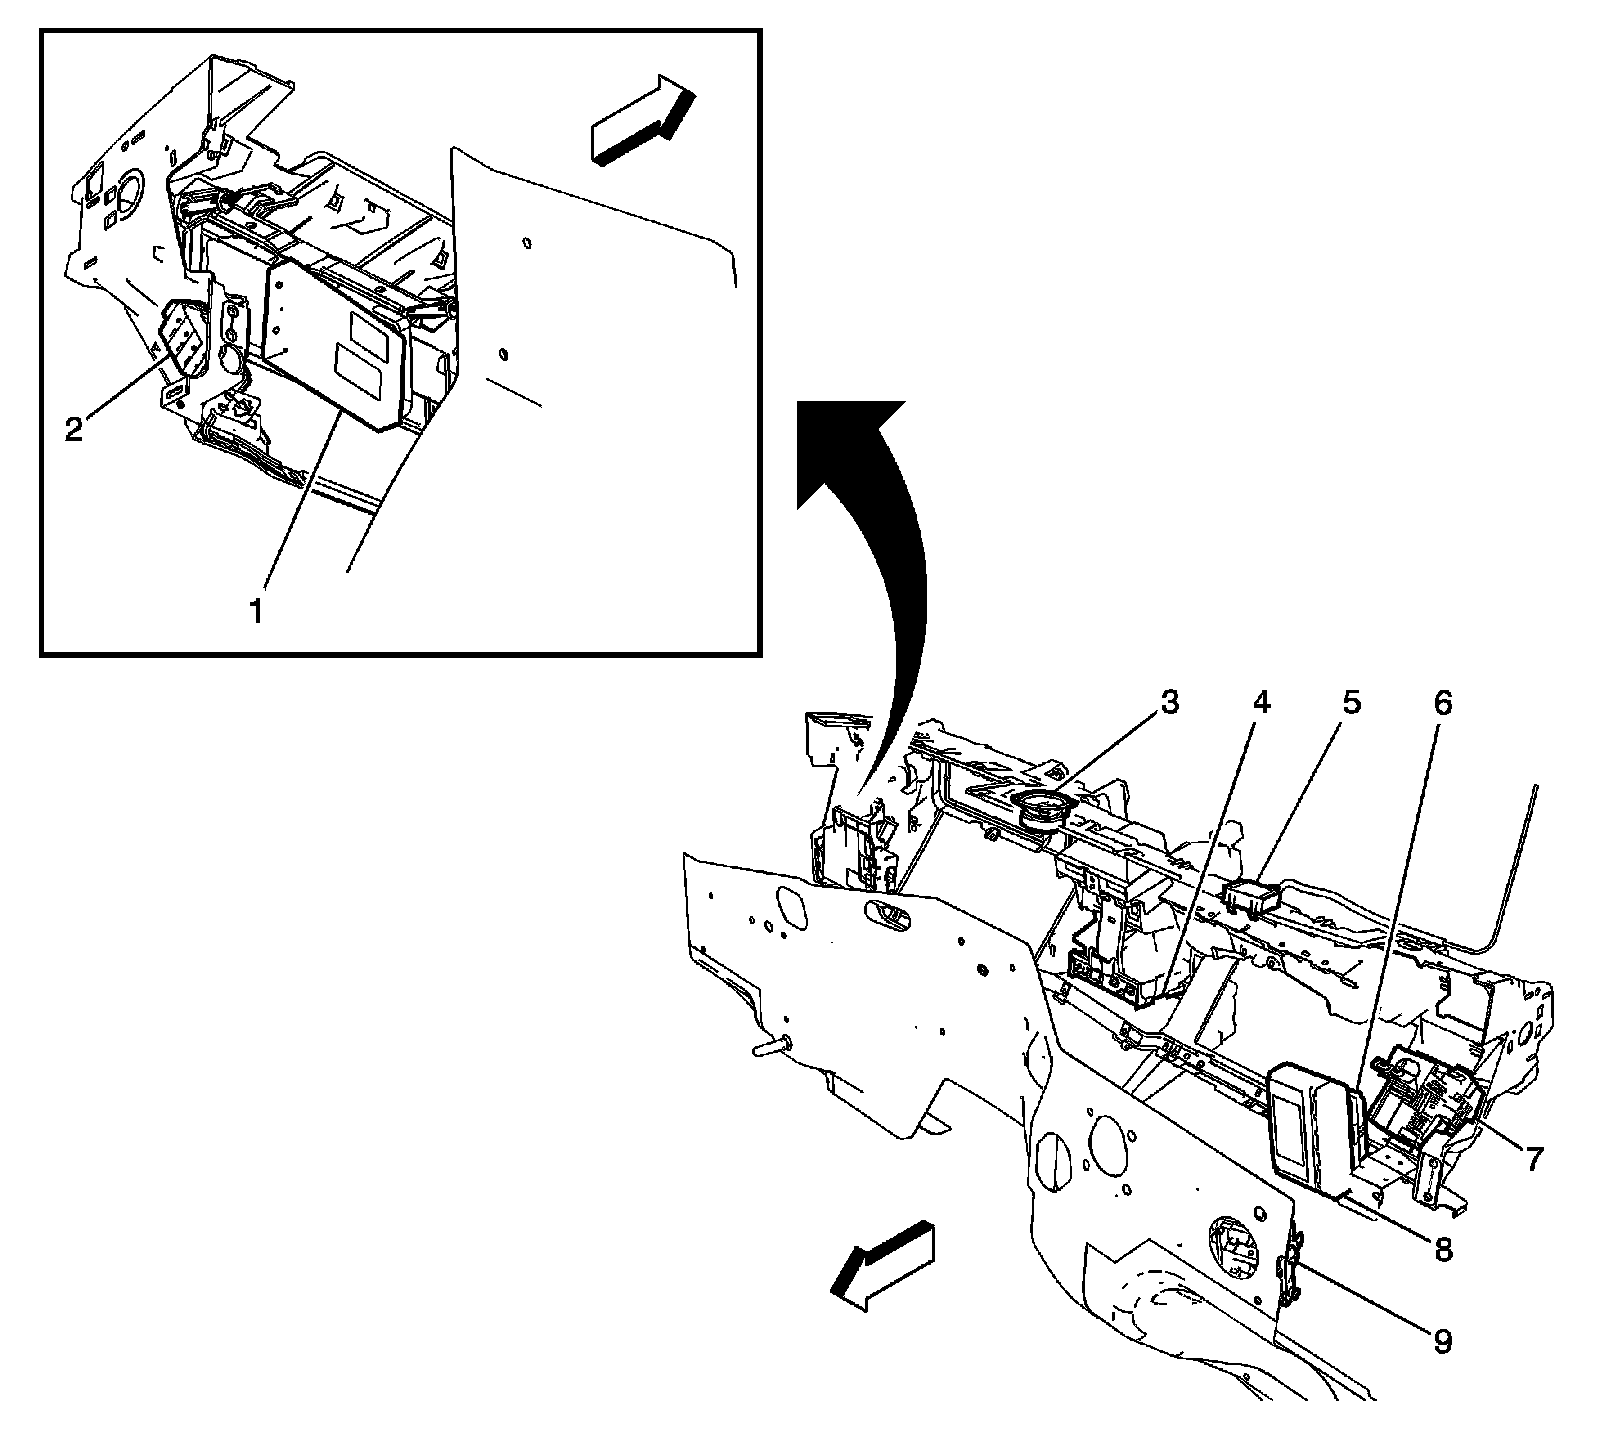
1 - Digital Radio Receiver (U2K)
2 - Junction Block - I/P
3 - Speaker - Center
4 - Vehicle Communication Interface Module (VCIM) (UE9)
5 - Remote Control Door Lock Receiver (RCDLR)
6 - Transfer Case Shift Control Module
7 - Fuse Block - I/P
8 - Body Control Module (BCM)
9 - Junction Block - Body
HVAC Module
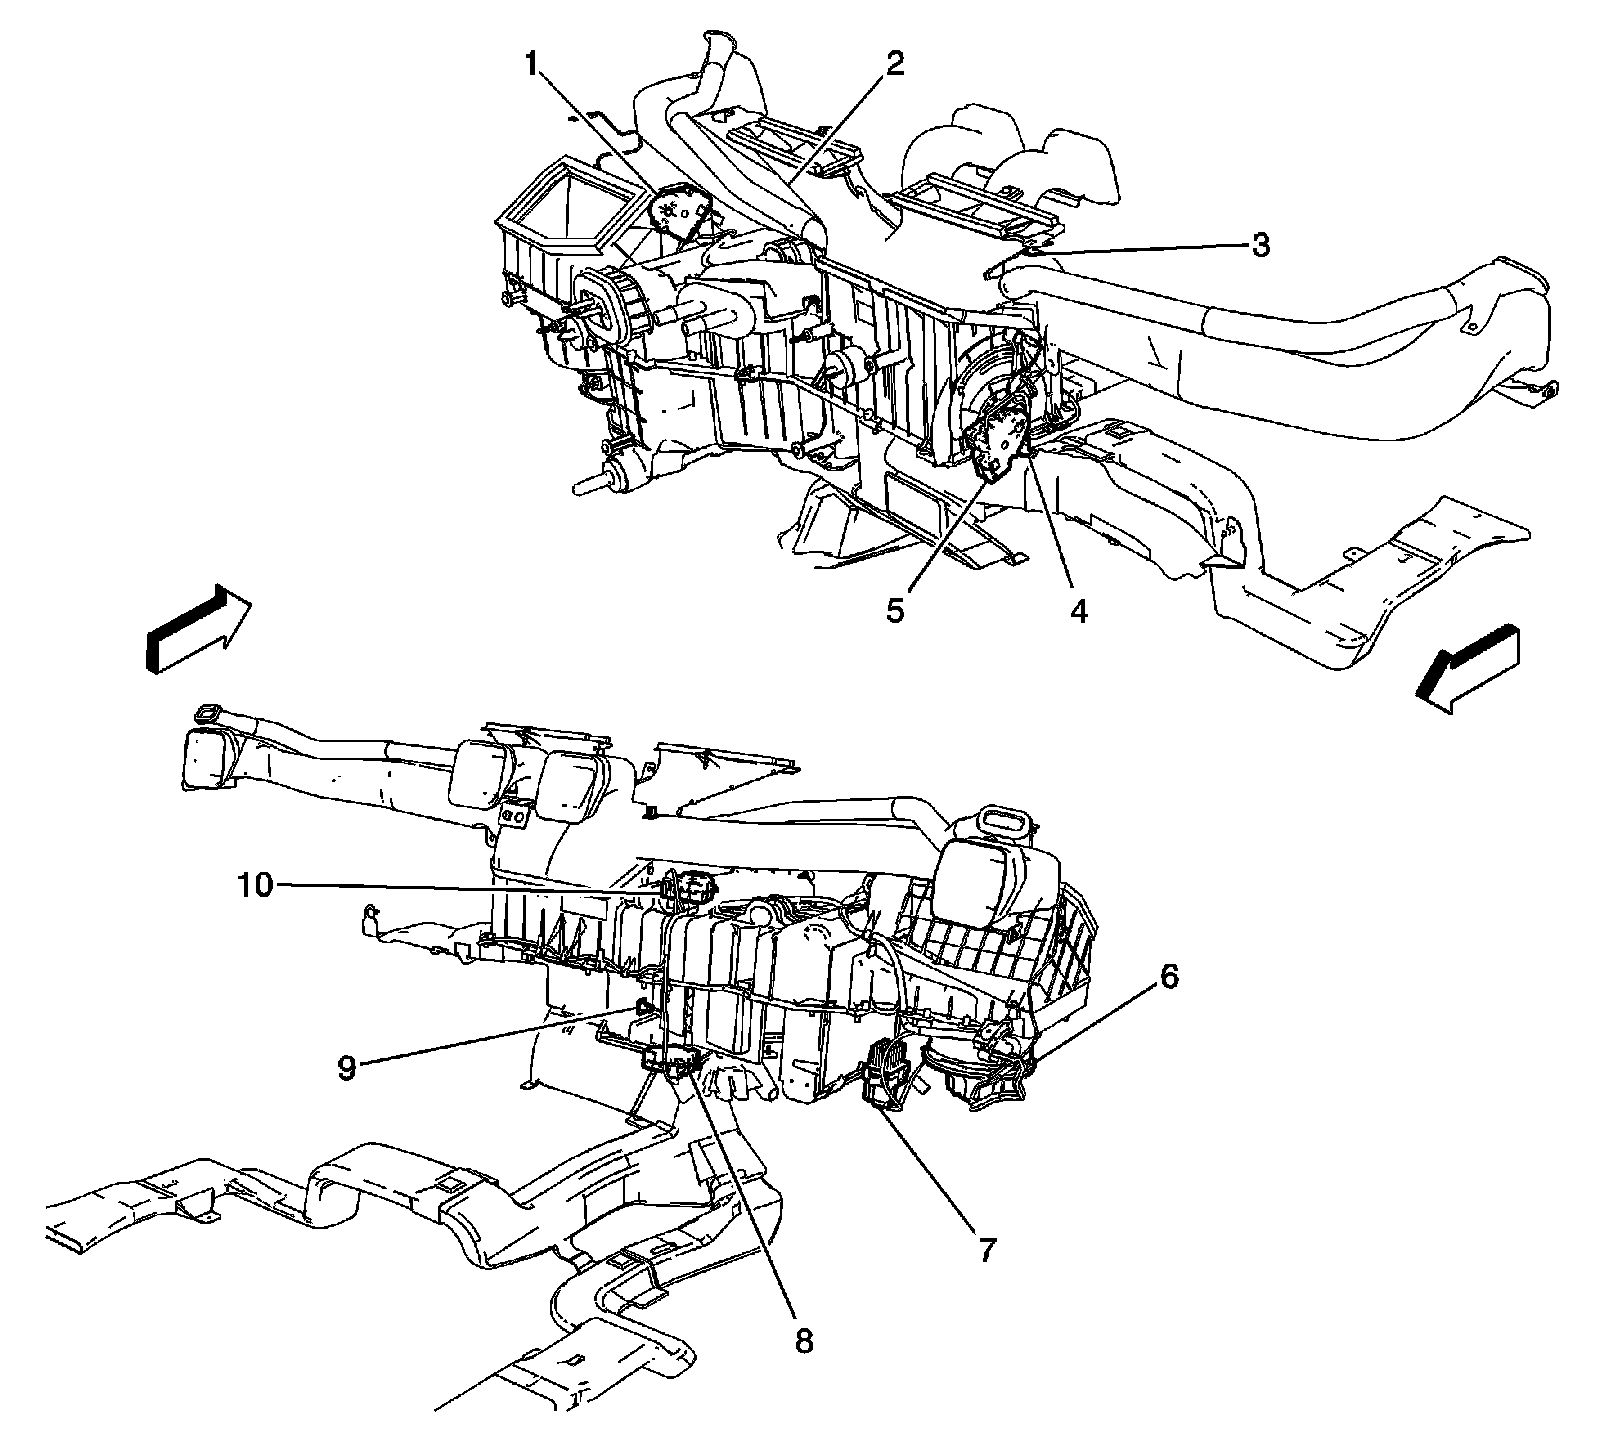
1 - Recirculation Actuator
2 - Air Temperature Sensor - Upper Right
3 - Air Temperature Sensor - Upper Left
4 - Air Temperature Sensor - Lower Left
5 - Mode Actuator
6 - Blower Motor
7 - Blower Motor Control Processor
8 - Air Temperature Actuator - Left
9 - Air Temperature Sensor - Lower Right
10 - Air Temperature Actuator - Right
Steering Column Components
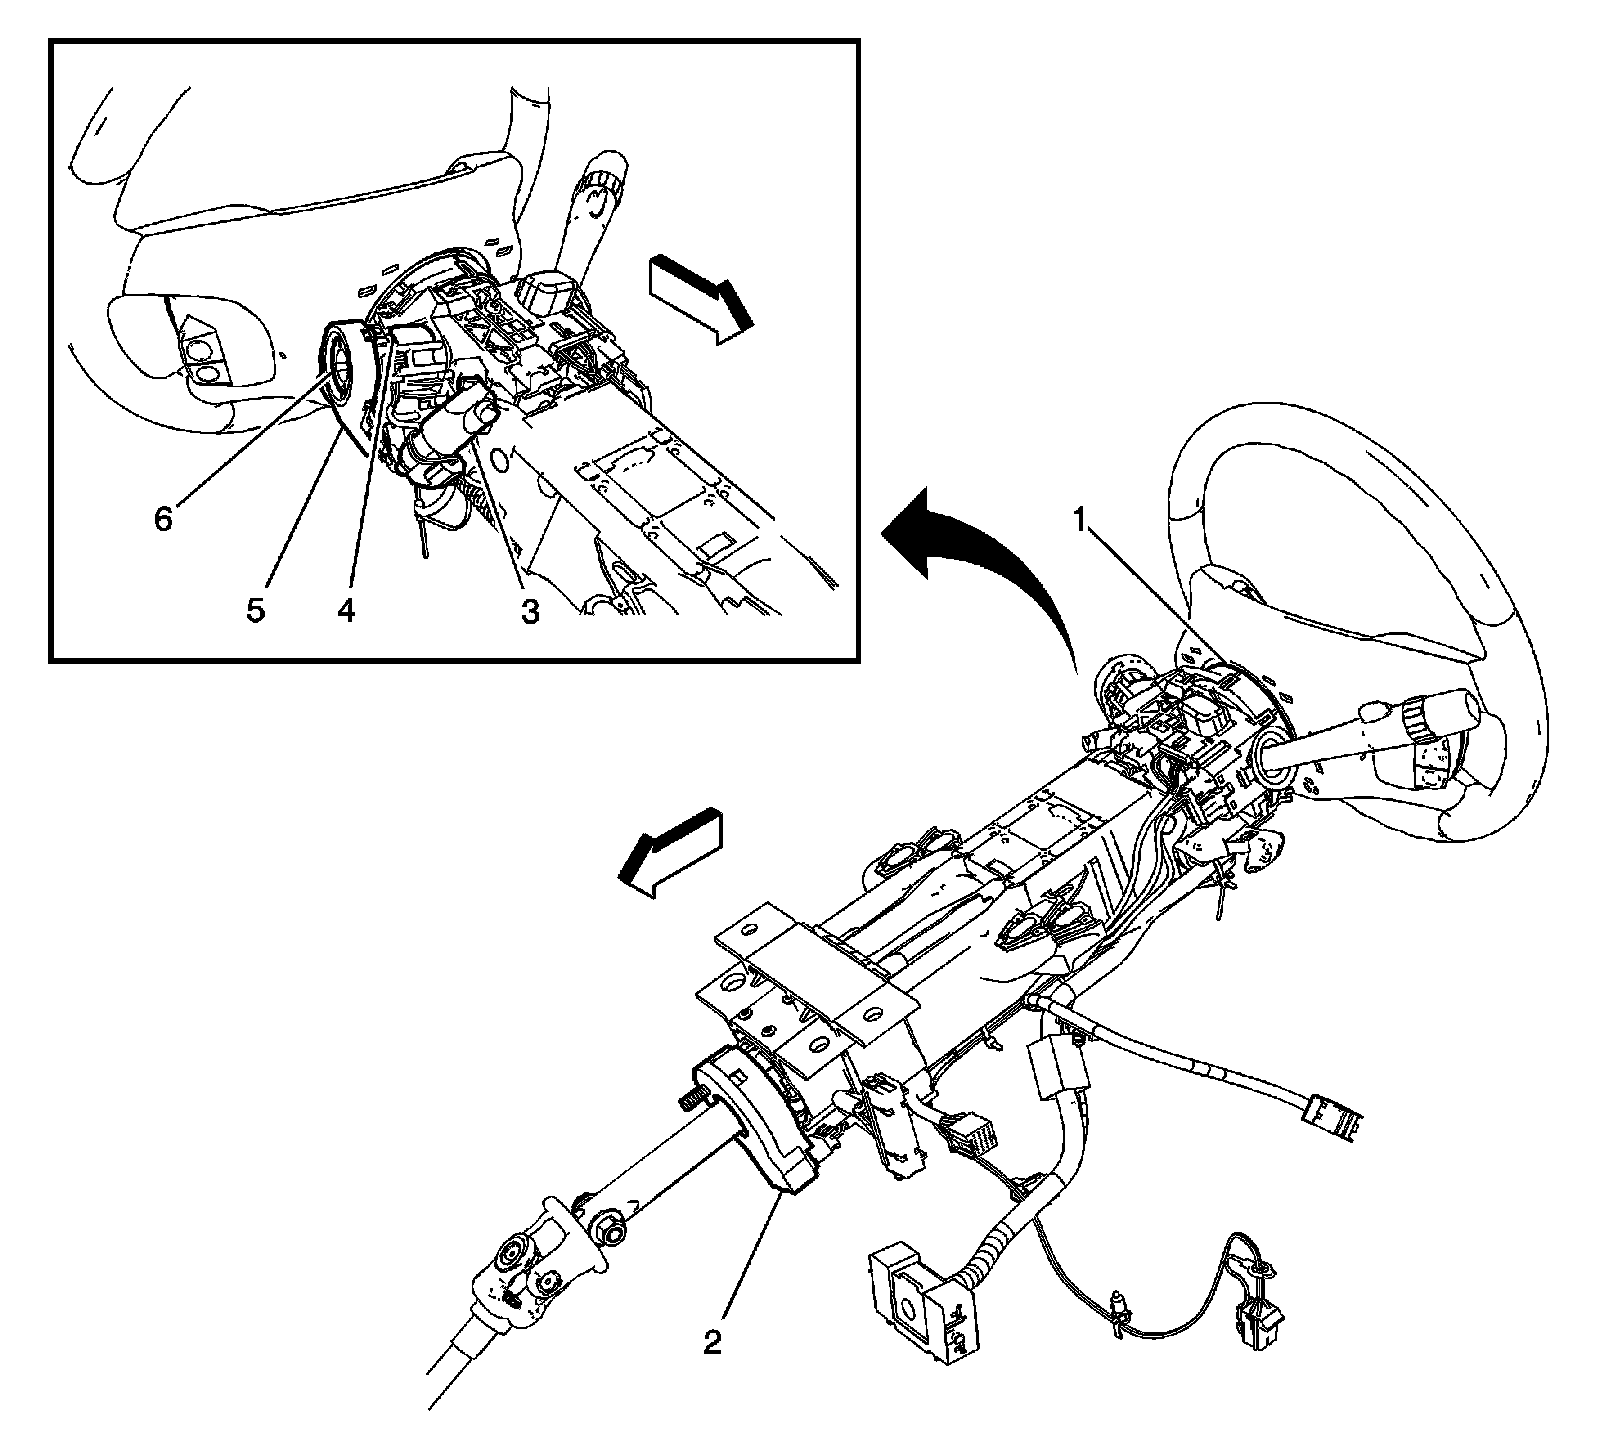
1 - Inflatable Restraint Steering Wheel Module Coil
2 - Steering Angle Sensor
3 - Ignition Lock Cylinder Solenoid
4 - Ignition Key Cylinder Case
5 - Theft Deterrent Module
6 - Ignition Key
Floor Console Components
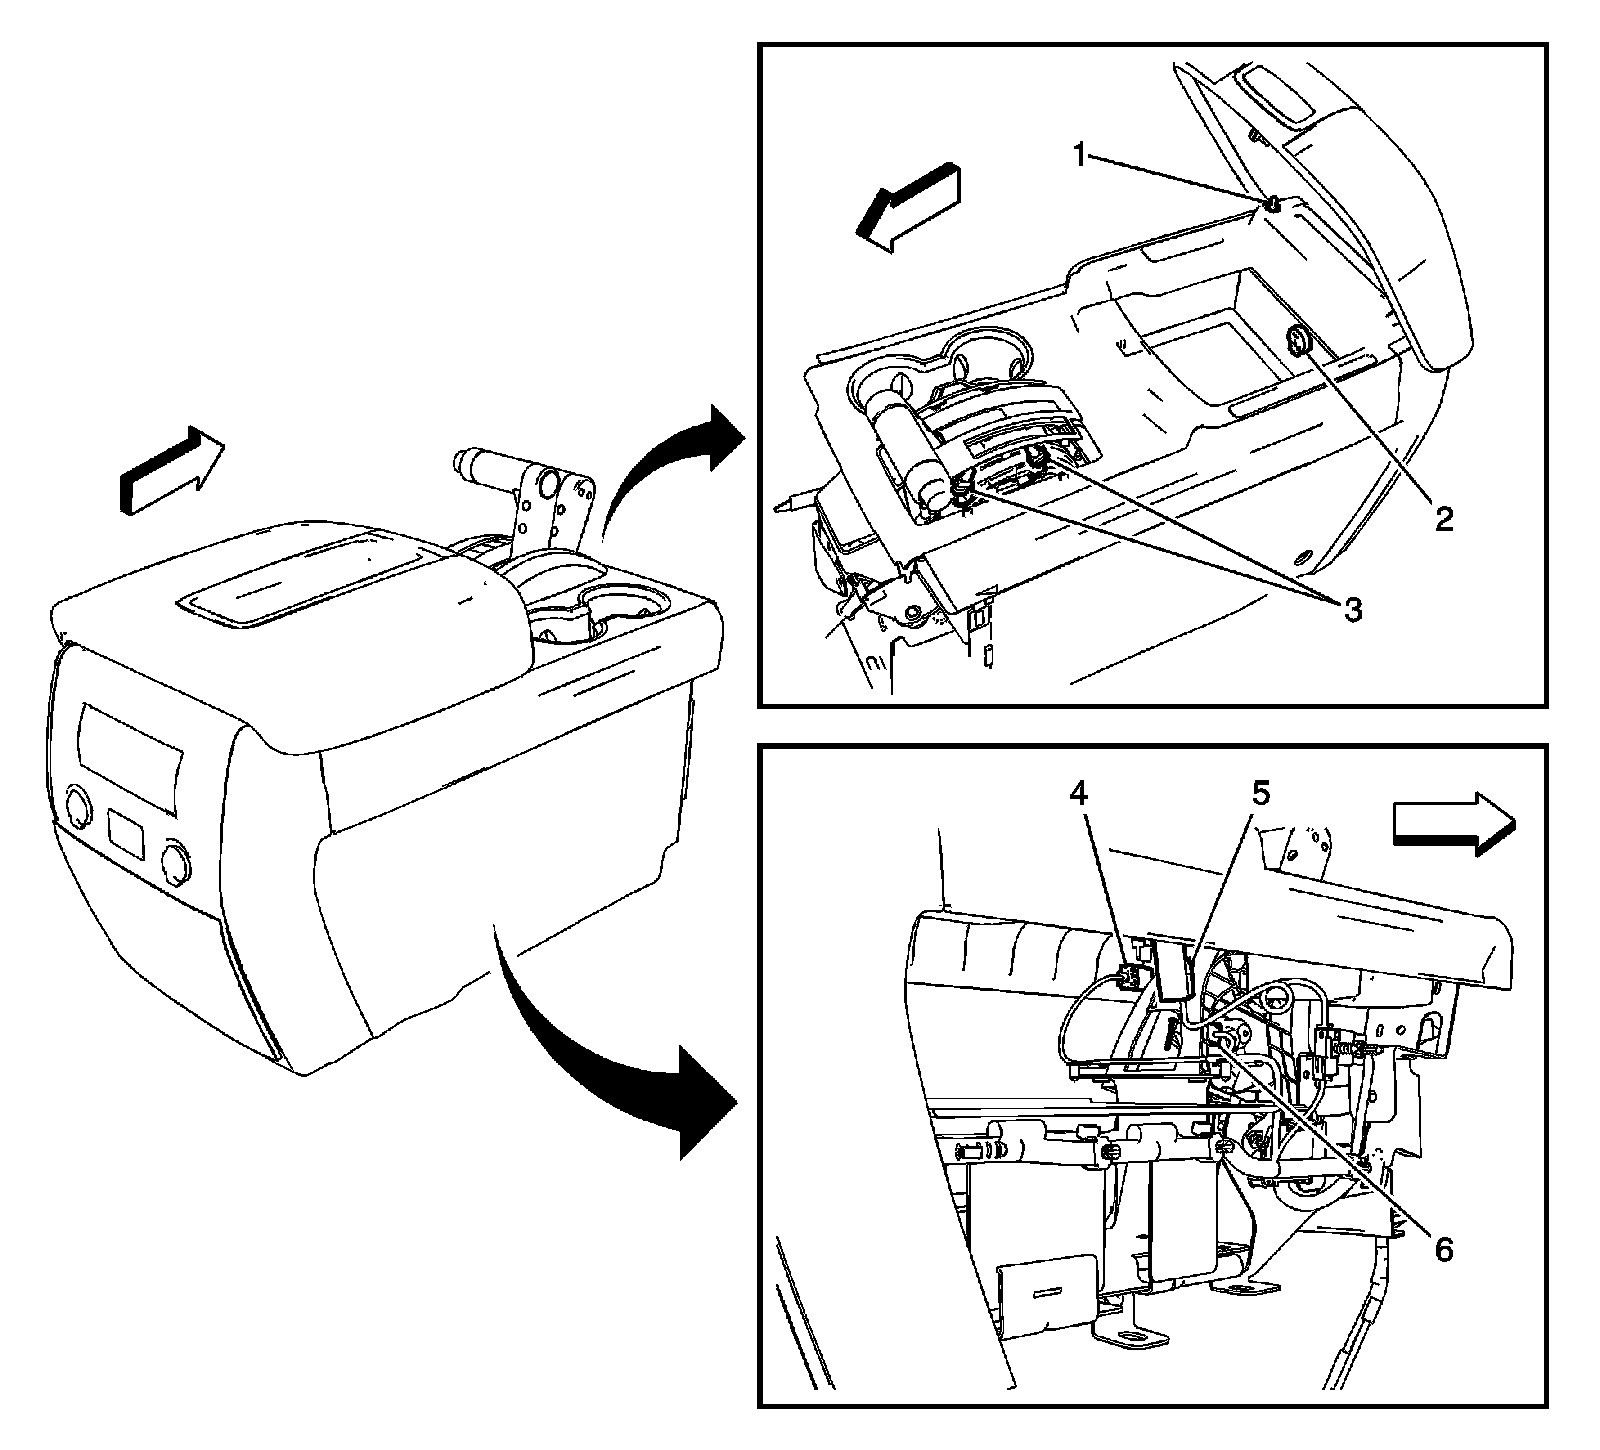
1 - Console Bin Lamp Switch
2 - Auxiliary Power Outlet-Console
3 - PRNDL Lamps
4 - X356
5 - Console Bin Lamp
6 - Automatic Transmission Shift Lock Control Solenoid
Factory Service Tools
Use the Manual With the Right Hardware
Pair factory procedures with proven DIY tools so the instructions are easier to execute.
Disclosure: Verified tool recommendations may earn an affiliate commission at no cost to you.
When to See a Mechanic
Stop DIY work and contact a certified mechanic immediately if any of the following apply:
- • You smell fuel, burning insulation, or see smoke.
- • Brakes feel soft, pull hard to one side, or make grinding noises.
- • The engine overheats, stalls repeatedly, or misfires under load.
- • You are missing required tools, torque specs, or safe lifting equipment.
- • You are not confident in the next step or safety outcome.
Rather have a pro handle this?
A certified mobile mechanic comes to your home or office. They bring the tools, you stay comfortable. No tow truck, no waiting room, no surprises.
Comes to youSame-day available12-month warranty
Get a Free QuoteNo obligation. See pricing before you book.