
Safety Warning
DIY auto repair can cause serious injury, fire, or vehicle damage. These guides are for informational purposes only. Always follow OEM torque specs, wear PPE, and consult a certified mechanic if you are unsure. You are solely responsible for your safety.
2003 Hummer H2 V8-6.0LFACTORY OEM SERVICE PROCEDURE
Front Wheel Alignment
FRONT CASTER AND CAMBER ADJUSTMENT
IMPORTANT: Caster measurements or values must be compensated for the measured frame angle.
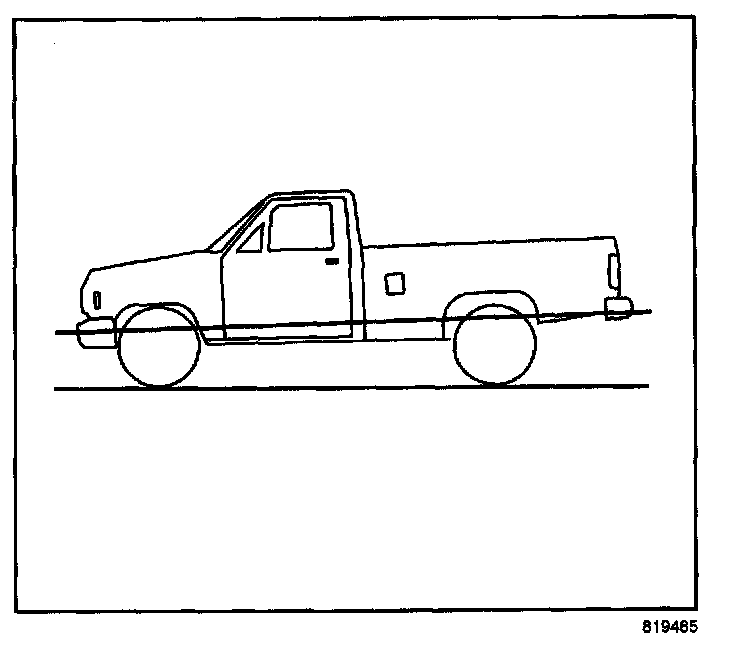
1. Caster is relative to frame, the caster values must be compensated for the measured frame angle by using a digital protractor or equivalent on a flat portion of the frame in front of the rear tire.
2. Frame angle is positive when higher in the rear. Measure both sides of the frame and take an average from those measurements. Then add the average frame angle to the caster reading when making adjustments.
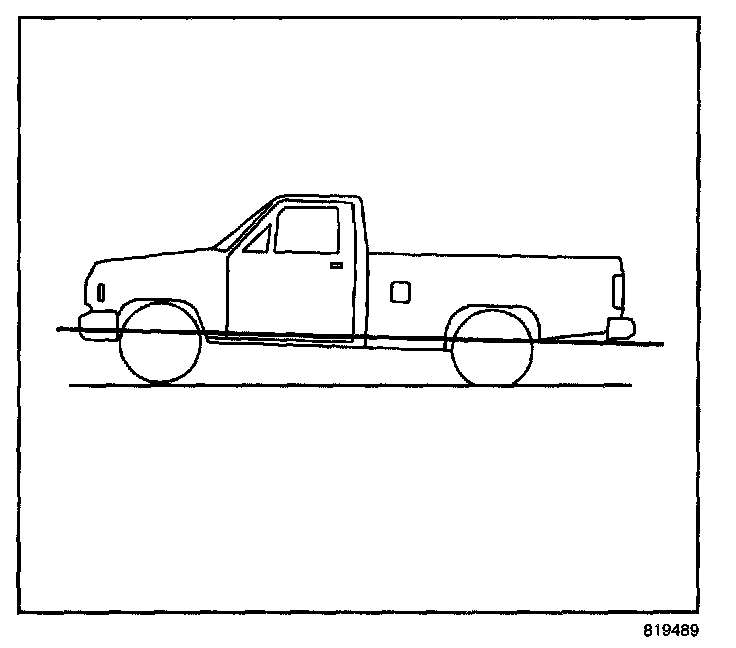
3. Frame angle is negative when lower in the rear. Measure both sides of the frame and take an average from the measurements. Then subtract the average frame angle from the caster reading when making adjustments.
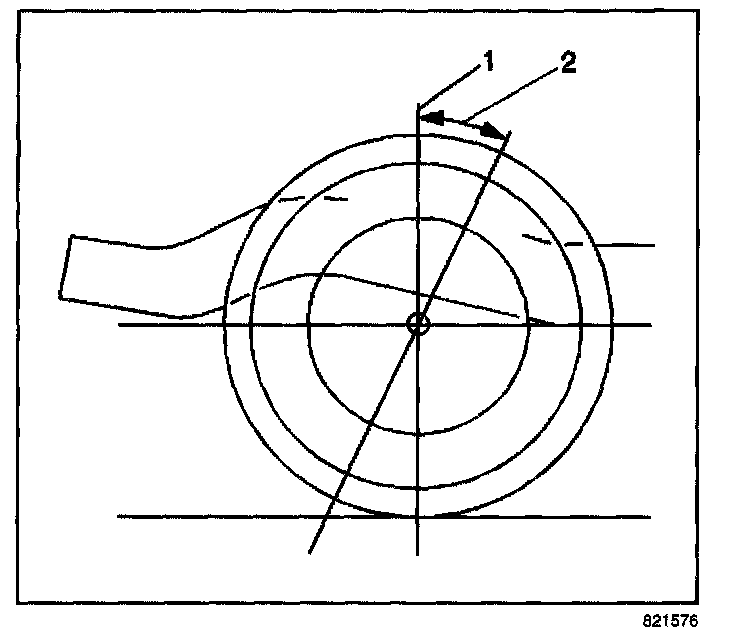
4. The caster and camber adjustments are made by rotating the offset cam bolt and the cam in the slotted frame bracket in order to reposition the control arm.
IMPORTANT: Before adjusting the caster and camber angles, jounce the front bumper three times to allow the vehicle to return to normal height.
Measure and adjust the caster and the camber with the vehicle at curb height. The front suspension Z dimension is indicated in Trim Heights.
5. For an accurate reading, do not push or pull on the tires during the alignment process.
6. Determine the caster angle (2). Be sure to compensate for frame angle where required.
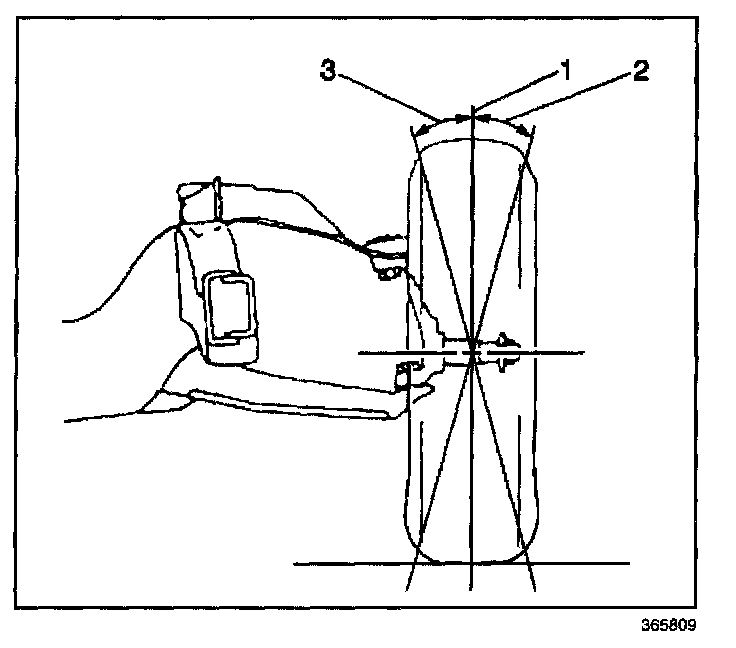
7. Determine the positive camber (2) or negative camber (3) angle.
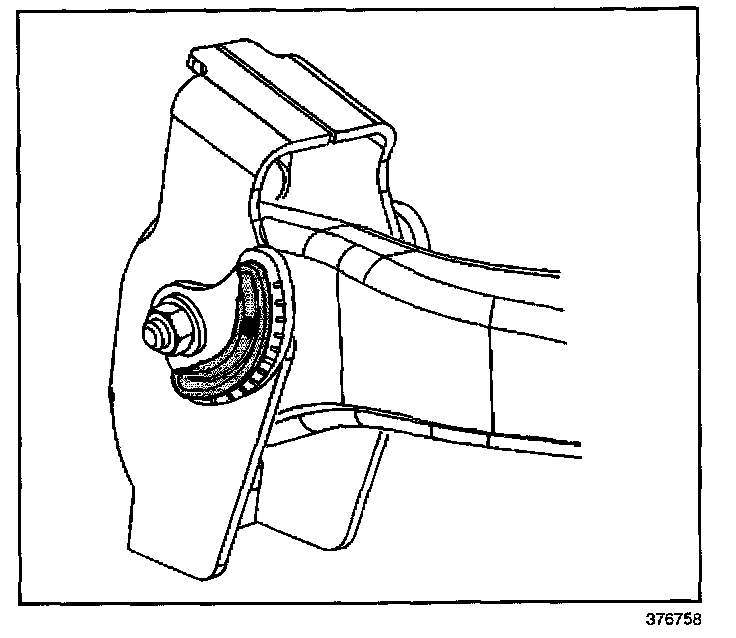
8. Remove the pinned adjusting cam insert. Do not reinstall the cam insert.
9. Loosen the upper control arm cam adjustment bolts.
NOTE: Refer to Fastener Notice in Service Precautions.
10. Adjust the caster and the camber angle by turning the cam bolts until the specifications have been met.
When the adjustments are complete, hold the cam bolt head in order to ensure the cam bolt position does not change while tightening the nut.
Tighten
Tighten the cam nuts to 190 N.m (140 lb ft).
11. Verify that the caster and the camber are still within specifications.
When the caster and camber are within specifications, adjust the toe.
FRONT TOE ADJUSTMENT
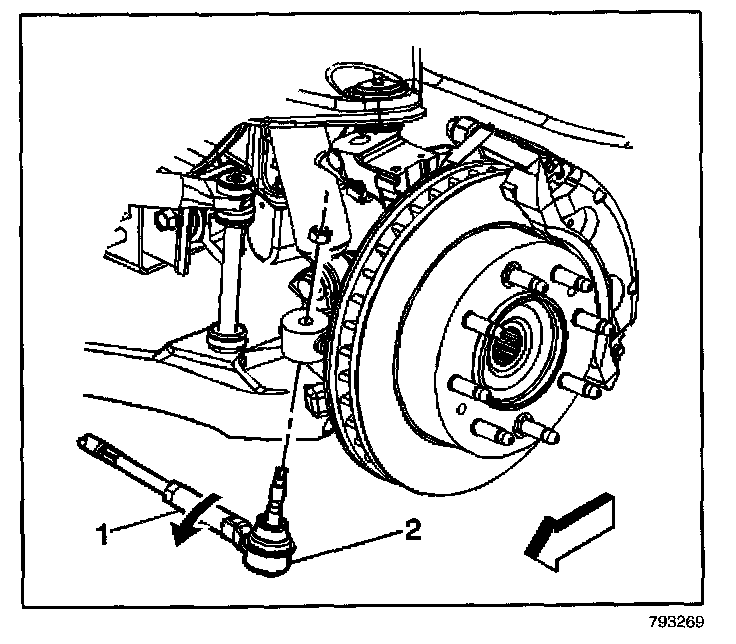
1. Loosen the jam nut on the tie rod (1).
2. Rotate the inner tie rod (2) to the required toe specification setting.
NOTE: Refer to Fastener Notice in Service Precautions.
3. Tighten the jam nut on the tie rod.
Tighten
Tighten the tie rod jam to 68 N.m (50 lb ft).
4. Check the toe setting after tightening.
5. Re-adjust the toe setting if necessary.
IMPORTANT: Caster measurements or values must be compensated for the measured frame angle.
1. Caster is relative to frame, the caster values must be compensated for the measured frame angle by using a digital protractor or equivalent on a flat portion of the frame in front of the rear tire.
2. Frame angle is positive when higher in the rear. Measure both sides of the frame and take an average from those measurements. Then add the average frame angle to the caster reading when making adjustments.
3. Frame angle is negative when lower in the rear. Measure both sides of the frame and take an average from the measurements. Then subtract the average frame angle from the caster reading when making adjustments.
4. The caster and camber adjustments are made by rotating the offset cam bolt and the cam in the slotted frame bracket in order to reposition the control arm.
IMPORTANT: Before adjusting the caster and camber angles, jounce the front bumper three times to allow the vehicle to return to normal height.
Measure and adjust the caster and the camber with the vehicle at curb height. The front suspension Z dimension is indicated in Trim Heights.
5. For an accurate reading, do not push or pull on the tires during the alignment process.
6. Determine the caster angle (2). Be sure to compensate for frame angle where required.
7. Determine the positive camber (2) or negative camber (3) angle.
8. Remove the pinned adjusting cam insert. Do not reinstall the cam insert.
9. Loosen the upper control arm cam adjustment bolts.
NOTE: Refer to Fastener Notice in Service Precautions.
10. Adjust the caster and the camber angle by turning the cam bolts until the specifications have been met.
When the adjustments are complete, hold the cam bolt head in order to ensure the cam bolt position does not change while tightening the nut.
Tighten
Tighten the cam nuts to 190 N.m (140 lb ft).
11. Verify that the caster and the camber are still within specifications.
When the caster and camber are within specifications, adjust the toe.
FRONT TOE ADJUSTMENT
1. Loosen the jam nut on the tie rod (1).
2. Rotate the inner tie rod (2) to the required toe specification setting.
NOTE: Refer to Fastener Notice in Service Precautions.
3. Tighten the jam nut on the tie rod.
Tighten
Tighten the tie rod jam to 68 N.m (50 lb ft).
4. Check the toe setting after tightening.
5. Re-adjust the toe setting if necessary.
Factory Service Tools
Use the Manual With the Right Hardware
Pair factory procedures with proven DIY tools so the instructions are easier to execute.
Disclosure: Verified tool recommendations may earn an affiliate commission at no cost to you.
When to See a Mechanic
Stop DIY work and contact a certified mechanic immediately if any of the following apply:
- • You smell fuel, burning insulation, or see smoke.
- • Brakes feel soft, pull hard to one side, or make grinding noises.
- • The engine overheats, stalls repeatedly, or misfires under load.
- • You are missing required tools, torque specs, or safe lifting equipment.
- • You are not confident in the next step or safety outcome.