
Safety Warning
DIY auto repair can cause serious injury, fire, or vehicle damage. These guides are for informational purposes only. Always follow OEM torque specs, wear PPE, and consult a certified mechanic if you are unsure. You are solely responsible for your safety.
2012 Honda Ridgeline V6-3.5LFACTORY OEM SERVICE PROCEDURE
Navigation Module: Service and Repair
Navigation Unit Removal/Installation
SRS components are located in this area. Review the SRS component location Locations and the precautions and procedures Service and Repair in the SRS section before doing repairs or service.
NOTE:
- Before you replace the navigation unit, back-up the customer data using system diagnostic mode save users memory under the functional set up.
- If the navigation unit is replaced or disconnected, a Map Matching must be done.
1. Turn the ignition switch to ON (II).
2. Eject the navigation DVD from the original navigation unit Service and Repair. To avoid scratching or damaging the navigation DVD, temporarily place the navigation DVD in a jewel case.
NOTE: If the navigation DVD does not eject, refer to the Navigation unit will not eject or accept the navigation DVD troubleshooting Navigation Unit Will Not Eject Or Accept The Navigation DVD.
3. Turn the ignition switch to LOCK (0).
4. Remove the nuts (A), then pull out the navigation unit (B).
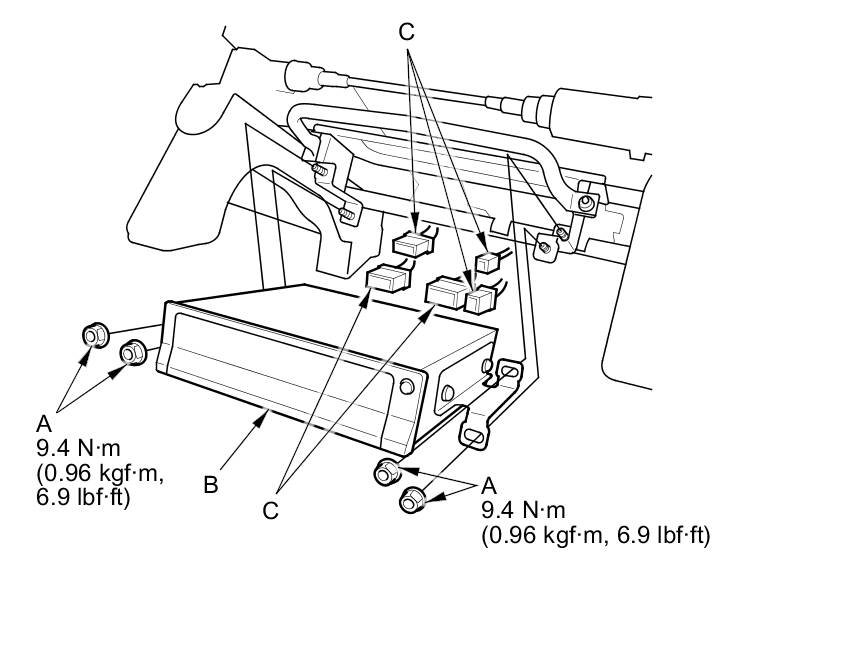
5. Disconnect the connectors (C), then remove the navigation unit.
6. Remove the screws and the bracket (A).
NOTE: Do not install screws longer than 8 mm or you will damage the navigation.
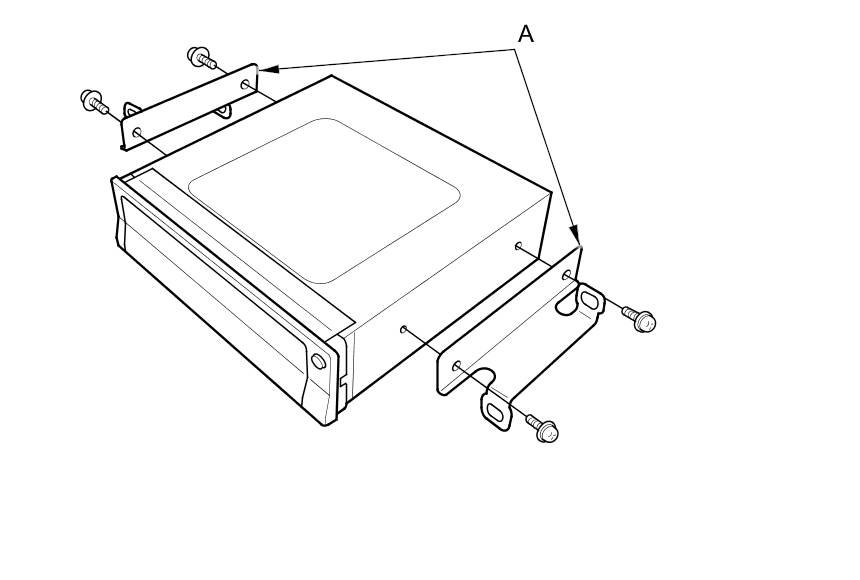
7. Install the navigation unit in the reverse order of removal.
8. Turn the ignition switch to ON (II), then reinstall the customer's original navigation DVD, verifying that the DVD is free of scratches or smudges.
9. Check any official Honda service website for more service information about patches for the navigation system. Apply any prescribed patches to the new navigation unit.
NOTE:
- Simply transferring the navigation DVD from the original navigation unit to the new navigation unit does not assure the correct software for the vehicle will be loaded into the new navigation unit. Doing the navigation DVD transfer without doing software patches may cause the new navigation unit to appear to be malfunctioning.
- The latest navigation software does not come loaded in a new navigation unit. If you load the original navigation DVD into the new navigation unit and an error message stating that the DVD is outdated appears on screen, it means that there is a newer DVD available. When the navigation unit was built, the manufacturer installed a higher version number in the units memory. There are two methods to resolve the issue:
- Have the customer purchase a new navigation DVD.
- Download the software from the original navigation DVD. See the downloading procedure under Version.
10. Enter the new navigation anti-theft code.
11. Park the vehicle outside, and do the GPS initialization.
12. Give the new navigation anti-theft code to the customer.
Factory Service Tools
Use the Manual With the Right Hardware
Pair factory procedures with proven DIY tools so the instructions are easier to execute.
Disclosure: Verified tool recommendations may earn an affiliate commission at no cost to you.
When to See a Mechanic
Stop DIY work and contact a certified mechanic immediately if any of the following apply:
- • You smell fuel, burning insulation, or see smoke.
- • Brakes feel soft, pull hard to one side, or make grinding noises.
- • The engine overheats, stalls repeatedly, or misfires under load.
- • You are missing required tools, torque specs, or safe lifting equipment.
- • You are not confident in the next step or safety outcome.