
Safety Warning
DIY auto repair can cause serious injury, fire, or vehicle damage. These guides are for informational purposes only. Always follow OEM torque specs, wear PPE, and consult a certified mechanic if you are unsure. You are solely responsible for your safety.
2012 Honda Pilot 4WD V6-3.5LFACTORY OEM SERVICE PROCEDURE
Alignment: Service and Repair
Wheel Alignment
The suspension can be adjusted for front camber, front toe, and rear toe. However, each of these adjustments are related to each other. For example, when you adjust camber, the toe will change. Therefore, you must adjust the front wheel alignment whenever you adjust camber or toe.
Pre-Alignment Checks
For proper inspection and adjustment of the wheel alignment, do these checks:
1. Release the parking brake to avoid an incorrect measurement.
2. Make sure the suspension is not modified.
3. Make sure the fuel tank is full, and that the spare tire, the jack, and the tools are in place on the vehicle.
4. Check the tire size and tire pressure.
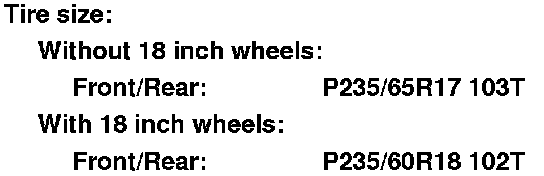
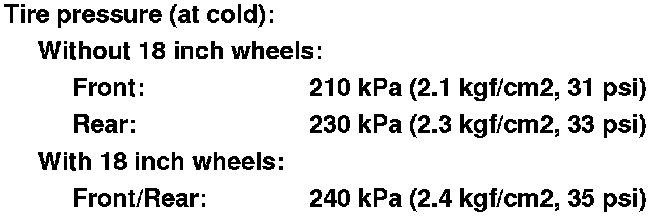
5. Check the runout of the wheels and tires Testing and Inspection.
6. Check the suspension ball joints. (Raise and support the vehicle Service and Repair. Hold a tire with your hands, and move it up and down and right and left to check for movement.)

7. Before doing alignment inspections, be sure to remove all extra weight from the vehicle, and no one should be inside the vehicle (driver or passengers).
8. Lower the vehicle to the ground. Bounce the vehicle up and down several times to stabilize the suspension.
9. Check that the steering column is set at the center tilt and telescopic position.
Caster Inspection
Use commercially available computerized four wheel alignment equipment to measure wheel alignment (caster, camber, toe, and turning angle). Follow the equipment manufacturer's instructions.
1. Check the caster angle.

- If the measurement is within specifications, measure the camber angle.
- If the measurement is not within specifications, check for bent or damaged suspension components.
Camber Inspection
Use commercially available computerized four wheel alignment equipment to measure wheel alignment (caster, camber, toe, and turning angle). Follow the equipment manufacturer's instructions.
1. Check the camber angle.

- If the measurement is within specifications, measure the toe-in.
- If the measurement for the front camber is not within specifications, go to front camber adjustment.
- If the measurement for the rear camber is not within specifications, check for bent or damaged suspension components.
Front Camber Adjustment
1. Raise and support the vehicle Service and Repair.
2. Remove the front wheels.
3. Loosen the damper pinch bolts (A), and adjust the camber angle by moving the bottom of the damper within the range of the damper pinch bolt free play.

4. Tighten the damper pinch bolts to the specified torque.
5. Clean the mating surfaces of the brake disc and the inside of the wheel, then install the front wheels.
6. Lower the vehicle to the ground, and bounce the front of the vehicle up and down several times to settle the suspension.
7. Measure the camber angle.
- If the measurement is within specifications, measure the toe-in.
- If the measurement is not within specifications, check for bent or damaged suspension components.
Rear Toe Inspection/Adjustment
Use commercially available computerized four wheel alignment equipment to measure wheel alignment (caster, camber, toe, and turning angle). Follow the equipment manufacturer's instructions.
1. Release the parking brake to avoid an incorrect measurement.
2. Check the toe.

- If adjustment is required, go to step 3.
- If no adjustment is required, go to front toe inspection/adjustment.
3. Hold the adjusting bolt (A) on the lower arm B, and loosen the self-locking nut (C).
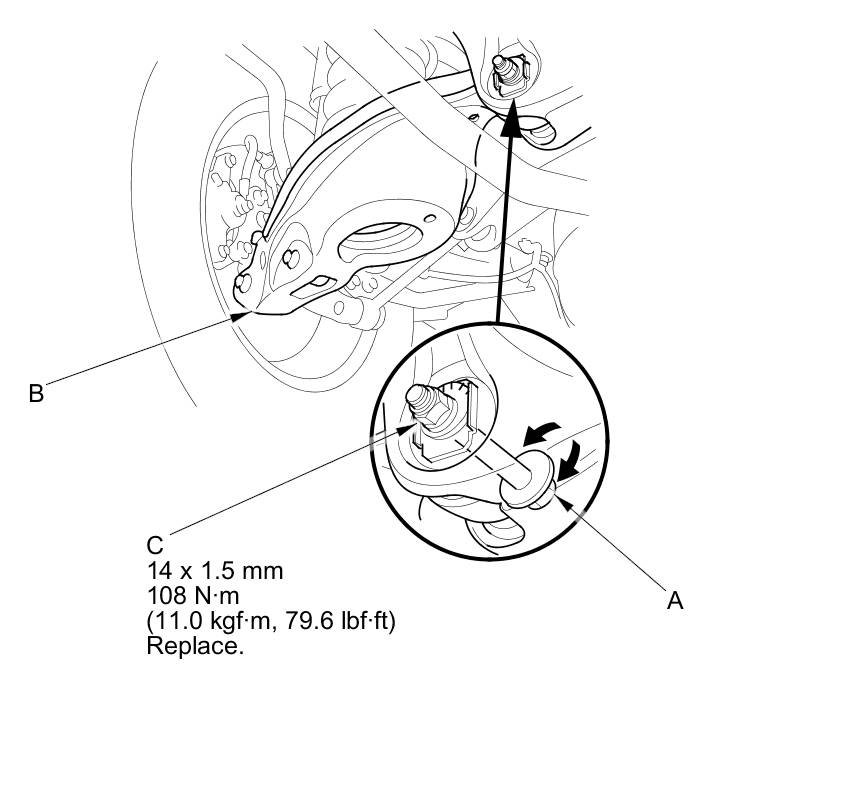
4. Replace the self-locking nut with a new one, and lightly tighten it.
NOTE:
- Always use a new self-locking nut whenever it has been loosened.
- Reassemble the adjusting bolt and the adjusting cam plate with the eccentric facing up.
5. Adjust the rear toe by turning the adjusting bolt until the toe is correct.
6. Tighten the self-locking nut to the specified torque while holding the adjusting bolt.
Front Toe Inspection/Adjustment
Use commercially available computerized four wheel alignment equipment to measure wheel alignment (caster, camber, toe, and turning angle). Follow the equipment manufacturer's instructions.
1. Set the steering column to the middle tilt position and telescopic positions. Center the steering wheel spokes, and install a steering wheel holder tool.
2. Check the toe with the wheels pointed straight ahead.

- If adjustment is required, go to step 3.
- If no adjustment is required, remove the alignment equipment.
3. Loosen the tie-rod end locknuts (A) while holding the flat surface sections (B) of the tie-rod end with a wrench, and turn both tie-rods (C) until the front toe is within specifications.
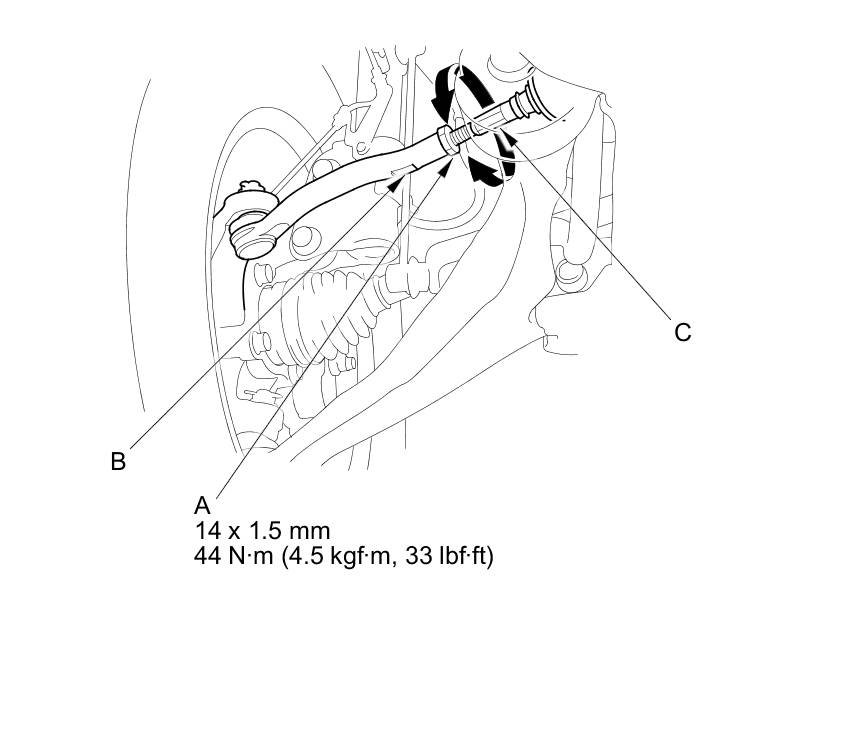
4. After adjusting, tighten the tie-rod end locknuts to the specified torque. Reposition the rack-end boot if it is twisted or displaced.
Turning Angle Inspection
Use commercially available computerized four wheel alignment equipment to measure wheel alignment (caster, camber, toe, and turning angle). Follow the equipment manufacturer's instructions.
1. Turn the wheel right and left while applying the brake, and measure the turning angle of both wheels.

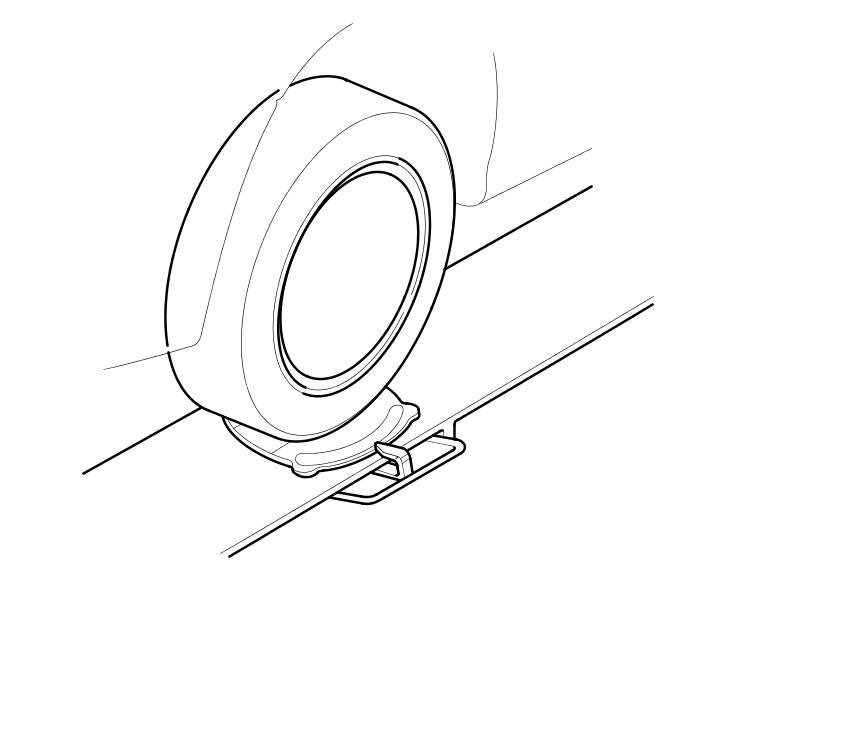
2. If the measurement is not within the specifications, even up both sides of the tie-rod threaded section length while adjusting the front toe. If it is correct, but the turning angle is not within the specifications, check for bent or damaged suspension components.
Factory Service Tools
Use the Manual With the Right Hardware
Pair factory procedures with proven DIY tools so the instructions are easier to execute.
Disclosure: Verified tool recommendations may earn an affiliate commission at no cost to you.
When to See a Mechanic
Stop DIY work and contact a certified mechanic immediately if any of the following apply:
- • You smell fuel, burning insulation, or see smoke.
- • Brakes feel soft, pull hard to one side, or make grinding noises.
- • The engine overheats, stalls repeatedly, or misfires under load.
- • You are missing required tools, torque specs, or safe lifting equipment.
- • You are not confident in the next step or safety outcome.
Rather have a pro handle this?
A certified mobile mechanic comes to your home or office. They bring the tools, you stay comfortable. No tow truck, no waiting room, no surprises.
Comes to youSame-day available12-month warranty
Get a Free QuoteNo obligation. See pricing before you book.