
Safety Warning
DIY auto repair can cause serious injury, fire, or vehicle damage. These guides are for informational purposes only. Always follow OEM torque specs, wear PPE, and consult a certified mechanic if you are unsure. You are solely responsible for your safety.
2006 Honda S2000 L4-2.2LFACTORY OEM SERVICE PROCEDURE
Coolant: Service and Repair
Coolant Replacement
1. Start the engine. Set the heater temperature control dial to maximum heat, then turn off the ignition switch. Make sure the engine and radiator are cool to the touch.
2. Remove the radiator cap.
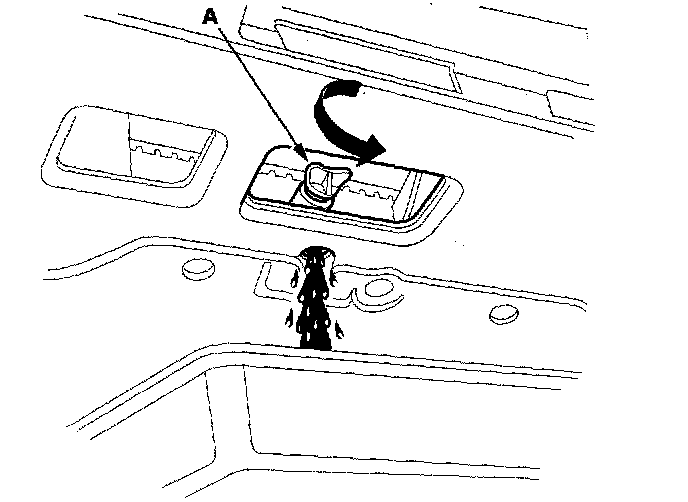
3. Loosen the drain plug (A), and drain the coolant.
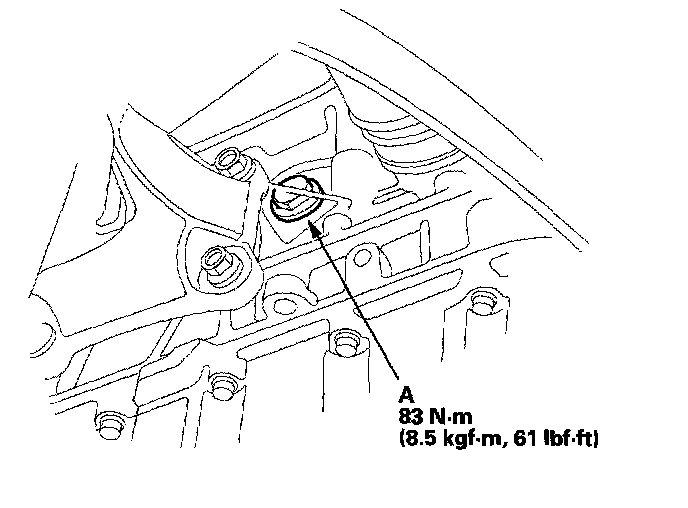
4. Remove the drain bolt (A) from the right side of the engine block.
5. After the coolant has drained, apply liquid gasket, P/N 08718-0009, to the drain bolt threads, then reinstall the bolt with a new washer and tighten it securely.
6. Tighten the radiator drain plug securely.
7. Remove, drain, and reinstall the reservoir. Fill the tank to the MAX mark with Honda Long Life Antifreeze/Coolant Type 2 (P/N OL999-9001).
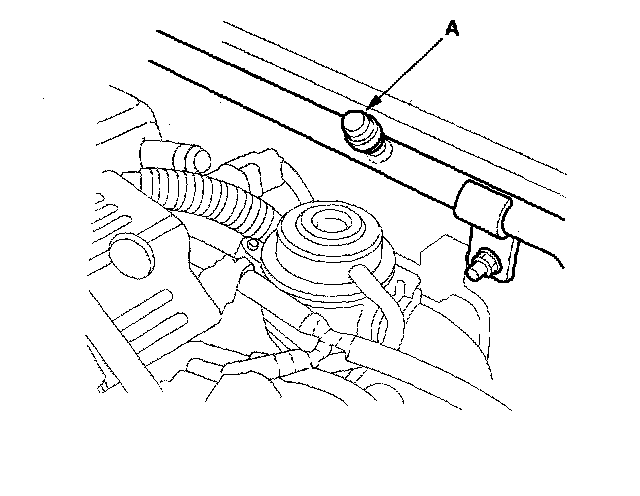
8. Remove the bleed cap (A) from the heater bypass tube.
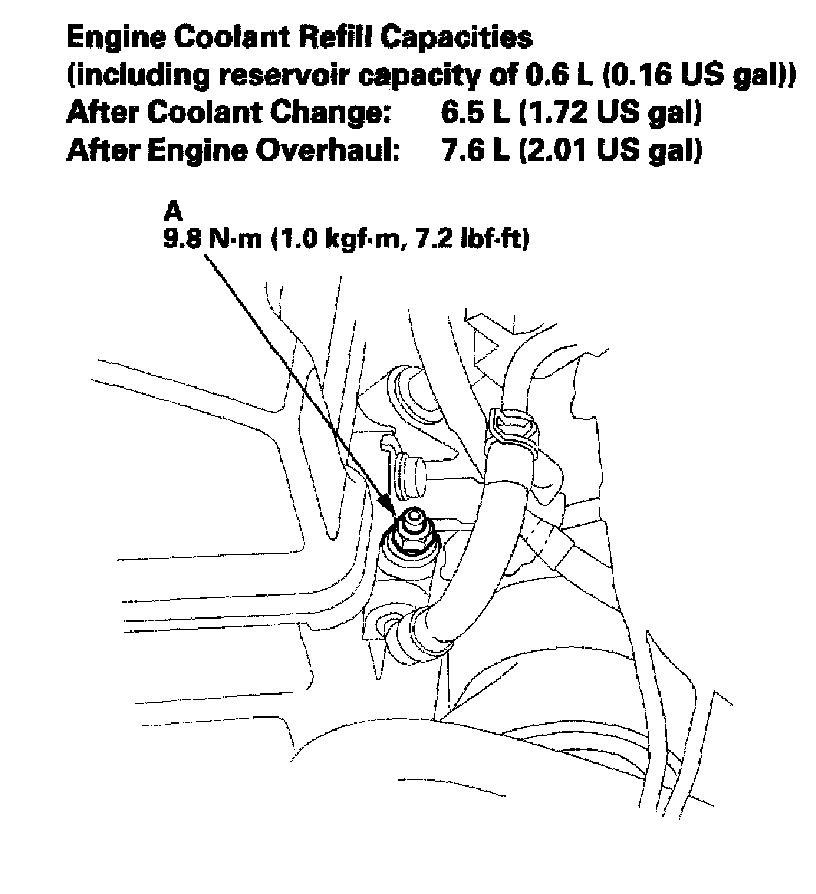
9. Loosen the air bleed bolt (A) in the intake manifold, then pour Honda Long Life Antifreeze/Coolant Type 2 into the radiator to the bottom of the filler neck. Do not let coolant spill on any electrical parts or the paint. If any coolant spills, rinse it off immediately.
NOTE:
^ Always use Honda Long Life Antifreeze/Coolant Type 2 (P/N OL999-9001). Using a non-Honda coolant can result in corrosion, causing the cooling system to malfunction or fail.
^ Honda Long Life Antifreeze/Coolant Type 2 is a mixture of 50% antifreeze and 50% water. Premixing is not required.
10. Tighten the air bleed bolt as soon as coolant starts to run out in a steady stream.
11. Reinstall the bleed cap on the heater bypass tube as soon as coolant starts to run out in a steady stream.
12. With the radiator cap off, start the engine and let it run until warmed up (radiator fan comes on at least twice). Then, if necessary, add more Honda Long Life Antifreeze/Coolant Type 2 to bring the level back up to the bottom of the filler neck.
13. Put the radiator cap An tightly, then run the engine again and check for leaks.
14. Clean up any spilled engine coolant.
1. Start the engine. Set the heater temperature control dial to maximum heat, then turn off the ignition switch. Make sure the engine and radiator are cool to the touch.
2. Remove the radiator cap.
3. Loosen the drain plug (A), and drain the coolant.
4. Remove the drain bolt (A) from the right side of the engine block.
5. After the coolant has drained, apply liquid gasket, P/N 08718-0009, to the drain bolt threads, then reinstall the bolt with a new washer and tighten it securely.
6. Tighten the radiator drain plug securely.
7. Remove, drain, and reinstall the reservoir. Fill the tank to the MAX mark with Honda Long Life Antifreeze/Coolant Type 2 (P/N OL999-9001).
8. Remove the bleed cap (A) from the heater bypass tube.
9. Loosen the air bleed bolt (A) in the intake manifold, then pour Honda Long Life Antifreeze/Coolant Type 2 into the radiator to the bottom of the filler neck. Do not let coolant spill on any electrical parts or the paint. If any coolant spills, rinse it off immediately.
NOTE:
^ Always use Honda Long Life Antifreeze/Coolant Type 2 (P/N OL999-9001). Using a non-Honda coolant can result in corrosion, causing the cooling system to malfunction or fail.
^ Honda Long Life Antifreeze/Coolant Type 2 is a mixture of 50% antifreeze and 50% water. Premixing is not required.
10. Tighten the air bleed bolt as soon as coolant starts to run out in a steady stream.
11. Reinstall the bleed cap on the heater bypass tube as soon as coolant starts to run out in a steady stream.
12. With the radiator cap off, start the engine and let it run until warmed up (radiator fan comes on at least twice). Then, if necessary, add more Honda Long Life Antifreeze/Coolant Type 2 to bring the level back up to the bottom of the filler neck.
13. Put the radiator cap An tightly, then run the engine again and check for leaks.
14. Clean up any spilled engine coolant.
Factory Service Tools
Use the Manual With the Right Hardware
Pair factory procedures with proven DIY tools so the instructions are easier to execute.
Disclosure: Verified tool recommendations may earn an affiliate commission at no cost to you.
When to See a Mechanic
Stop DIY work and contact a certified mechanic immediately if any of the following apply:
- • You smell fuel, burning insulation, or see smoke.
- • Brakes feel soft, pull hard to one side, or make grinding noises.
- • The engine overheats, stalls repeatedly, or misfires under load.
- • You are missing required tools, torque specs, or safe lifting equipment.
- • You are not confident in the next step or safety outcome.