
Safety Warning
DIY auto repair can cause serious injury, fire, or vehicle damage. These guides are for informational purposes only. Always follow OEM torque specs, wear PPE, and consult a certified mechanic if you are unsure. You are solely responsible for your safety.
2005 Honda Element 2WD L4-2.4LFACTORY OEM SERVICE PROCEDURE
Repair and Diagnosis: Service Precautions
General Troubleshooting Information
Tips and Precautions
Before Troubleshooting
1. Check applicable fuses in the appropriate fuse/relay box.
2. Check the battery for damage, state of charge, and clean and tight connections.
NOTE:
- Do not quick-charge a battery unless the battery ground cable has been disconnected, otherwise you will damage the alternator diodes.
- Do not attempt to crank the engine with the battery ground cable loosely connected or you will severely damage the wiring.
Handling Connectors
- Make sure the connectors are clean and have no loose wire terminals.
- Make sure multiple cavity connectors are packed with dielectric grease (except watertight connectors).
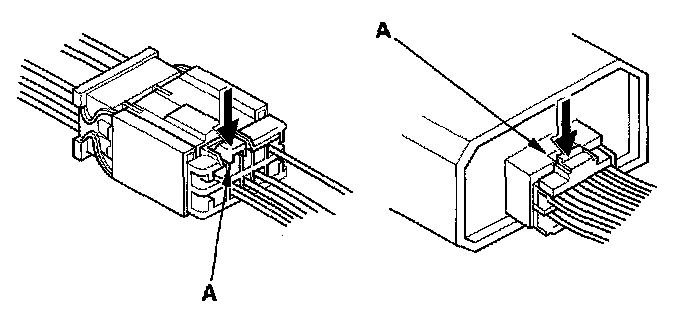
- All connectors have push-down release type locks (A).
- Some connectors have a clip on their side used to attach them to a mount bracket on the body or on another component. This clip has a pull type lock.
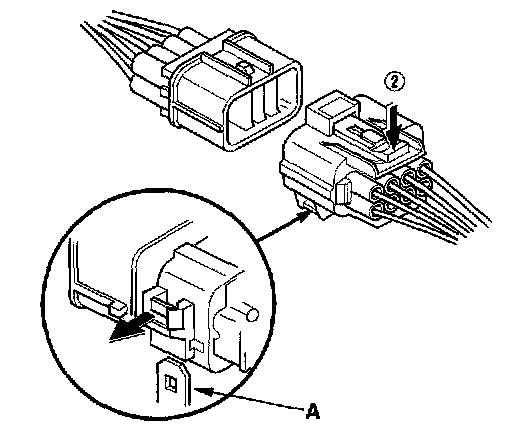
- Some mounted connectors cannot be disconnected unless you first release the lock and remove the connector from its mount bracket (A).
- Never try to disconnect connectors by pulling on their wires; pull on the connector halves instead.
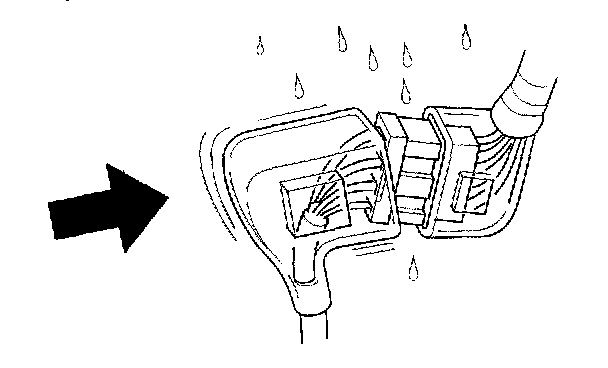
- Always reinstall plastic covers.
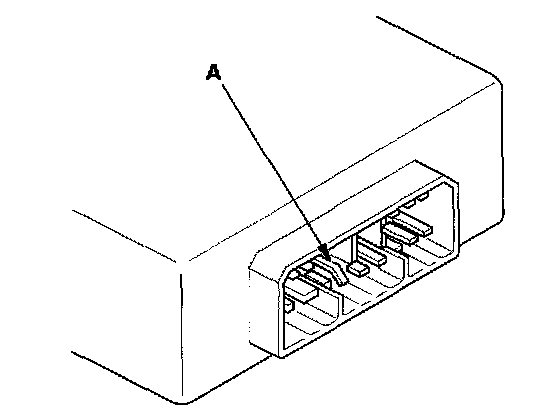
- Before connecting connectors, make sure the terminals (A) are in place and not bent.
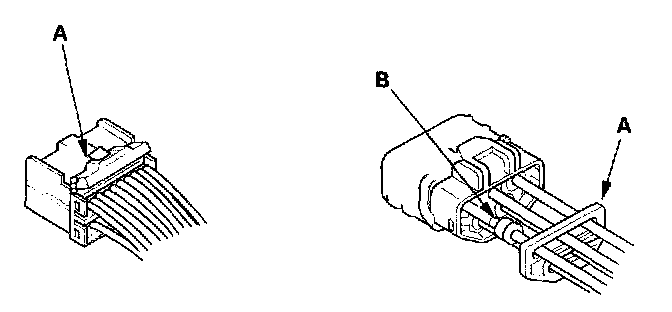
- Check for loose retainer (A) and rubber seals (B).

- The backs of some connectors are packed with dielectric grease. Add grease if necessary. If the grease is contaminated, replace it.
- Insert the connector all the way and make sure it is securely locked.

- Position wires so that the open end of the cover faces down.
Handling Wires and Harnesses
- Secure wires and wire harnesses to the frame with their respective wire ties at the designated locations.

- Remove clips carefully; don't damage their locks (A).

- Slip pliers (A) under the clip base and through the hole at an angle, then squeeze the expansion tabs to release the clip.
- After installing harness clips, make sure the harness doesn't interfere with any moving parts.
- Keep wire harnesses away from exhaust pipes and other hot parts, from sharp edges of brackets and holes, and from exposed screws and bolts.
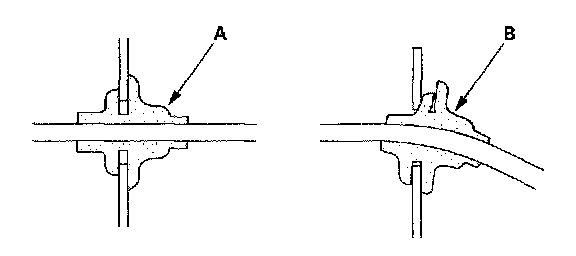
- Seat grommets in their grooves properly (A). Do not leave grommets distorted (B).
Testing and Repairs
- Do not use wires or harnesses with broken insulation. Replace them or repair them by wrapping the break with electrical tape.
- After installing parts, make sure that no wires are pinched under them.
- When using electrical test equipment, follow the manufacturer's instructions and those described.

- If possible, insert the probe of the tester from the wire side (except waterproof connector).

- Use a probe with a tapered tip.
- Refer to the instructions in the Honda Terminal Kit for identification and replacement of connector terminals.
Tips and Precautions
Before Troubleshooting
1. Check applicable fuses in the appropriate fuse/relay box.
2. Check the battery for damage, state of charge, and clean and tight connections.
NOTE:
- Do not quick-charge a battery unless the battery ground cable has been disconnected, otherwise you will damage the alternator diodes.
- Do not attempt to crank the engine with the battery ground cable loosely connected or you will severely damage the wiring.
Handling Connectors
- Make sure the connectors are clean and have no loose wire terminals.
- Make sure multiple cavity connectors are packed with dielectric grease (except watertight connectors).
- All connectors have push-down release type locks (A).
- Some connectors have a clip on their side used to attach them to a mount bracket on the body or on another component. This clip has a pull type lock.
- Some mounted connectors cannot be disconnected unless you first release the lock and remove the connector from its mount bracket (A).
- Never try to disconnect connectors by pulling on their wires; pull on the connector halves instead.
- Always reinstall plastic covers.
- Before connecting connectors, make sure the terminals (A) are in place and not bent.
- Check for loose retainer (A) and rubber seals (B).
- The backs of some connectors are packed with dielectric grease. Add grease if necessary. If the grease is contaminated, replace it.
- Insert the connector all the way and make sure it is securely locked.
- Position wires so that the open end of the cover faces down.
Handling Wires and Harnesses
- Secure wires and wire harnesses to the frame with their respective wire ties at the designated locations.
- Remove clips carefully; don't damage their locks (A).
- Slip pliers (A) under the clip base and through the hole at an angle, then squeeze the expansion tabs to release the clip.
- After installing harness clips, make sure the harness doesn't interfere with any moving parts.
- Keep wire harnesses away from exhaust pipes and other hot parts, from sharp edges of brackets and holes, and from exposed screws and bolts.
- Seat grommets in their grooves properly (A). Do not leave grommets distorted (B).
Testing and Repairs
- Do not use wires or harnesses with broken insulation. Replace them or repair them by wrapping the break with electrical tape.
- After installing parts, make sure that no wires are pinched under them.
- When using electrical test equipment, follow the manufacturer's instructions and those described.
- If possible, insert the probe of the tester from the wire side (except waterproof connector).
- Use a probe with a tapered tip.
- Refer to the instructions in the Honda Terminal Kit for identification and replacement of connector terminals.
Factory Service Tools
Use the Manual With the Right Hardware
Pair factory procedures with proven DIY tools so the instructions are easier to execute.
Disclosure: Verified tool recommendations may earn an affiliate commission at no cost to you.
When to See a Mechanic
Stop DIY work and contact a certified mechanic immediately if any of the following apply:
- • You smell fuel, burning insulation, or see smoke.
- • Brakes feel soft, pull hard to one side, or make grinding noises.
- • The engine overheats, stalls repeatedly, or misfires under load.
- • You are missing required tools, torque specs, or safe lifting equipment.
- • You are not confident in the next step or safety outcome.