
Safety Warning
DIY auto repair can cause serious injury, fire, or vehicle damage. These guides are for informational purposes only. Always follow OEM torque specs, wear PPE, and consult a certified mechanic if you are unsure. You are solely responsible for your safety.
2005 Honda Element 2WD L4-2.4LFACTORY OEM SERVICE PROCEDURE
Fuel Level Sensor: Service and Repair
Fuel Pump/Fuel Gauge Sending Unit Replacement
Special Tools Required
Fuel sender wrench 07AAA-S0XA100
1. Relieve the fuel pressure.
2. Remove the fuel fill cap.
3. Remove the center console, both track floor coverings, and both sill trims.
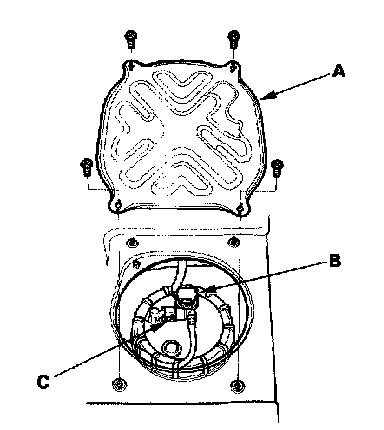
4. Fold back the floor mat until the access panel is accessible. Remove the access panel (A) from the floor.
5. Disconnect the fuel pump 5P connector (B).
6. Disconnect the quick-connect fitting (C) from the fuel tank unit.
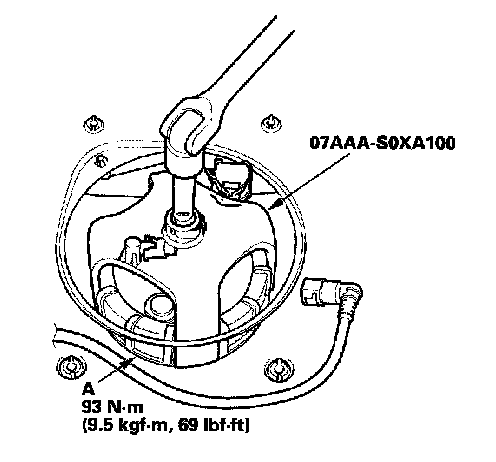
7. Using the special tool, loosen the fuel tank unit locknut (A).
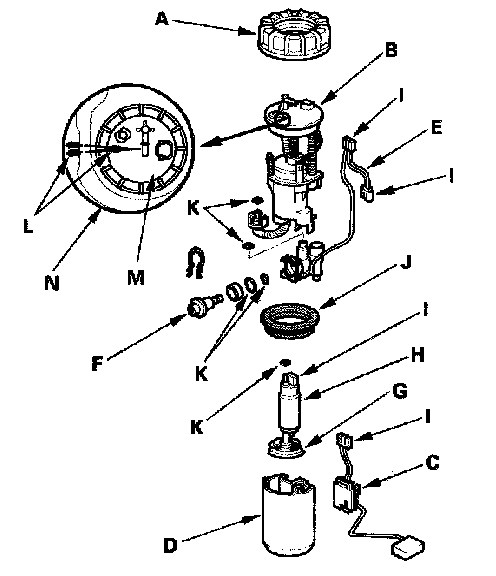
8. Remove the locknut (A) and the fuel tank unit.
9. Remove the fuel filter (B), the fuel gauge sending unit (C), the case (D), the wire harness (E), and the fuel pressure regulator (F).
10. Check these items before installing the fuel tank unit:
- Make sure the connection is secure and the suction filter (G) is firmly connected to the fuel pump (H).
- When connecting the wire harness, make sure the connection is secure and the connectors (I) are firmly locked into place.
- When installing the fuel gauge sending unit, make sure the connection is secure and the connector is firmly locked into place. Be careful not to bend or twist it excessively.
11. Install the parts in the reverse order of removal with a new base gasket (J), new locknut (A), and new O-rings (K). When installing the fuel tank unit, align the marks (L) on the unit (M) and the fuel tank (N).
Special Tools Required
Fuel sender wrench 07AAA-S0XA100
1. Relieve the fuel pressure.
2. Remove the fuel fill cap.
3. Remove the center console, both track floor coverings, and both sill trims.
4. Fold back the floor mat until the access panel is accessible. Remove the access panel (A) from the floor.
5. Disconnect the fuel pump 5P connector (B).
6. Disconnect the quick-connect fitting (C) from the fuel tank unit.
7. Using the special tool, loosen the fuel tank unit locknut (A).
8. Remove the locknut (A) and the fuel tank unit.
9. Remove the fuel filter (B), the fuel gauge sending unit (C), the case (D), the wire harness (E), and the fuel pressure regulator (F).
10. Check these items before installing the fuel tank unit:
- Make sure the connection is secure and the suction filter (G) is firmly connected to the fuel pump (H).
- When connecting the wire harness, make sure the connection is secure and the connectors (I) are firmly locked into place.
- When installing the fuel gauge sending unit, make sure the connection is secure and the connector is firmly locked into place. Be careful not to bend or twist it excessively.
11. Install the parts in the reverse order of removal with a new base gasket (J), new locknut (A), and new O-rings (K). When installing the fuel tank unit, align the marks (L) on the unit (M) and the fuel tank (N).
Factory Service Tools
Use the Manual With the Right Hardware
Pair factory procedures with proven DIY tools so the instructions are easier to execute.
Disclosure: Verified tool recommendations may earn an affiliate commission at no cost to you.
When to See a Mechanic
Stop DIY work and contact a certified mechanic immediately if any of the following apply:
- • You smell fuel, burning insulation, or see smoke.
- • Brakes feel soft, pull hard to one side, or make grinding noises.
- • The engine overheats, stalls repeatedly, or misfires under load.
- • You are missing required tools, torque specs, or safe lifting equipment.
- • You are not confident in the next step or safety outcome.