
Safety Warning
DIY auto repair can cause serious injury, fire, or vehicle damage. These guides are for informational purposes only. Always follow OEM torque specs, wear PPE, and consult a certified mechanic if you are unsure. You are solely responsible for your safety.
2012 GMC Canyon 4WD L4-2.9LFACTORY OEM SERVICE PROCEDURE
Transfer Case Shift Control Module X1 and X2
Harness Routing Views
Body Harness Routing 2 of 3 (Crew Cab)
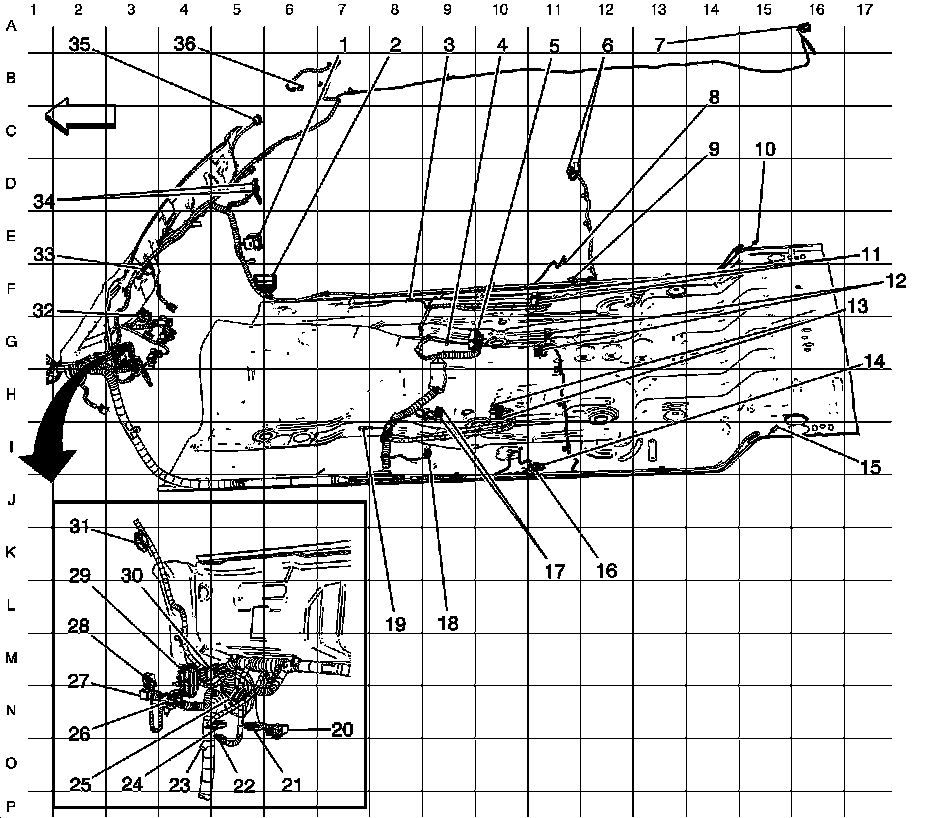
1 - Body Control Module (BCM) X1
2 - X201
3 - G301
4 - G302
5 - Inflatable Restraint Sensing and Diagnostic Module (SDM)
6 - X800
7 - X320
8 - Door Jamb Switch - Front Passenger
9 - Seat Belt Pretensioner - Right Front
10 - Door Jamb Switch - Right Rear
11 - X313
12 - X700
13 - X314
14 - Seat Belt Pretensioner - Left Front
15 - Door Jamb Switch - Left Rear
16 - Door Jamb Switch - Driver
17 - Transfer Case Shift Control Module X1 and X2
18 - G Sensor
19 - G300
20 - Stop Lamp Switch
21 - TCC Brake/Cruise Release Switch
22 - Park Brake Switch
23 - J303
24 - Clutch Switch
25 - Clutch Start Switch
26 - X208
27 - X500
28 - X501
29 - X200
30 - X275
31 - Inflatable Restraint Roof Rail Module - Left
32 - Accelerator Pedal Position (APP) Sensor
33 - X310
34 - X600 and X601 (AU3 and A31)
35 - Inflatable Restraint Roof Rail Module - Right
36 - Inside Rearview Mirror
Factory Service Tools
Use the Manual With the Right Hardware
Pair factory procedures with proven DIY tools so the instructions are easier to execute.
Disclosure: Verified tool recommendations may earn an affiliate commission at no cost to you.
When to See a Mechanic
Stop DIY work and contact a certified mechanic immediately if any of the following apply:
- • You smell fuel, burning insulation, or see smoke.
- • Brakes feel soft, pull hard to one side, or make grinding noises.
- • The engine overheats, stalls repeatedly, or misfires under load.
- • You are missing required tools, torque specs, or safe lifting equipment.
- • You are not confident in the next step or safety outcome.