
Safety Warning
DIY auto repair can cause serious injury, fire, or vehicle damage. These guides are for informational purposes only. Always follow OEM torque specs, wear PPE, and consult a certified mechanic if you are unsure. You are solely responsible for your safety.
2009 Freightliner Sprinter 2500 V6-3.0L DSL TurboFACTORY OEM SERVICE PROCEDURE
Alignment: Service and Repair
CAMBER ADJUSTMENT
1. Raise the vehicle on an alignment hoist.
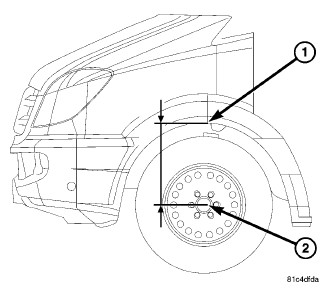
NOTE: Before each alignment check, measure the distance between the wheel center (2) and wheel well housing (1) on either side of the vehicle. Verify that it is between minimum and maximum values given. If so, the alignment check can be performed. If not, adjust the height of the front of the vehicle as necessary using the cradle until the distance is within specification. .
Before each alignment reading the vehicle should be jounced (rear first, then front). Grasp each bumper at the center and jounce the vehicle up and down several times. Always release the bumper in the down position. Also curb height should be checked prior to an alignment. Set the front end alignment to specifications while the vehicle is in its NORMALLY LOADED CONDITION AND CORRECT CURB HEIGHT.
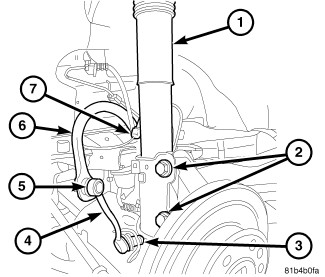
Camber angle adjustments involve changing the position of the knuckle at the strut base.
NOTE: A cam/bolt kit is available to achieve more camber if needed, This kit must be installed in place of the existing lower strut bolts.
2. Loosen the lower strut bolts (2) to allow the knuckle to move inward or outward for camber adjustment.

The wheel toe position adjustment is the final adjustment.
3. Start the engine and turn wheels both ways before straightening the wheels. Secure the steering wheel with the front wheels in the straight-ahead position.
4. Loosen the tie rod jam nuts (2).
NOTE: Each front wheel should be adjusted for one-half of the total toe position specification. This will ensure the steering wheel will be centered when the wheels are positioned straight-ahead.
5. Adjust the wheel toe position by turning the inner tie rod (1) as necessary.
6. Tighten the tie rod jam nut (2) to 50 Nm (37 ft. lbs.).
7. Verify the specifications
8. Turn off engine.
Factory Service Tools
Use the Manual With the Right Hardware
Pair factory procedures with proven DIY tools so the instructions are easier to execute.
Disclosure: Verified tool recommendations may earn an affiliate commission at no cost to you.
When to See a Mechanic
Stop DIY work and contact a certified mechanic immediately if any of the following apply:
- • You smell fuel, burning insulation, or see smoke.
- • Brakes feel soft, pull hard to one side, or make grinding noises.
- • The engine overheats, stalls repeatedly, or misfires under load.
- • You are missing required tools, torque specs, or safe lifting equipment.
- • You are not confident in the next step or safety outcome.