
Safety Warning
DIY auto repair can cause serious injury, fire, or vehicle damage. These guides are for informational purposes only. Always follow OEM torque specs, wear PPE, and consult a certified mechanic if you are unsure. You are solely responsible for your safety.
2003 Freightliner Sprinter 2500 L5-2.7L DSL TurboFACTORY OEM SERVICE PROCEDURE
Fuel Pressure Sensor: Service and Repair
WARNING: HIGH PRESSURE FUEL LINES DELIVER DIESEL FUEL UNDER EXTREME PRESSURE FROM THE INJECTION PUMP TO THE FUEL INJECTORS. THIS MAY BE AS HIGH AS 23,000PSI (1600)BAR. USE EXTREME CAUTION WHEN INSPECTING FOR HIGH PRESSURE FUEL LEAKS. FUEL UNDER THIS AMOUNT OF PRESSURE CAN PENETRATE SKIN CAUSING PERSONAL INJURY OR DEATH. INSPECT FOR HIGH PRESSURE LEAKS WITH A SHEET OF CARD BOARD. WEAR SAFETY GOGGLES AND ADEQUATE PROTECTIVE CLOTHING WHEN SERVICING THE FUEL SYSTEM.
REMOVAL
1. Disconnect the negative battery cable.
2. Disconnect the fuel rail pressure sensor wiring harness connector.
3. Unbolt fuel rail pressure sensor from the housing and remove together with the seal.
INSTALLATION
1. Clean sealing surfaces.
2. Install new seal and lubricate with clean diesel fuel.
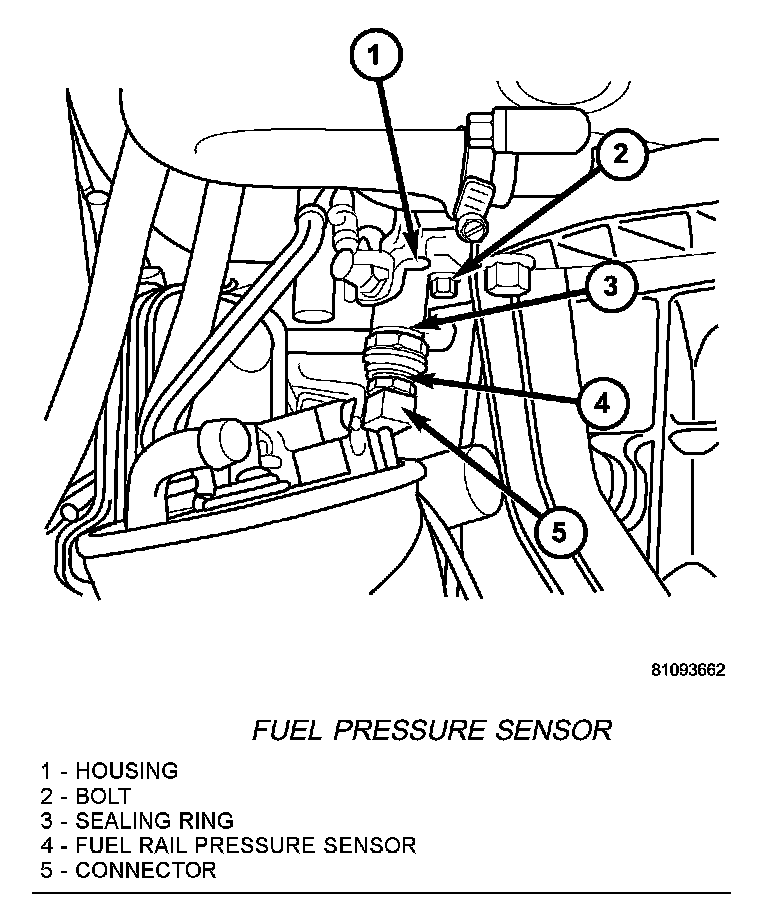
3. Properly position sensor and install retaining bolt.
4. Connect wiring harness connector.
5. Connect negative battery cable.
REMOVAL
1. Refer to FUEL SYSTEM/FUEL INJECTION - WARNING Disconnect the negative battery cable.
2. Remove the mixing housing.
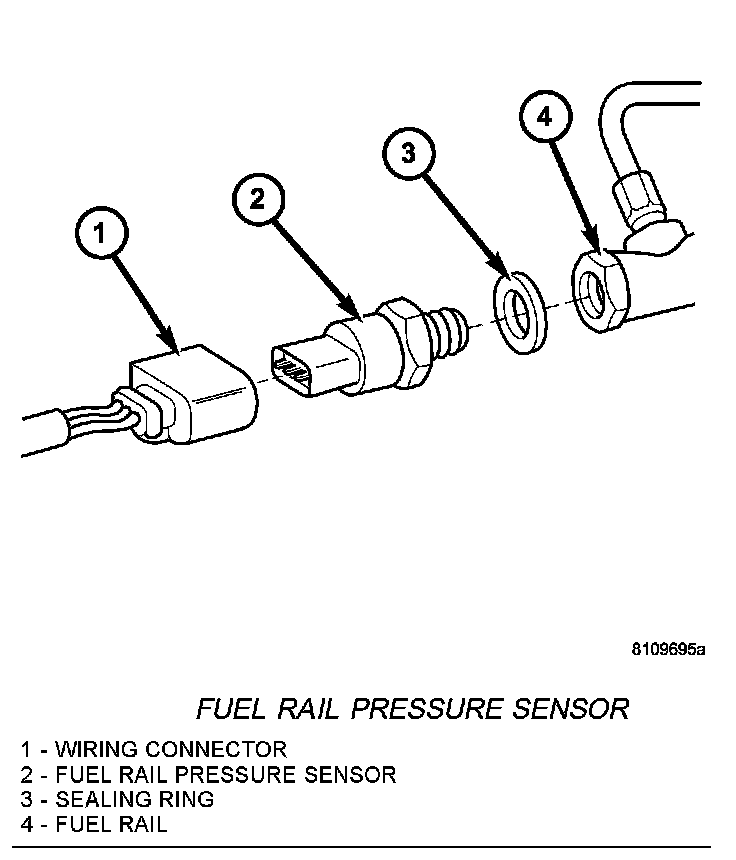
3. Unplug the sensor.
4. Counter-hold the threaded connection at the fuel rail and unscrew the sensor.
INSTALLATION
1. Refer to FUEL SYSTEM/FUEL INJECTION - WARNING Install the sealing ring on to the sensor.
2. Screw the sensor in to the fuel rail. Counter-hold the threaded connection and tighten the sensor to 18 lbs. ft. (25 N.m.).
3. Connect the wiring harness to the sensor.
4. Install the mixing housing.
5. Connect negative battery cable.
REMOVAL
1. Disconnect the negative battery cable.
2. Disconnect the fuel rail pressure sensor wiring harness connector.
3. Unbolt fuel rail pressure sensor from the housing and remove together with the seal.
INSTALLATION
1. Clean sealing surfaces.
2. Install new seal and lubricate with clean diesel fuel.
Fuel Pressure Sensor:
3. Properly position sensor and install retaining bolt.
4. Connect wiring harness connector.
5. Connect negative battery cable.
REMOVAL
1. Refer to FUEL SYSTEM/FUEL INJECTION - WARNING Disconnect the negative battery cable.
2. Remove the mixing housing.
Fuel Rail Pressure Sensor:
3. Unplug the sensor.
4. Counter-hold the threaded connection at the fuel rail and unscrew the sensor.
INSTALLATION
1. Refer to FUEL SYSTEM/FUEL INJECTION - WARNING Install the sealing ring on to the sensor.
2. Screw the sensor in to the fuel rail. Counter-hold the threaded connection and tighten the sensor to 18 lbs. ft. (25 N.m.).
3. Connect the wiring harness to the sensor.
4. Install the mixing housing.
5. Connect negative battery cable.
Factory Service Tools
Use the Manual With the Right Hardware
Pair factory procedures with proven DIY tools so the instructions are easier to execute.
Disclosure: Verified tool recommendations may earn an affiliate commission at no cost to you.
When to See a Mechanic
Stop DIY work and contact a certified mechanic immediately if any of the following apply:
- • You smell fuel, burning insulation, or see smoke.
- • Brakes feel soft, pull hard to one side, or make grinding noises.
- • The engine overheats, stalls repeatedly, or misfires under load.
- • You are missing required tools, torque specs, or safe lifting equipment.
- • You are not confident in the next step or safety outcome.