
Safety Warning
DIY auto repair can cause serious injury, fire, or vehicle damage. These guides are for informational purposes only. Always follow OEM torque specs, wear PPE, and consult a certified mechanic if you are unsure. You are solely responsible for your safety.
2008 Ford Taurus FWD V6-3.5LFACTORY OEM SERVICE PROCEDURE
Transmission Position Sensor/Switch: Service and Repair
Digital Transmission Range (TR) Sensor
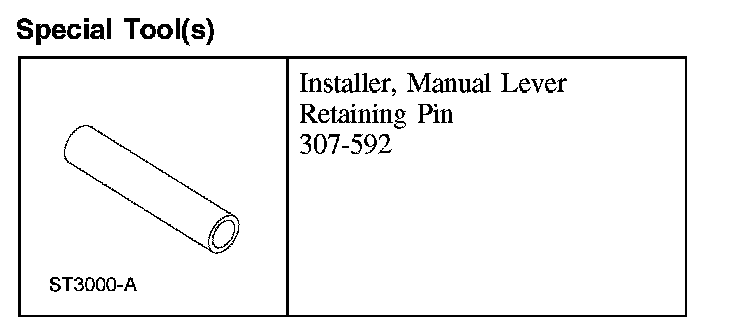
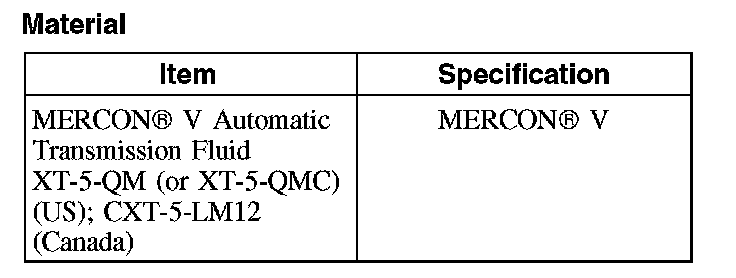
Removal
1. With the vehicle in NEUTRAL, position it on a hoist.
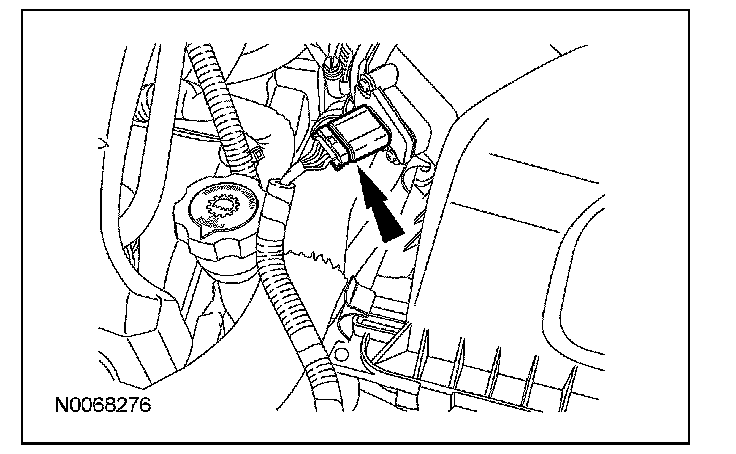
2. Disconnect the mass air flow (MAF) sensor electrical connector.
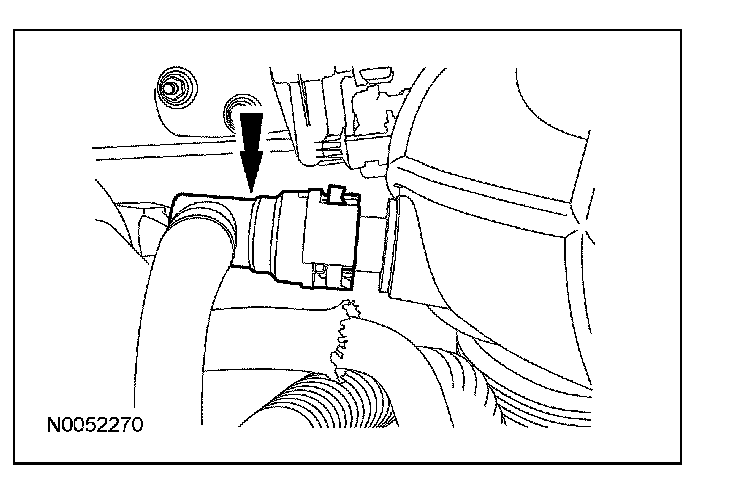
3. Disconnect the engine breather from the air cleaner assembly.
4. Remove the 2 air cleaner assembly bracket bolts.

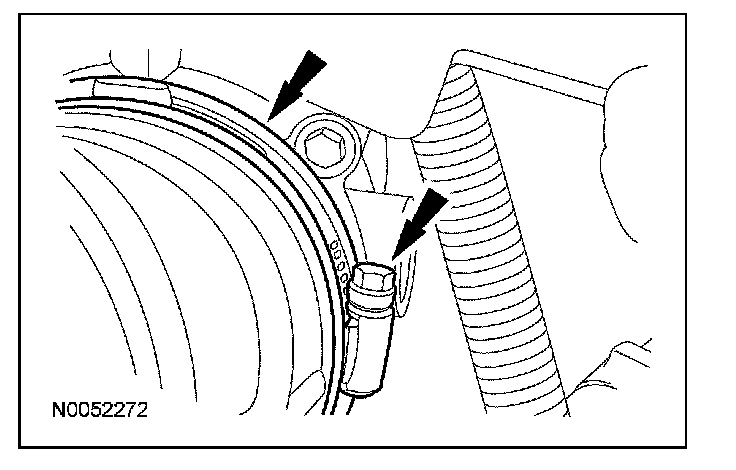
5. Loosen the air cleaner outlet pipe clamp at the throttle body and remove the air cleaner and air cleaner outlet pipe assembly.
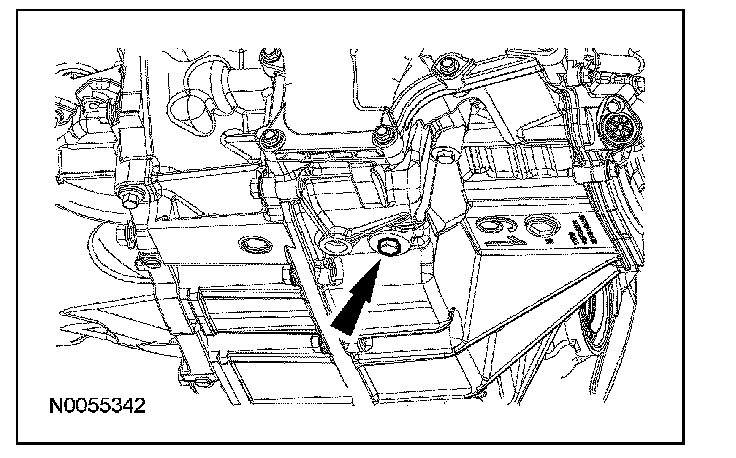
6. Remove the transmission fluid drain plug and allow the transmission fluid to drain.
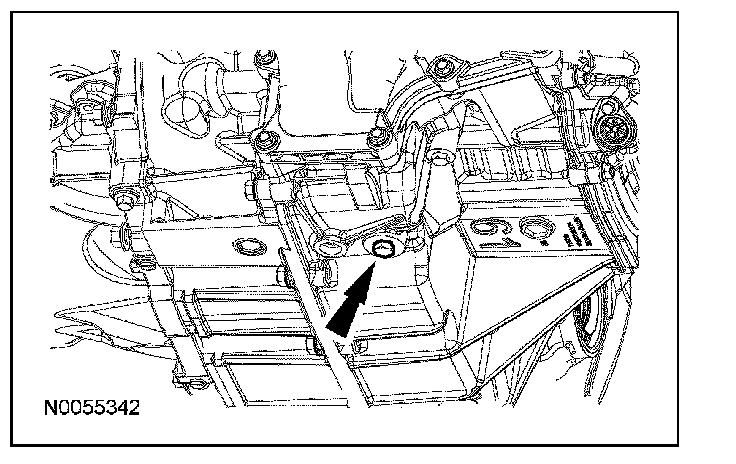
7. Install the transmission fluid drain plug.
^ Tighten to 9 Nm (80 lb-inch).
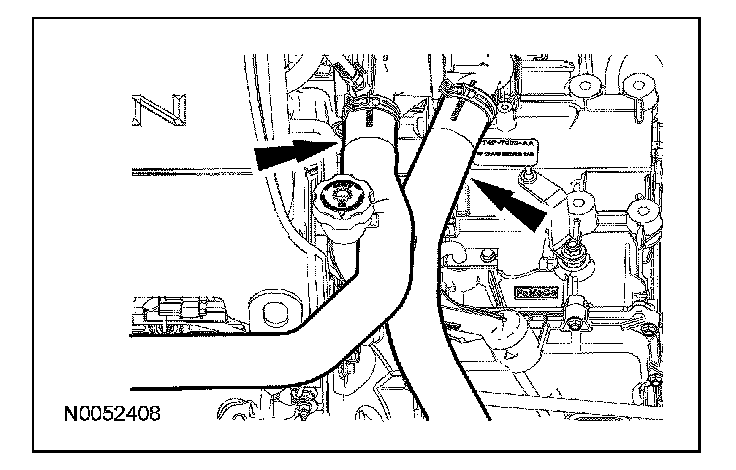
8. Remove the coolant hoses from the transmission fluid filler tube.
9. Remove the transmission fluid level indicator.
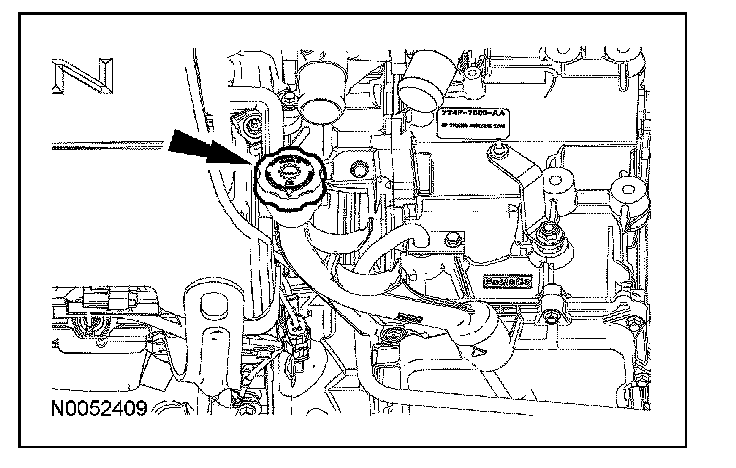
10. Remove the nut, rotate the transmission fluid filler tube counterclockwise 90 degrees and remove the transmission fluid filler tube.
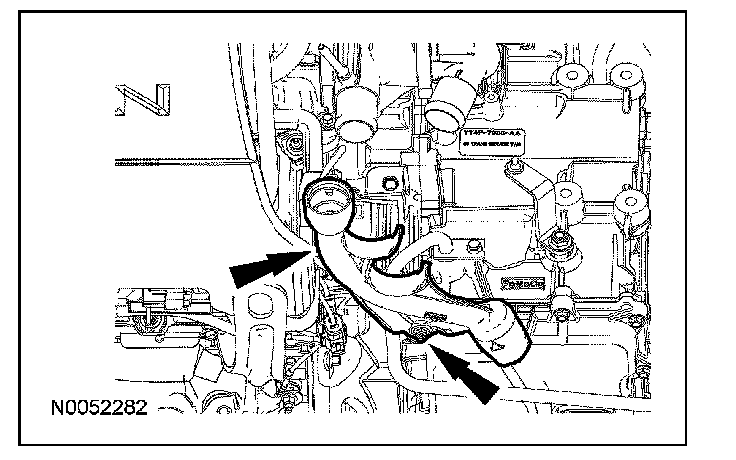
11. Disconnect the selector lever cable end from the manual lever.
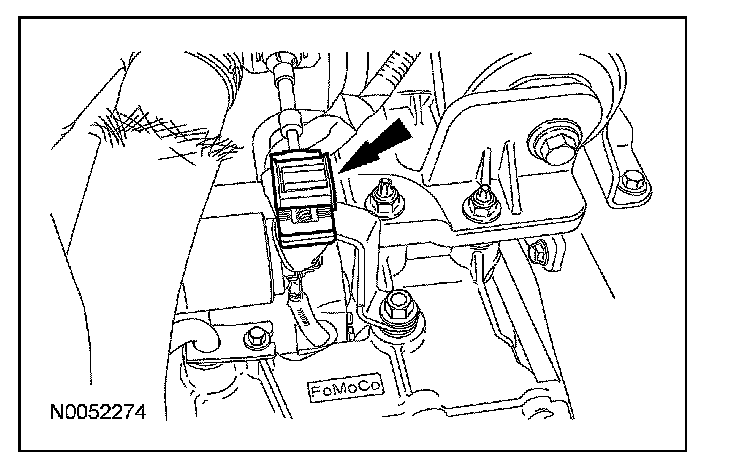
12. Remove the nut and the manual lever.
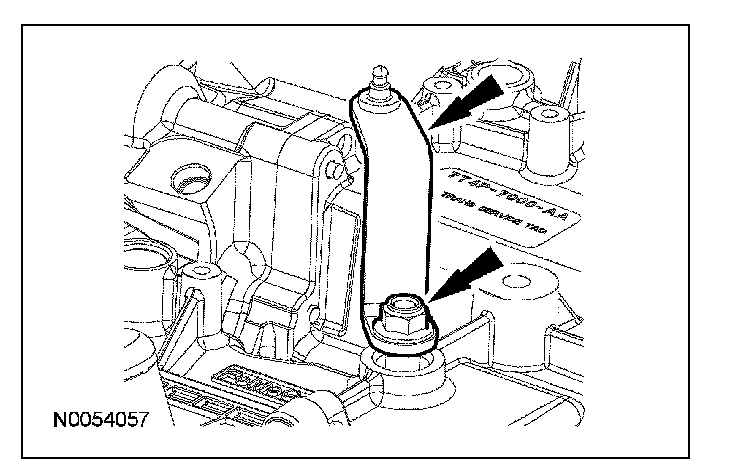
13. Loosen the transmission fluid cooler tube fitting from the thermal bypass valve.
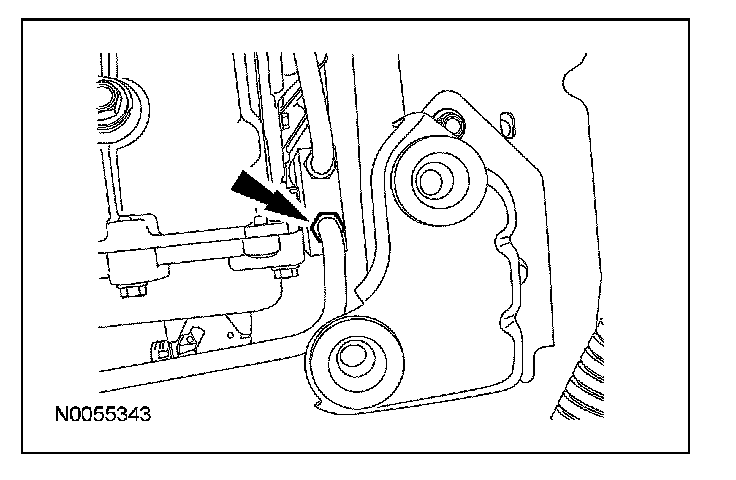
14. Remove and discard the transmission fluid cooler tube bolt and remove the transmission fluid cooler tube.
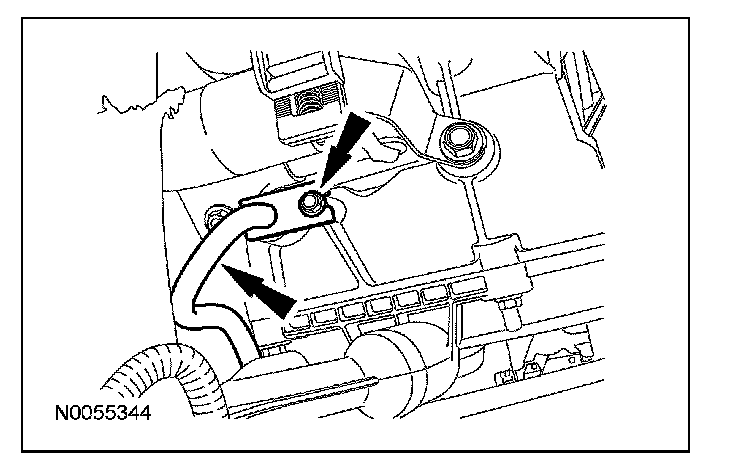
15. Inspect the transaxle case to make sure that the transmission fluid cooler tube seal and backing ring were removed with the transmission fluid cooler tube and are not stuck in the transaxle case. If the transmission fluid cooler tube seal or backing ring are stuck in the transaxle case, remove the seal and backing ring.
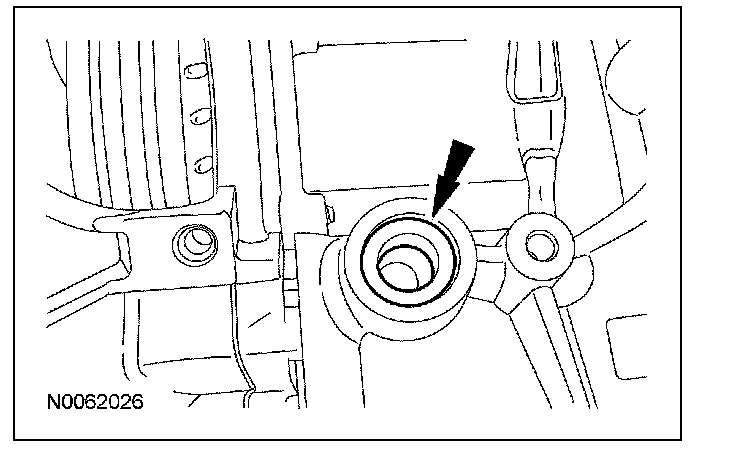
16. Disconnect the transaxle electrical connector and remove the wiring harness fastener from the main control cover stud.
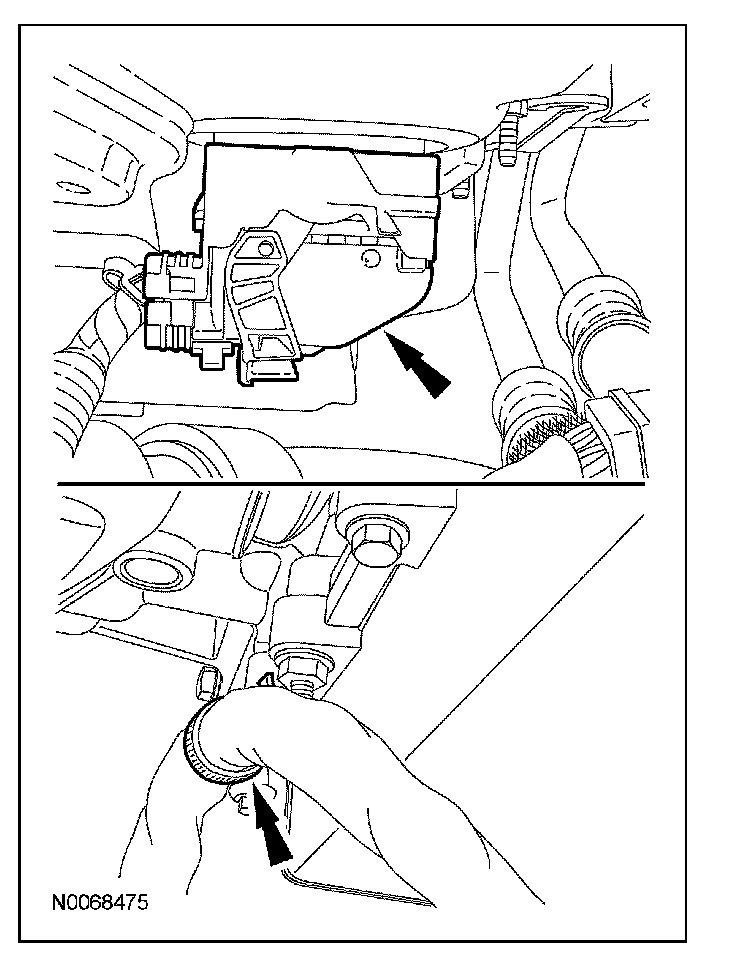
17. Remove the 2 nuts, pull the transmission fluid cooler thermal bypass valve straight up and position it aside.
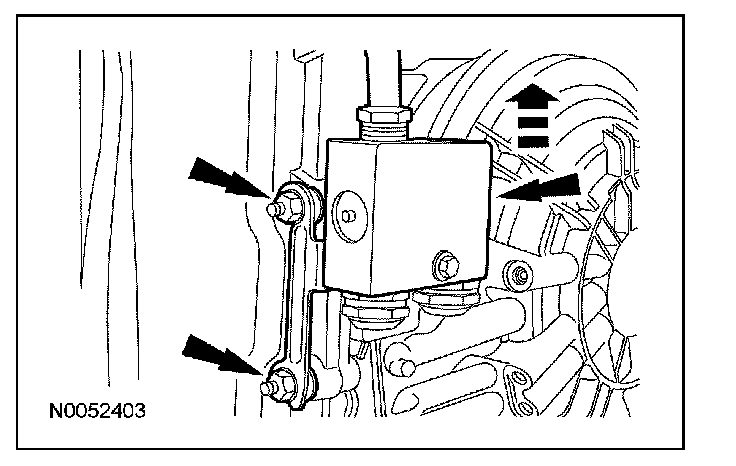
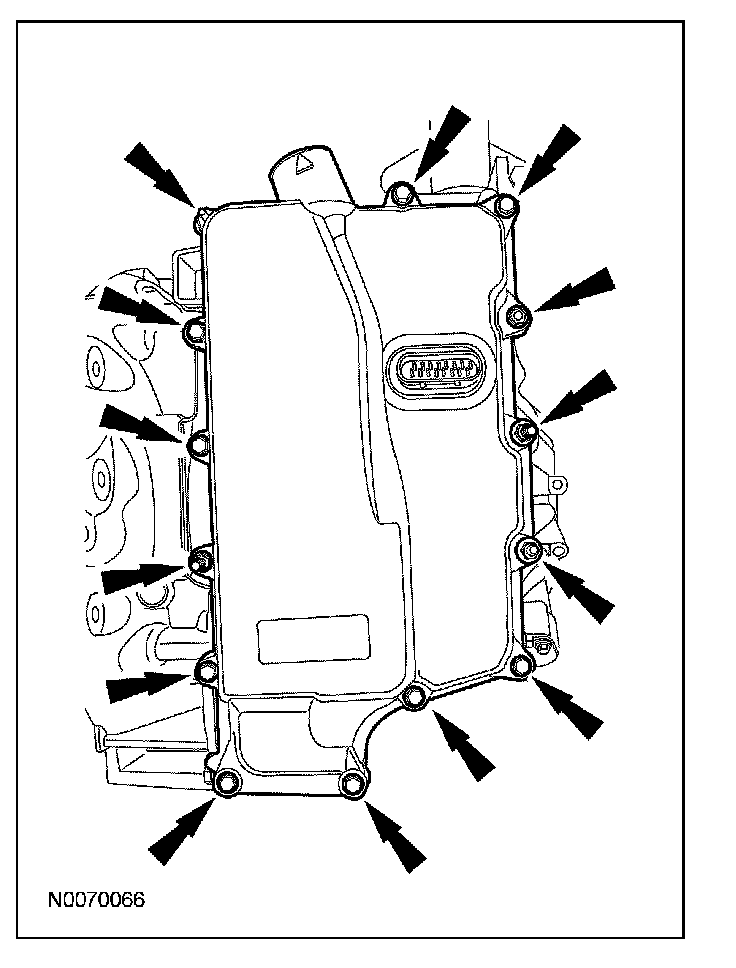
18. NOTE: Note the location of the studbolts for assembly.
Remove the 14 bolts and the main control cover.
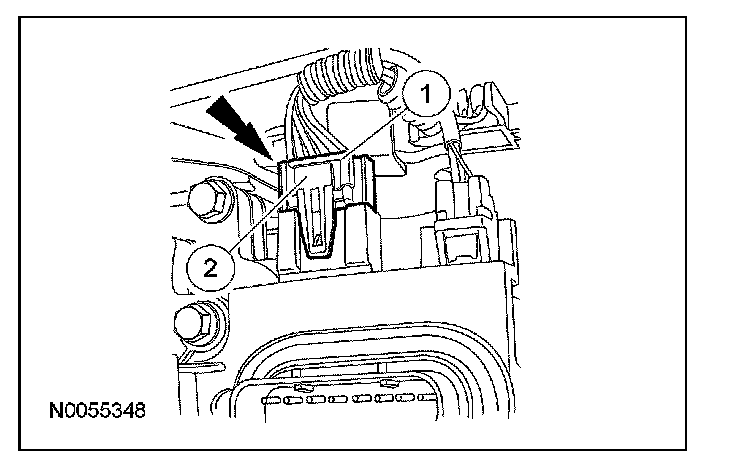
19. Disconnect the transmission range (TR) sensor electrical connector.
1 Slide the lock over.
2 Press the tab and disconnect the connector.
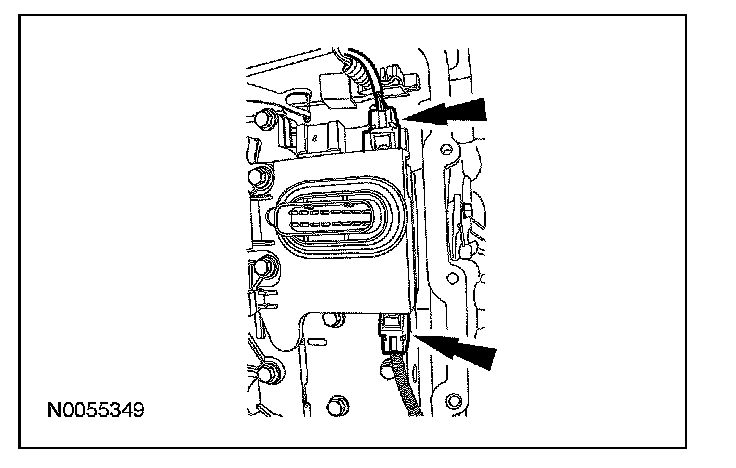
20. Disconnect the turbine shaft speed (TSS) and output shaft speed (OSS) sensor electrical connectors.
21. NOTE: Note the location of the different length bolts for assembly.
Remove the 11 bolts and the solenoid body.
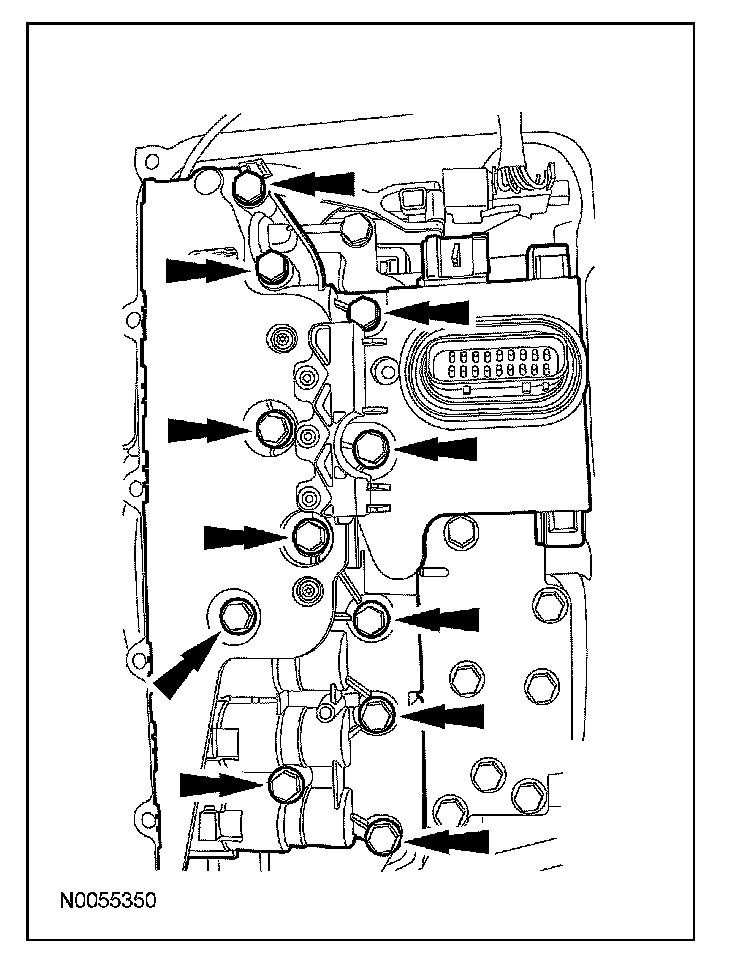
22. CAUTION: Do not handle the solenoid body in the leadframe area or by the screens of the solenoid body filter or damage to the solenoid body may occur.
CAUTION: Use care not to break the alignment tabs when removing the solenoid body filter.
Remove the solenoid body filter assembly by pulling it straight up from the alignment tabs. Discard the filter.
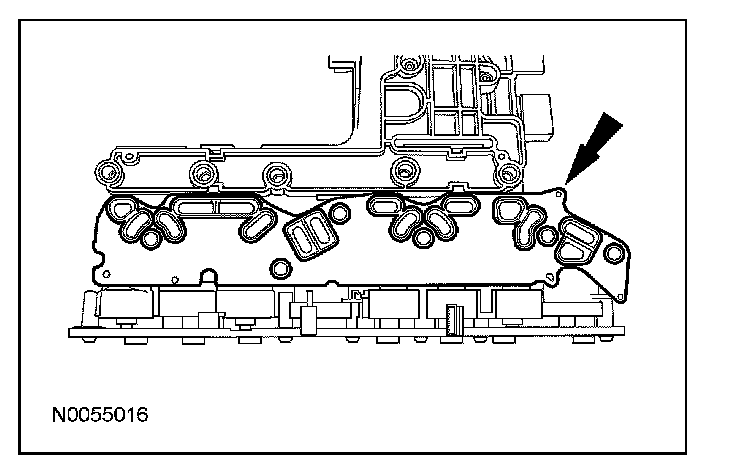
23. Remove the 10 bolts, the TR sensor detent spring and the main control valve body.
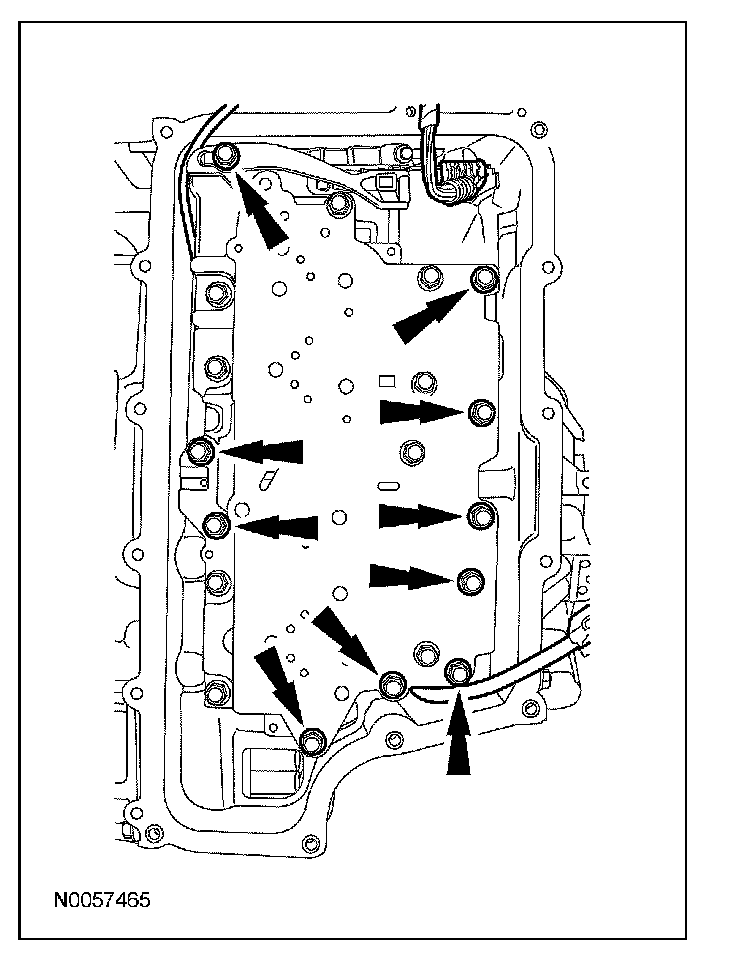
24. Using a suitable tool, remove and discard the TR sensor locking pin.
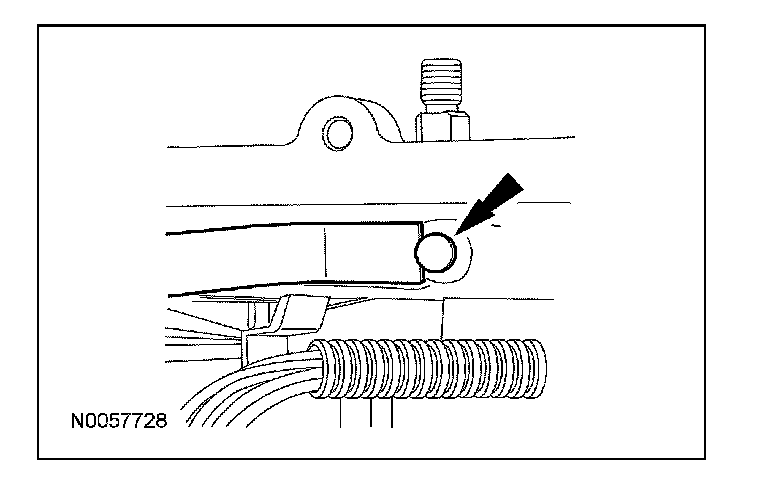
25. NOTE: TR sensor removed for clarity.
Make sure that the park pawl actuator rod does not become disengaged from the park pawl and the abutment by keeping the end of the park pawl actuator rod behind the machined valve body mating surface of the transaxle case. If the park pawl actuator rod becomes disengaged from the park pawl and the abutment, transaxle removal and disassembly is required to reinstall the actuator rod.

26. CAUTION: Make sure that the park pawl actuator rod does not become disengaged from the park pawl and the abutment, or transaxle removal and disassembly is required to reinstall the actuator rod.
Remove the TR sensor.
1 Slide the TR sensor down until the manual shaft is out of the transaxle case.
2 Rotate the TR sensor detent plate counterclockwise, as viewed from below until the plate rests against the transaxle case, remove the park pawl actuating rod from the TR sensor and remove the TR sensor.

Installation
1. Install the TR sensor.
1 Position the park pawl actuating rod in the TR sensor.
2 Install the TR sensor in the transaxle case.
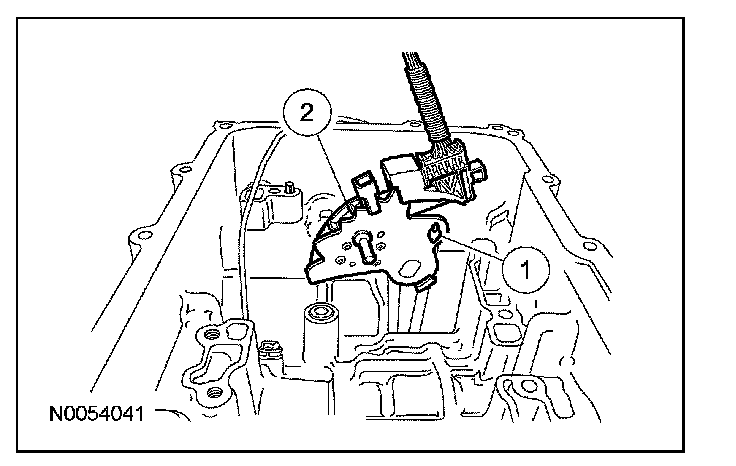
2. Using the special tool, install a new TR sensor locking pin.
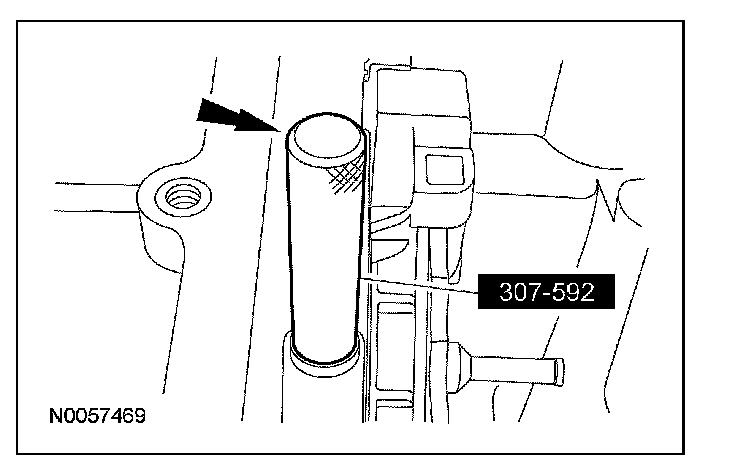
3. NOTE: If cleaning the main control assembly or inspecting the valves, refer to Automatic Transmission/Transaxle. If installing a new main control assembly continue with this procedure.
NOTE: Make sure that the manual pin (part of the TR sensor) is correctly installed in the manual valve.
Position the TSS, OSS and TR sensor wiring harnesses aside and install the main control valve body.
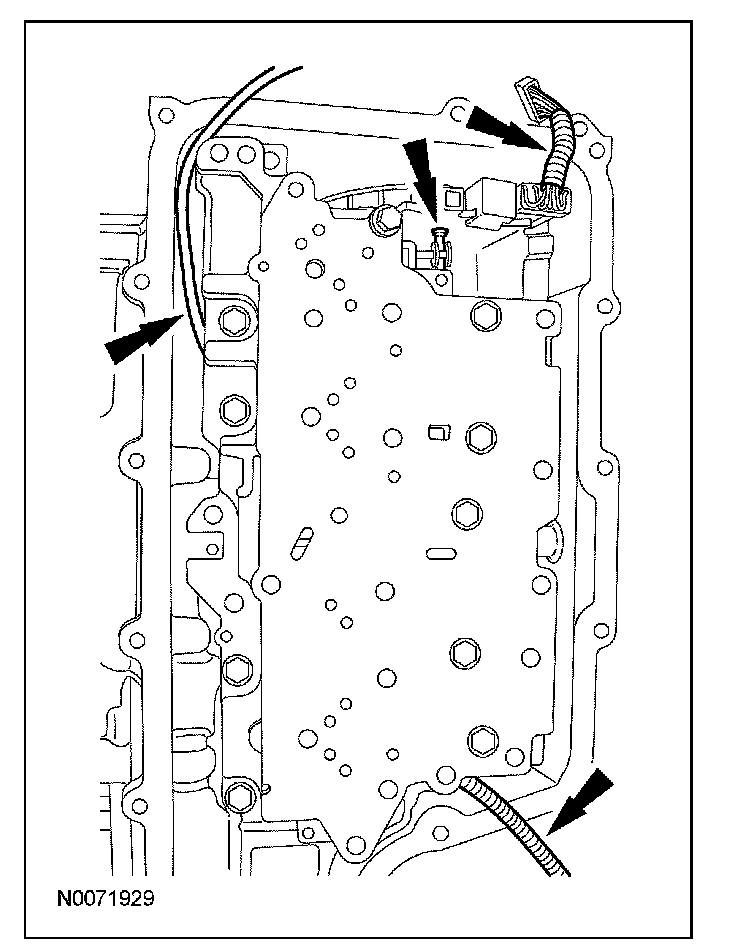
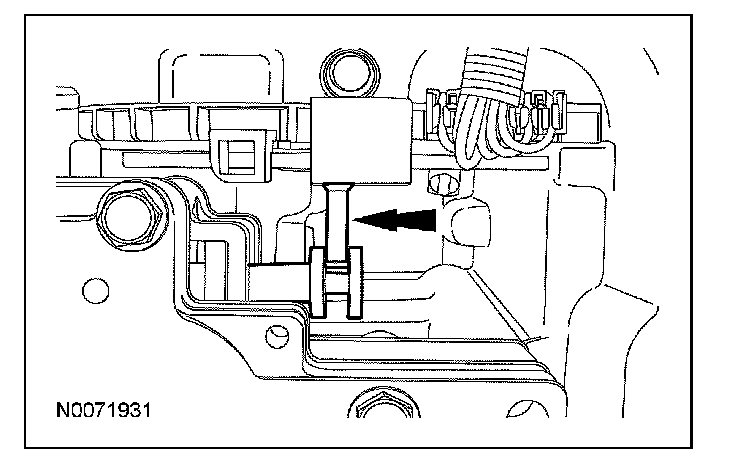
4. Inspect the manual pin to make sure it is correctly installed in the manual valve. If it is not, pull the valve body off the transaxle case. Correctly install the manual pin in the manual valve and position the valve body in place.
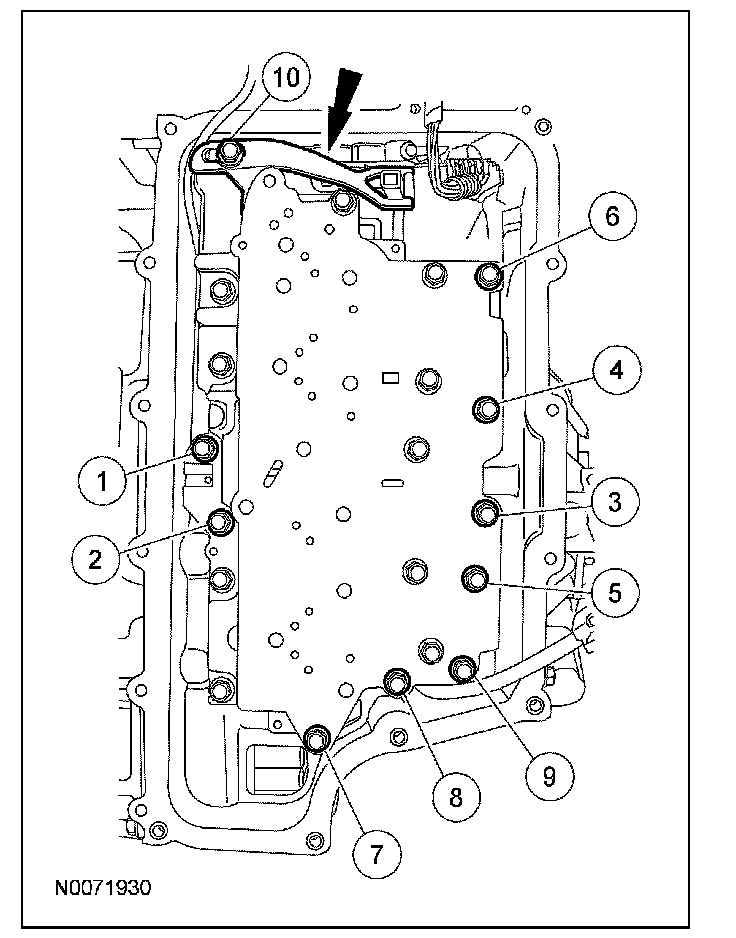
5. Install the TR sensor detent spring and the 10 bolts. Tighten the bolts in the sequence shown.
^ Tighten to 12 Nm (9 lb-ft).
6. CAUTION: Do not handle the solenoid body in the leadframe area or by the screens of the solenoid body filter or damage to the solenoid body may occur.
CAUTION: Use care not to break the alignment tabs when installing the solenoid body filter. Damage to the transaxle will occur if the solenoid body is not correctly aligned.
CAUTION: Make sure that the filter passage areas are clean of foreign material before installing the filter. Damage to the transaxle will occur if the filter passages are not clean.
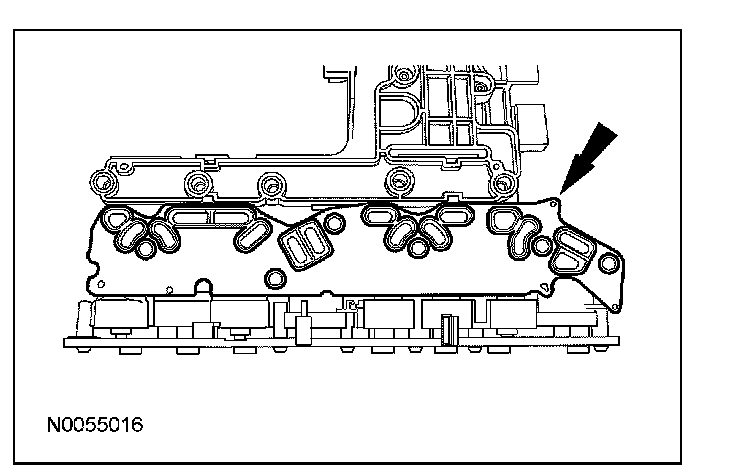
Install a new solenoid body filter assembly by pushing it straight down on to the alignment tabs.
7. CAUTION: Make sure not to pinch the turbine shaft speed (TSS), output shaft speed (OSS) or transmission range (TR) sensor wiring harnesses when installing the solenoid body. Damage to the wiring harness will occur.
NOTE: Install the different length bolts in the locations noted during disassembly.
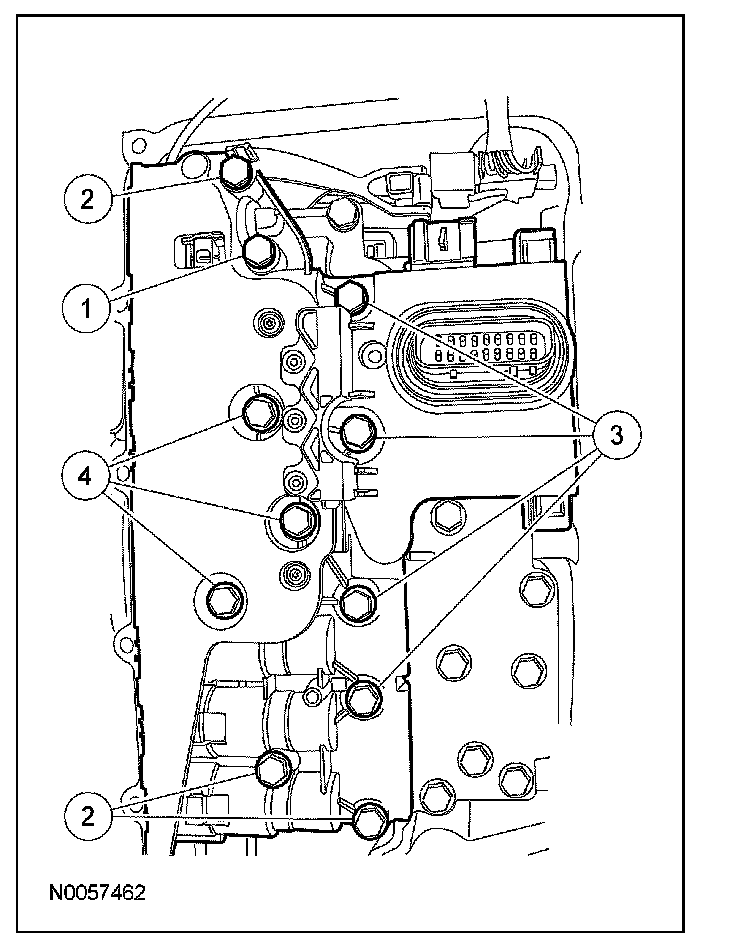
Install the solenoid body and the 11 bolts.
1 42 mm (1.65 inch) bolt
2 63 mm (2.48 inch) bolts
3 80 mm (3.14 inch) bolts
4 95 mm (3.74 inch) bolts
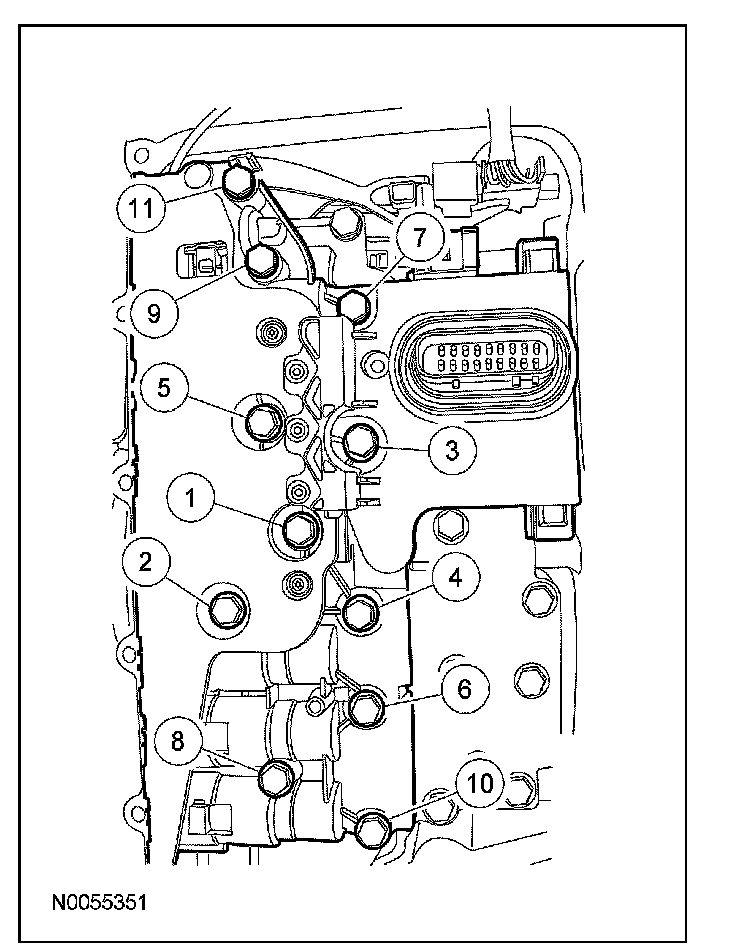
8. Tighten the solenoid body bolts in the sequence shown.
^ Tighten to 12 Nm (9 lb-ft).
9. Route the OSS sensor wiring harness and connect the electrical connector.
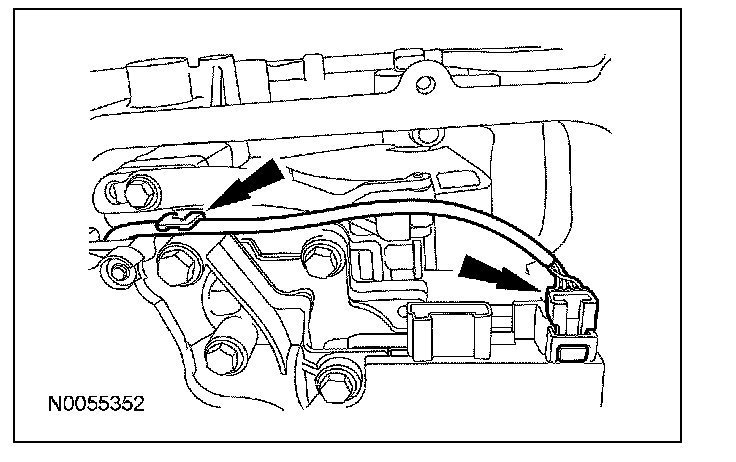
10. Connect the TR sensor electrical connector.
1 Connect the electrical connector.
2 Slide the locking tab over.
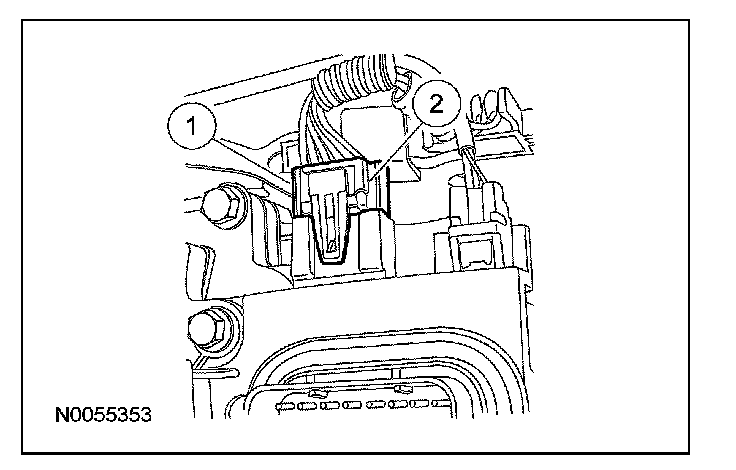
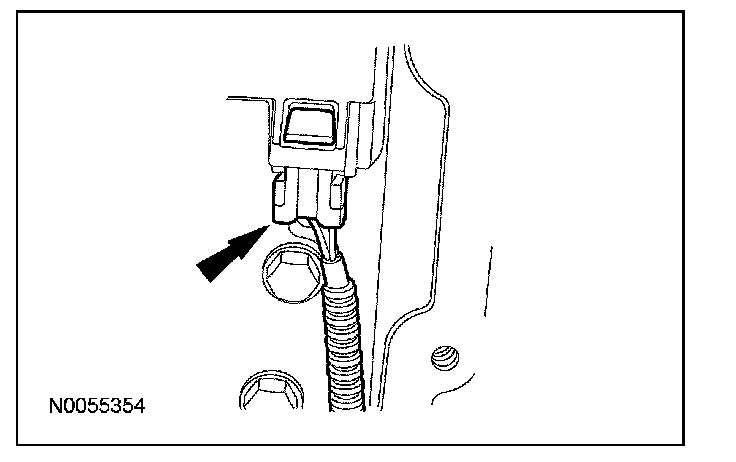
11. Connect the TSS sensor electrical connector.
12. Inspect the transaxle side cover seal for damage and install new if necessary.
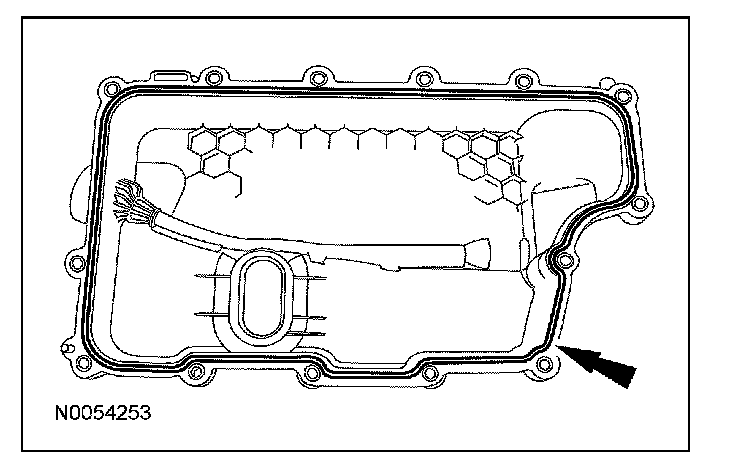
13. CAUTION: Inspect the 20-pin solenoid body connector seal to make sure that the seal is on the inside of the main control cover. Transmission fluid leak will occur.
NOTE: Install the studbolts in the locations noted during disassembly.
Install the main control cover and loosely install the 14 bolts.
1 Bolt location
2 Studbolt location
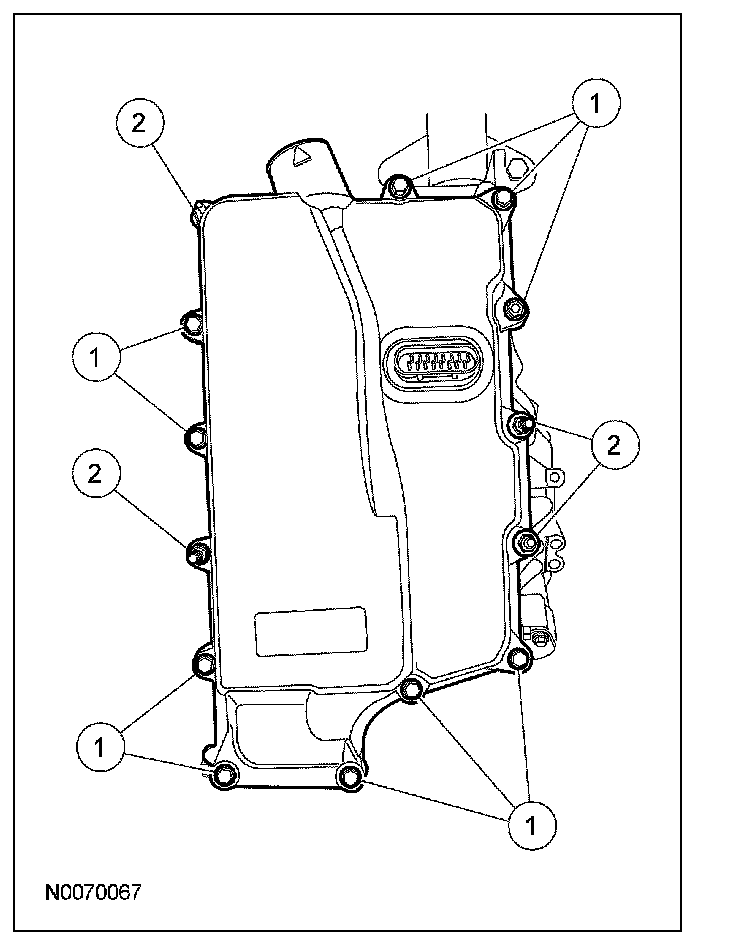
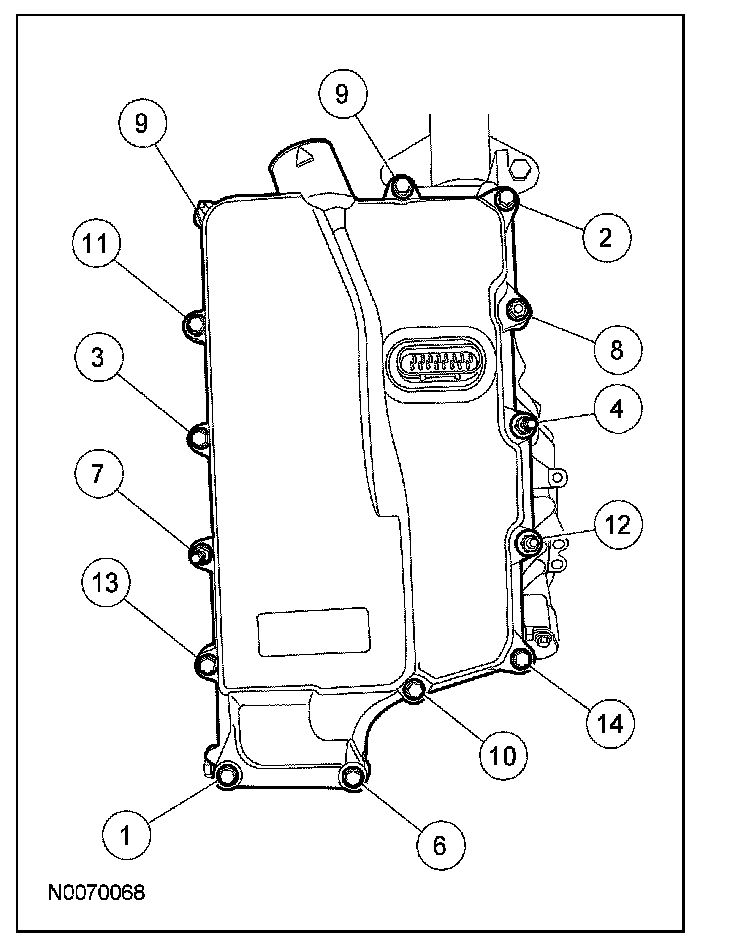
14. Tighten the main control cover bolts in the sequence shown.
^ Tighten to 12 Nm (9 lb-ft).
15. Position the transmission fluid cooler thermal bypass valve and transmission fluid cooler tube assembly in place and install the 2 nuts.
^ Tighten to 9 Nm (80 lb-inch).
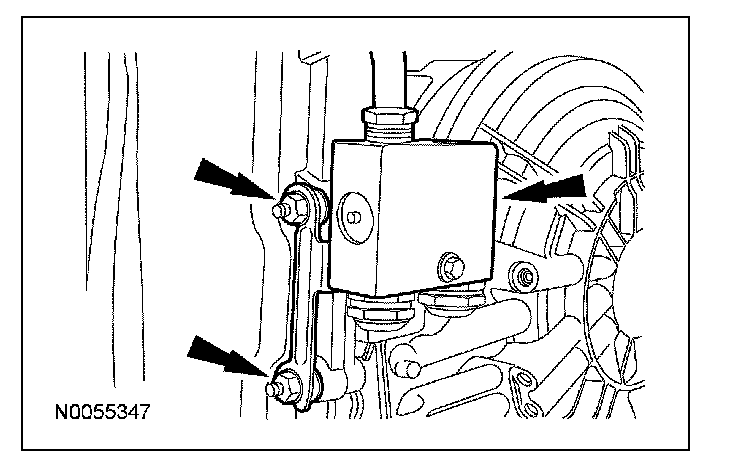
16. Connect the transaxle electrical connector and install the wiring harness fastener on the main control cover stud.

17. Inspect the transmission fluid cooler tube backing ring and seal for damage and install a new backing ring or seal if necessary. Lubricate the transmission fluid cooler tube seal with clean automatic transmission fluid and install the backing ring and seal on the transmission fluid cooler tube.
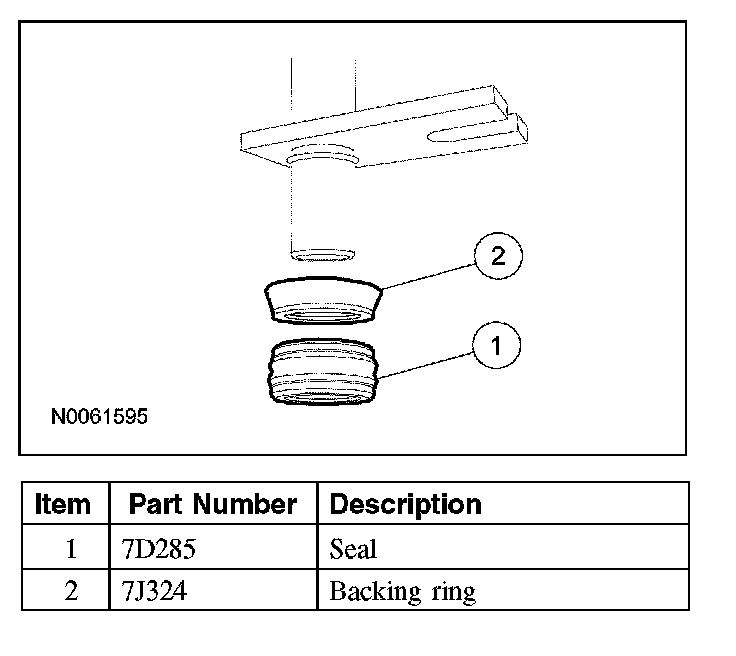
18. Position the transmission fluid cooler tube in place and install a new bolt.
^ Tighten to 9 Nm (80 lb-inch).
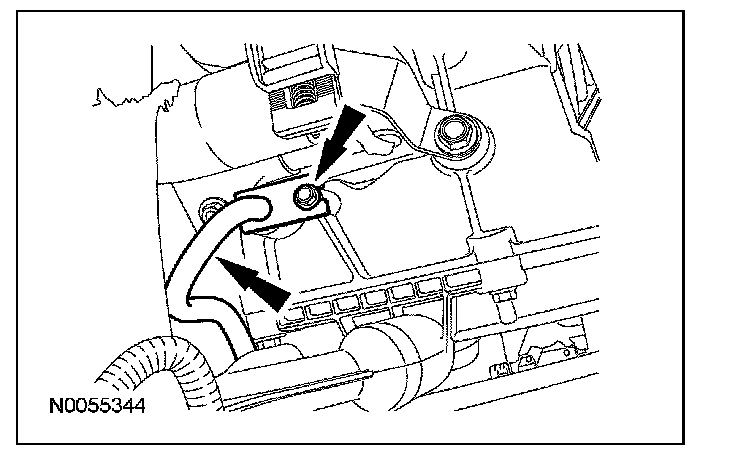
19. Tighten the transmission fluid cooler tube fitting.
^ Tighten to 25 Nm (18 lb-ft).

20. Install the manual lever and the nut.
^ Tighten to 18 Nm (13 lb-ft).
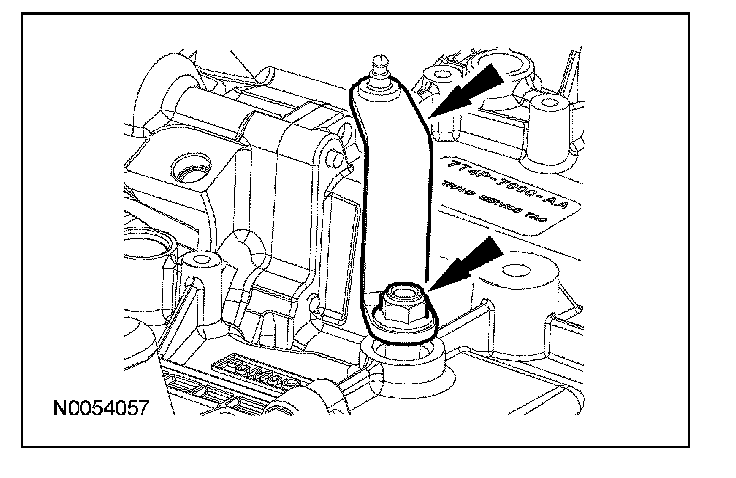
21. Connect the selector lever cable end to the manual lever.
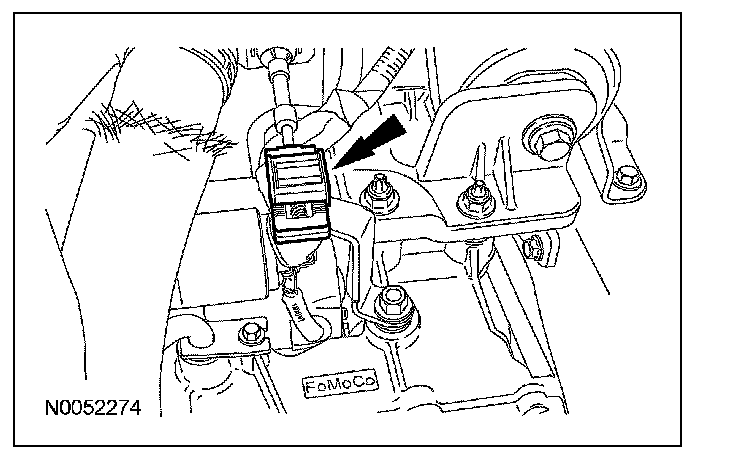
22. Install the fluid filler tube and the nut.
^ Tighten to 11 Nm (8 lb-ft).
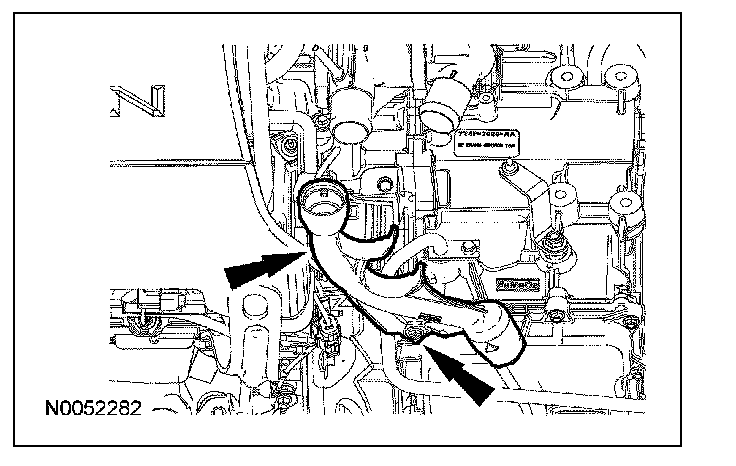
23. Install the transmission fluid level indicator.
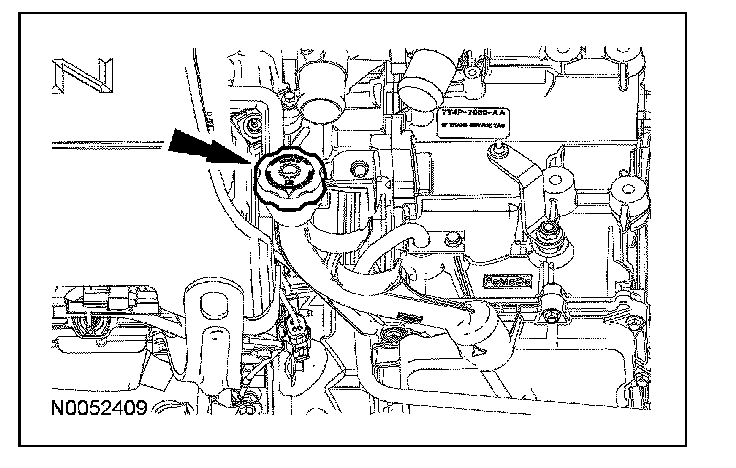
24. Route the coolant hoses in the transmission fluid filler tube.
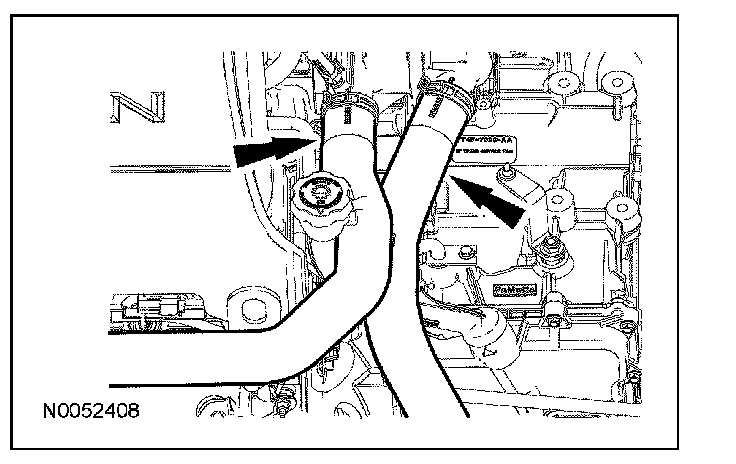
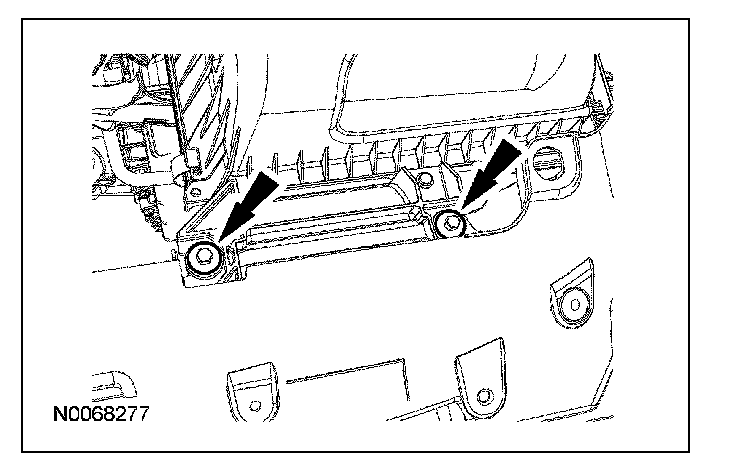
25. Position the air cleaner assembly in place and install the 2 air cleaner assembly bracket bolts.
^ Tighten to 11 Nm (8 lb-ft).
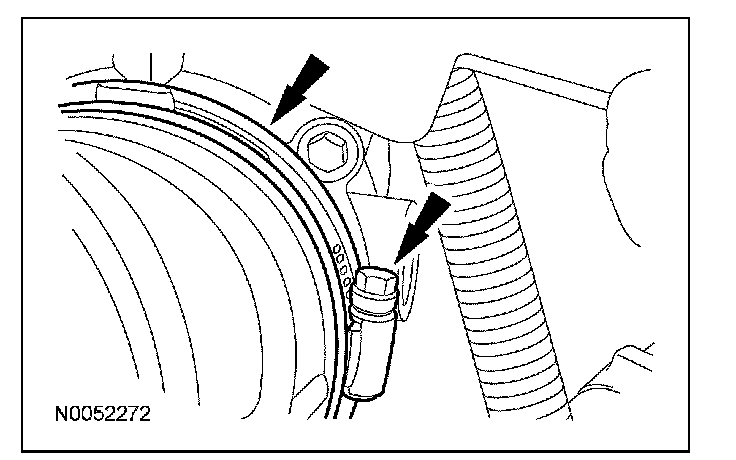
26. Tighten the air cleaner outlet pipe clamp at the throttle body.
^ Tighten to 5 Nm (44 lb-inch).
27. Connect the engine breather to the air cleaner assembly.
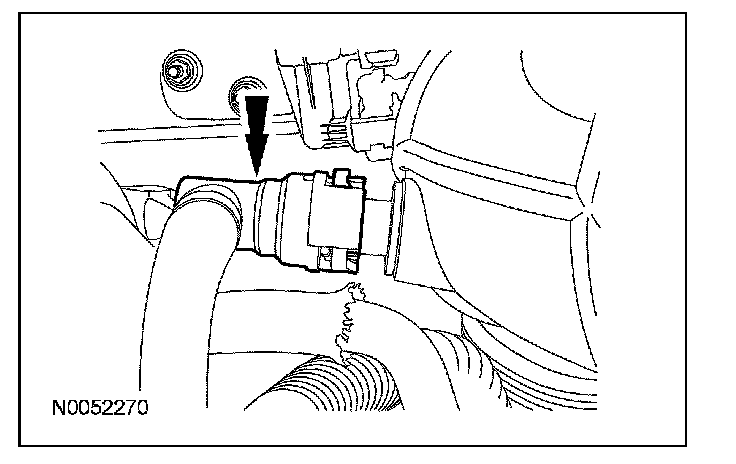
28. Connect the MAF sensor electrical connector.
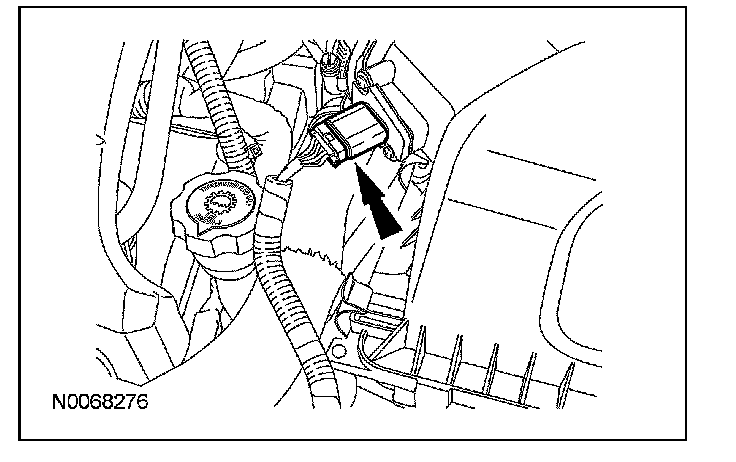
29. Fill with clean automatic transmission fluid to the correct level.
Removal
1. With the vehicle in NEUTRAL, position it on a hoist.
2. Disconnect the mass air flow (MAF) sensor electrical connector.
3. Disconnect the engine breather from the air cleaner assembly.
4. Remove the 2 air cleaner assembly bracket bolts.
5. Loosen the air cleaner outlet pipe clamp at the throttle body and remove the air cleaner and air cleaner outlet pipe assembly.
6. Remove the transmission fluid drain plug and allow the transmission fluid to drain.
7. Install the transmission fluid drain plug.
^ Tighten to 9 Nm (80 lb-inch).
8. Remove the coolant hoses from the transmission fluid filler tube.
9. Remove the transmission fluid level indicator.
10. Remove the nut, rotate the transmission fluid filler tube counterclockwise 90 degrees and remove the transmission fluid filler tube.
11. Disconnect the selector lever cable end from the manual lever.
12. Remove the nut and the manual lever.
13. Loosen the transmission fluid cooler tube fitting from the thermal bypass valve.
14. Remove and discard the transmission fluid cooler tube bolt and remove the transmission fluid cooler tube.
15. Inspect the transaxle case to make sure that the transmission fluid cooler tube seal and backing ring were removed with the transmission fluid cooler tube and are not stuck in the transaxle case. If the transmission fluid cooler tube seal or backing ring are stuck in the transaxle case, remove the seal and backing ring.
16. Disconnect the transaxle electrical connector and remove the wiring harness fastener from the main control cover stud.
17. Remove the 2 nuts, pull the transmission fluid cooler thermal bypass valve straight up and position it aside.
18. NOTE: Note the location of the studbolts for assembly.
Remove the 14 bolts and the main control cover.
19. Disconnect the transmission range (TR) sensor electrical connector.
1 Slide the lock over.
2 Press the tab and disconnect the connector.
20. Disconnect the turbine shaft speed (TSS) and output shaft speed (OSS) sensor electrical connectors.
21. NOTE: Note the location of the different length bolts for assembly.
Remove the 11 bolts and the solenoid body.
22. CAUTION: Do not handle the solenoid body in the leadframe area or by the screens of the solenoid body filter or damage to the solenoid body may occur.
CAUTION: Use care not to break the alignment tabs when removing the solenoid body filter.
Remove the solenoid body filter assembly by pulling it straight up from the alignment tabs. Discard the filter.
23. Remove the 10 bolts, the TR sensor detent spring and the main control valve body.
24. Using a suitable tool, remove and discard the TR sensor locking pin.
25. NOTE: TR sensor removed for clarity.
Make sure that the park pawl actuator rod does not become disengaged from the park pawl and the abutment by keeping the end of the park pawl actuator rod behind the machined valve body mating surface of the transaxle case. If the park pawl actuator rod becomes disengaged from the park pawl and the abutment, transaxle removal and disassembly is required to reinstall the actuator rod.
26. CAUTION: Make sure that the park pawl actuator rod does not become disengaged from the park pawl and the abutment, or transaxle removal and disassembly is required to reinstall the actuator rod.
Remove the TR sensor.
1 Slide the TR sensor down until the manual shaft is out of the transaxle case.
2 Rotate the TR sensor detent plate counterclockwise, as viewed from below until the plate rests against the transaxle case, remove the park pawl actuating rod from the TR sensor and remove the TR sensor.
Installation
1. Install the TR sensor.
1 Position the park pawl actuating rod in the TR sensor.
2 Install the TR sensor in the transaxle case.
2. Using the special tool, install a new TR sensor locking pin.
3. NOTE: If cleaning the main control assembly or inspecting the valves, refer to Automatic Transmission/Transaxle. If installing a new main control assembly continue with this procedure.
NOTE: Make sure that the manual pin (part of the TR sensor) is correctly installed in the manual valve.
Position the TSS, OSS and TR sensor wiring harnesses aside and install the main control valve body.
4. Inspect the manual pin to make sure it is correctly installed in the manual valve. If it is not, pull the valve body off the transaxle case. Correctly install the manual pin in the manual valve and position the valve body in place.
5. Install the TR sensor detent spring and the 10 bolts. Tighten the bolts in the sequence shown.
^ Tighten to 12 Nm (9 lb-ft).
6. CAUTION: Do not handle the solenoid body in the leadframe area or by the screens of the solenoid body filter or damage to the solenoid body may occur.
CAUTION: Use care not to break the alignment tabs when installing the solenoid body filter. Damage to the transaxle will occur if the solenoid body is not correctly aligned.
CAUTION: Make sure that the filter passage areas are clean of foreign material before installing the filter. Damage to the transaxle will occur if the filter passages are not clean.
Install a new solenoid body filter assembly by pushing it straight down on to the alignment tabs.
7. CAUTION: Make sure not to pinch the turbine shaft speed (TSS), output shaft speed (OSS) or transmission range (TR) sensor wiring harnesses when installing the solenoid body. Damage to the wiring harness will occur.
NOTE: Install the different length bolts in the locations noted during disassembly.
Install the solenoid body and the 11 bolts.
1 42 mm (1.65 inch) bolt
2 63 mm (2.48 inch) bolts
3 80 mm (3.14 inch) bolts
4 95 mm (3.74 inch) bolts
8. Tighten the solenoid body bolts in the sequence shown.
^ Tighten to 12 Nm (9 lb-ft).
9. Route the OSS sensor wiring harness and connect the electrical connector.
10. Connect the TR sensor electrical connector.
1 Connect the electrical connector.
2 Slide the locking tab over.
11. Connect the TSS sensor electrical connector.
12. Inspect the transaxle side cover seal for damage and install new if necessary.
13. CAUTION: Inspect the 20-pin solenoid body connector seal to make sure that the seal is on the inside of the main control cover. Transmission fluid leak will occur.
NOTE: Install the studbolts in the locations noted during disassembly.
Install the main control cover and loosely install the 14 bolts.
1 Bolt location
2 Studbolt location
14. Tighten the main control cover bolts in the sequence shown.
^ Tighten to 12 Nm (9 lb-ft).
15. Position the transmission fluid cooler thermal bypass valve and transmission fluid cooler tube assembly in place and install the 2 nuts.
^ Tighten to 9 Nm (80 lb-inch).
16. Connect the transaxle electrical connector and install the wiring harness fastener on the main control cover stud.
17. Inspect the transmission fluid cooler tube backing ring and seal for damage and install a new backing ring or seal if necessary. Lubricate the transmission fluid cooler tube seal with clean automatic transmission fluid and install the backing ring and seal on the transmission fluid cooler tube.
18. Position the transmission fluid cooler tube in place and install a new bolt.
^ Tighten to 9 Nm (80 lb-inch).
19. Tighten the transmission fluid cooler tube fitting.
^ Tighten to 25 Nm (18 lb-ft).
20. Install the manual lever and the nut.
^ Tighten to 18 Nm (13 lb-ft).
21. Connect the selector lever cable end to the manual lever.
22. Install the fluid filler tube and the nut.
^ Tighten to 11 Nm (8 lb-ft).
23. Install the transmission fluid level indicator.
24. Route the coolant hoses in the transmission fluid filler tube.
25. Position the air cleaner assembly in place and install the 2 air cleaner assembly bracket bolts.
^ Tighten to 11 Nm (8 lb-ft).
26. Tighten the air cleaner outlet pipe clamp at the throttle body.
^ Tighten to 5 Nm (44 lb-inch).
27. Connect the engine breather to the air cleaner assembly.
28. Connect the MAF sensor electrical connector.
29. Fill with clean automatic transmission fluid to the correct level.
Factory Service Tools
Use the Manual With the Right Hardware
Pair factory procedures with proven DIY tools so the instructions are easier to execute.
Disclosure: Verified tool recommendations may earn an affiliate commission at no cost to you.
When to See a Mechanic
Stop DIY work and contact a certified mechanic immediately if any of the following apply:
- • You smell fuel, burning insulation, or see smoke.
- • Brakes feel soft, pull hard to one side, or make grinding noises.
- • The engine overheats, stalls repeatedly, or misfires under load.
- • You are missing required tools, torque specs, or safe lifting equipment.
- • You are not confident in the next step or safety outcome.
Rather have a pro handle this?
A certified mobile mechanic comes to your home or office. They bring the tools, you stay comfortable. No tow truck, no waiting room, no surprises.
Comes to youSame-day available12-month warranty
Get a Free QuoteNo obligation. See pricing before you book.