
Safety Warning
DIY auto repair can cause serious injury, fire, or vehicle damage. These guides are for informational purposes only. Always follow OEM torque specs, wear PPE, and consult a certified mechanic if you are unsure. You are solely responsible for your safety.
2004 Ford Excursion 2WD V10-6.8L VIN SFACTORY OEM SERVICE PROCEDURE
Torque Specifications
Torque Specifications
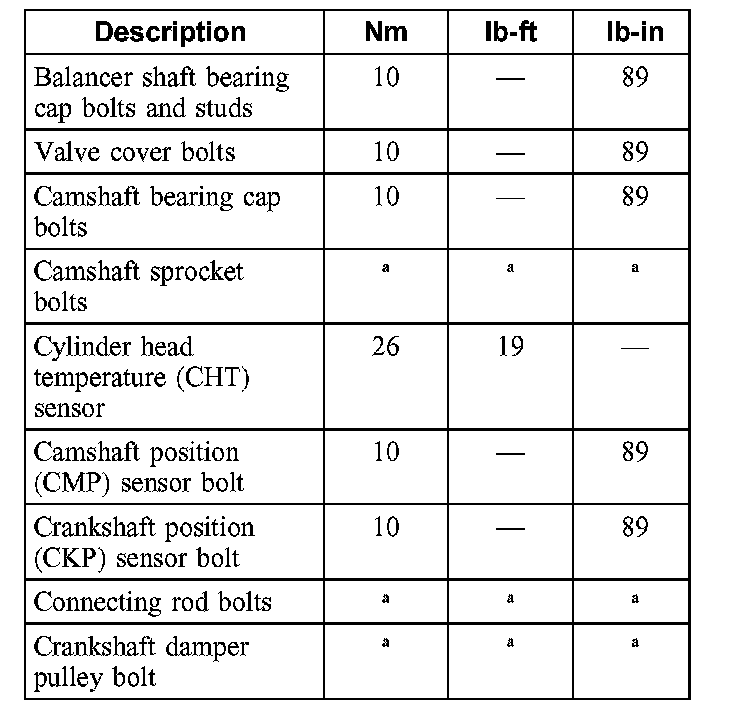
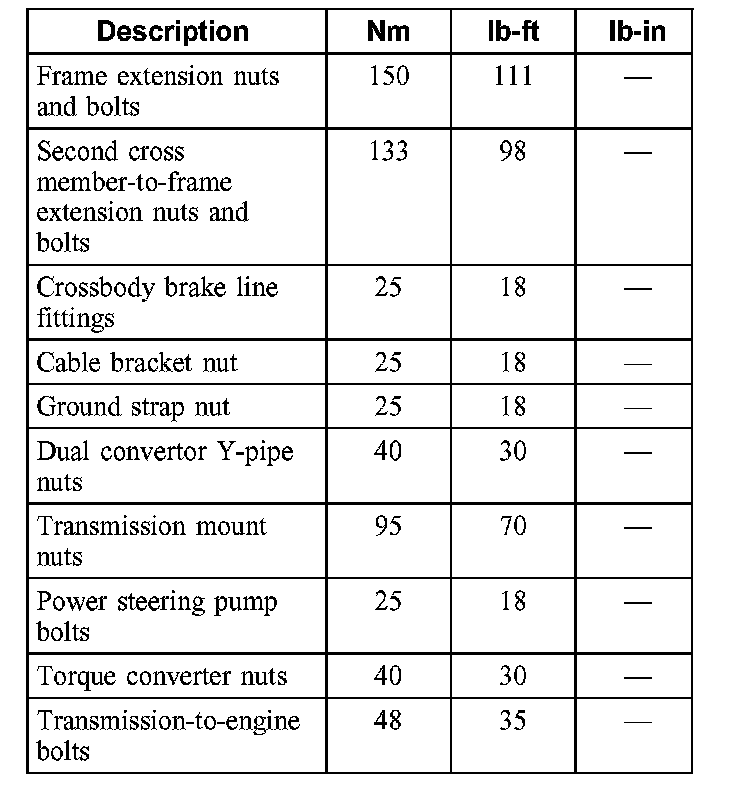
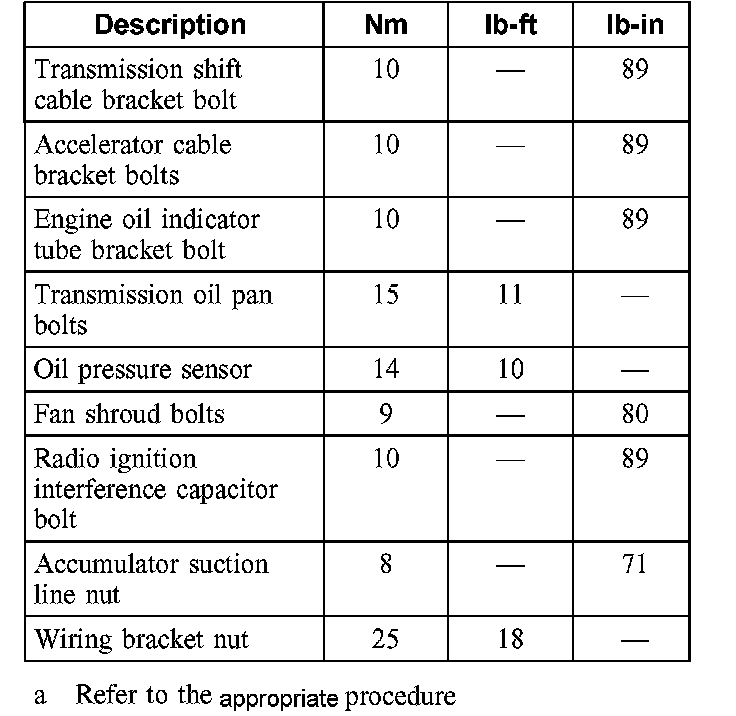
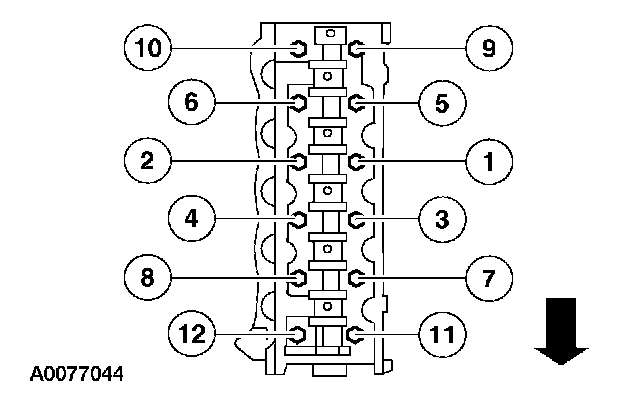
LH cylinder head
New Head Bolts Must Be Used
Tighten the cylinder head bolts in three stages in the sequence shown.
^ Stage 1: Tighten the bolts to 40 Nm (30 ft. lbs.).
^ Stage 2: Tighten the bolts an additional 90°.
^ Stage 3: Tighten the bolts an additional 90°.
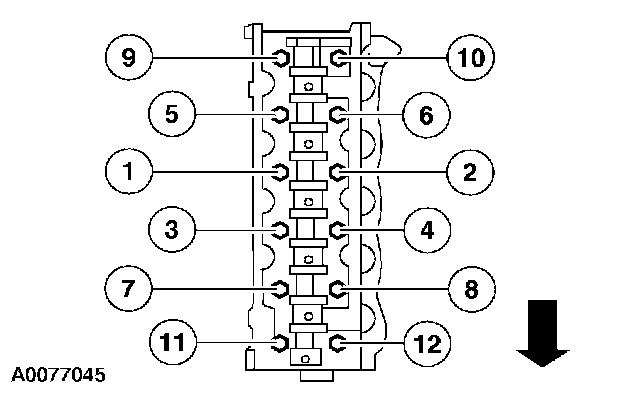
RH cylinder head
Tighten the cylinder head bolts in three stages in the sequence shown.
^ Stage 1: Tighten to 40 Nm (30 ft. lbs.).
^ Stage 2: Tighten an additional 90°.
^ Stage 3: Tighten an additional 90°.
Lower Intake manifold
Install the 10 bolts.
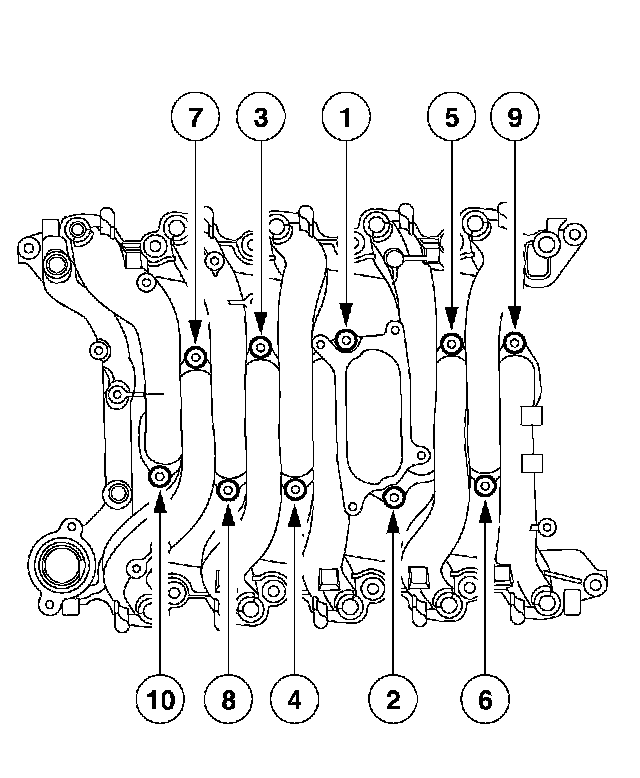
Tighten the bolts in two stages.
Tighten the bolts in the sequence shown.
^ Stage 1: Tighten to 2 Nm (18 inch lbs.).
^ Stage 2: Tighten to 10 Nm (89 inch lbs.).
Upper Intake manifold
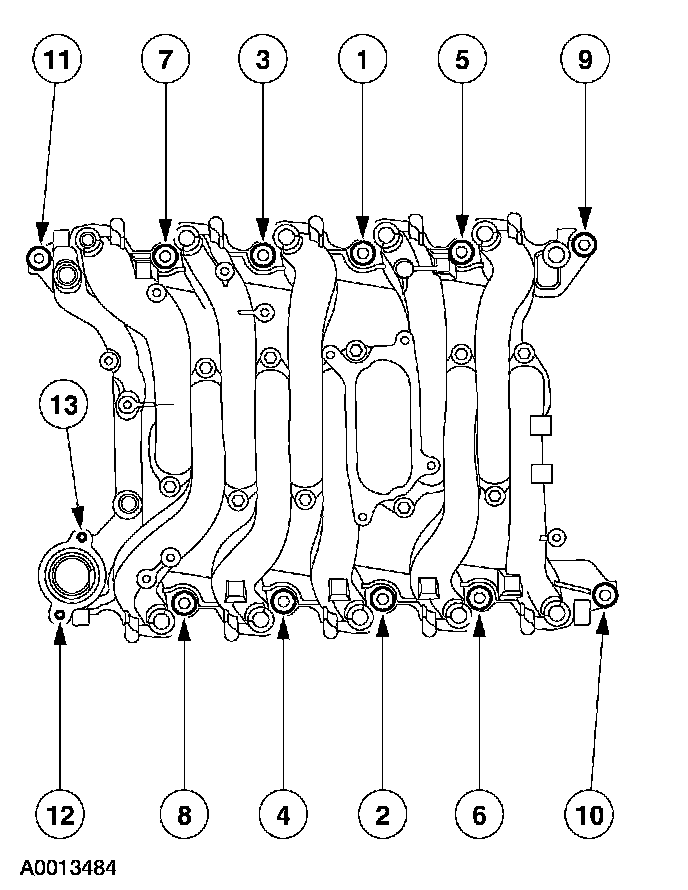
Tighten the bolts in two stages, in the sequence shown.
^ Stage 1: Tighten to 2 Nm (18 inch lbs.).
^ Stage 2: Tighten to 25 Nm (18 ft. lbs.).
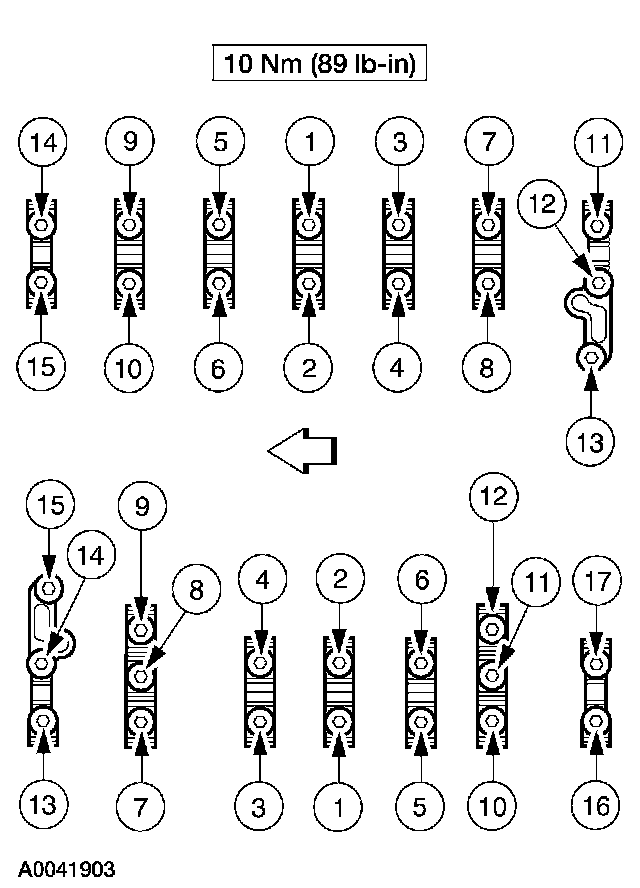
Camshaft bearing caps
Install the fifteen bolts.
Tighten the bolts in the sequence shown.
Tighten to 10 Nm (89 in. lbs.)
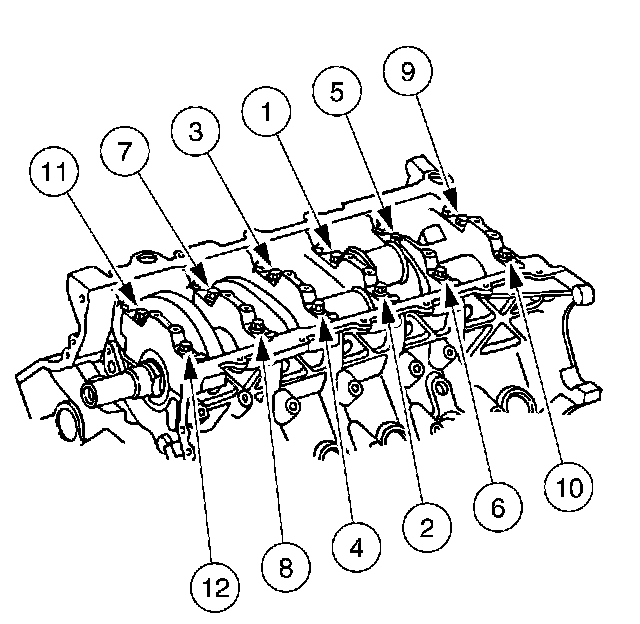
Crankshaft Main Bearing Caps
Tighten fasteners 1 through 12 in two stages, in the sequence shown.
^ Stage 1: Tighten to 40 Nm (30 ft. lbs.).
^ Stage 2: Tighten an additional 90°.
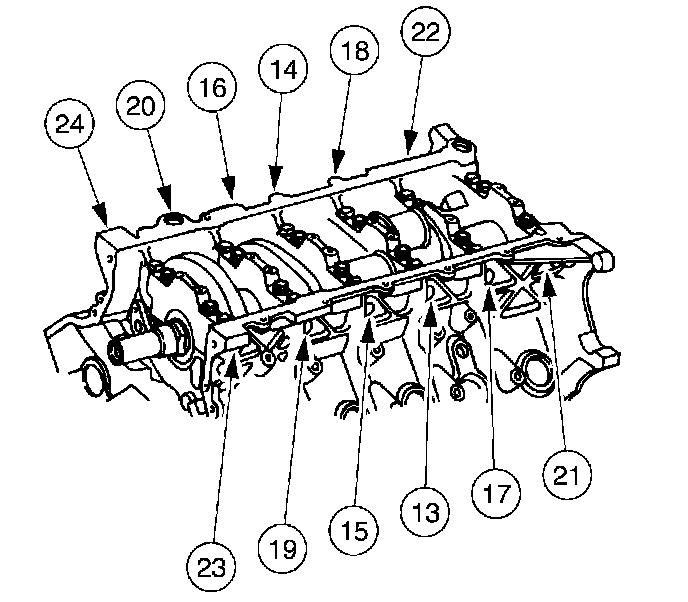
Tighten fasteners 13 through 24 in two stages, in the sequence shown.
^ Stage 1: Tighten to 30 Nm (22 ft. lbs.).
^ Stage 2: Tighten an additional 90°.
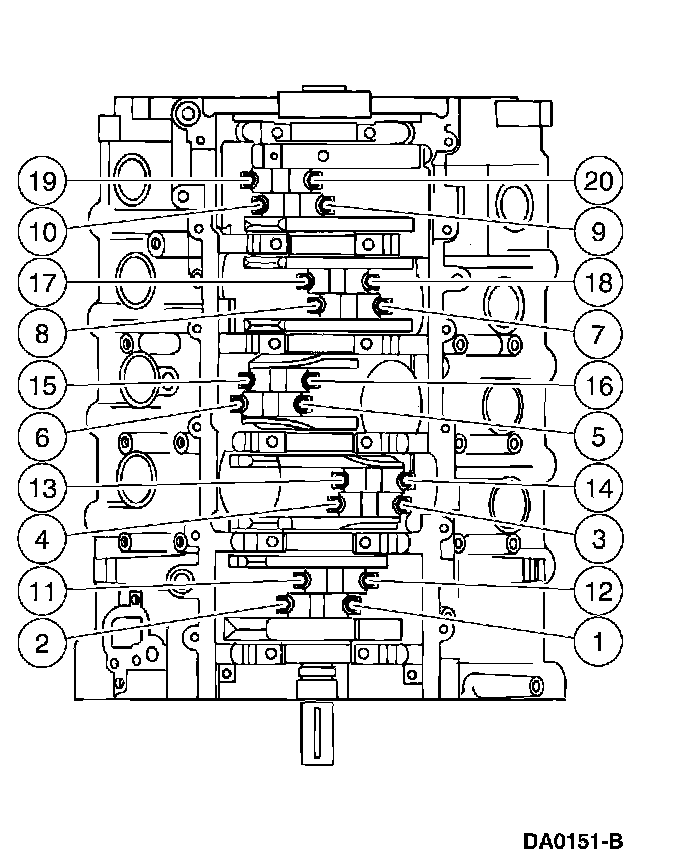
Connecting rod bearings
NOTE: Be sure to tighten the bolts in two stages.
Tighten the connecting rod bolts in the sequence shown.
^ Stage 1: Tighten to 43 Nm (32 ft. lbs.).
^ Stage 2: Tighten an additional 105°.
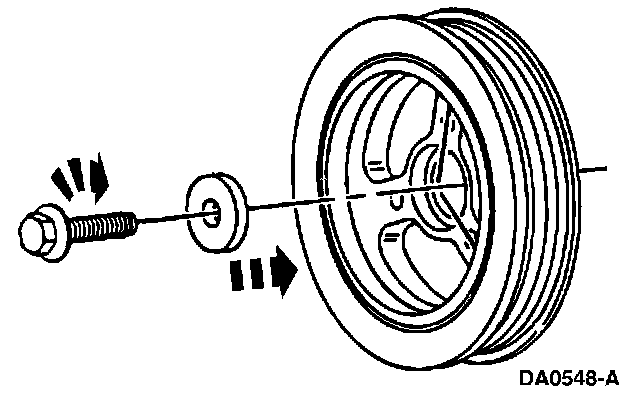
Crankshaft Pulley bolt
Tighten the in four stages.
^ Stage 1: Tighten to 90 Nm (66 ft. lbs.).
^ Stage 2: Loosen 360°.
^ Stage 3: Tighten to 50 Nm (37 ft. lbs.).
^ Stage 4: Tighten an additional 90°.
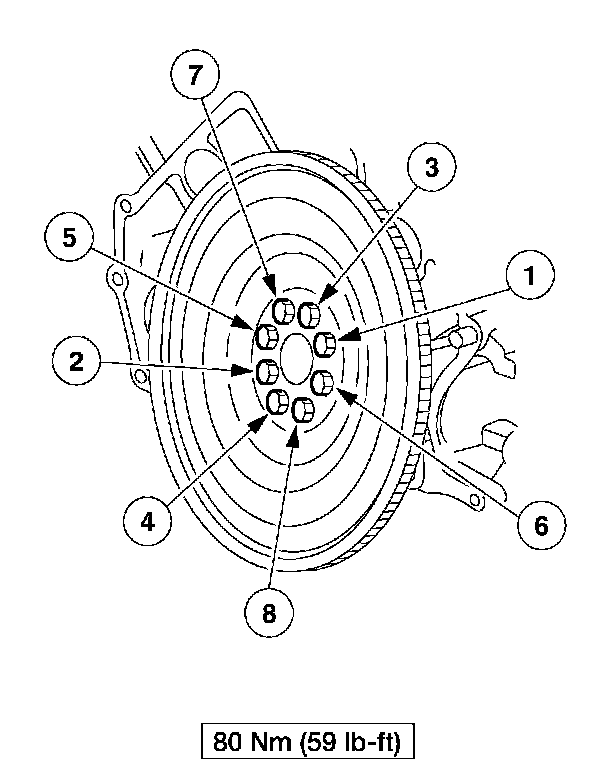
Flexplate
Flexplate bolts 80 Nm (59 ft. lbs.)
To install, reverse the removal procedure.
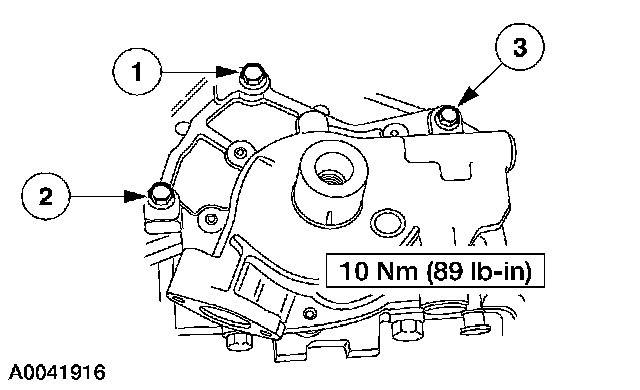
Oil pump
Loosely install the bolts.
Tighten the bolts in the sequence shown.
Tighten to 10 Nm (89 in. lbs.)
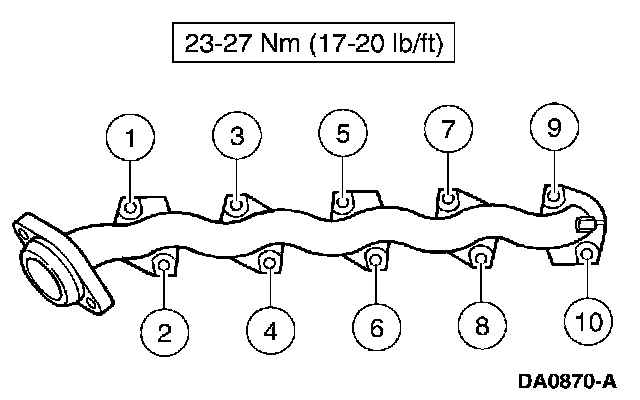
Exhaust Manifold RH
Tighten to 23-27 Nm (17-20 ft.lbs.)
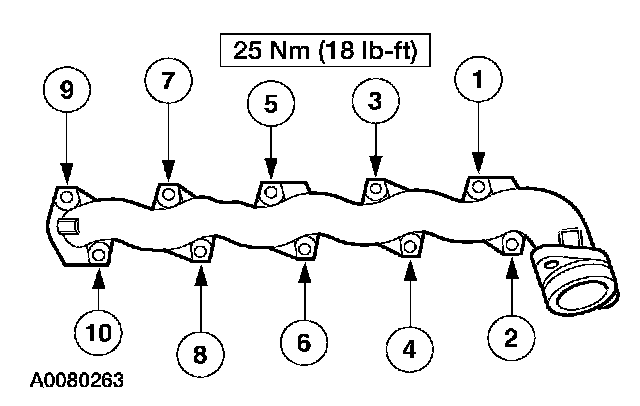
Exhaust Manifold LH
Tighten to 25 Nm (18 ft.lbs.)
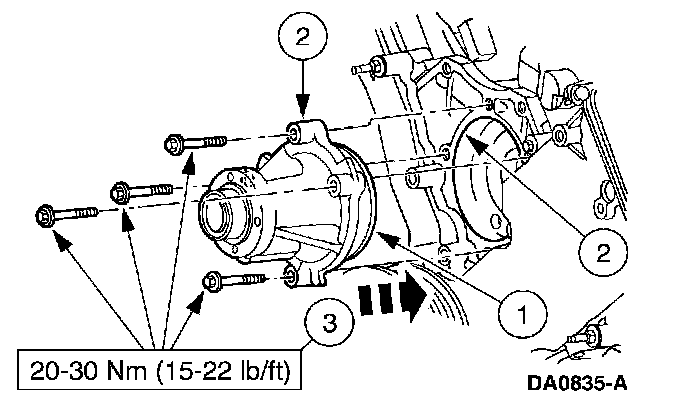
Coolant pump
Install the bolts.
Tighten to 20-30 Nm (15-22 ft. lbs.)
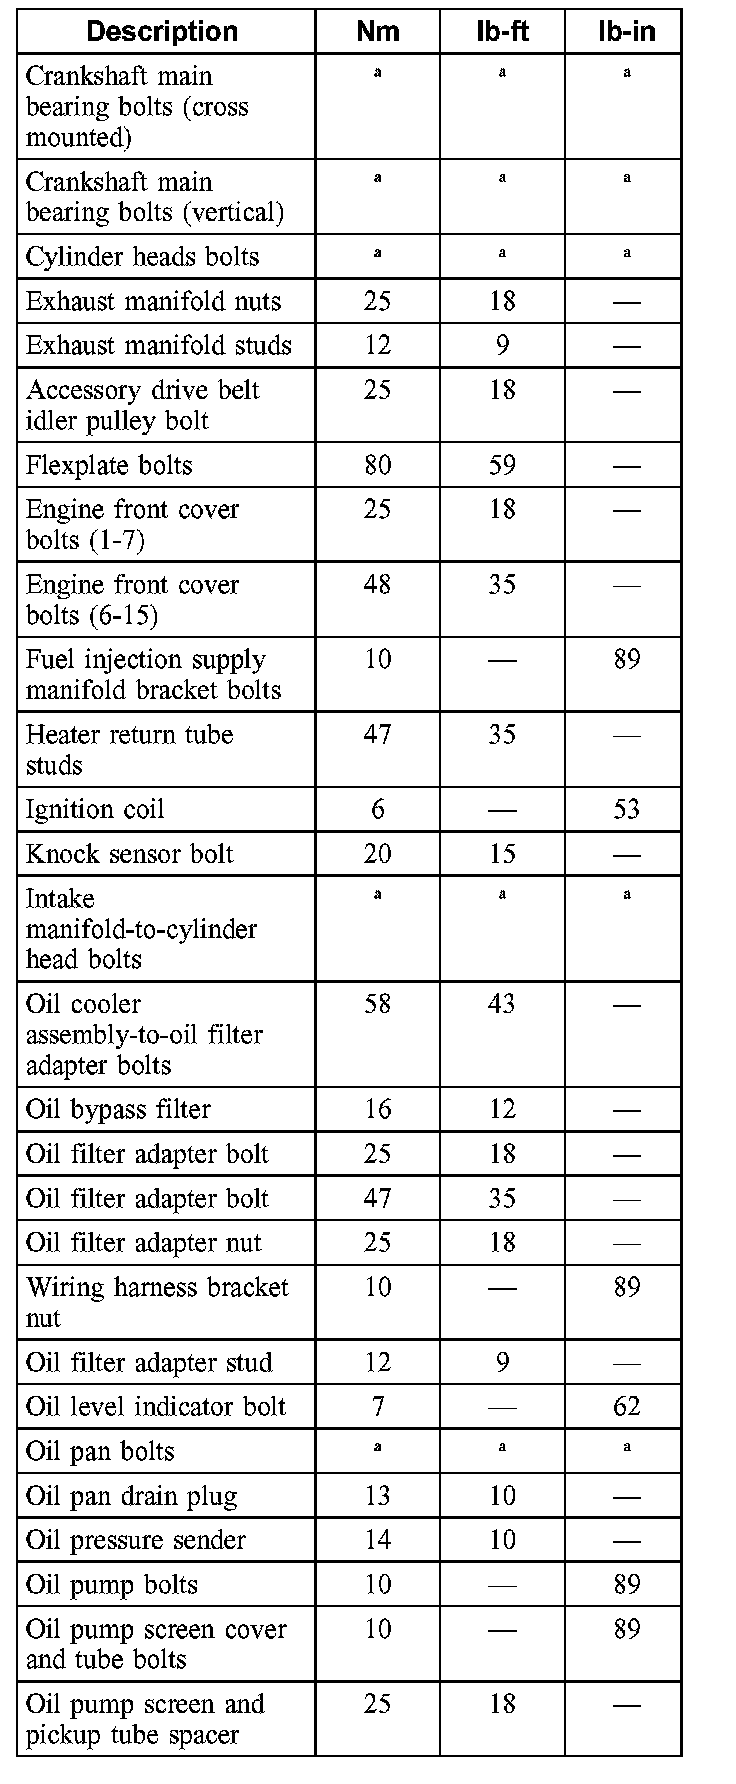
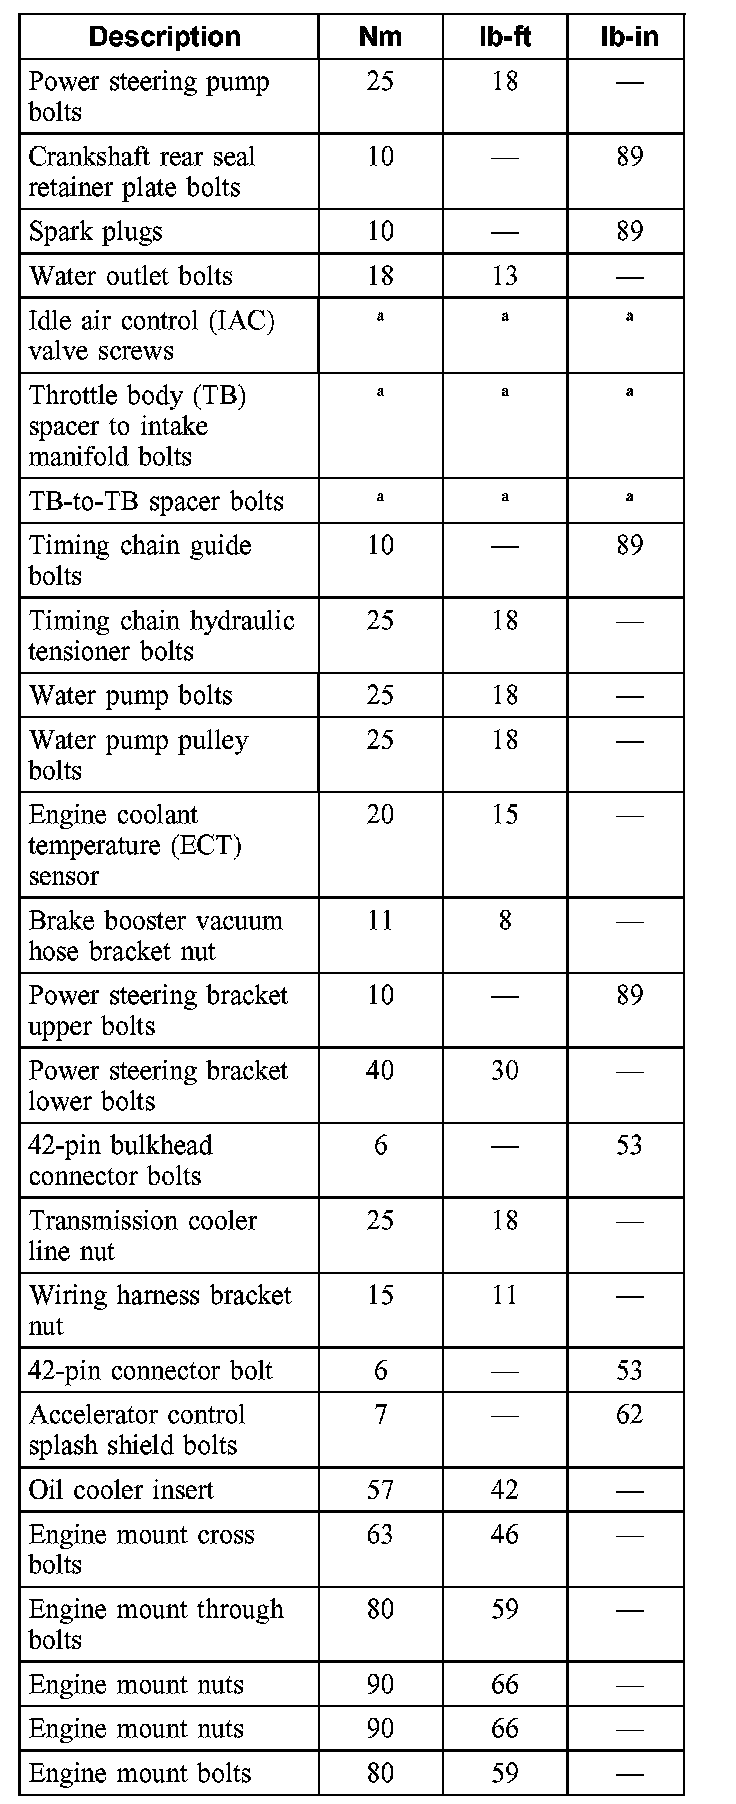
LH cylinder head
New Head Bolts Must Be Used
Tighten the cylinder head bolts in three stages in the sequence shown.
^ Stage 1: Tighten the bolts to 40 Nm (30 ft. lbs.).
^ Stage 2: Tighten the bolts an additional 90°.
^ Stage 3: Tighten the bolts an additional 90°.
RH cylinder head
Tighten the cylinder head bolts in three stages in the sequence shown.
^ Stage 1: Tighten to 40 Nm (30 ft. lbs.).
^ Stage 2: Tighten an additional 90°.
^ Stage 3: Tighten an additional 90°.
Lower Intake manifold
Install the 10 bolts.
Tighten the bolts in two stages.
Tighten the bolts in the sequence shown.
^ Stage 1: Tighten to 2 Nm (18 inch lbs.).
^ Stage 2: Tighten to 10 Nm (89 inch lbs.).
Upper Intake manifold
Tighten the bolts in two stages, in the sequence shown.
^ Stage 1: Tighten to 2 Nm (18 inch lbs.).
^ Stage 2: Tighten to 25 Nm (18 ft. lbs.).
Camshaft bearing caps
Install the fifteen bolts.
Tighten the bolts in the sequence shown.
Tighten to 10 Nm (89 in. lbs.)
Crankshaft Main Bearing Caps
Tighten fasteners 1 through 12 in two stages, in the sequence shown.
^ Stage 1: Tighten to 40 Nm (30 ft. lbs.).
^ Stage 2: Tighten an additional 90°.
Tighten fasteners 13 through 24 in two stages, in the sequence shown.
^ Stage 1: Tighten to 30 Nm (22 ft. lbs.).
^ Stage 2: Tighten an additional 90°.
Connecting rod bearings
NOTE: Be sure to tighten the bolts in two stages.
Tighten the connecting rod bolts in the sequence shown.
^ Stage 1: Tighten to 43 Nm (32 ft. lbs.).
^ Stage 2: Tighten an additional 105°.
Crankshaft Pulley bolt
Tighten the in four stages.
^ Stage 1: Tighten to 90 Nm (66 ft. lbs.).
^ Stage 2: Loosen 360°.
^ Stage 3: Tighten to 50 Nm (37 ft. lbs.).
^ Stage 4: Tighten an additional 90°.
Flexplate
Flexplate bolts 80 Nm (59 ft. lbs.)
To install, reverse the removal procedure.
Oil pump
Loosely install the bolts.
Tighten the bolts in the sequence shown.
Tighten to 10 Nm (89 in. lbs.)
Exhaust Manifold RH
Tighten to 23-27 Nm (17-20 ft.lbs.)
Exhaust Manifold LH
Tighten to 25 Nm (18 ft.lbs.)
Coolant pump
Install the bolts.
Tighten to 20-30 Nm (15-22 ft. lbs.)
Factory Service Tools
Use the Manual With the Right Hardware
Pair factory procedures with proven DIY tools so the instructions are easier to execute.
Disclosure: Verified tool recommendations may earn an affiliate commission at no cost to you.
When to See a Mechanic
Stop DIY work and contact a certified mechanic immediately if any of the following apply:
- • You smell fuel, burning insulation, or see smoke.
- • Brakes feel soft, pull hard to one side, or make grinding noises.
- • The engine overheats, stalls repeatedly, or misfires under load.
- • You are missing required tools, torque specs, or safe lifting equipment.
- • You are not confident in the next step or safety outcome.