
Safety Warning
DIY auto repair can cause serious injury, fire, or vehicle damage. These guides are for informational purposes only. Always follow OEM torque specs, wear PPE, and consult a certified mechanic if you are unsure. You are solely responsible for your safety.
1995 Ford Taurus V6-232 3.8LFACTORY OEM SERVICE PROCEDURE
Ignition Control Module: Service and Repair
REMOVAL
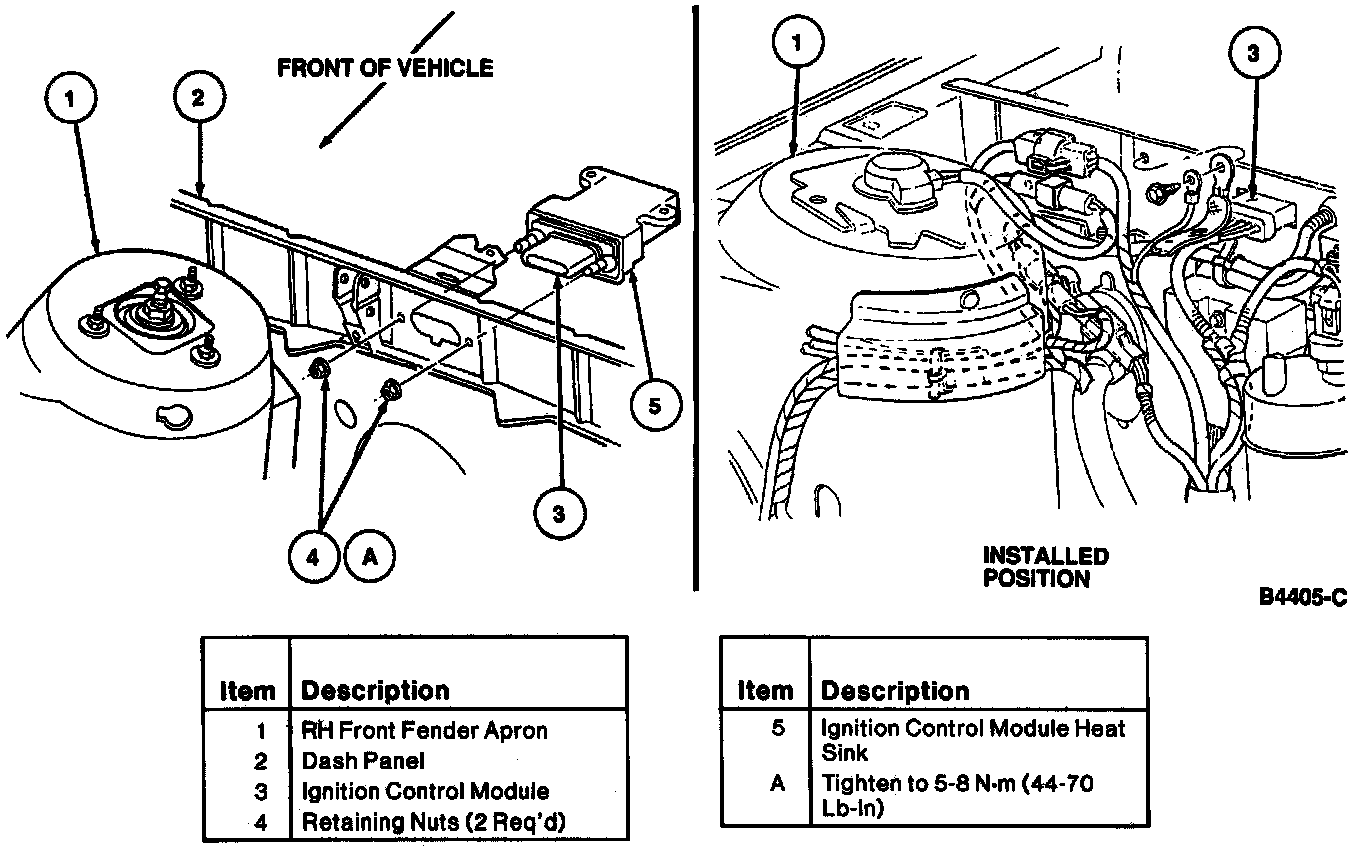
1. Remove screws attaching cowl vent screen to top of cowl.
2. Separate engine compartment cowl seal strip from cowl vent screen and cowl dash extension panel in area of ignition control module.
3. Lift off cowl vent screen to allow access to ignition control module.
NOTE: The connector latch is underneath ignition control module shroud. Press upward to unlatch.
4. Disconnect engine control sensor wiring connector from the ignition control module.
5. Remove two retaining nuts attaching ignition control module and heatsink to dash panel.
NOTE: The ignition control module and heatsink are mounted with heatsink fins pointed downward.
6. Remove ignition control module and heatsink.
7. Remove two ignition control module retaining screws and remove ignition control module from heatsink.
8. While holding ignition control module connector shroud with one hand, pull seal off other end of ignition control module.
INSTALLATION
1. Coat metal base plate of ignition control module uniformly with Silicone Dielectric Compound D7AZ-19A331-A (Motorcraft WA-10) or equivalent meeting Ford specification ESE-M1C171-A approximately 0.79 mm (1/32 inch) thick.
2. Place ignition control module onto heatsink. Install two retaining screws. Tighten to 1.7-4.0 Nm (15-35 in lb).
3. Push seal over ignition control module connector shroud and heatsink studs with metal part toward heatsink.
4. Insert ignition control module and heatsink into cowl dash extension panel enough to have mounting studs protrude into the engine compartment side.
5. Hand-tighten retaining nuts. Tighten nuts to 5-8 Nm (44-70 in lb).
6. Connect engine control sensor wiring connector to ignition control module.
7. Install cowl vent screen and screws.
8. Install engine compartment cowl panel and seal strip.
Ignition Control Module:
1. Remove screws attaching cowl vent screen to top of cowl.
2. Separate engine compartment cowl seal strip from cowl vent screen and cowl dash extension panel in area of ignition control module.
3. Lift off cowl vent screen to allow access to ignition control module.
NOTE: The connector latch is underneath ignition control module shroud. Press upward to unlatch.
4. Disconnect engine control sensor wiring connector from the ignition control module.
5. Remove two retaining nuts attaching ignition control module and heatsink to dash panel.
NOTE: The ignition control module and heatsink are mounted with heatsink fins pointed downward.
6. Remove ignition control module and heatsink.
7. Remove two ignition control module retaining screws and remove ignition control module from heatsink.
8. While holding ignition control module connector shroud with one hand, pull seal off other end of ignition control module.
INSTALLATION
1. Coat metal base plate of ignition control module uniformly with Silicone Dielectric Compound D7AZ-19A331-A (Motorcraft WA-10) or equivalent meeting Ford specification ESE-M1C171-A approximately 0.79 mm (1/32 inch) thick.
2. Place ignition control module onto heatsink. Install two retaining screws. Tighten to 1.7-4.0 Nm (15-35 in lb).
3. Push seal over ignition control module connector shroud and heatsink studs with metal part toward heatsink.
4. Insert ignition control module and heatsink into cowl dash extension panel enough to have mounting studs protrude into the engine compartment side.
5. Hand-tighten retaining nuts. Tighten nuts to 5-8 Nm (44-70 in lb).
6. Connect engine control sensor wiring connector to ignition control module.
7. Install cowl vent screen and screws.
8. Install engine compartment cowl panel and seal strip.
Factory Service Tools
Use the Manual With the Right Hardware
Pair factory procedures with proven DIY tools so the instructions are easier to execute.
Disclosure: Verified tool recommendations may earn an affiliate commission at no cost to you.
When to See a Mechanic
Stop DIY work and contact a certified mechanic immediately if any of the following apply:
- • You smell fuel, burning insulation, or see smoke.
- • Brakes feel soft, pull hard to one side, or make grinding noises.
- • The engine overheats, stalls repeatedly, or misfires under load.
- • You are missing required tools, torque specs, or safe lifting equipment.
- • You are not confident in the next step or safety outcome.