
Safety Warning
DIY auto repair can cause serious injury, fire, or vehicle damage. These guides are for informational purposes only. Always follow OEM torque specs, wear PPE, and consult a certified mechanic if you are unsure. You are solely responsible for your safety.
2010 Chrysler 300 V6-2.7LFACTORY OEM SERVICE PROCEDURE
Fuel Pump Module - Removal
REMOVAL
WARNING: The fuel system is under constant high pressure even with engine off. Until the fuel pressure has been properly released from the system, do not attempt to open the fuel system. Do not smoke or use open flames/sparks when servicing the fuel system. Wear protective clothing and eye protection. Make sure the area in which the vehicle is being serviced is in a well ventilated area and free of flames/sparks. Failure to comply may result in serious or fatal injury.
WARNING: No sparks, open flames or smoking. Risk of poisoning from inhaling and swallowing fuel. Pour fuel only into appropriately marked OSHA approved containers. Wear protective clothing. Risk of injury to eyes and skin from contact with fuel.
1. Perform the fuel pressure release procedure Service and Repair.
CAUTION: If the electric fuel pump module is not operating or the fuel level sending unit is not operating and the fuel level cannot be determined, the fuel tank must be removed prior to draining. If the fuel level is above 5/8 of a tank and the fuel pump module lock-ring is removed, fuel will spill into the interior of the vehicle
2. If required, perform the draining fuel tank procedure . Procedures
3. Disconnect the negative battery cable.
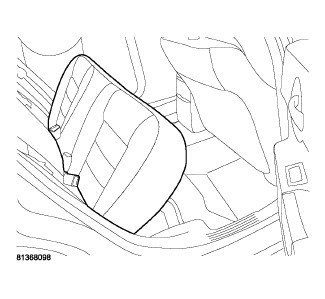
4. Push the rear lower seat cushion up and back and remove the seat cushion.
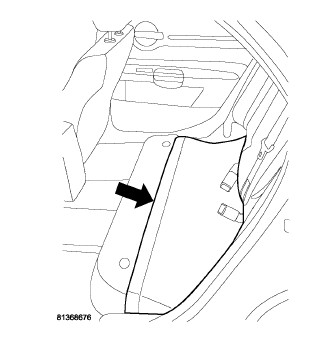
5. Fold back the foam pad covering the fuel pump module plastic access covers.
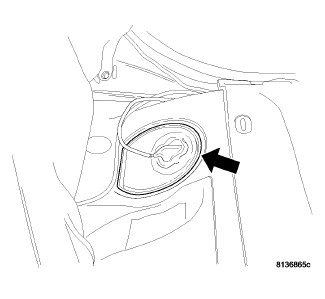
6. Remove the left side fuel pump module plastic access cover.
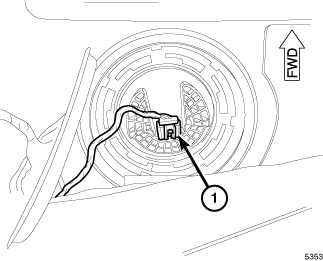
7. Disconnect the electrical connector from the fuel pump module.
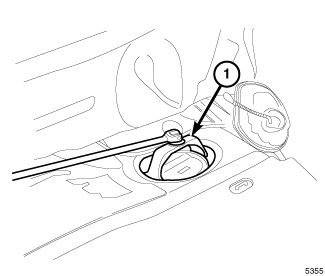
CAUTION: An indexing arrow is located on top of the fuel pump module to clock it's position into the fuel tank, note it's location for reassembly.
NOTE: Prior to removing the fuel pump module, use compressed air to remove any accumulated dirt and debris from around fuel tank opening.
8. Mark the fuel pump module orientation.
9. Position the lock-ring remover/installer 9340 (1) into the notches on the outside edge of the lock-ring.
10. Install a 1/2 inch drive breaker bar into the lock-ring remover/installer 9340 (1).
11. Rotate the breaker bar counterclockwise and remove the lock-ring.
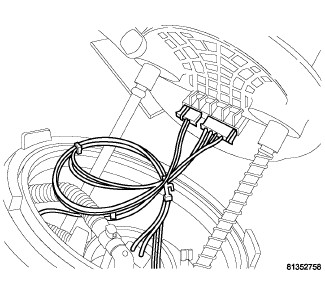
12. Raise the fuel pump module up enough to gain access to the lower connections.
13. Disconnect the electrical connectors from under the top of the fuel pump module.
14. Remove the top section of the fuel pump module.
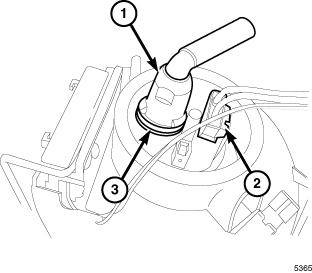
15. Press the quick connect release tab (3) and remove the fuel supply line (1).
16. Disconnect the lower fuel pump module electrical connector (2).
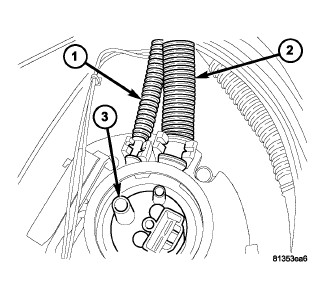
17. Disconnect the fuel pump module fuel return lines (1,2).
NOTE: Do not spill fuel into the interior of the vehicle.
18. Tip the fuel pump module on its side to drain the remaining fuel from the bottom reservoir and remove from vehicle.
NOTE: Whenever the fuel pump module is serviced, the rubber O-ring seal must be replaced.
19. Remove and discard the rubber O-ring seal.
Factory Service Tools
Use the Manual With the Right Hardware
Pair factory procedures with proven DIY tools so the instructions are easier to execute.
Disclosure: Verified tool recommendations may earn an affiliate commission at no cost to you.
When to See a Mechanic
Stop DIY work and contact a certified mechanic immediately if any of the following apply:
- • You smell fuel, burning insulation, or see smoke.
- • Brakes feel soft, pull hard to one side, or make grinding noises.
- • The engine overheats, stalls repeatedly, or misfires under load.
- • You are missing required tools, torque specs, or safe lifting equipment.
- • You are not confident in the next step or safety outcome.