
Safety Warning
DIY auto repair can cause serious injury, fire, or vehicle damage. These guides are for informational purposes only. Always follow OEM torque specs, wear PPE, and consult a certified mechanic if you are unsure. You are solely responsible for your safety.
2002 Chrysler Intrepid (CANADA) V6-2.7LFACTORY OEM SERVICE PROCEDURE
Compressor HVAC: Service and Repair
A/C COMPRESSOR
REMOVAL
The A/C compressor may be unbolted and repositioned without discharging the refrigerant system. Discharging is not necessary if removing the compressor clutch/coil assembly engine, cylinder head, or alternator.
WARNING: REVIEW THE WARNINGS IN THE FRONT OF THIS SECTION BEFORE PERFORMING THE FOLLOWING OPERATION.
1. Disconnect the negative battery cable remote terminal from the remote battery post.
2. Loosen and remove the drive belts.
3. Disconnect the compressor clutch wire lead.
4. Recover the refrigerant from the system.
5. Remove the refrigerant lines from the compressor.
6. If system is going to be left open, plug or cap the open lines.
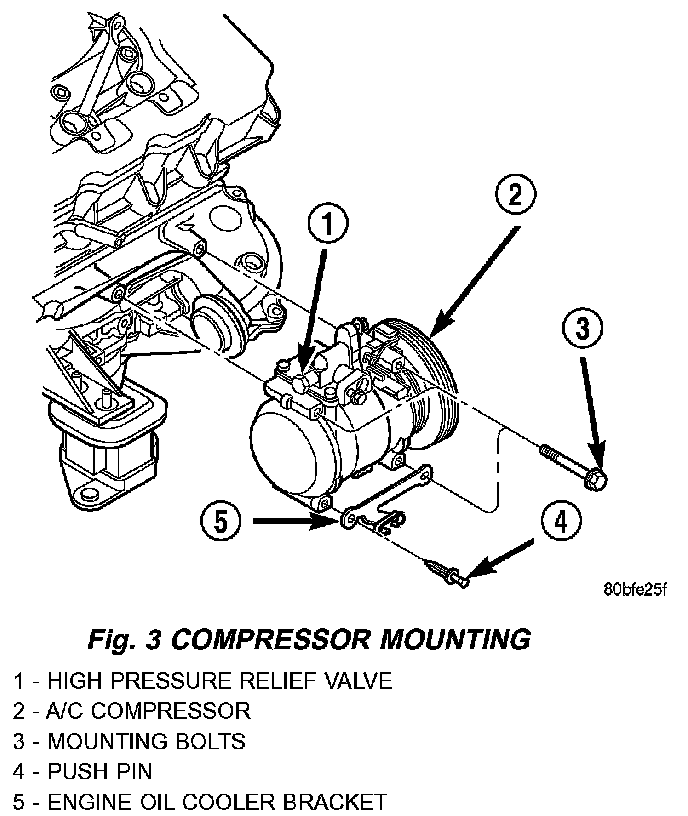
7. Remove compressor attaching bolts and.
INSTALLATION
WARNING: REVIEW THE WARNINGS IN THE FRONT OF THIS SECTION BEFORE PERFORMING THE FOLLOWING OPERATION.
Any kinks or sharp bends in the refrigerant plumbing will reduce the capacity of the entire air conditioning system. Kinks and sharp bends reduce the flow of refrigerant in the system. A good rule for the flexible hose refrigerant lines is to keep the radius of all bends at least ten times the diameter of the hose. In addition, the flexible hose refrigerant lines should be routed so they are at least 80 millimeters (3 inches) from the exhaust manifold.
High pressures are produced in the refrigerant system when the air conditioning compressor is operating. Extreme care must be exercised to make sure that each of the refrigerant system connections is pressure-tight and leak free. It is a good practice to inspect all flexible hose refrigerant lines at least once a year to make sure they are in good condition and properly routed.
NOTE: If a replacement compressor is being installed, be certain to check the refrigerant oil level. Use only refrigerant oil of the type recommended for the compressor in the vehicle.
1. Position the a/c compressor in the vehicle and install the attaching bolts. Torque the a/c compressor mounting bolts to 28 Nm (21 ft. lbs.).
2. Remove the plug or cap from the opened refrigerant line fittings. Install the suction line and discharge line fittings to the manifold on the a/c compressor. Tighten the fasteners to 23 Nm (17 ft. lbs.).
3. Install the drive belts.
4. Connect the a/c compressor clutch coil wire lead.
5. Connect the negative battery cable remote terminal from the remote battery post.
6. Evacuate the refrigerant system.
7. Charge the refrigerant system.
REMOVAL
The A/C compressor may be unbolted and repositioned without discharging the refrigerant system. Discharging is not necessary if removing the compressor clutch/coil assembly engine, cylinder head, or alternator.
WARNING: REVIEW THE WARNINGS IN THE FRONT OF THIS SECTION BEFORE PERFORMING THE FOLLOWING OPERATION.
1. Disconnect the negative battery cable remote terminal from the remote battery post.
2. Loosen and remove the drive belts.
3. Disconnect the compressor clutch wire lead.
4. Recover the refrigerant from the system.
5. Remove the refrigerant lines from the compressor.
6. If system is going to be left open, plug or cap the open lines.
Fig. 3 Compressor Mounting - 2.7L:
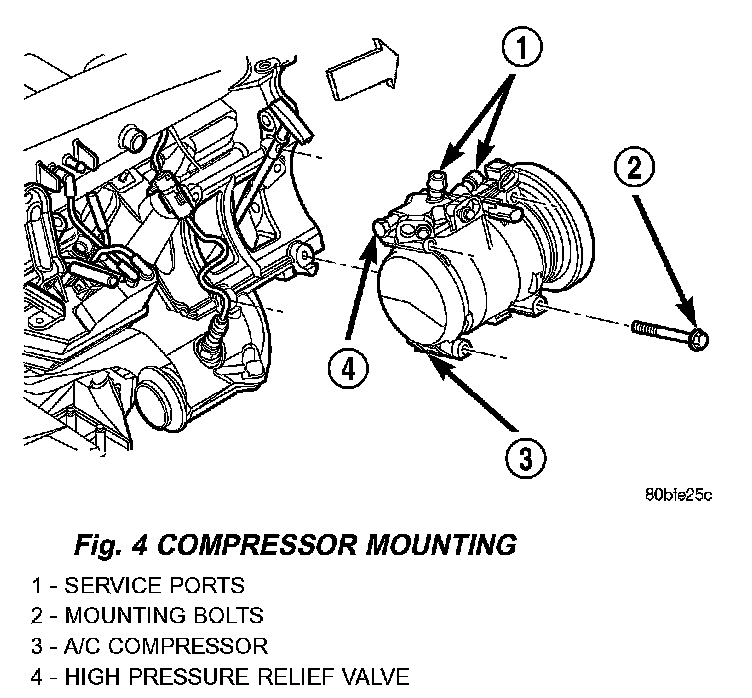
Fig. 4 Compressor Mounting - 3.2L/3.5L:
7. Remove compressor attaching bolts and.
INSTALLATION
WARNING: REVIEW THE WARNINGS IN THE FRONT OF THIS SECTION BEFORE PERFORMING THE FOLLOWING OPERATION.
Any kinks or sharp bends in the refrigerant plumbing will reduce the capacity of the entire air conditioning system. Kinks and sharp bends reduce the flow of refrigerant in the system. A good rule for the flexible hose refrigerant lines is to keep the radius of all bends at least ten times the diameter of the hose. In addition, the flexible hose refrigerant lines should be routed so they are at least 80 millimeters (3 inches) from the exhaust manifold.
High pressures are produced in the refrigerant system when the air conditioning compressor is operating. Extreme care must be exercised to make sure that each of the refrigerant system connections is pressure-tight and leak free. It is a good practice to inspect all flexible hose refrigerant lines at least once a year to make sure they are in good condition and properly routed.
NOTE: If a replacement compressor is being installed, be certain to check the refrigerant oil level. Use only refrigerant oil of the type recommended for the compressor in the vehicle.
1. Position the a/c compressor in the vehicle and install the attaching bolts. Torque the a/c compressor mounting bolts to 28 Nm (21 ft. lbs.).
2. Remove the plug or cap from the opened refrigerant line fittings. Install the suction line and discharge line fittings to the manifold on the a/c compressor. Tighten the fasteners to 23 Nm (17 ft. lbs.).
3. Install the drive belts.
4. Connect the a/c compressor clutch coil wire lead.
5. Connect the negative battery cable remote terminal from the remote battery post.
6. Evacuate the refrigerant system.
7. Charge the refrigerant system.
Factory Service Tools
Use the Manual With the Right Hardware
Pair factory procedures with proven DIY tools so the instructions are easier to execute.
Disclosure: Verified tool recommendations may earn an affiliate commission at no cost to you.
When to See a Mechanic
Stop DIY work and contact a certified mechanic immediately if any of the following apply:
- • You smell fuel, burning insulation, or see smoke.
- • Brakes feel soft, pull hard to one side, or make grinding noises.
- • The engine overheats, stalls repeatedly, or misfires under load.
- • You are missing required tools, torque specs, or safe lifting equipment.
- • You are not confident in the next step or safety outcome.