
Safety Warning
DIY auto repair can cause serious injury, fire, or vehicle damage. These guides are for informational purposes only. Always follow OEM torque specs, wear PPE, and consult a certified mechanic if you are unsure. You are solely responsible for your safety.
2000 Chrysler Neon (CANADA) L4-2.0LFACTORY OEM SERVICE PROCEDURE
Power Steering Pressure Switch: Service and Repair
NOTE: Before proceeding with this removal and installation procedure, review SERVICE WARNINGS AND CAUTIONS found under Steering, Service Precautions.
REMOVAL
1. Disconnect negative battery cable from the negative post of the battery. Be sure cable is isolated from negative post on battery.
2. Raise the vehicle, refer to Maintaince for procedure. the vehicle.
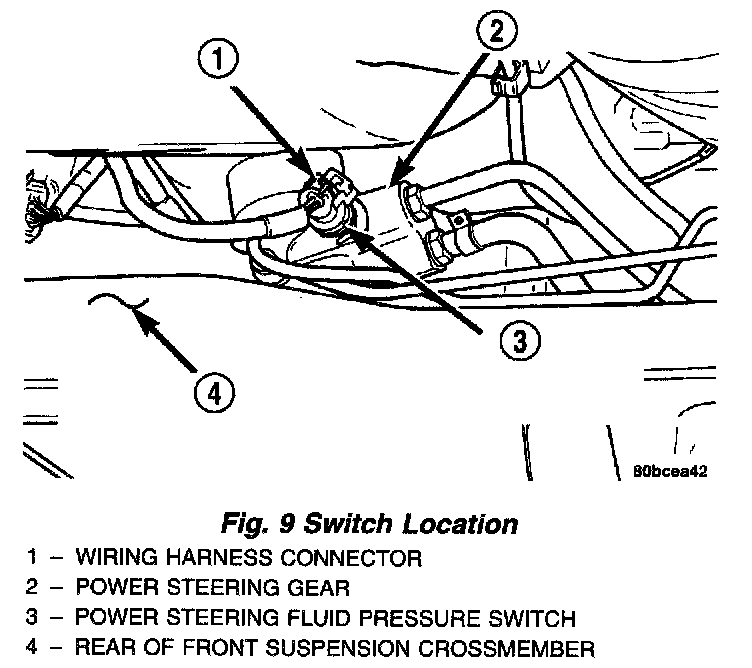
3. Locate the power steering fluid pressure switch on the back side of the power steering gear.
4. Remove the vehicle wiring harness connector from the power steering fluid pressure switch.
NOTE: When removing and installing the power steering pressure switch, use a 7/8 inch deep well socket. The deep well socket will prevent damage to the plastic electrical connector area of the power steering fluid pressure switch.
5. Unscrew and remove the power steering fluid pressure switch from the power steering gear.
INSTALLATION
1. By hand, screw the power steering pressure switch into the power steering gear until it is fully seated. Tighten the power steering pressure switch to a maximum torque of 8 Nm (70 inch lbs.). Over-torquing will result in stripping the threads out of the power steering pressure switch port in the steering gear.
2. Install the vehicle wiring harness connector. Be sure the latch on the wiring harness connector is fully engaged with the locking tab on the power steering pressure switch.
3. Lower the vehicle.
4. Fill the power steering fluid reservoir to the correct fluid level. Use only Mopar Power Steering Fluid, or equivalent.
5. Connect the negative cable to the negative post of the battery.
6. Start the engine and turn the steering wheel several times stop-to-stop to bleed any air from the fluid in the power steering system. Stop the engine, check the fluid level, and inspect the system for leaks.
REMOVAL
1. Disconnect negative battery cable from the negative post of the battery. Be sure cable is isolated from negative post on battery.
2. Raise the vehicle, refer to Maintaince for procedure. the vehicle.
3. Locate the power steering fluid pressure switch on the back side of the power steering gear.
4. Remove the vehicle wiring harness connector from the power steering fluid pressure switch.
NOTE: When removing and installing the power steering pressure switch, use a 7/8 inch deep well socket. The deep well socket will prevent damage to the plastic electrical connector area of the power steering fluid pressure switch.
5. Unscrew and remove the power steering fluid pressure switch from the power steering gear.
INSTALLATION
1. By hand, screw the power steering pressure switch into the power steering gear until it is fully seated. Tighten the power steering pressure switch to a maximum torque of 8 Nm (70 inch lbs.). Over-torquing will result in stripping the threads out of the power steering pressure switch port in the steering gear.
2. Install the vehicle wiring harness connector. Be sure the latch on the wiring harness connector is fully engaged with the locking tab on the power steering pressure switch.
3. Lower the vehicle.
4. Fill the power steering fluid reservoir to the correct fluid level. Use only Mopar Power Steering Fluid, or equivalent.
5. Connect the negative cable to the negative post of the battery.
6. Start the engine and turn the steering wheel several times stop-to-stop to bleed any air from the fluid in the power steering system. Stop the engine, check the fluid level, and inspect the system for leaks.
Factory Service Tools
Use the Manual With the Right Hardware
Pair factory procedures with proven DIY tools so the instructions are easier to execute.
Disclosure: Verified tool recommendations may earn an affiliate commission at no cost to you.
When to See a Mechanic
Stop DIY work and contact a certified mechanic immediately if any of the following apply:
- • You smell fuel, burning insulation, or see smoke.
- • Brakes feel soft, pull hard to one side, or make grinding noises.
- • The engine overheats, stalls repeatedly, or misfires under load.
- • You are missing required tools, torque specs, or safe lifting equipment.
- • You are not confident in the next step or safety outcome.