
Safety Warning
DIY auto repair can cause serious injury, fire, or vehicle damage. These guides are for informational purposes only. Always follow OEM torque specs, wear PPE, and consult a certified mechanic if you are unsure. You are solely responsible for your safety.
2012 Chevrolet Traverse FWD V6-3.6LFACTORY OEM SERVICE PROCEDURE
Alignment: Testing and Inspection
Trim Height Inspection
Trim Height Measurement
Trim height is a predetermined measurement relating to vehicle ride height. Incorrect trim heights can cause the vehicle to bottom out over bumps, damage to the suspension components and symptoms similar to wheel alignment problems. Check the trim heights when diagnosing suspension concerns and before checking the wheel alignment.
Perform the following before measuring the trim heights:
* Set the tire pressure to the specifications shown on the certification label. Refer to Vehicle Certification, Tire Placard, Anti-Theft, and Service Parts ID Label Vehicle Certification, Tire Placard, Anti-Theft and Service Parts ID Label.
* Check the fuel level. Add additional weight if necessary to simulate a full tank.
One U.S. gallon of gasoline weighs approximately 6.5 lbs. One liter of gasoline weights approximately 0.70 kg.
* Make sure the passenger and rear compartments are empty, except for the spare tire.
* Make sure the vehicle is on a flat and level surface, such as an alignment rack.
* For vehicles equipped with automatic level control, ensure the system is functioning properly.
* Check that all the vehicle doors are securely closed.
* Check that the vehicle hood and rear deck lids are securely closed.
* Check for installed after market accessories or modifications that could affect trim height measurement:
- Larger of smaller than production wheels and tires
- Lifting or lowering kits
- Wheel opening flares or ground affects
Measuring the Z Height
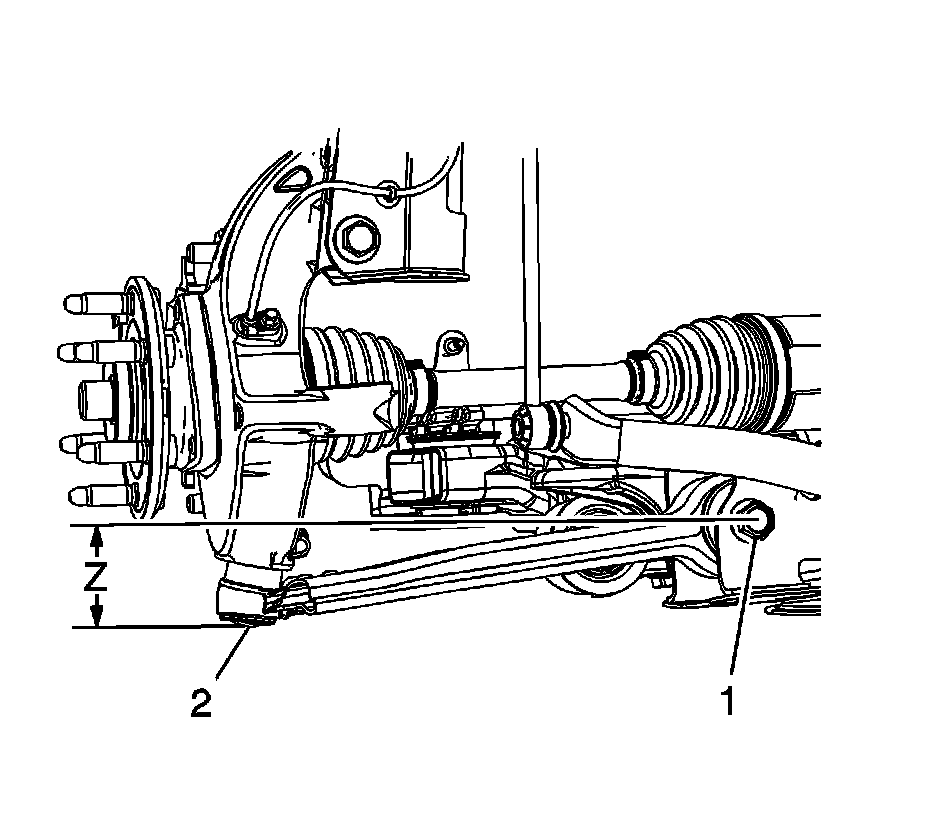
Important:
* In order to obtain the proper measurement, Z will equal inner minus the outer.
* The left and right Z height difference should be no more than 12 mm (0.47 in).
Use the following procedure to measure the Z height:
1. Lift the front bumper of the vehicle up about 38 mm (1.5 in).
2. Gently remove your hands and let the vehicle settle.
3. Repeat this operation 2 more times for a total of 3 times.
4. Repeat this jouncing operation 2 more times for a total of 3 times.
5. Measure from the center of the lower ball joint (outer) 2 to the center of the lower control arm bolt (inner) 1.
6. Push the front bumper of the vehicle down about 38 mm (1.5 in).
7. Gently remove your hands and let the vehicle settle.
8. Repeat this operation 2 more times for a total of 3 times.
9. Re-measure the Z height as in step 5.
10. The true Z height is the average of the measurements taken in steps 5 and 8. Refer to Trim Height Specifications Trim Height Specifications.
If any of these measurements are out of specifications, inspect for the following conditions:
* Worn or damage suspension components
* Collision damage
Measuring the D Height
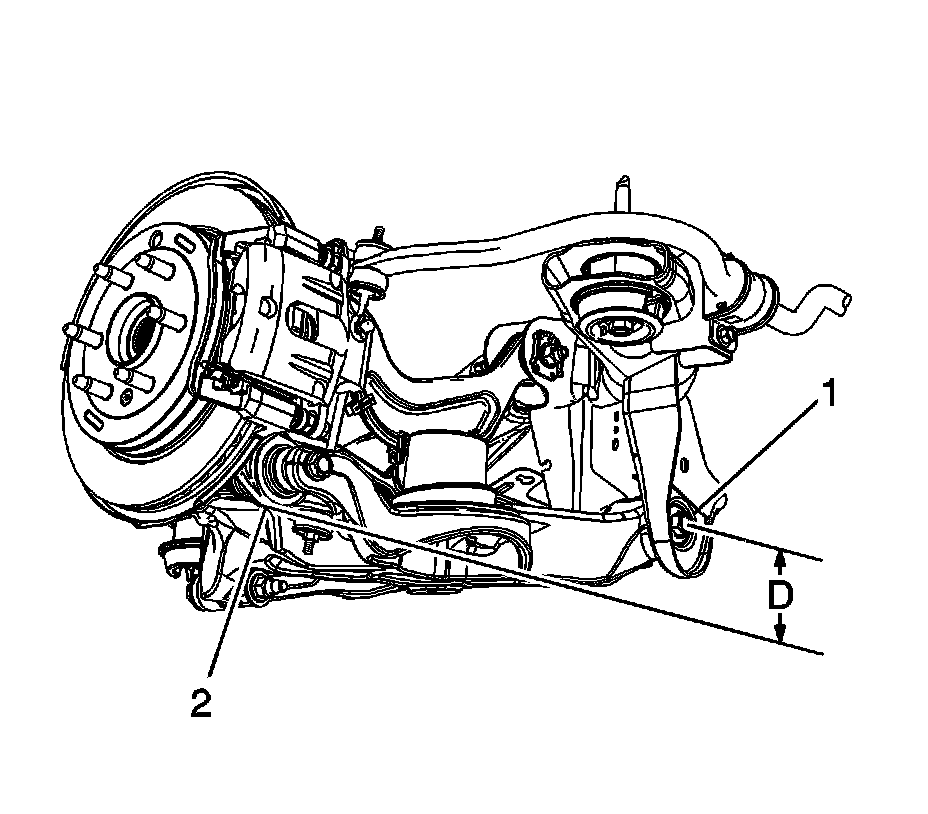
Important:
* In order to obtain the proper measurement, D will equal inner minus the outer.
* The left and right D height difference should be no more than 12 mm (0.47 in).
Use the following procedure to measure the D height:
1. Lift the rear bumper of the vehicle up about 38 mm (1.5 in).
2. Gently remove your hands and let the vehicle settle.
3. Repeat this operation 2 more times for a total of 3 times.
4. Use the outer flat spot 2 on the knuckle as the reference point for the D height measurement.
5. Measure from the outer on the knuckle to the center of the lower control arm bolt (1).
6. The difference between these 2 measurements is the D height.
7. Lift the rear bumper of the vehicle up about 38 mm (1.5 in).
8. Gently remove your hands and let the vehicle settle.
9. Repeat this operation 2 more times for a total of 3 times.
10. Re-measure the D height as in step 4.
11. The true D height is the average of the measurements taken in steps 4 and 8. Refer to Trim Height Specifications Trim Height Specifications.
If any of these measurements are out of specifications, inspect for the following conditions:
* Worn or damage suspension components
* Collision damage
Factory Service Tools
Use the Manual With the Right Hardware
Pair factory procedures with proven DIY tools so the instructions are easier to execute.
Disclosure: Verified tool recommendations may earn an affiliate commission at no cost to you.
When to See a Mechanic
Stop DIY work and contact a certified mechanic immediately if any of the following apply:
- • You smell fuel, burning insulation, or see smoke.
- • Brakes feel soft, pull hard to one side, or make grinding noises.
- • The engine overheats, stalls repeatedly, or misfires under load.
- • You are missing required tools, torque specs, or safe lifting equipment.
- • You are not confident in the next step or safety outcome.
Rather have a pro handle this?
A certified mobile mechanic comes to your home or office. They bring the tools, you stay comfortable. No tow truck, no waiting room, no surprises.
Comes to youSame-day available12-month warranty
Get a Free QuoteNo obligation. See pricing before you book.