
Safety Warning
DIY auto repair can cause serious injury, fire, or vehicle damage. These guides are for informational purposes only. Always follow OEM torque specs, wear PPE, and consult a certified mechanic if you are unsure. You are solely responsible for your safety.
2008 Chevrolet Uplander V6-3.9LFACTORY OEM SERVICE PROCEDURE
Instrument Panel/Center Console Component Views
Instrument Panel/Center Console Component Views
Instrument Panel Components
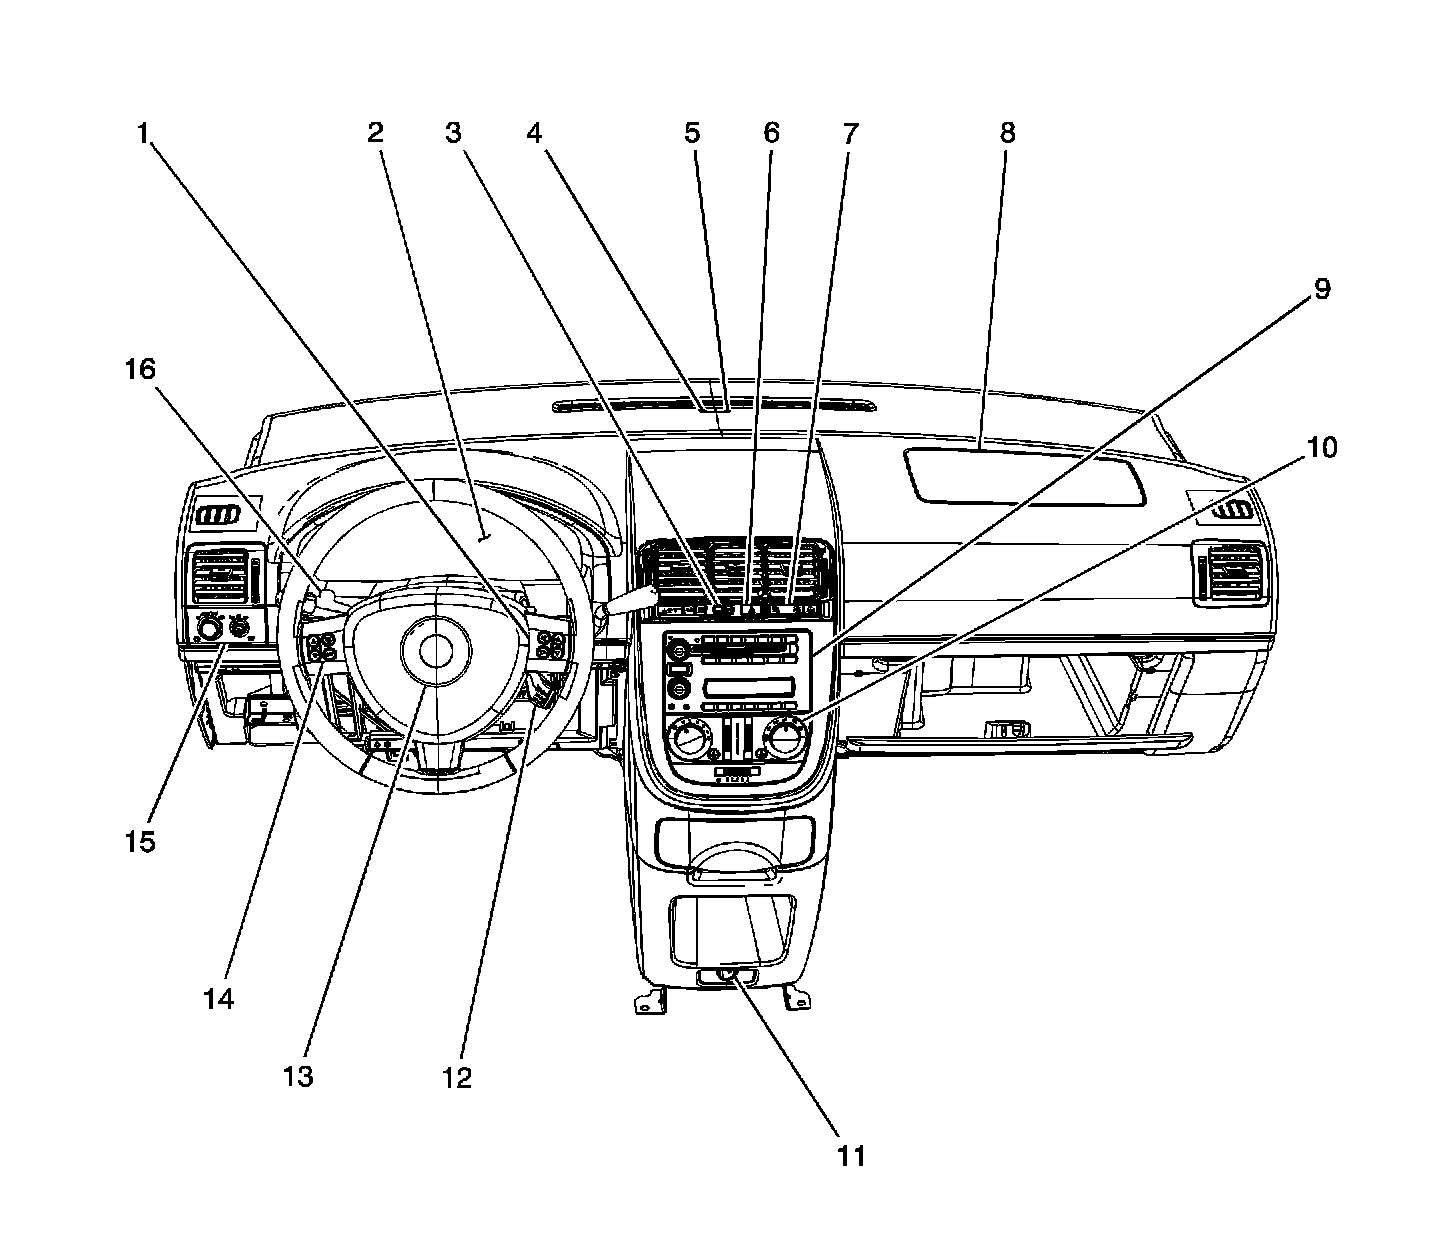
1 - Steering Wheel Control Switch Assembly - Right (UK3)
2 - Instrument Panel Cluster (IPC)
3 - Multifunction Switch - Instrument Panel
4 - Theft Light Emitted Diode (LED) (UA6)
5 - Ambient Light Sensor
6 - Hazard Switch
7 - Inflatable Restraint Passenger Air Bag ON/OFF Indicator
8 - Inflatable Restraint I/P Module
9 - Radio
10 - HVAC Control Module
11 - Cigar Lighter
12 - Cruise Control Lever (K34)
13 - Inflatable Restraint Steering Wheel Module
14 - Steering Wheel Control Switch Assembly - Left (Uk3)
15 - Headlamp Switch
16 - Turn Signal/Multifunction Switch
Instrument Panel Components 2 of 3
Underneath Front Console Extension:
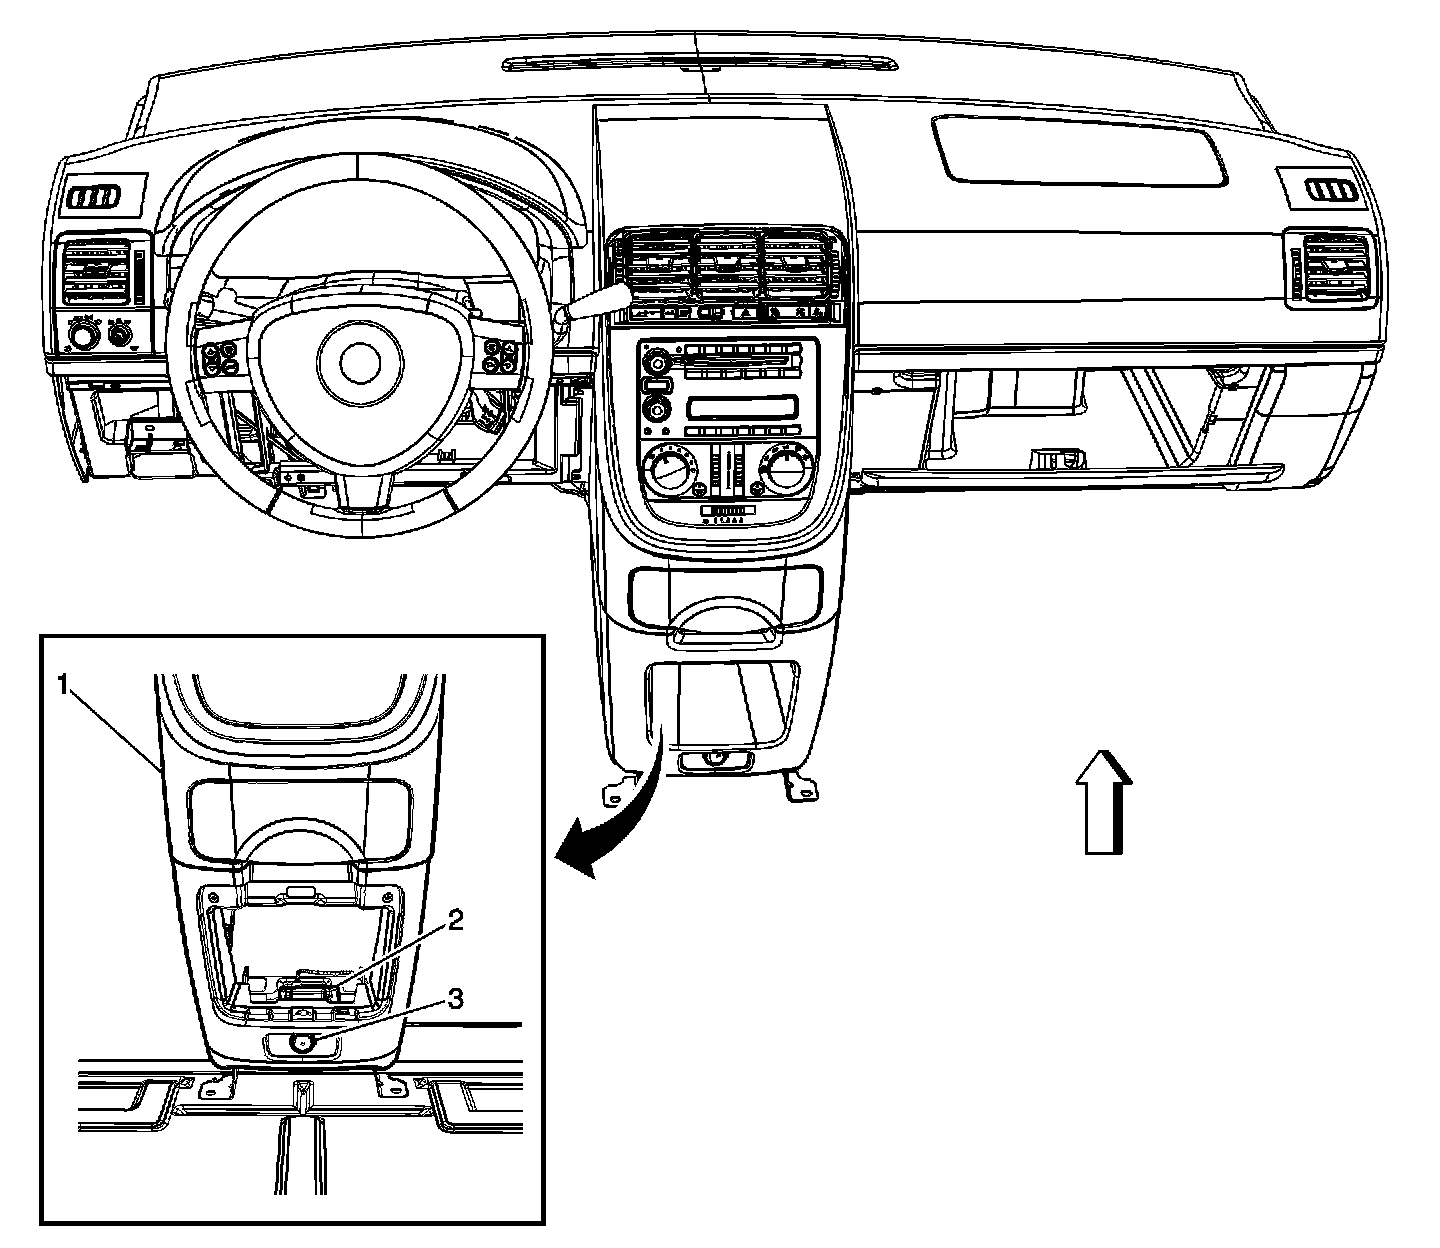
1 - Floor Console Extension
2 - Yaw Rate and Lateral Acceleration Sensor (JL4)
3 - Cigar Lighter
Instrument Panel Components 3 of 3
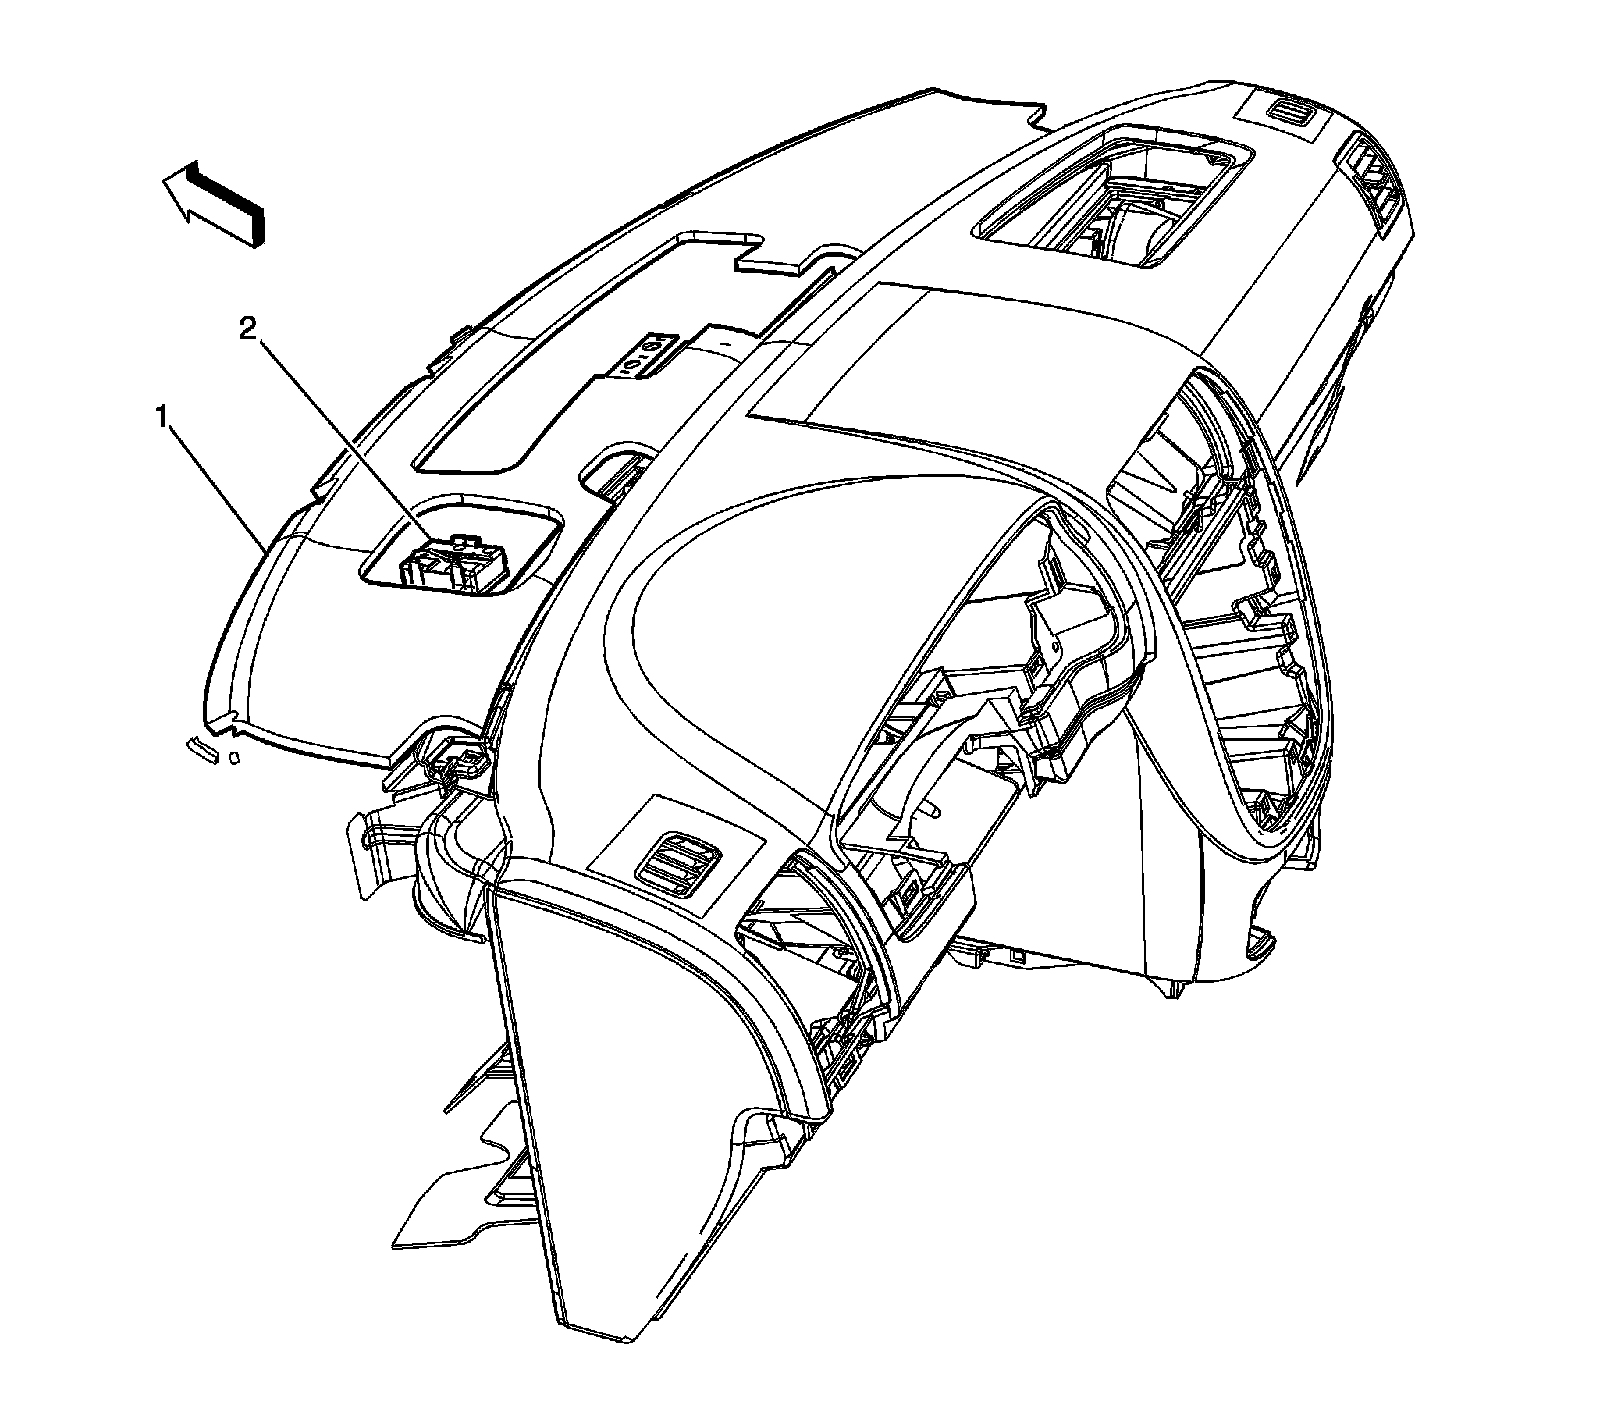
1 - Upper Instrument Panel Trim Panel
2 - Remote Control Door Lock Receiver (RCDLR)
Lower Left Side Instrument Panel Components
Left Side of I/P Components:
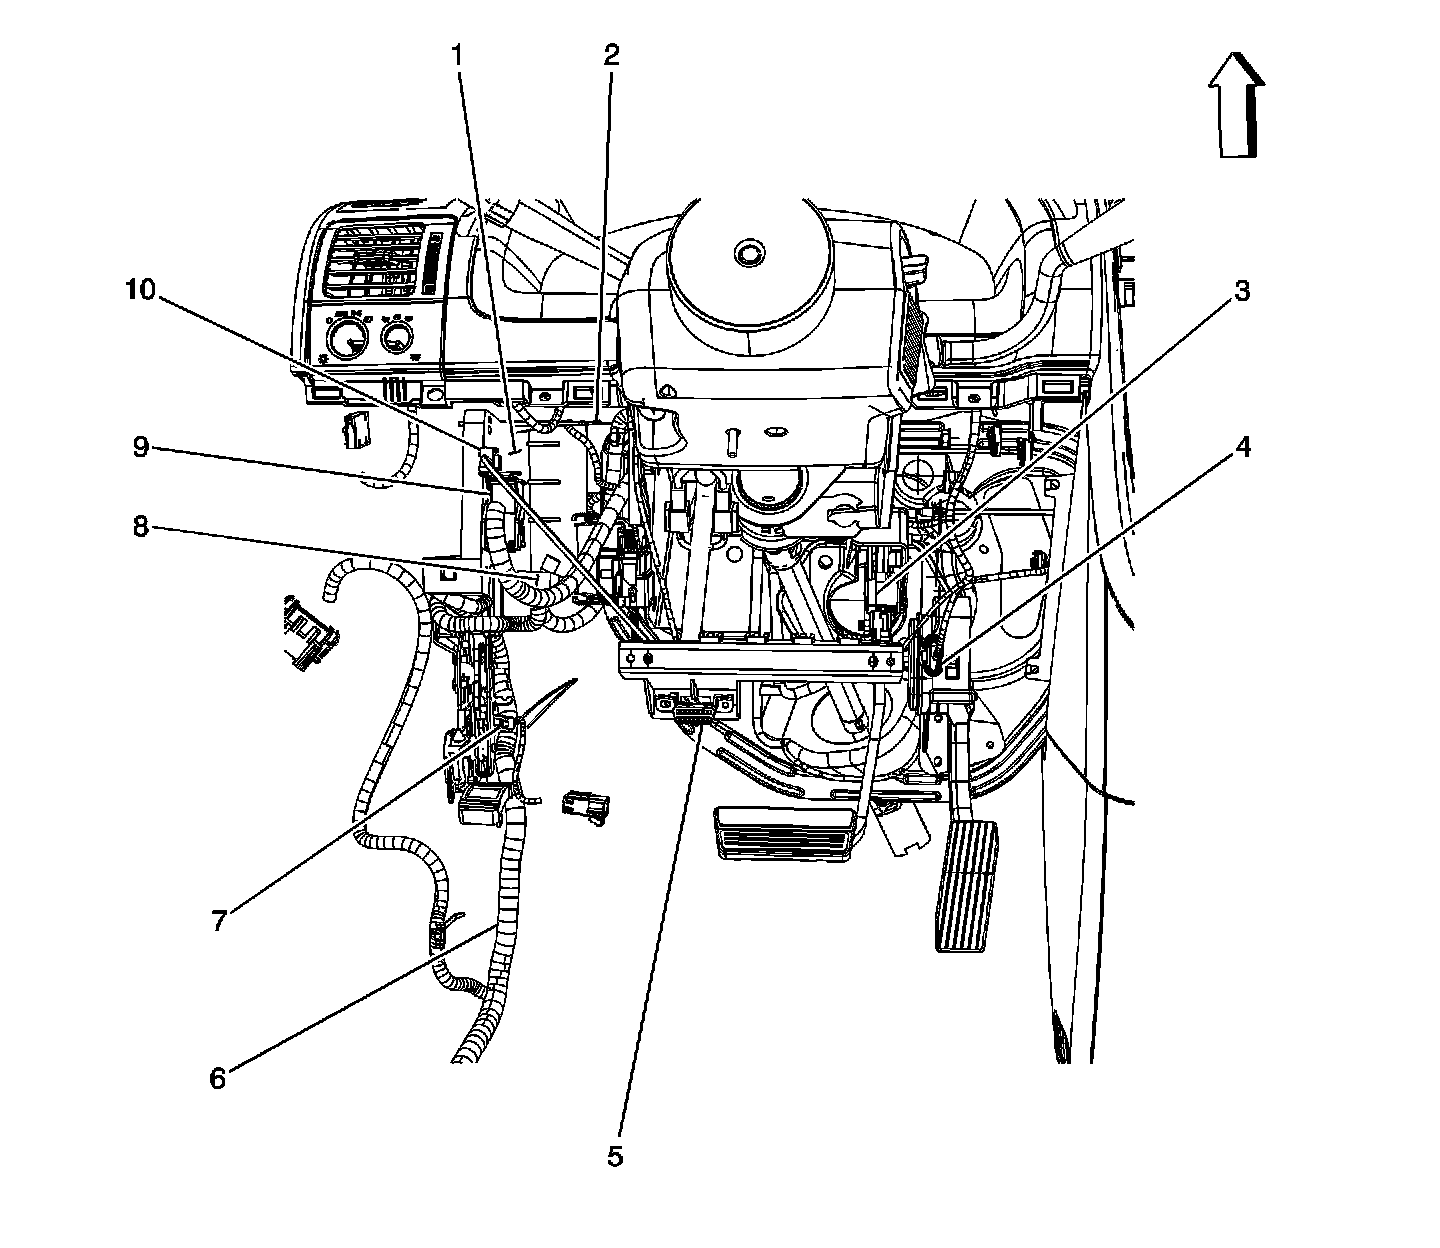
1 - Body Control Module (BCM)
2 - G201
3 - Brake Pedal Position Sensor
4 - Accelerator Pedal Position (APP) Sensor
5 - Data Link Connector (DLC)
6 - Body Harness
7 - Park Brake Switch
8 - BCM - X2
9 - BCM - X1
10 - BCM - X3 (Steering Column Harness)
Right Side Instrument Panel Components
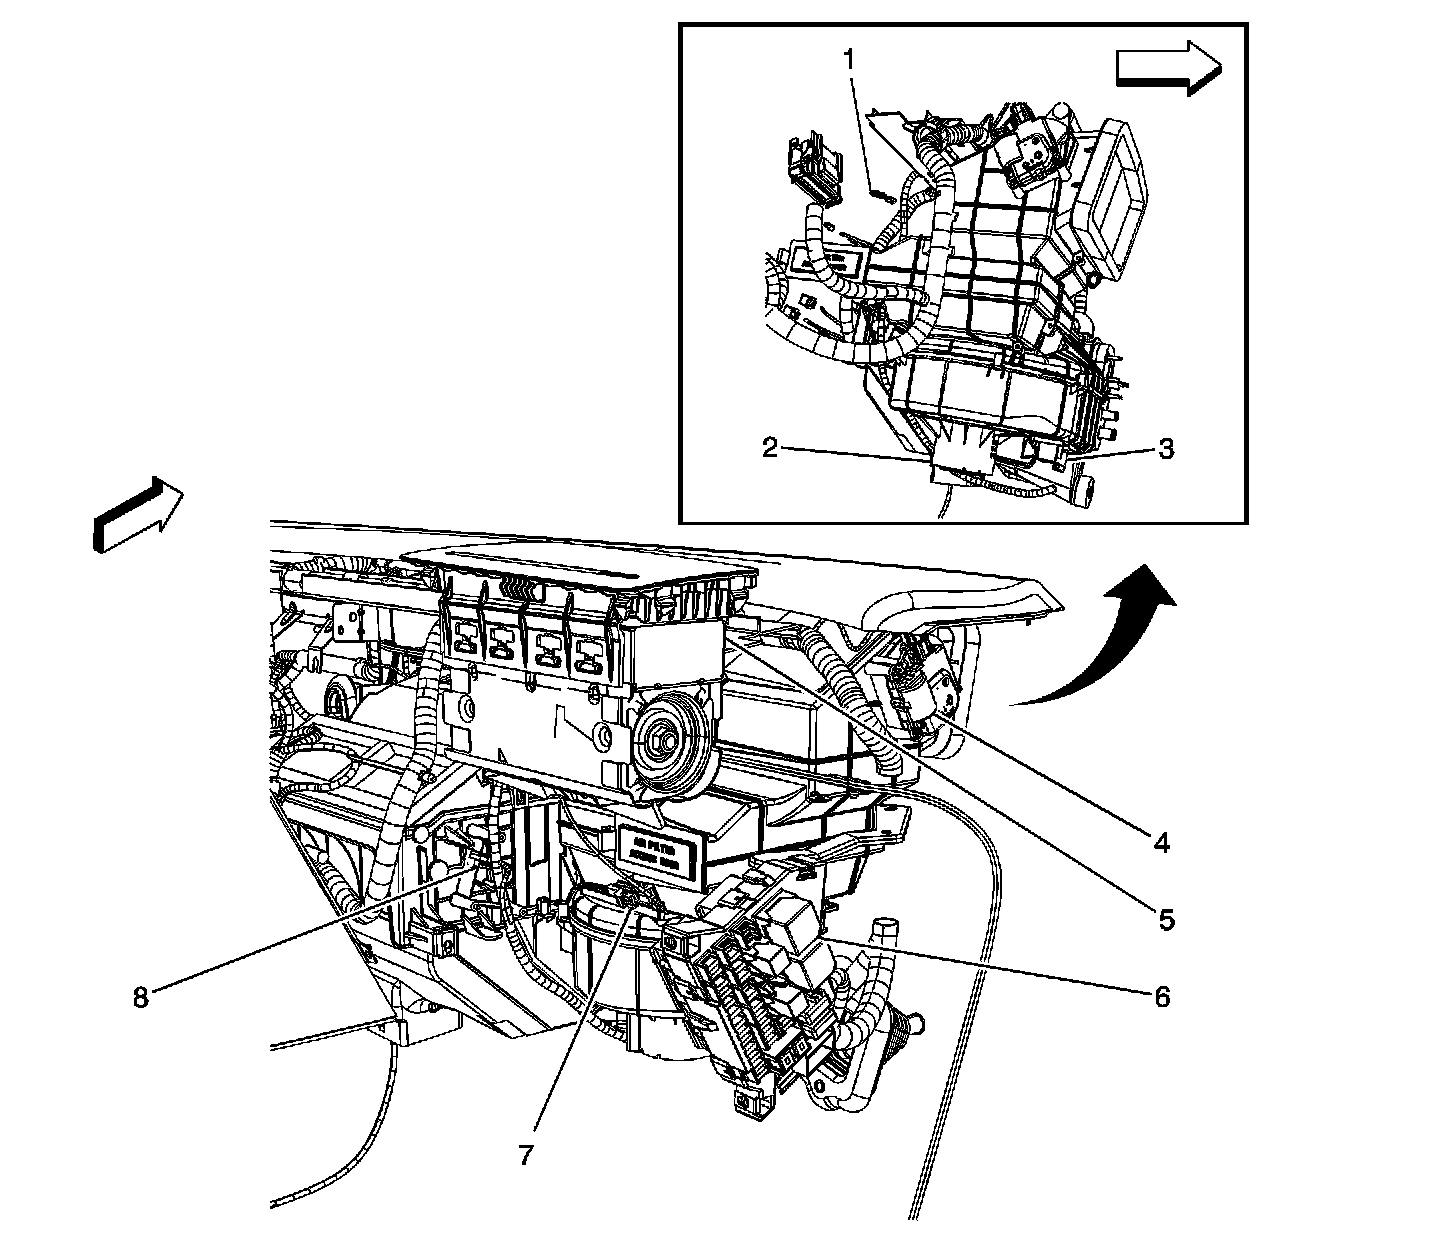
1 - G200
2 - Blower Motor
3 - Blower Motor Resistor Assembly
4 - Recirculation Actuator
5 - Inflatable Restraint Instrument Panel Module
6 - Fuse Block - Instrument Panel
7 - Evaporative Temperature Sensor
8 - X205 (CJ3)
Middle Left Side Instrument Panel Components
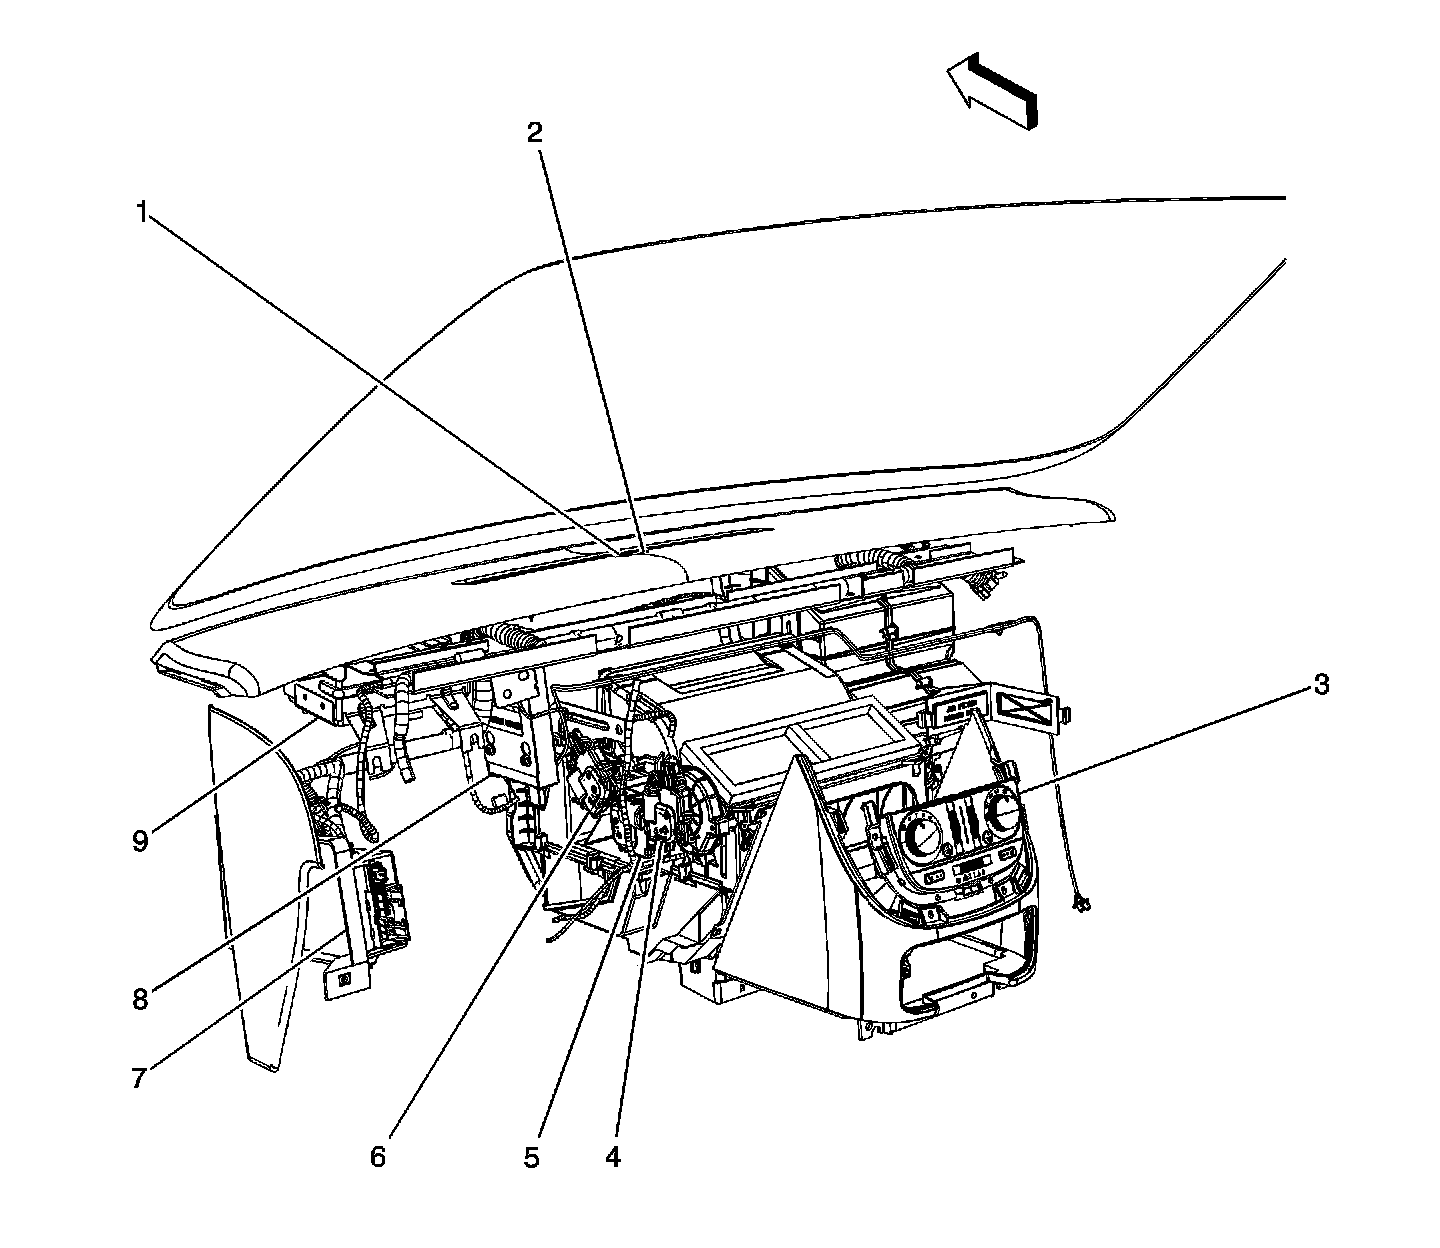
1 - Theft Light Emitted Diode (LED) (UA6)
2 - Ambient Light Sensor
3 - HVAC Control Module
4 - Vent and Floor Actuator
5 - Air Temperature Actuator (C60) or Air Temperature Actuator - Left (CJ3)
6 - Defrost Actuator
7 - Body Control Module (BCM)
8 - Digital Radio Receiver (U2K)
9 - Vehicle Communication Unit (VCU) (UE1)
Steering Wheel Components
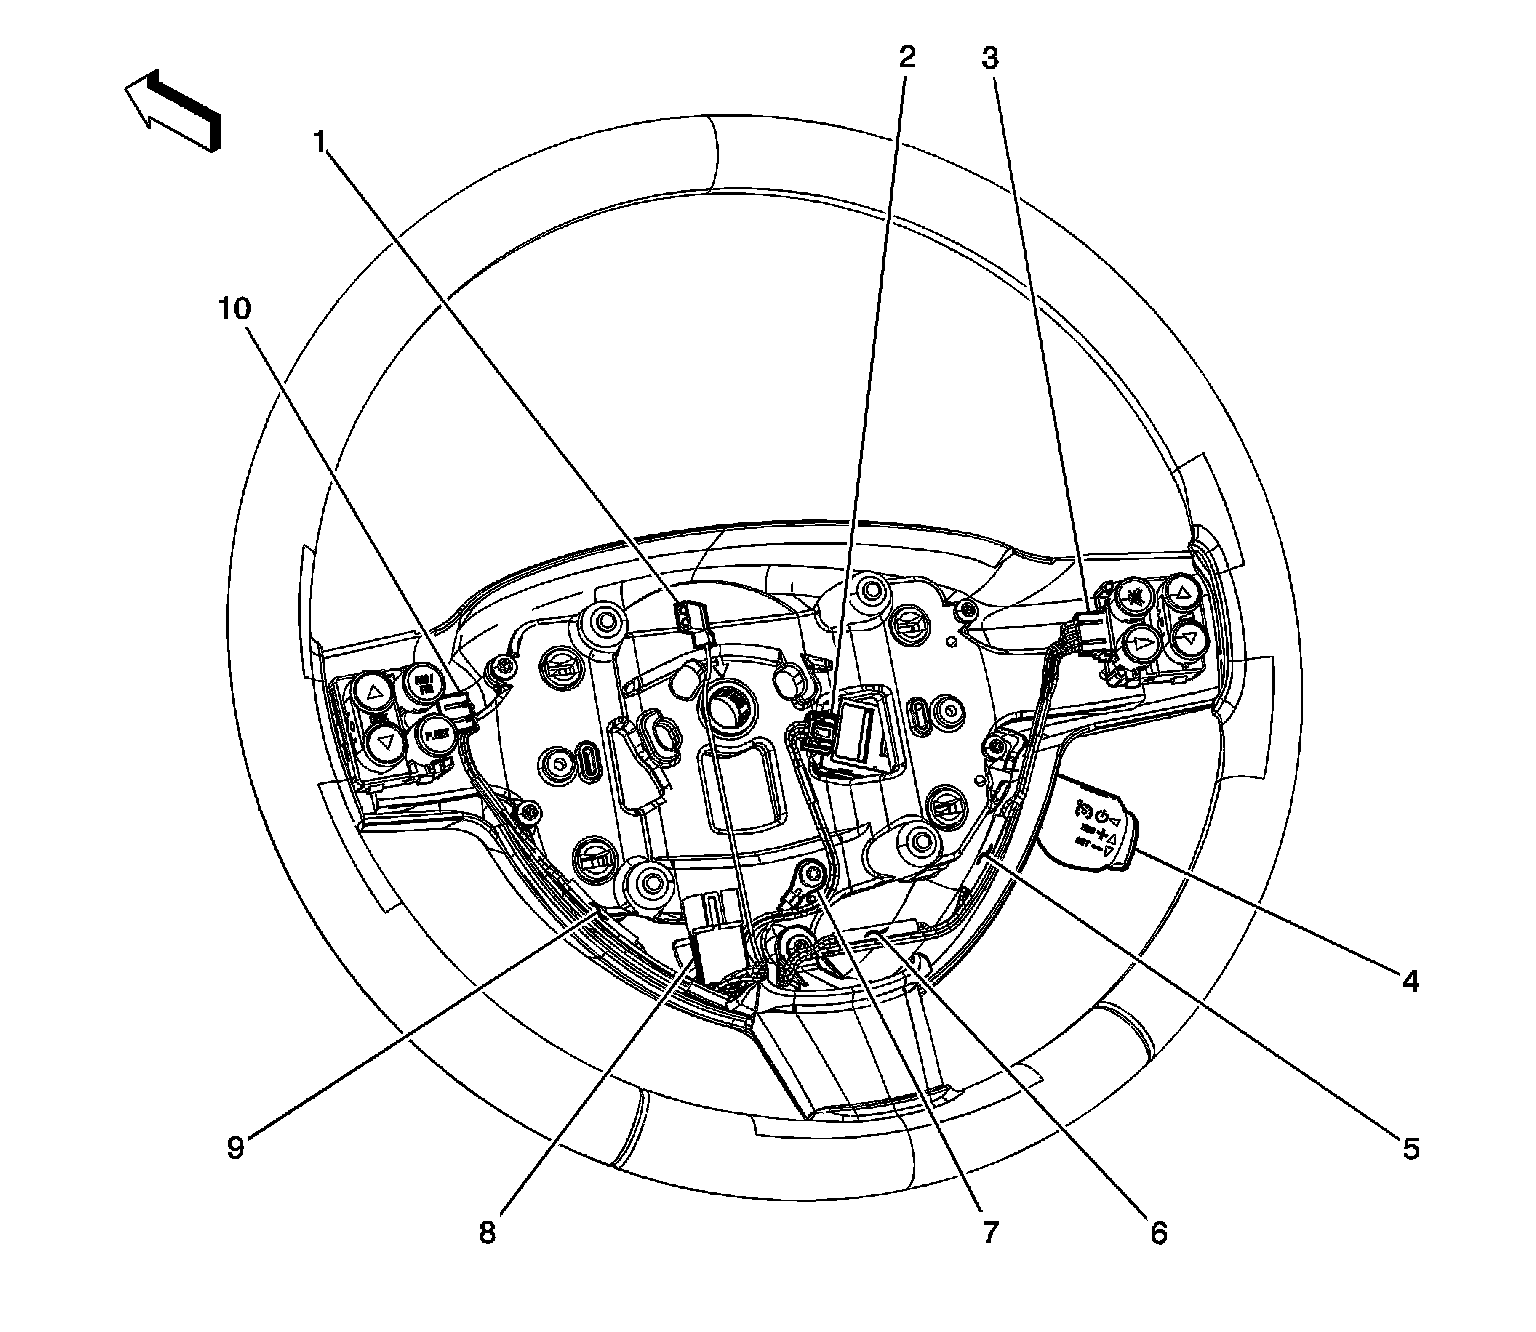
1 - Horn Switch Connector
2 - Cruise Control Lever Connector (K34)
3 - Steering Wheel Control Switch Assembly - Right (UK3)
4 - Cruise Control Lever (K34)
5 - J293 (UK3)
6 - J297 (UK3)
7 - Steering Wheel Ground
8 - X279
9 - J295 (UK3)
10 - Steering Wheel Control Switch Assembly - Left (UK3)
Steering Column Components
Steering Column Components:
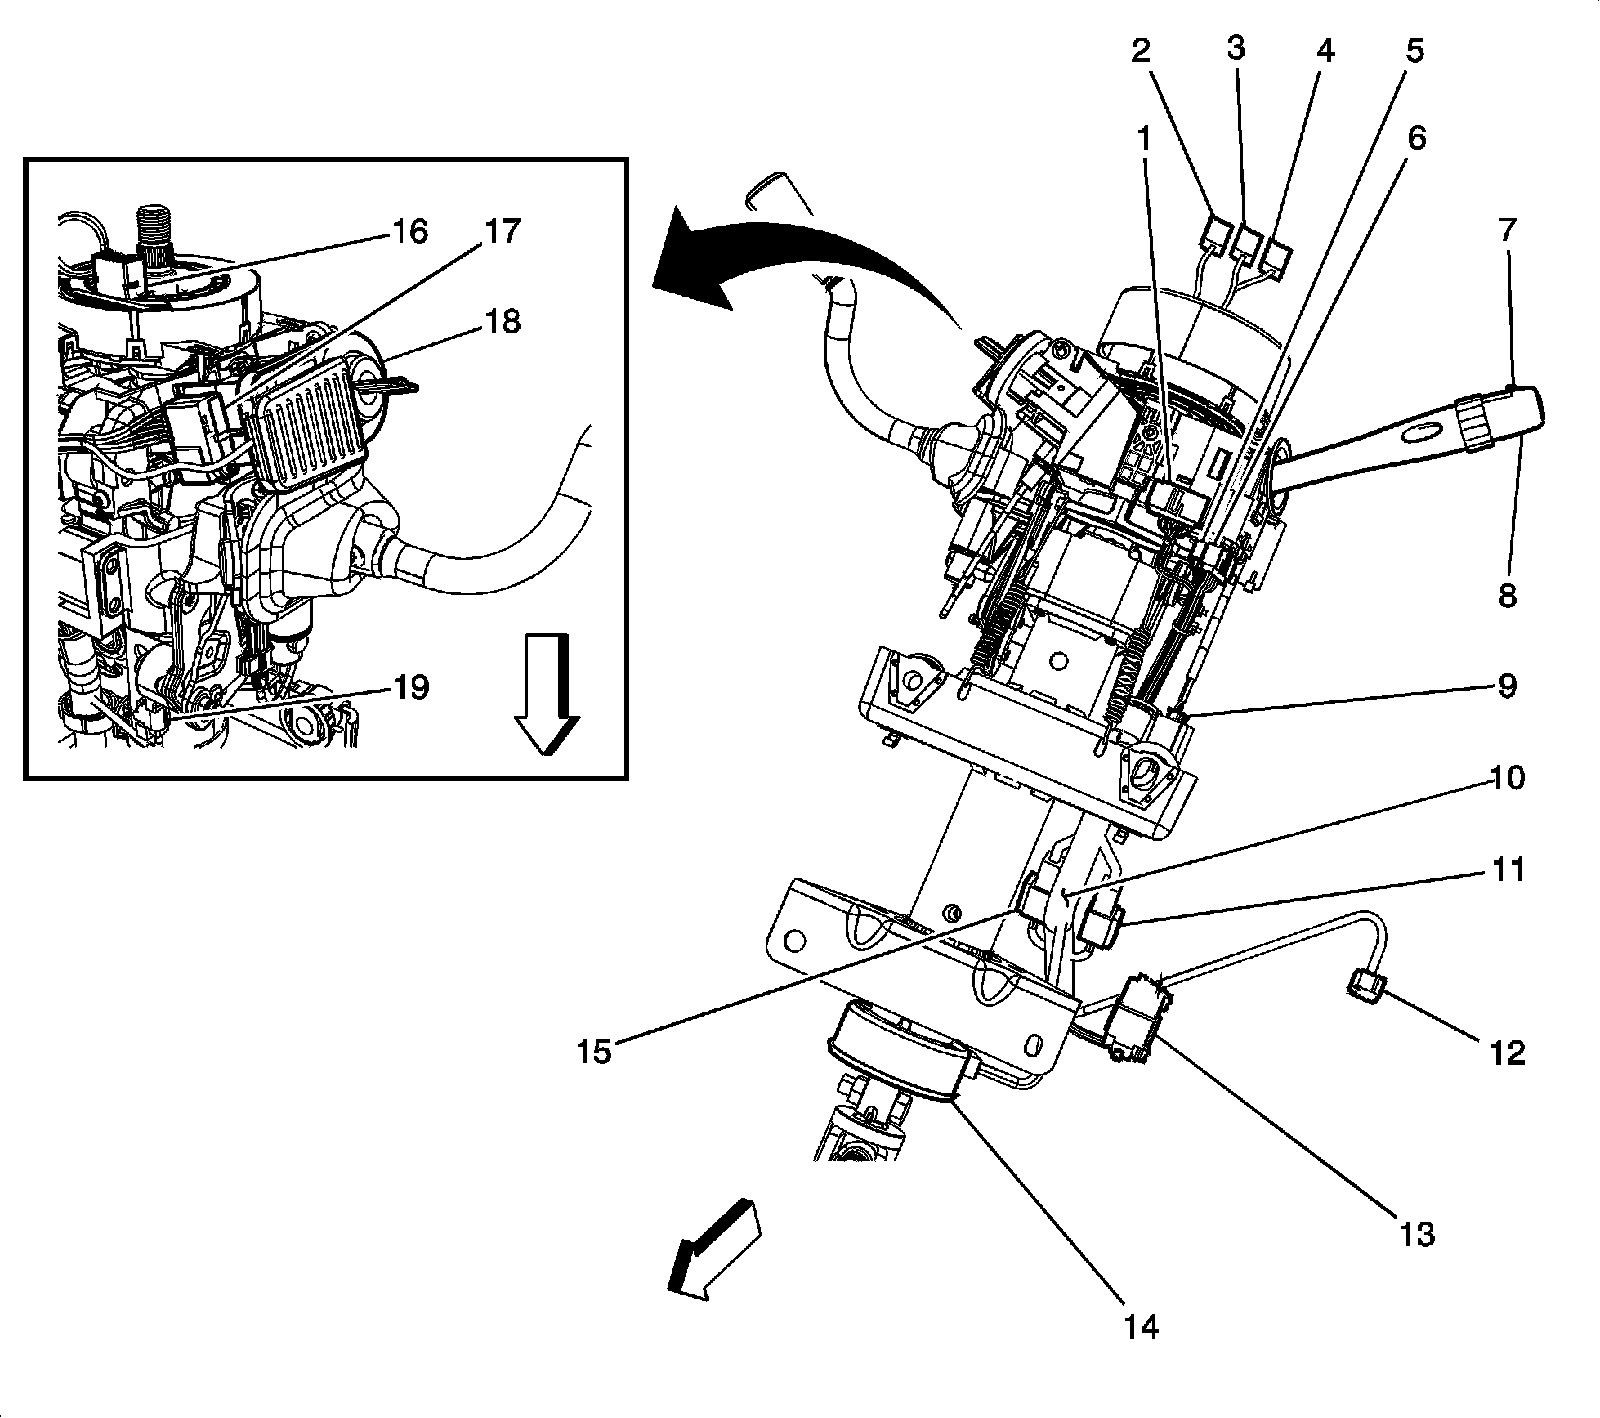
1 - Turn Signal/Multifunction Switch X3
2 - X279
3 - Inflatable Restraint Steering Wheel Module Coil X1 Connector
4 - Inflatable Restraint Steering Wheel Module Coil X2 Connector
5 - Turn Signal/Multifunction Switch X2
6 - Turn Signal/Multifunction Switch X1
7 - Rear Wiper/Washer Switch
8 - Turn Signal/Multifunction Switch
9 - Turn Signal/Multifunction Switch X4
10 - J277 and J279
11 - X277
12 - X275
13 - X201
14 - Steering Wheel Speed Position Sensor (JL4)
15 - Theft Deterrent Exciter Module Connector (Pigtail)
16 - Inflatable Restraint Steering Wheel Module Coil
17 - Theft Deterrent Exciter Module
18 - Ignition Switch
19 - Automatic Transmission Shift Lock Control Solenoid Connector
Factory Service Tools
Use the Manual With the Right Hardware
Pair factory procedures with proven DIY tools so the instructions are easier to execute.
Disclosure: Verified tool recommendations may earn an affiliate commission at no cost to you.
When to See a Mechanic
Stop DIY work and contact a certified mechanic immediately if any of the following apply:
- • You smell fuel, burning insulation, or see smoke.
- • Brakes feel soft, pull hard to one side, or make grinding noises.
- • The engine overheats, stalls repeatedly, or misfires under load.
- • You are missing required tools, torque specs, or safe lifting equipment.
- • You are not confident in the next step or safety outcome.