
Safety Warning
DIY auto repair can cause serious injury, fire, or vehicle damage. These guides are for informational purposes only. Always follow OEM torque specs, wear PPE, and consult a certified mechanic if you are unsure. You are solely responsible for your safety.
2007 Chevrolet Uplander V6-3.9LFACTORY OEM SERVICE PROCEDURE
Rear Subframe: Service and Repair
Rear Suspension Support Nut Replacement
Removal Procedure
1.Disconnect the negative battery cable. Refer to Battery Negative Cable Disconnection and Connection .
2.Remove the carpet from the trunk area. Refer to Floor Panel Carpet Replacement .
3.Remove the following components as needed:
-The sealers
-The sound deadening materials
-The corrosion materials
4.Remove the rear suspension support bolt.
5.Place a center punch through the damaged rear suspension support nut. Strike the center punch using a hammer. The punch will leave a dimple on the floor. Use the dimple in order to locate the area where the frame crossmember nut will be removed.
Important:Do not cut or damage the adjacent panels or the reinforcements.
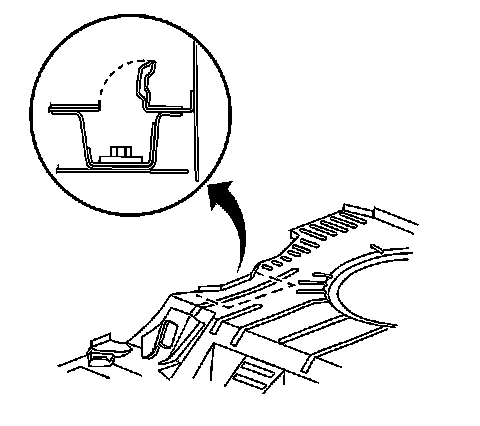
1.Use a cutoff wheel in order to cut an access panel.
2.Lift the panel upward in order to gain access to the frame crossmember nut retainer.
Important:Reuse the frame crossmember nut retainer if the retainer is not damaged from the stripped out bolt.
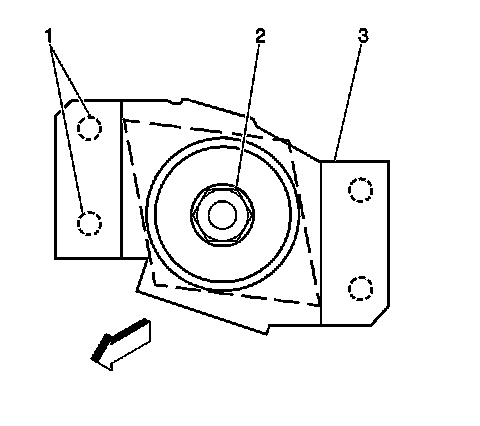
1.Use an air chisel in order to break away the spot welds (1) on one side of the frame crossmember nut retainer (3).
2.Lift one side of the frame crossmember nut retainer enough in order to remove the frame crossmember nut.
3.Remove the rear suspension support nut (2).
Installation Procedure
1.Install the rear suspension support nut (2).
2.Lower the frame crossmember nut retainer into place. Ensure that the following conditions exist:
-The frame crossmember nut is correctly positioned.
-The frame crossmember nut operates correctly.
3.Spot weld the frame crossmember nut retainer in the original location.
1.Clean and prepare the welded surfaces.
2.Apply corrosion protection. Refer to Anti-Corrosion Treatment and Repair .
Notice:Refer to Fastener Notice .
3.Install the new rear suspension support bolt to the frame crossmember nut.
TightenTighten the bolt to 130 N �m (96 lb ft).
4.Reposition the panel downward to the original position.
5.Stitch weld the panel back to the original position using 25 mm (0.98 in) welds along the seam. Leave 25 mm (0.98 in) gaps between the welds. A solid joint with minimal heat distortion will result. Continue to finish the stitch weld procedure.
6.Use a small grinder in order to remove the excess material from the floor panel until the following conditions exist:
-The floor panel is smooth.
-The floor panel is free from rough edges.
7.Clean and prepare the welded surfaces.
8.Apply anti-corrosion compound GM P/N 12346225 or equivalent. Thoroughly coat the inside of the repair area through the access hole.
9.Apply Primer and let the primer dry for approximately 30 minutes. Then apply Dominion Sure Seal P/N 110900 Sound Deadener or the equivalent to the repair area.
10.Install the carpet and the pad over the repair area Refer to Floor Panel Carpet Replacement .
11.Connect the negative battery cable. Refer to Battery Negative Cable Disconnection and Connection .
Factory Service Tools
Use the Manual With the Right Hardware
Pair factory procedures with proven DIY tools so the instructions are easier to execute.
Disclosure: Verified tool recommendations may earn an affiliate commission at no cost to you.
When to See a Mechanic
Stop DIY work and contact a certified mechanic immediately if any of the following apply:
- • You smell fuel, burning insulation, or see smoke.
- • Brakes feel soft, pull hard to one side, or make grinding noises.
- • The engine overheats, stalls repeatedly, or misfires under load.
- • You are missing required tools, torque specs, or safe lifting equipment.
- • You are not confident in the next step or safety outcome.