
Safety Warning
DIY auto repair can cause serious injury, fire, or vehicle damage. These guides are for informational purposes only. Always follow OEM torque specs, wear PPE, and consult a certified mechanic if you are unsure. You are solely responsible for your safety.
2004 Chevrolet Optra (CANADA) L4-2.0LFACTORY OEM SERVICE PROCEDURE
Collision Repair Specifications
Collision Repair Specifications
Radiator Support
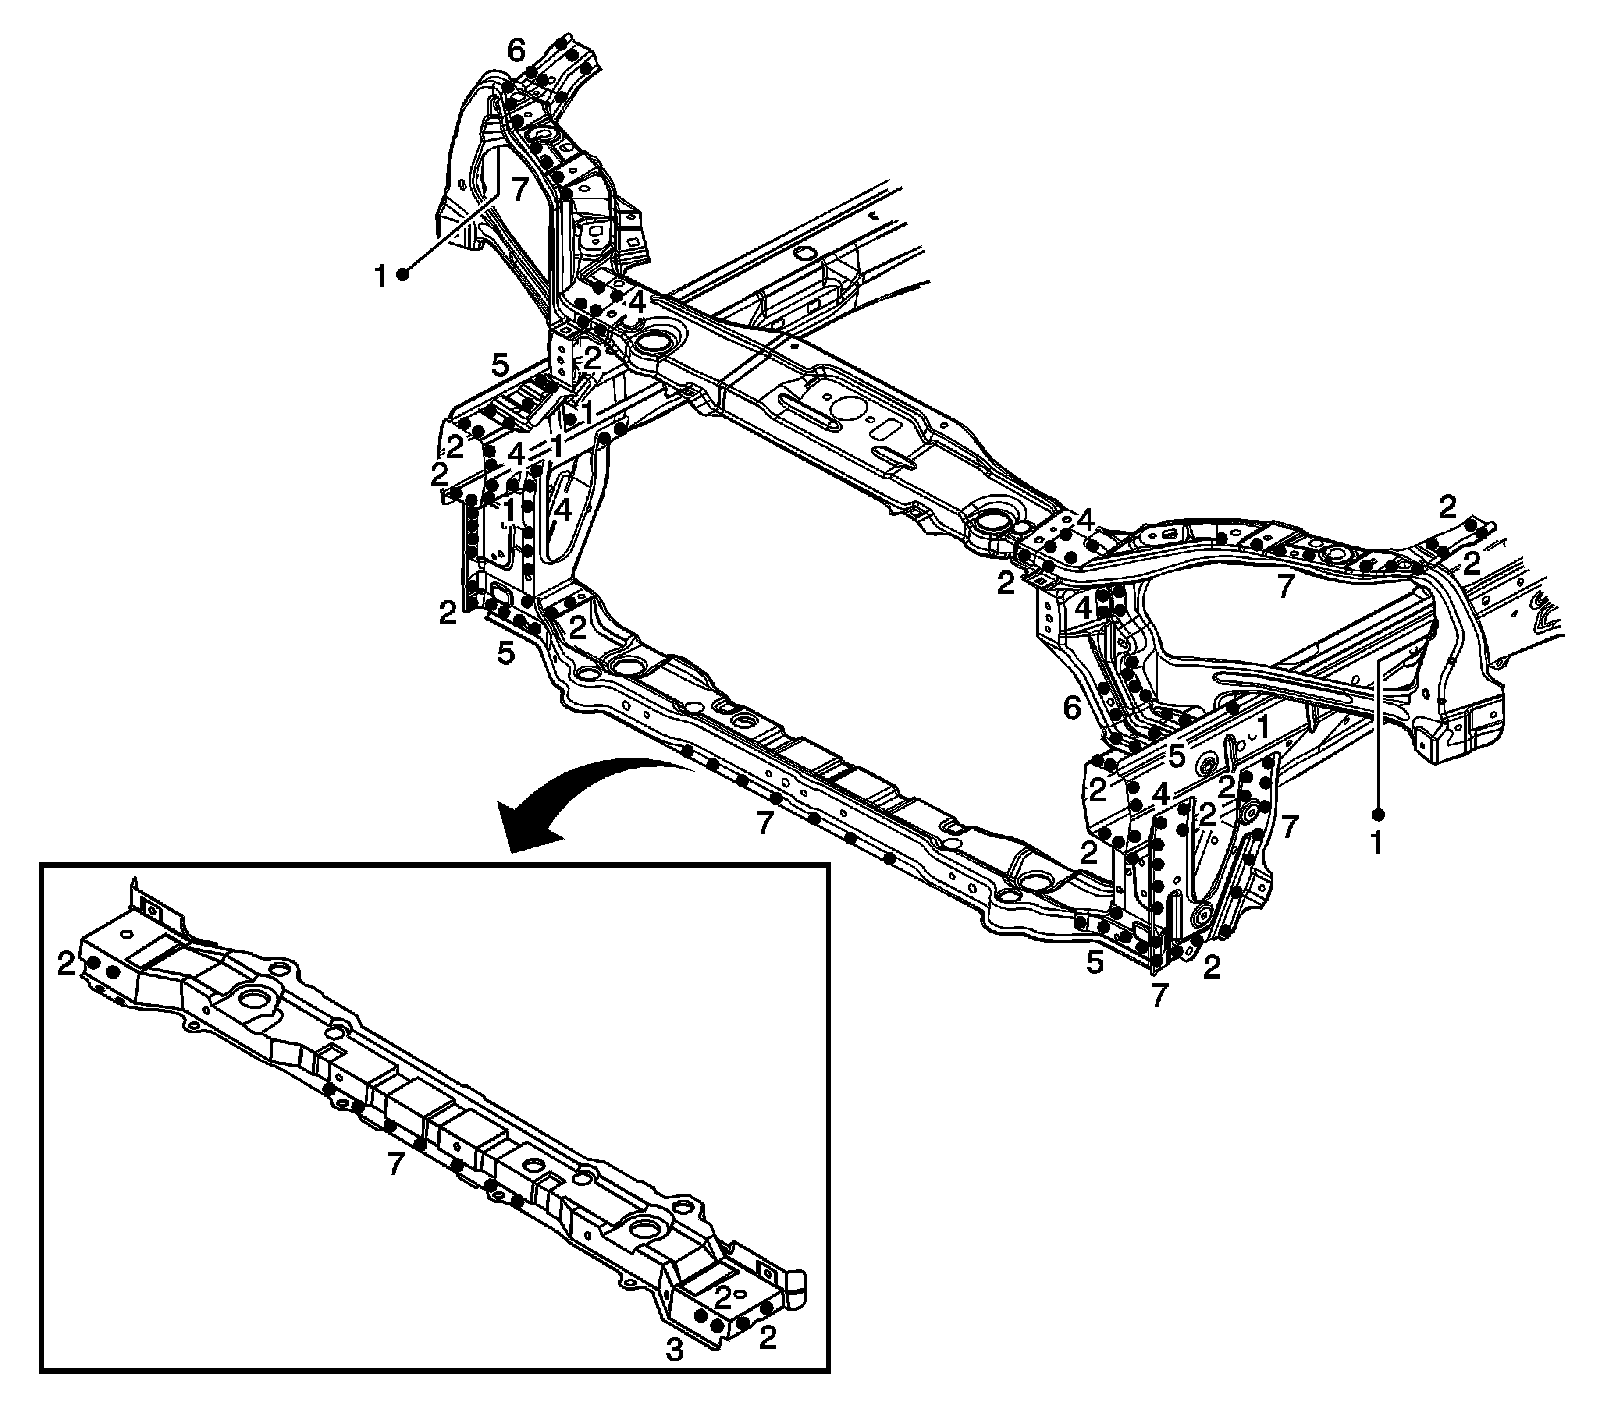
Important: The number of spot welds needed in each location is shown in illustration.
The front panel is joined to the front wheelhouse and front longitudinal. It forms the base for the headlamps and other parts and maintains the rigidity of the front section of the body. Pay particular attention to twists and parallelism and inspect mounting of related parts when welding.
Wheelhouse Panel - Front
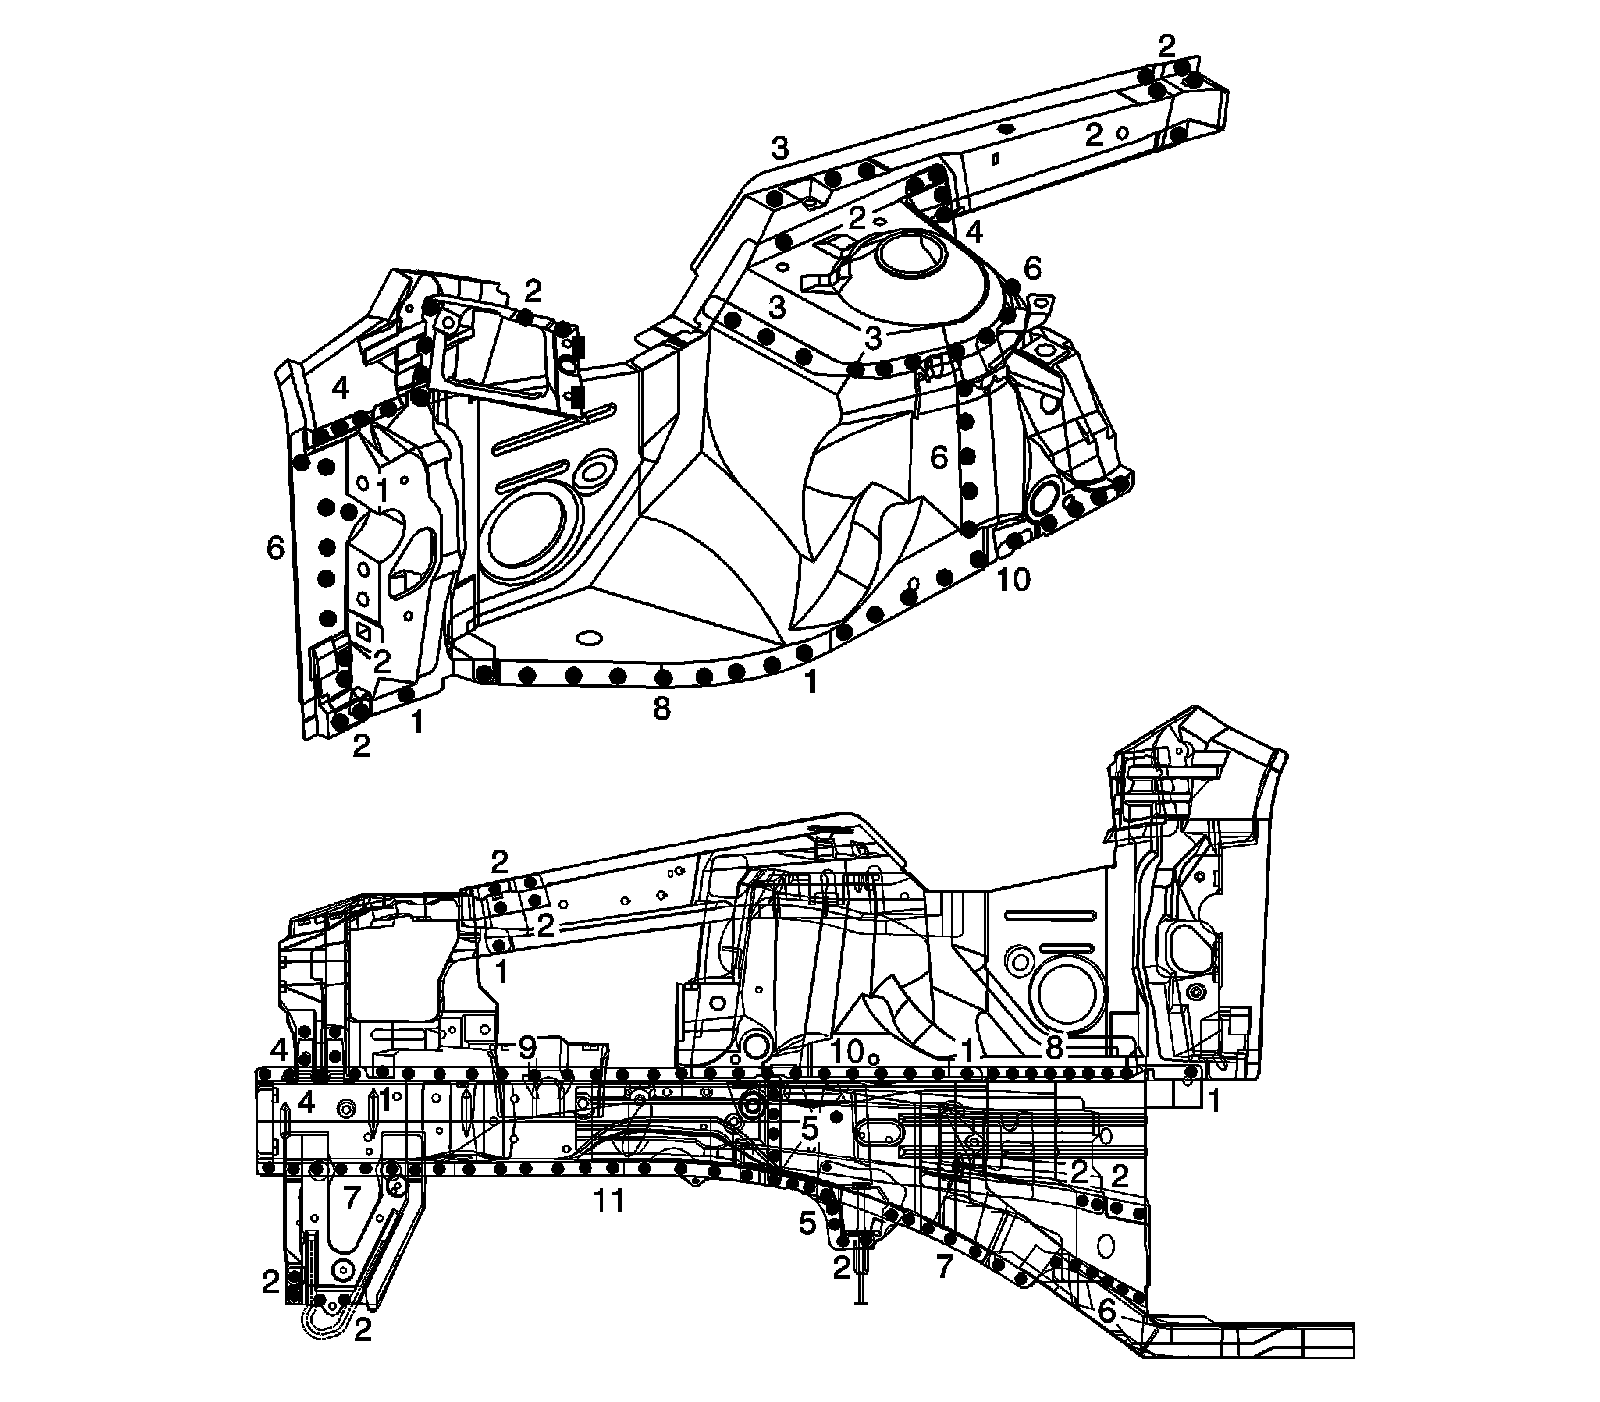
Important: The number of spot welds needed in each location is shown in illustration.
The front wheelhouse component is constructed as a unit with the locator shock absorber. Therefore, replacement of the component affects the front wheel alignment. When assembling it, either use a jig or follow dimensions on the body repair chart for positioning. It must be welded carefully.
Tie Bar
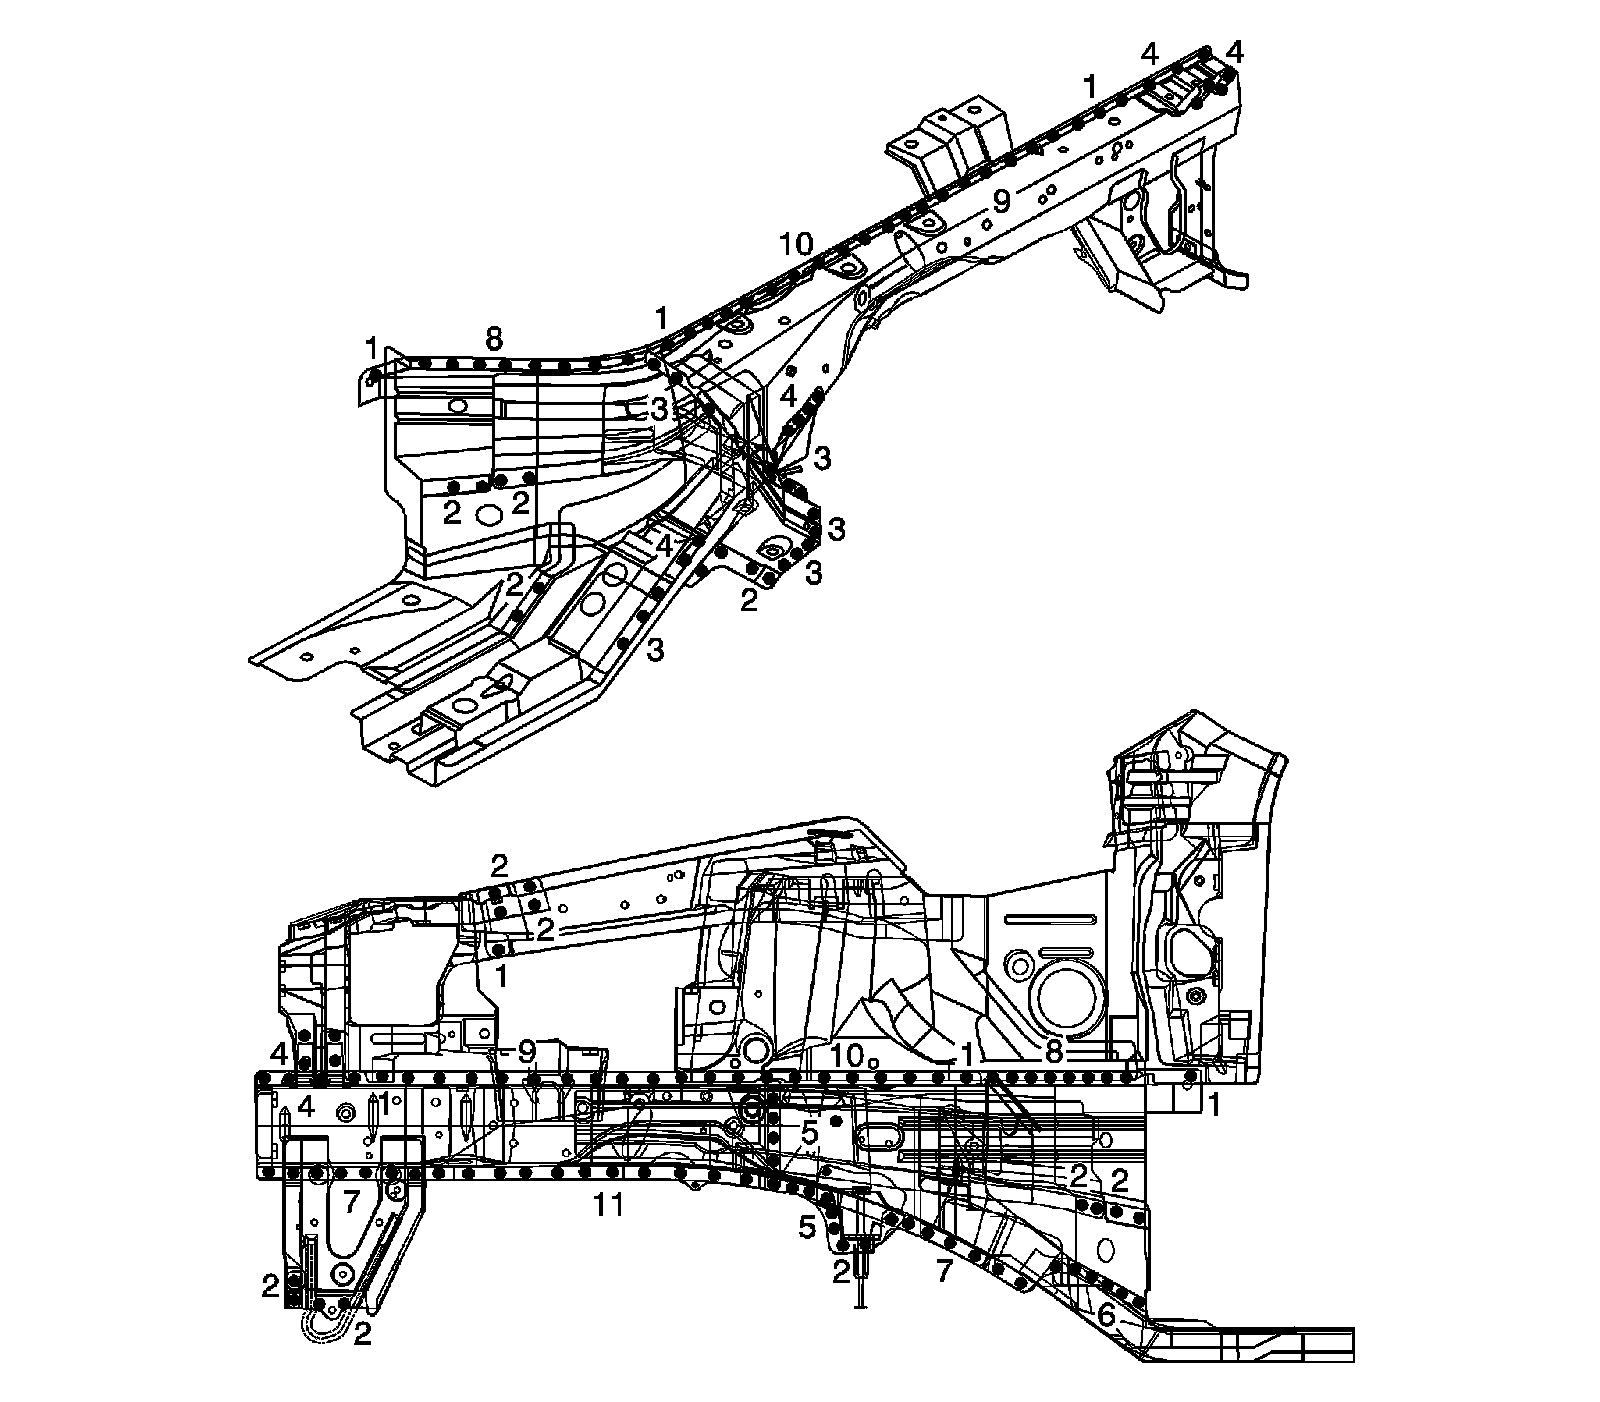
Important: The number of spot welds needed in each location is shown in illustration.
The front longitudinal is joined to the wheelhouse and front panel, it forms the base for the front suspension, engine, transmission and others. Therefore, replacement of the component affects the front wheel alignment and maintains the rigidity of the front section. When assembling it, either use a jig or follow dimensions on the body repair chart for positioning. It must be welded carefully.
Hinge Pillar Body - Sectioning (Front)

Important: The number of spot welds needed in each location is shown in illustration.
The front pillar area is part of the frame door opening panel. It's connected to the roof, windshield, door hinges and floor frame and is important as a support for the front side of the cabin. Connection of the front pillar determines the position of the windshield and front door. Align the fender, door and windshield while the front pillar is temporary mounted, and inspect the clearances and level differences.
Roof Panel - Outer
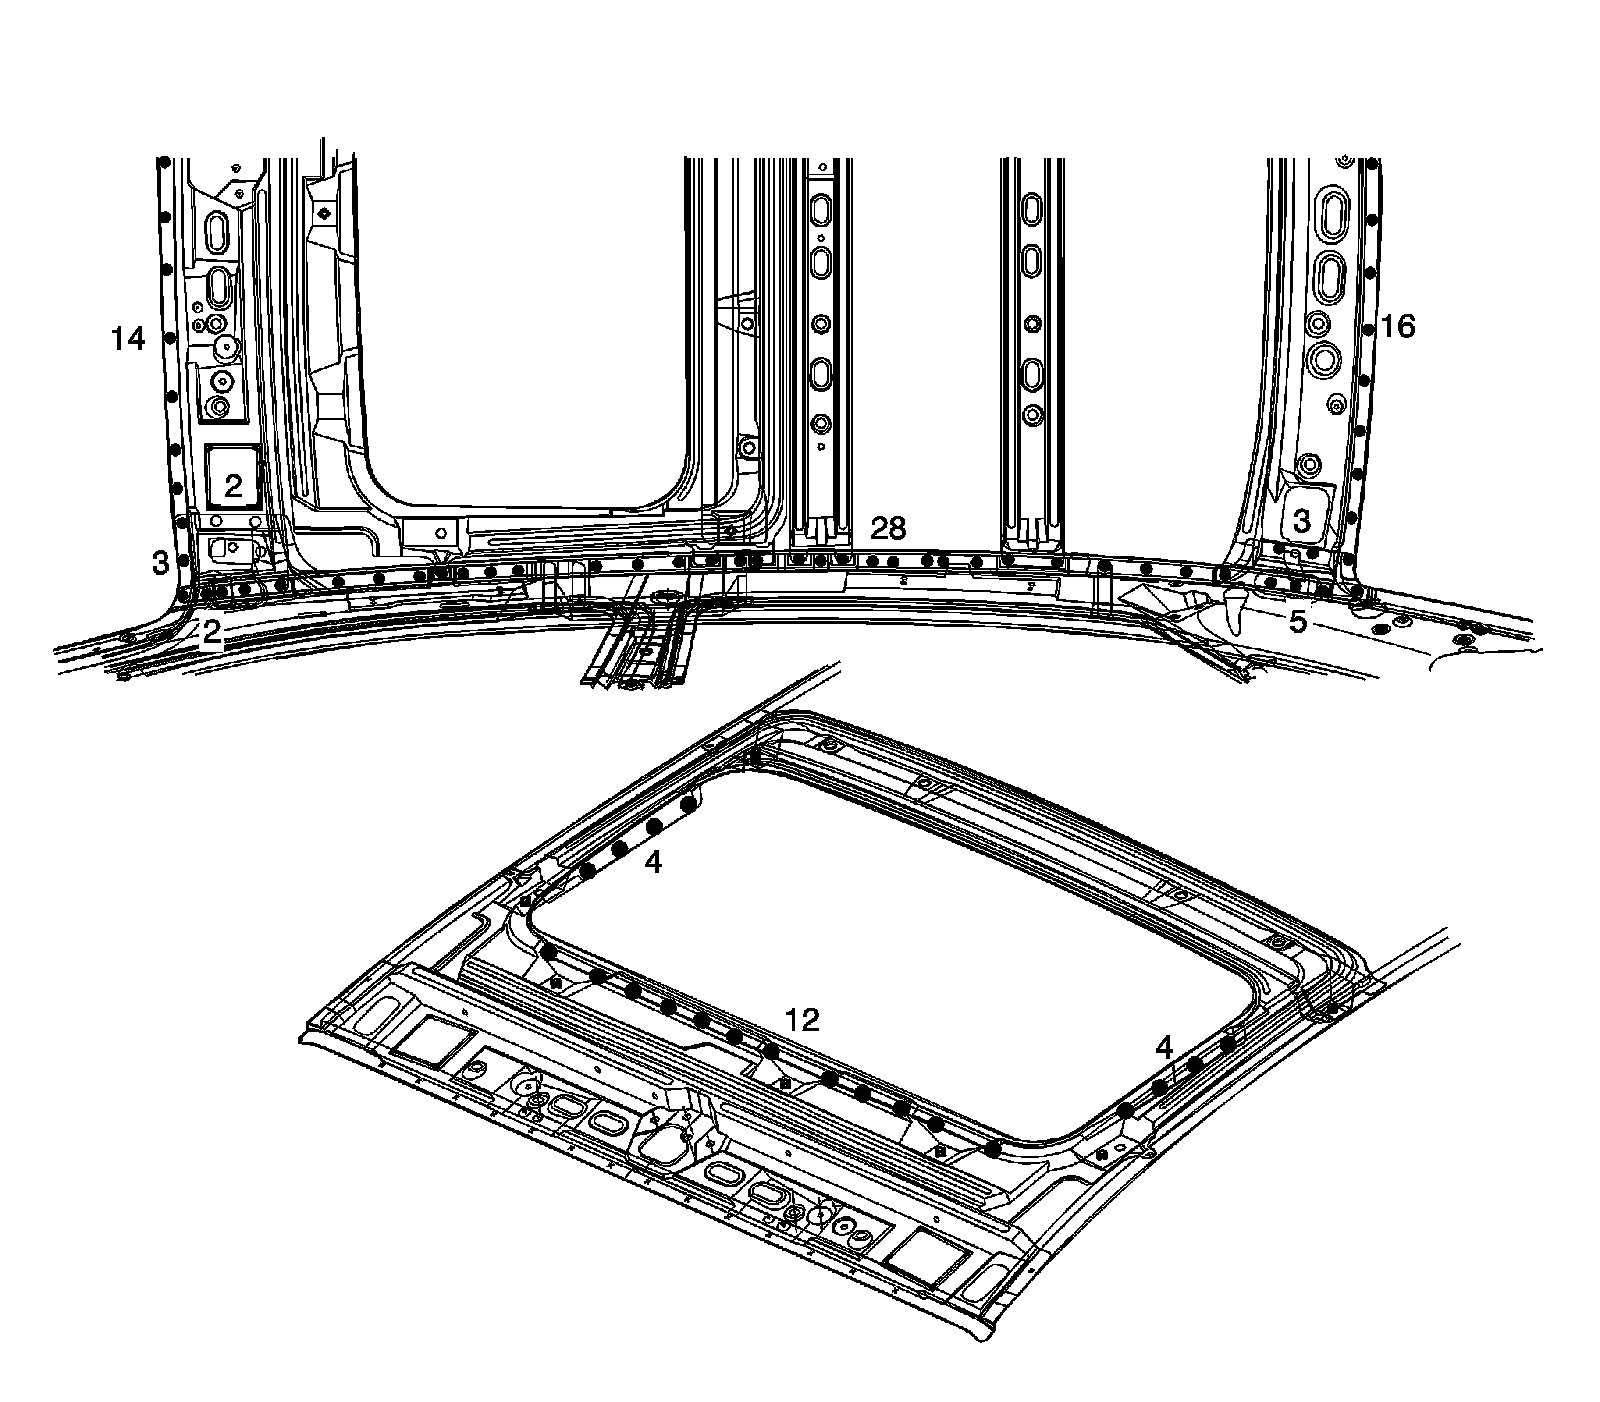
Important: The number of spot welds needed in each location is shown in illustration.
Deformation of the roof panel is highly noticeable in terms of the vehicle's outer appearance. Before replacing the roof, ensure that the body is horizontal. Before welding the roof panel, adjust the frame door opening flanges so that they contact the roof panel. Pay particular attention to twists and parallelism.
Body Rear End Panel
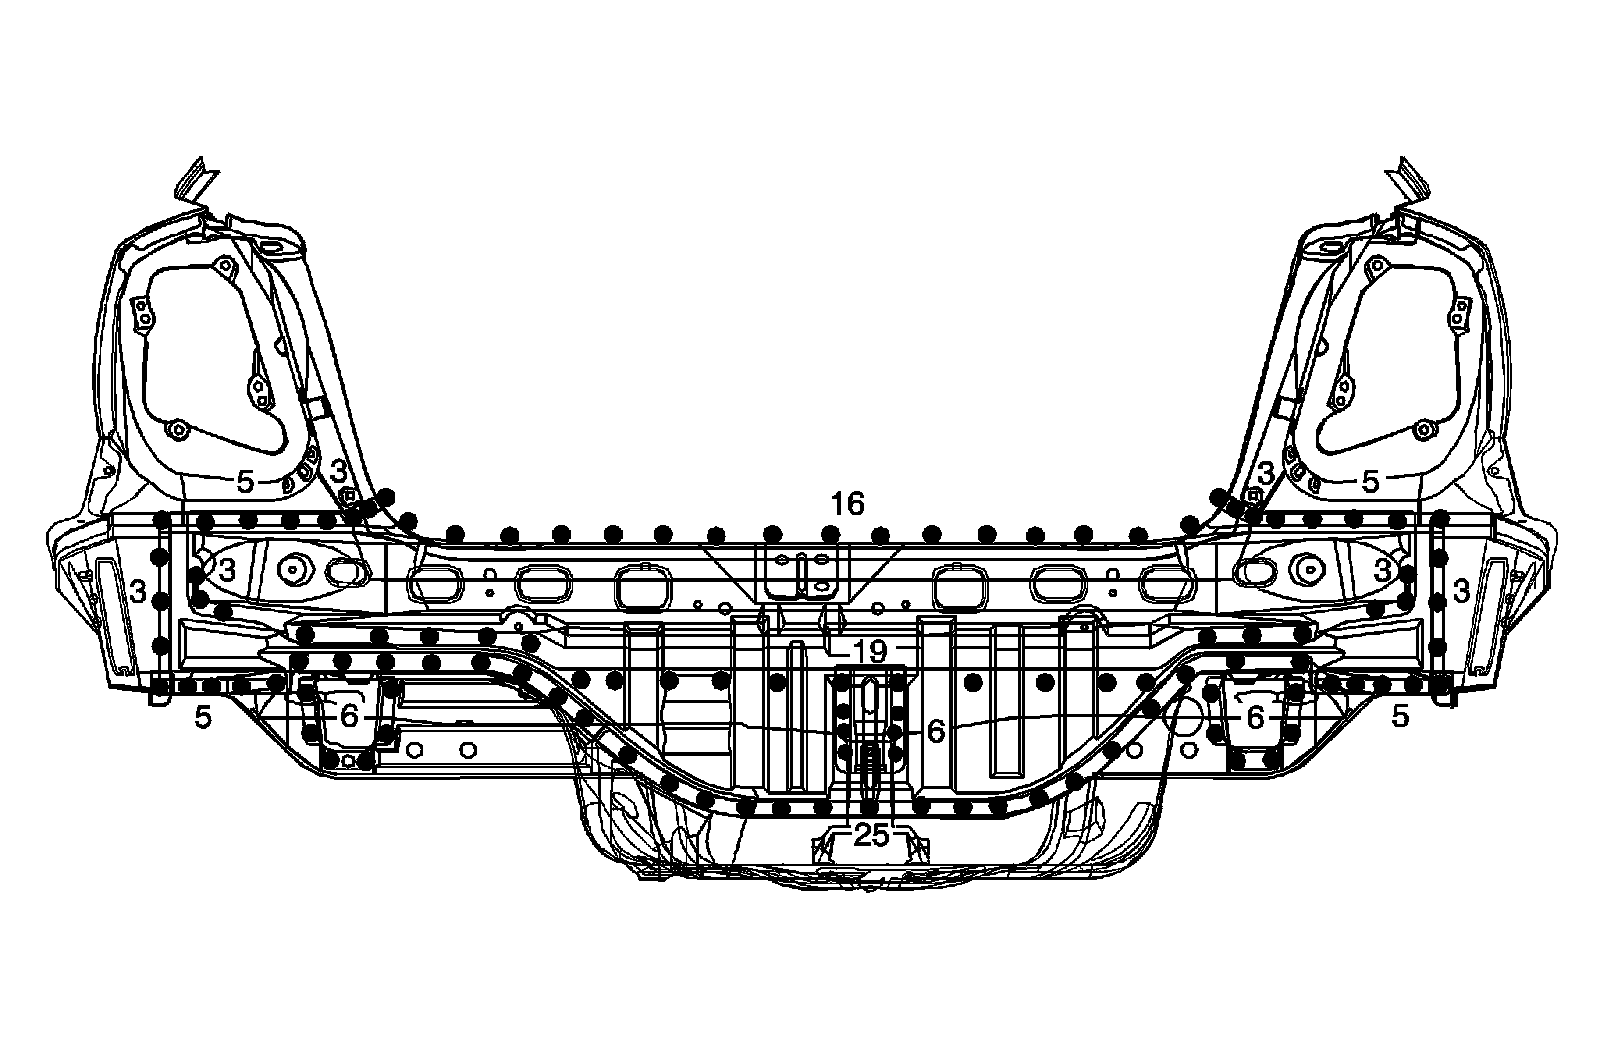
Important: The number of spot welds needed in each location is shown in illustration.
The back panel is joined to the side panel outer, rear extension longitudinal and extension rear floor. It forms the base for the rear combination lamps and other parts and maintains the rigidity of the rear body. Pay particular attention to twists and parallelism and inspect mounting of related parts when welding.
Rear Compartment Floor Panel Sectioning

Important: The number of spot welds needed in each location is shown in illustration.
The rear floor panel is the base of the rear body and it is critical for the rigidity of the rear body. During replacement, refer to the body dimension chart or body repair chart and determine the position to set the rear floor properly.
Ensure that the rear floor is not bent or deformed. Weld securely to maintain the rigidity of the rear body.
Pillar Lock Front Door Sectioning - Outer
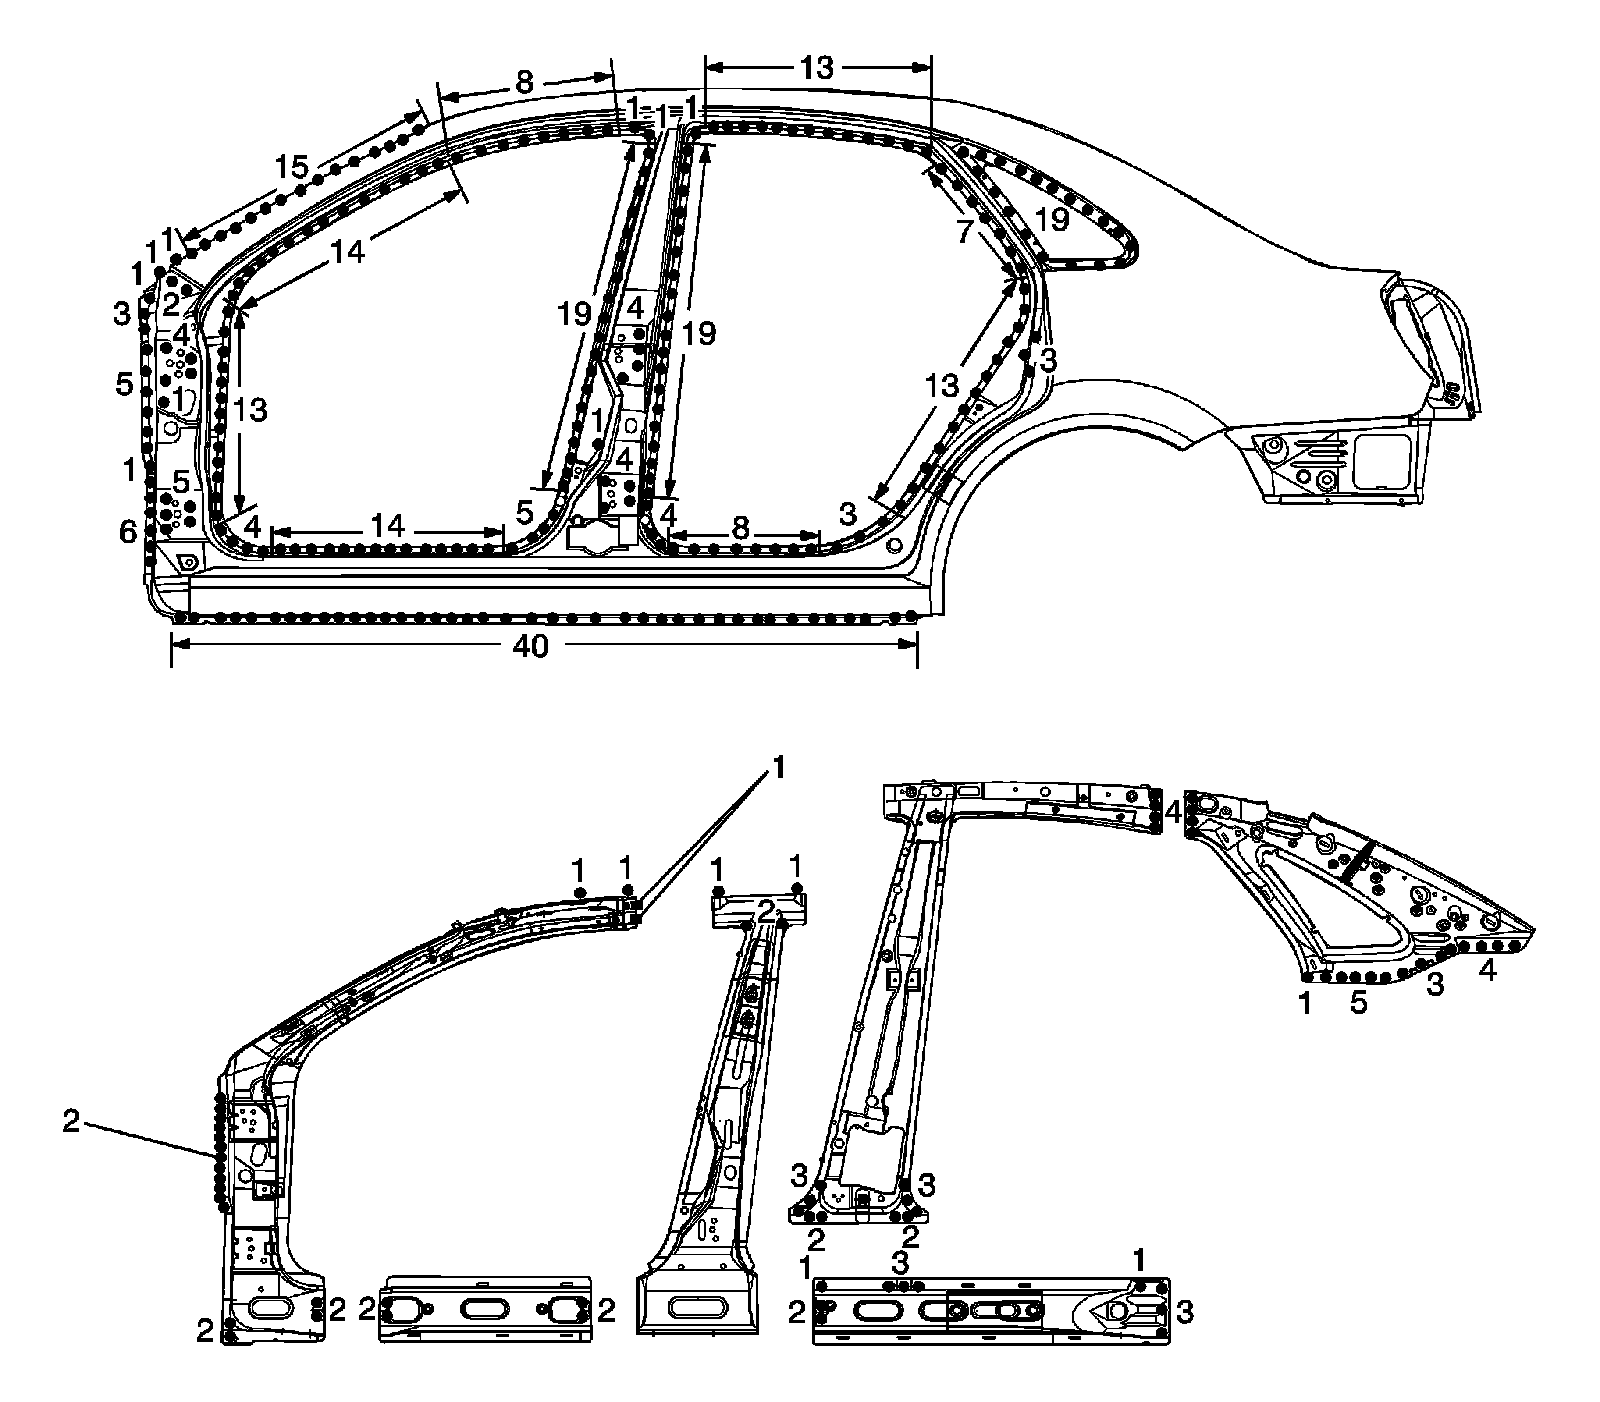
1 - CO2 Welding
2 - Sealing
Important: The number of spot welds needed in each location is shown in illustration.
The frame door opening consists of frame door area and side outer area. It forms the base for the front, rear doors and other parts and maintains the rigidity of the doors and roof. The frame door opening area should, depending on the degree of damage, be repaired as much as possible rather than replaced, repair by pulling out.
Side Panel - Outer
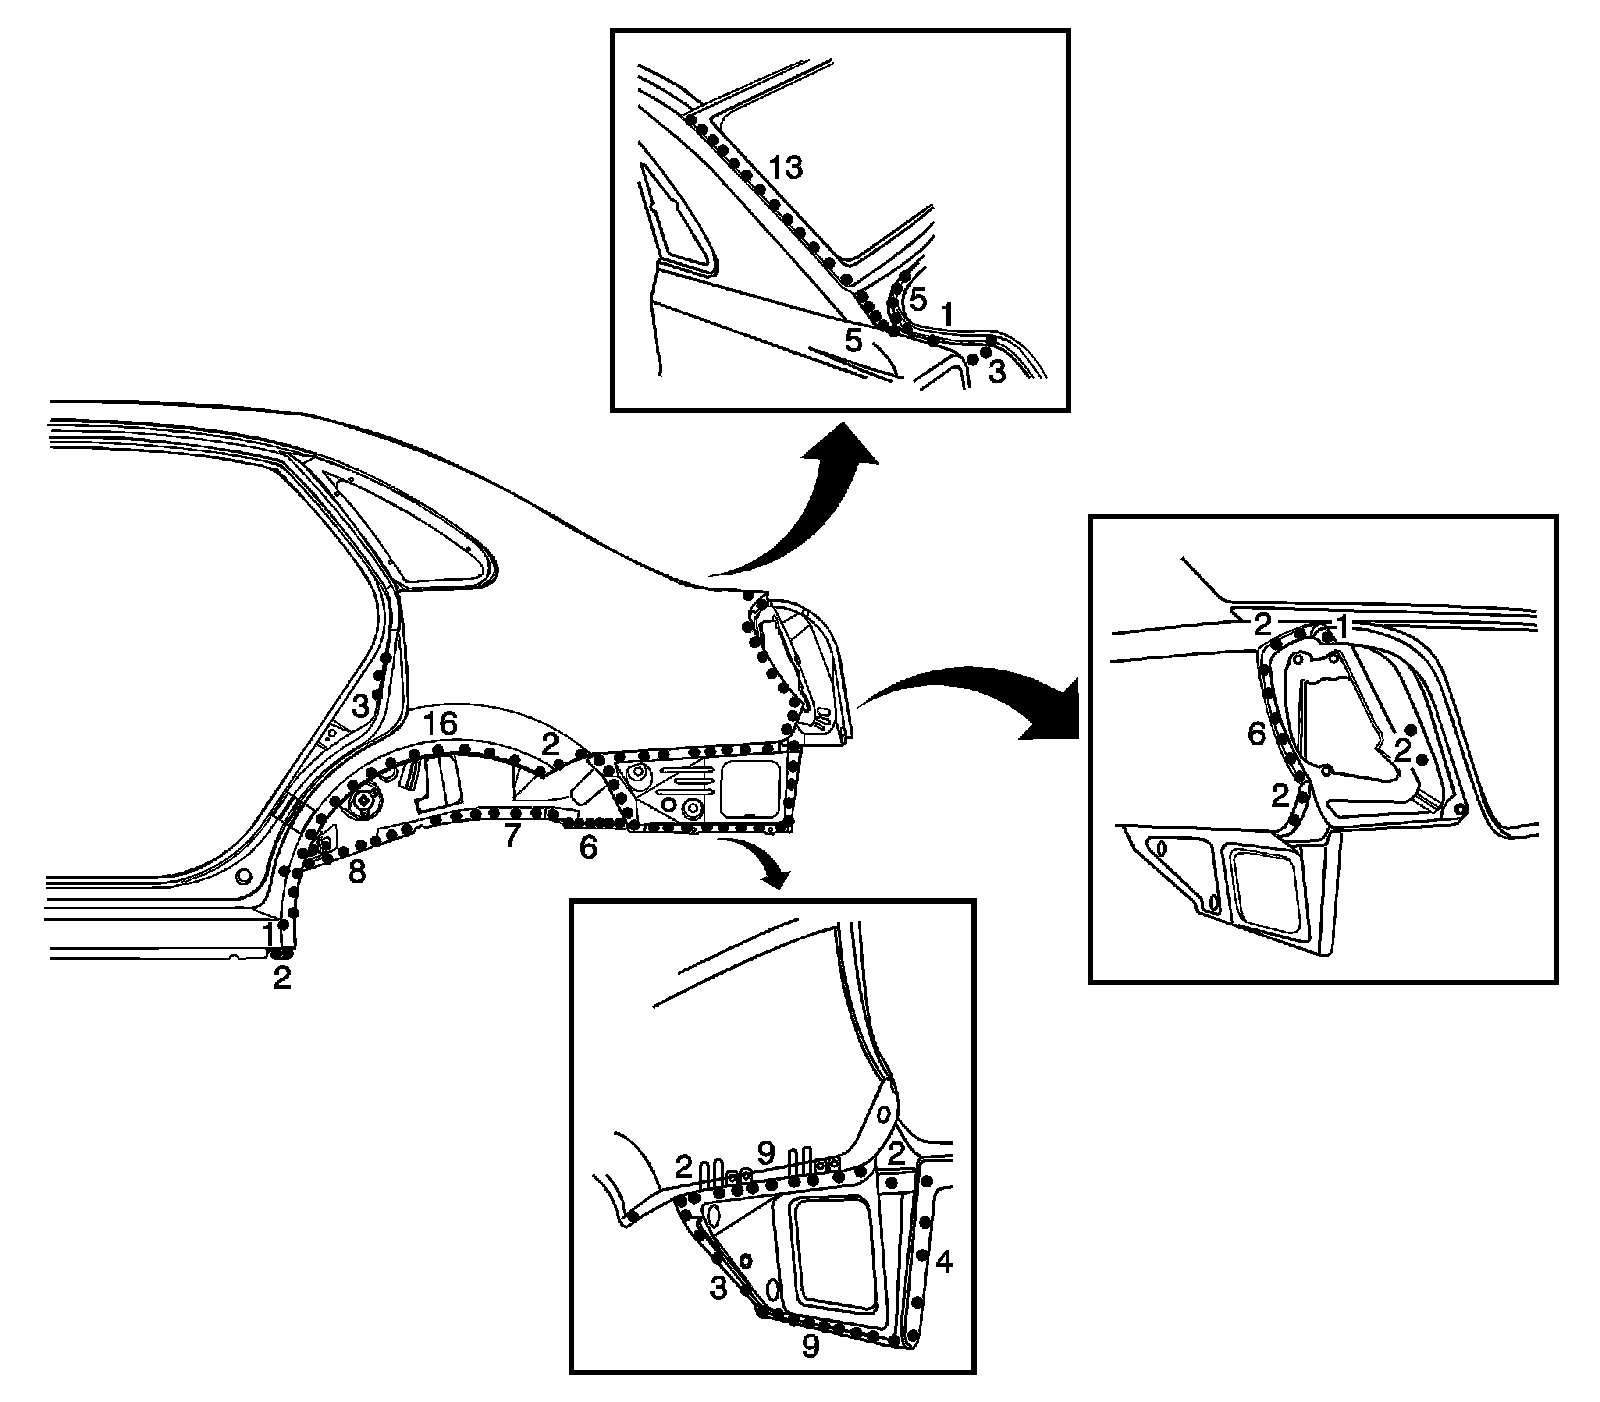
Important: The number of spot welds needed in each location is shown in illustration.
The side panel outer consists of side outer area and frame door area. The side outer area is a conspicuous part of the outer appearance of the vehicle. It is especially important for the body line continuing from door. Therefore, pay particular attention to it when conducting work. This part must be aligned with the rear door, trunk lid, rear glass and other parts.
Factory Service Tools
Use the Manual With the Right Hardware
Pair factory procedures with proven DIY tools so the instructions are easier to execute.
Disclosure: Verified tool recommendations may earn an affiliate commission at no cost to you.
When to See a Mechanic
Stop DIY work and contact a certified mechanic immediately if any of the following apply:
- • You smell fuel, burning insulation, or see smoke.
- • Brakes feel soft, pull hard to one side, or make grinding noises.
- • The engine overheats, stalls repeatedly, or misfires under load.
- • You are missing required tools, torque specs, or safe lifting equipment.
- • You are not confident in the next step or safety outcome.
Rather have a pro handle this?
A certified mobile mechanic comes to your home or office. They bring the tools, you stay comfortable. No tow truck, no waiting room, no surprises.
Comes to youSame-day available12-month warranty
Get a Free QuoteNo obligation. See pricing before you book.