
Safety Warning
DIY auto repair can cause serious injury, fire, or vehicle damage. These guides are for informational purposes only. Always follow OEM torque specs, wear PPE, and consult a certified mechanic if you are unsure. You are solely responsible for your safety.
2000 Chevrolet Venture V6-3.4L VIN EFACTORY OEM SERVICE PROCEDURE
Line Pressure Check Procedure
^ Tools Required
- J 21867 Universal Pressure Gauge Set
Important: Before performing a line pressure check, verify that the pressure control (PC) solenoid valve is receiving the correct electrical signal from the PCM.
1. Install a Scan Tool.
Caution: Keep the brakes applied at all times in order to prevent unexpected vehicle motion. Personal injury may result if the vehicle moves unexpectedly.
2. Start the engine and set the parking brake.
3. Check for a stored Diagnostic Trouble Code (DTC).
4. Repair the vehicle, if necessary.
5. Check the fluid level. Refer to the Transmission Fluid Checking Procedure. Testing and Inspection
6. Check the manual linkage for proper adjustment.
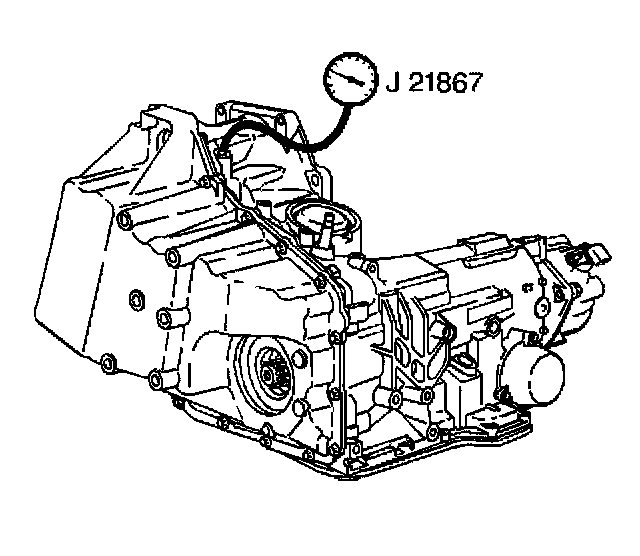
7. Turn the engine Off. Remove the oil pressure test hole plug and install the J21867.
8. Put the gear selector in PARK range and set the parking brake.
9. Start the engine and allow the engine to warm up at idle.
Notice: Total test running time should not be longer than two minutes, or else transmission damage could occur.
10. Access the PC solenoid valve control test on the Scan Tool.
11. Increase the PC solenoid actual current from 0.0 to 1.0 amps in 0.1 amp increments. Allow the pressure to stabilize for five seconds after each pressure change. Read the corresponding line pressure on the J21867.
12. Refer to the Line Pressure specification table. Compare the data to the table.
13. If pressure readings differ greatly from the table, refer to Incorrect Line Pressure. Incorrect Line Pressure
14. Remove the J 21867.
15. Apply sealant GM P/N 12345382 to the oil pressure test hole plug
Notice: Refer to Fastener Notice in Service Precautions.
16. Install the oil pressure test hole plug.
^ Tighten the oil pressure test hole plug to 12 Nm (106 inch lbs.).
- J 21867 Universal Pressure Gauge Set
Important: Before performing a line pressure check, verify that the pressure control (PC) solenoid valve is receiving the correct electrical signal from the PCM.
1. Install a Scan Tool.
Caution: Keep the brakes applied at all times in order to prevent unexpected vehicle motion. Personal injury may result if the vehicle moves unexpectedly.
2. Start the engine and set the parking brake.
3. Check for a stored Diagnostic Trouble Code (DTC).
4. Repair the vehicle, if necessary.
5. Check the fluid level. Refer to the Transmission Fluid Checking Procedure. Testing and Inspection
6. Check the manual linkage for proper adjustment.
7. Turn the engine Off. Remove the oil pressure test hole plug and install the J21867.
8. Put the gear selector in PARK range and set the parking brake.
9. Start the engine and allow the engine to warm up at idle.
Notice: Total test running time should not be longer than two minutes, or else transmission damage could occur.
10. Access the PC solenoid valve control test on the Scan Tool.
11. Increase the PC solenoid actual current from 0.0 to 1.0 amps in 0.1 amp increments. Allow the pressure to stabilize for five seconds after each pressure change. Read the corresponding line pressure on the J21867.
12. Refer to the Line Pressure specification table. Compare the data to the table.
13. If pressure readings differ greatly from the table, refer to Incorrect Line Pressure. Incorrect Line Pressure
14. Remove the J 21867.
15. Apply sealant GM P/N 12345382 to the oil pressure test hole plug
Notice: Refer to Fastener Notice in Service Precautions.
16. Install the oil pressure test hole plug.
^ Tighten the oil pressure test hole plug to 12 Nm (106 inch lbs.).
Factory Service Tools
Use the Manual With the Right Hardware
Pair factory procedures with proven DIY tools so the instructions are easier to execute.
Disclosure: Verified tool recommendations may earn an affiliate commission at no cost to you.
When to See a Mechanic
Stop DIY work and contact a certified mechanic immediately if any of the following apply:
- • You smell fuel, burning insulation, or see smoke.
- • Brakes feel soft, pull hard to one side, or make grinding noises.
- • The engine overheats, stalls repeatedly, or misfires under load.
- • You are missing required tools, torque specs, or safe lifting equipment.
- • You are not confident in the next step or safety outcome.
Rather have a pro handle this?
A certified mobile mechanic comes to your home or office. They bring the tools, you stay comfortable. No tow truck, no waiting room, no surprises.
Comes to youSame-day available12-month warranty
Get a Free QuoteNo obligation. See pricing before you book.